5.6. Designing a Database
The first step in database design is data modelling. This step provides a high level conceptual representation of the database structure. Data modelling includes capturing the:
- Entities: the data contained in the database (e.g., students, course, grade, classroom)
- Relationships: between data items (e.g., students get grades in courses that are offered in classrooms)
- Constraints: on data (e.g., student number has exactly eight digits; a subject has four or six units of credit only)
In the data modelling phase, a schema is developed to provide an overall description of the database. A schema is usually represented by an Entity Relationship Diagram (ERD) which shows the relationships among the tables of data. When a database is being designed, a data dictionary is also created to hold the metadata, defining the fields and structure of the database. To learn more, check out the example below and this resource from the University of Regina on data modeling and ERD diagrams.
Example: School Database Design
Continuing with the example from the previous section, let’s suppose a school wants to create a database to track student data. After interviewing several people, the design team learns that the goal of implementing the system is to give better insight into students’ performance and academic resources. From this, the team decides that the system must keep track of the students, their grades, courses, and classrooms.
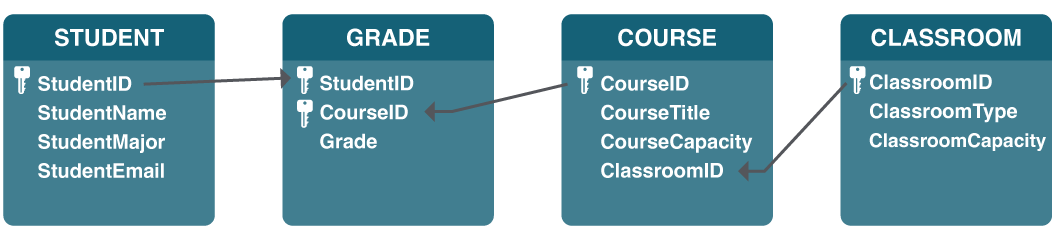
Step 1: Using this information, the design team determines that the following tables need to be created:
- STUDENT: student name, major, and email.
- COURSE: course title, enrollment capacity.
- GRADE: this table will correlate STUDENT with COURSE, allowing us to have any given student to enroll multiple courses and to receive a grade for each course.
- CLASSROOM: classroom location, classroom type, and classroom capacity
Step 2: Now that the design team has determined which tables/files to create, they need to define the specific data items that each table will hold. This requires identifying the fields that will be in each table. For example, the course title would be one of the fields in the COURSE table.
Step 3: Finally, since this will be a relational database, every table should have a field in common with at least one other table (in other words, they should have relationships with each other).
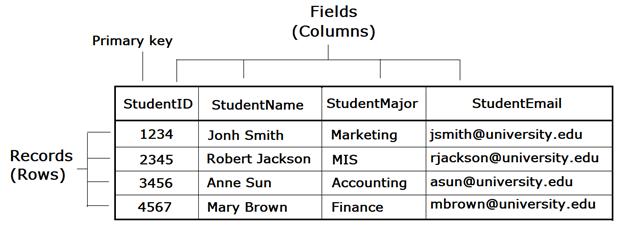
A primary key must be selected for each table in a relational database. This key is a unique identifier for each record in the table. For example, in the STUDENT table, it might be possible to use the student name as a way to identify a student. However, it is more than likely that some students share the same name. A student’s email address might be a good choice for a primary key, since email addresses are unique. However, a primary key cannot change, so this would mean that if students changed their email address we would have to remove them from the database and then re-insert them – not an attractive proposition. Our solution is to use student ID as the primary key of the STUDENT table. We will also do this for the COURSE table and the CLASSROOM table. This solution is quite common and is the reason you have so many IDs! The primary key of a table can be just one field, but can also be a combination of two or more fields. For example, the combination of StudentID and CourseID the GRADE table can be the primary key of the GRADE table, which means that a grade is received by a particular student for a specific course.
Step 4: The next step is to identify and make the relationships between the tables so that you can pull the data together in meaningful ways. A relationship between two tables is implemented by using a foreign key. A foreign key is a field in one table that connects to the primary key data in the original table. For example, ClassroomID in the COURSE table is the foreign key that connects to the primary key ClassroomID in the CLASSROOM table. With this design, not only do we have a way to organize all of the data we need and have successfully related all the tables together to meet the requirements, but have also prevented invalid data from being entered into the database. You can see the final database design in the figure below:
Normalization
When designing a database, one important concept to understand is normalization. In simple terms, to normalize a database means to design it in a way that:
1) reduces data redundancy; and
2) ensure data integrity.
In the School Database design, the design team worked to achieve these objectives. For example, to track grades, a simple (and wrong) solution might have been to create a Student field in the COURSE table and then just list the names of all of the students there. However, this design would mean that if a student takes two or more courses, then his or her data would have to be entered twice or more times. This means the data is redundant. Instead, the designers solved this problem by introducing the GRADE table.
In this design, when a student registers into the school system before taking a course, we first must add the student to the STUDENT table, where their ID, name, major, and email address are entered. Now we will add a new entry to denote that the student takes a specific course. This is accomplished by adding a record with the StudentID and the CourseID in the GRADE table. If this student takes a second course, we do not have to duplicate the entry of the student’s name, major, and email; instead, we only need to make another entry in the GRADE table of the second course’s ID and the student’s ID.
The design of the School database also makes it simple to change the design without major modifications to the existing structure. For example, if the design team were asked to add functionality to the system to track instructors who teach the courses, we could easily accomplish this by adding a PROFESSOR table (similar to the STUDENT table) and then adding a new field to the COURSE table to hold the professors’ ID.
“Chapter 4: Data and Databases” from Information Systems for Business and Beyond (2019) by David Bourgeois is licensed under a Creative Commons Attribution-NonCommercial 4.0 International License, except where otherwise noted.
