Chapter 10 Lab Overview and Background Information
Setting up DHFR Protein Crystals using the Sitting Drop Method
Learning Outcomes: Upon completion of this lab, students will gain practical experience in:
- Setting up crystal trays
- Visualizing protein crystals
Protein crystallization conditions
The process of protein crystallization begins with the protein sample. The protein sample must be very pure, and in relatively high concentration. In addition to the purity of DHFR, we will need to determine the method of crystallization. The most common crystallization methods are salt or pH screens. This means that by using an increasing gradient of salt, pH or a combination of the two, you should hopefully produce a crystal. Your protein crystals would then be taken to a lab to perform X-ray crystallography, which would produce diffraction data that can be used to determine the structure of the protein in question. Though this last process is outside the scope of this lab it is important to understand how X-ray crystallography works once the conditions for obtaining a positive/workable protein crystal are determined.
Prior to the lab time, please watch the following videos:
-
Understanding Crystallography – Part 1: From Proteins to Crystals
-
Understanding Crystallography – Part 2: From Crystals to Diamond
This project was initiated by past students in 2011-2012 with the successful purification of DHFR followed by a ~ 10 % success rate in using specific conditions to produce DHFR protein crystals.
You will also set up a positive control (Lysozyme protein) in order to test the crystallization conditions. You will be testing only one condition with the hopes of increasing the success rate of both the positive control and DHFR.
The first step towards x-ray crystallography is to crystalize our protein. As discussed in the introductory videos, we need to create crystals of regularly-arranged protein molecules in order to obtain high-quality x-ray diffraction data.
The process of protein crystallization is very complex as many variables can affect the quality of the protein crystal (aka. ordered arrangement of protein molecules) (3, 5, 6). As discussed previously, the quality of purified protein samples (i.e. purity and concentration of protein sample) is extremely important as the starting material for protein crystallization. The next step involves the crystallization conditions themselves. To form protein crystals we first need an appropriate closed system, or chamber that allows for vapor diffusion. The idea of vapor diffusion is very straightforward. The main goal is to slowly remove (or evaporate) water from the protein sample and supersaturate the remaining sample, meaning the concentration of protein increases in the sample and slowly crystalizes (i.e. precipitates… but in an ordered arrangement of molecules). There are two main vapor diffusion methods used in the lab: 1. hanging drop method and, 2. sitting drop method. We will be using the sitting drop method (3, 5, 6).
Sitting drop vapor diffusion (3, 5, 6)
In this method the closed system is a small chamber containing a shelf on which the protein sample is placed, and a piece of transparent sealing tape on top of the chamber. A protein sample is prepared by mixing the purified protein with a small amount of precipitant. A buffer containing a much higher concentration of precipitant is added to the bottom of the chamber (called the reservoir buffer). The chamber is sealed with transparent tape and left undisturbed.
Over time a new equilibrium is established in the closed chamber as water evaporates from the drop (low precipitant concentration) into the reservoir buffer. The result in an increase in overall protein concentration in the protein drop (remember that concentration is a ratio of solute over total volume. As the volume decreases with water leaving the drop, the resulting concentration of protein increases). This is sometimes referred to as an increase in supersaturation. The creation of this supersaturated state is absolutely essential for the development of protein crystals(3, 5, 6).
In our course, we are using a tray containing multiple sitting drop chambers. Once set up, each tray is sealed and placed at room temperature for one week. Protein crystals will be monitored using a stereo microscope to visualize each well in the tray. You will be looking for protein crystals like the ones described in the figure below:
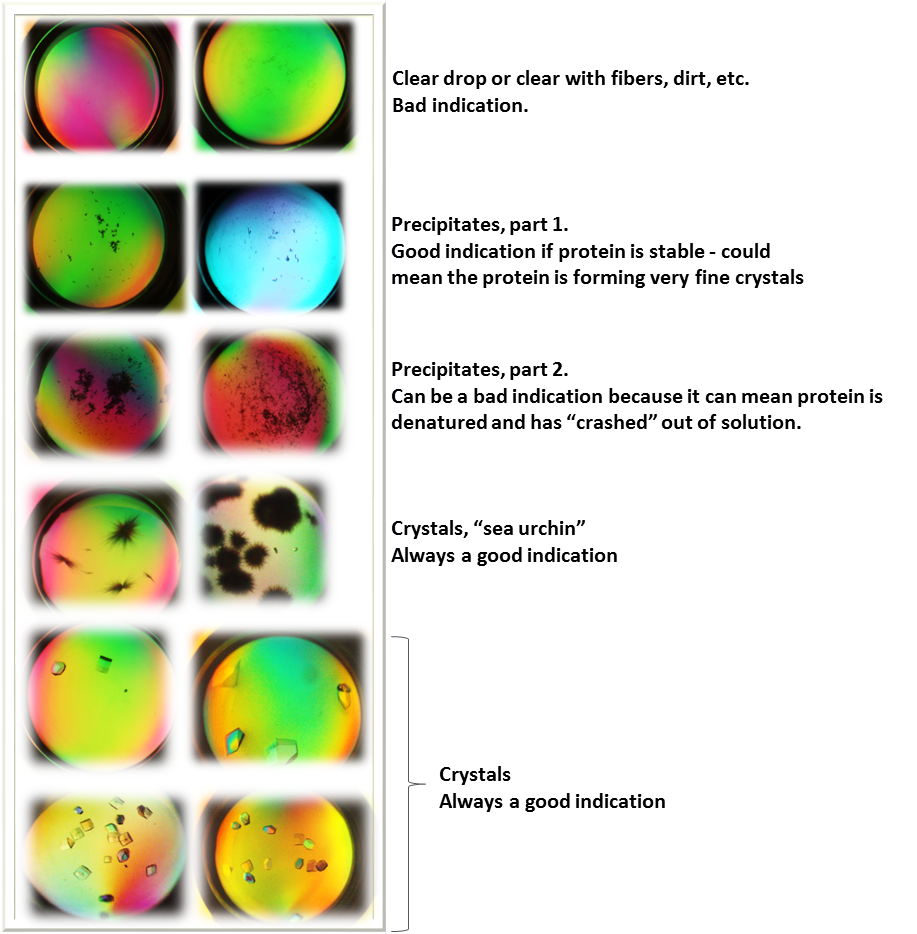
Typical protein crystal results obtained from students in our course. Image made by Felicia.
