Protocol for DHFR Protein Purification
Please click this hyperlink to access the virtual lab bench

| Materials and Reagents | |
| Reagents: | Materials: |
|
|
Please make sure that you work with liquids on your designated work surface. Do NOT work over your books! Always stay alert and UNDERSTAND what you are doing and WHY you are doing it!
NOTE: Never let the column run dry!! This will introduce air bubbles and lower the efficiency of your purification procedure.
•Please note students can work in pairs or small groups for purification (one column per student is not necessary)
•Prior to purification, make sure all of the following buffers have been prepared:
A. Equilibration Buffer – 50 mM NaH2PO4, pH 8.0; 150 mM NaCl.
B. Wash Buffer – 50 mM NaH2PO4, pH 8.0; 150 mM NaCl; 10 mM imidazole.
C. Elution Buffer – 50 mM NaH2PO4, pH 8.0; 150 mM NaCl; 250 mM imidazole.
Get ice. Keep all buffers, cell lysate, samples collected ON ICE!
Buffer preparation:
Please add the correct amount of imidazole to each of your 3 purification buffers. Aliquot prepared buffers into 50 mL conical tubes, as follows. These volumes are sufficient for one column purification procedure:
Buffer tube 1: ~ 20 mL Equilibration buffer
Buffer tube 2: ~ 20 mL Wash buffer
Buffer tube 3: ~ 20 mL Elution buffer
You will use these buffers for your protein purification experiment, below.
Please click this hyperlink to view the purification experiment process
1.Label all collection tubes (micro-centrifuge tubes). Make sure you label tubes accordingly as all tubes in your lab mentor team go into the same freezer storage box, so labels like 1,2,3, etc. are not appropriate.
|
DHFR sample tube label: |
|
|
Cell lysate: |
Elution 1:
|
|
Flow Through: |
Elution 2:
|
|
Wash 1:
|
Elution 3: |
|
Wash 2: |
|
2. Remove the top closure of the 1 mL (packed resin volume) nickel column. (Please DO NOT throw out the closure as you will need it at the end of the lab period to recap the column).
3. Flush the storage solution (20% ethanol) from the column by gently pipetting 5 mL of water onto the side of the bed using a plastic transfer pipette (take care not to disturb the bed too much). This will remove the ethanol in the storage buffer that currently surrounds the resin. Ethanol needs to be removed prior to adding the equilibration buffer as it can precipitate chemicals in the buffer itself.
4. Place a waste beaker under the column, open the stopper at the bottom of the column, and let the column drain into the beaker. Drain the column until less than 1-2 mm of buffer remains above the bed. Add the stopper to the bottom of the column.
5.Gently apply 5 mL of equilibration buffer onto the side of the resin bed using a plastic transfer pipette and let the column drain into the beaker. Drain the column until less than 1-2 mm of buffer remains above the bed. Add the stopper to the bottom of the column.
6. Reserve 100 µL of the cell lysate into a fresh 1.5 mL micro-centrifuge tube previously labeled. This sample will be used for SDS-PAGE and Bradford assay analyses.
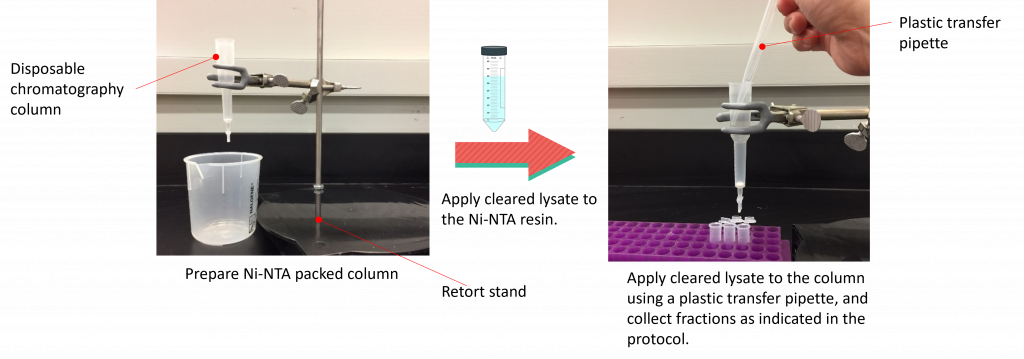
7. Gently apply the remaining cell lysate on to the side of the resin bed using a plastic transfer pipette.
8. Place a 1.5 mL microcentrifuge tube under the column. Open the stopper and collect a 1 mL sample of the flow-through. Allow the remaining cell lysate to flow through the column and into the waste beaker before moving on to step 9.
9. Gently apply 5 mL of wash buffer onto the side of the resin bed using a plastic transfer pipette.
10. Place a new 1.5 mL microcentrifuge tube under the column. Open the stopper and collect two, 1 mL samples of the wash in two separate tubes. The remaining wash buffer can be collected in the waste beaker.
11. Gently apply 5 mL of elution buffer onto the center of the resin bed using a transfer pipette. Add the stopper to the bottom of the column.
12. Open the stopper. Collect three, 1 mL factions into sterile 1.5 mL microcentrifuge tubes, previously labeled.
13. Dispose of the column as instructed by your lab mentor.
At the end of this lab you should have 7 fractions:
|
Fractions collected: |
|
1) A 100 µL sample of the cell lysate collected.
|
|
2) A 1 mL sample of the flow-through.
|
|
3-4) Two, 1 mL samples of the wash fraction.
|
|
5-7) Three, 1 mL elution fractions. |
Once you are finished please wash your hands!
