Chapter 3 Lab Overview and Background Information
Learning Outcomes: Upon completion of this lab, students will gain experience in:
- setting up ligation reactions
- using a PCR purification kit
- extracting pertinent information from a kit manual to fit specific lab work conditions
- using sterile technique when working with bacteria
- transforming and plating bacteria
Required Readings
- PureLink™ Quick Gel Extraction and PCR Purification Combo Kit manual. In this course we are using the following kit for DNA purification: Link to manual Once you have entered the manual, scroll to the bottom of the page and navigate to documents, manuals, and protocols.
- The Basics: How Does DNA Ligation Work? Link to article
- Plasmids 101: Common Lab E. coli Strains. Link to article
In this lab you will be performing three separate techniques as part of the lab workflow. Each technique fits perfectly into the overall concept of molecular cloning (1). The techniques include:
- DNA purification (we will be using a direct purification procedure, not the typical purification from an excised agarose gel slice)
- DNA ligation
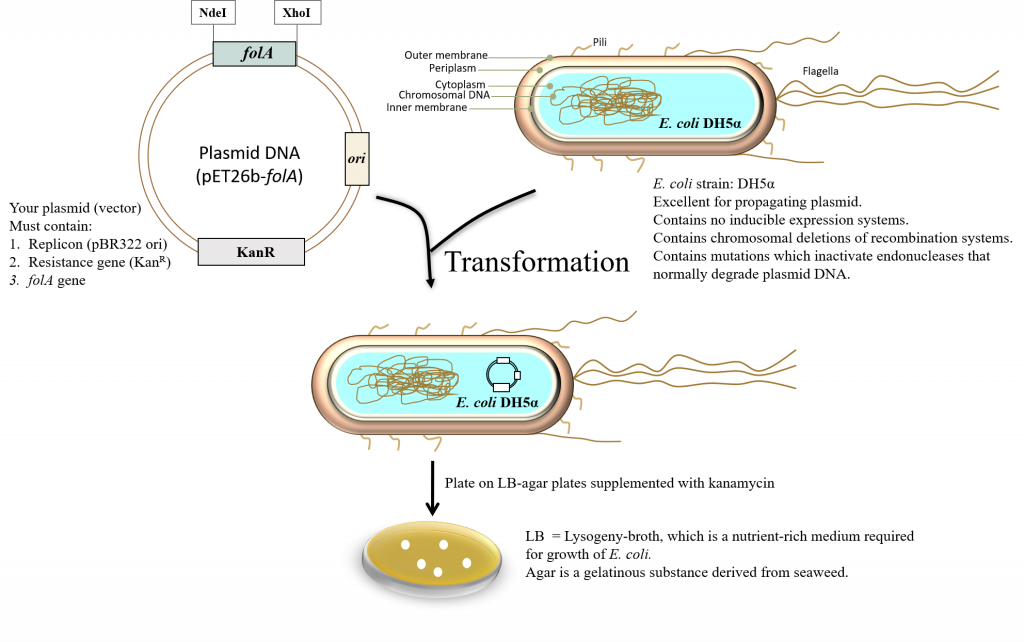
- Bacterial transformation (2) – the resulting ligation reaction products are introduced into E. coli DH5α bacteria using a technique called the heat shock transformation method (2). The E. coli DH5α cells that you will be provided with were treated with calcium chloride to make them chemically competent (i.e. able to take up foreign DNA). At the end of the lab, you will plate the transformed cells on LB agar plates containing the appropriate antibiotic.
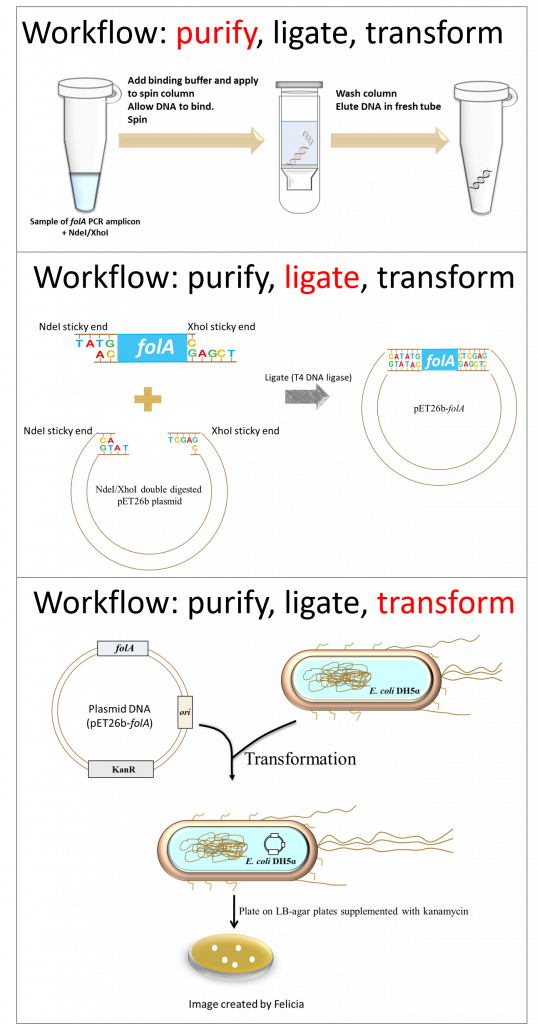
And so, let’s take stock of where we are thus far in our molecular cloning project: we have PCR amplified the folA gene and digested it with NdeI/XhoI (See Chapter 2).
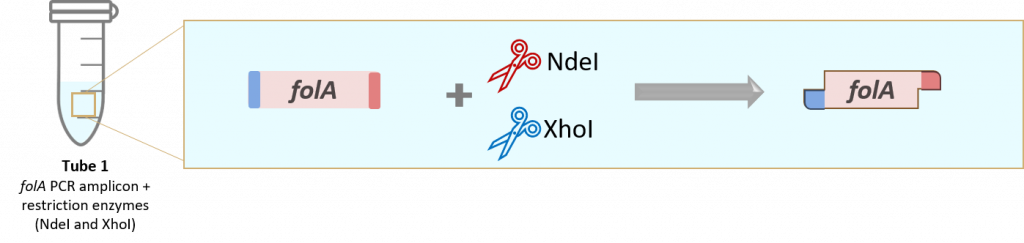
The above image gives us a very clear, conceptual idea of this process. However, before proceeding to the ligation step, we need to first purify the digested gene products from all other components in the reaction. Why? Well, let’s take a look inside the NdeI/XhoI digested folA amplicon reaction tube to see what we have:
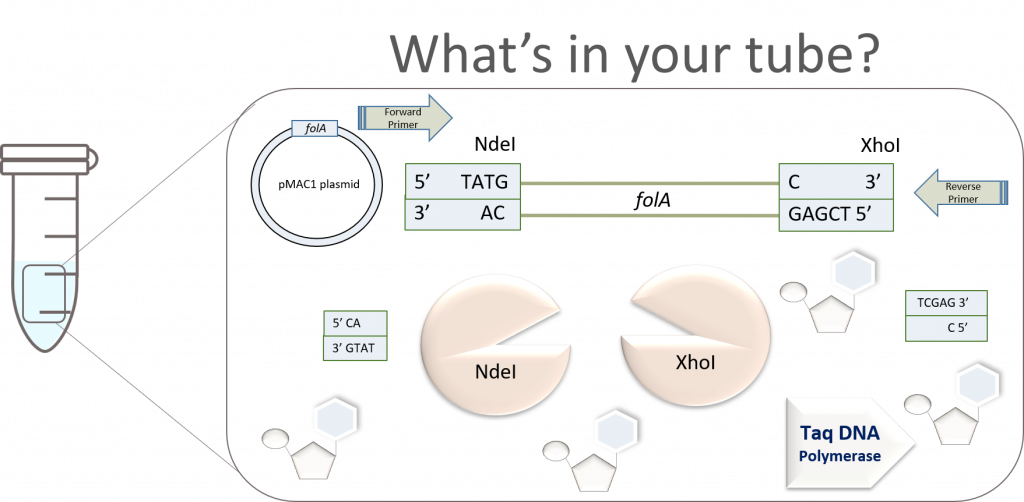
Wow! Why do we have so many things in our tube? Well, let’s look back at the reagents we added to the tube last lab:
- PCR amplicon – this sample itself has multiple components, the very same components of your PCR: pMAC1-folA DNA template, Forward Primer (FP), Reverse Primer (RP), Taq DNA polymerase, dNTPs, PCR buffer.
- NdeI and XhoI restriction enzymes
- RE digestion buffer
Purification of NdeI/XhoI Double-Digested folA Amplicon DNA
To purify DNA from all other components, scientists typically use one of two techniques:
- Directly purify DNA from the reaction tube using a “spin column”. This is a silica-based semipermeable membrane that readily binds nucleic acids while allowing all other components to flow through the membrane. This technique is super fast, especially if you are not too worried about separating different types of DNA from the mixture.
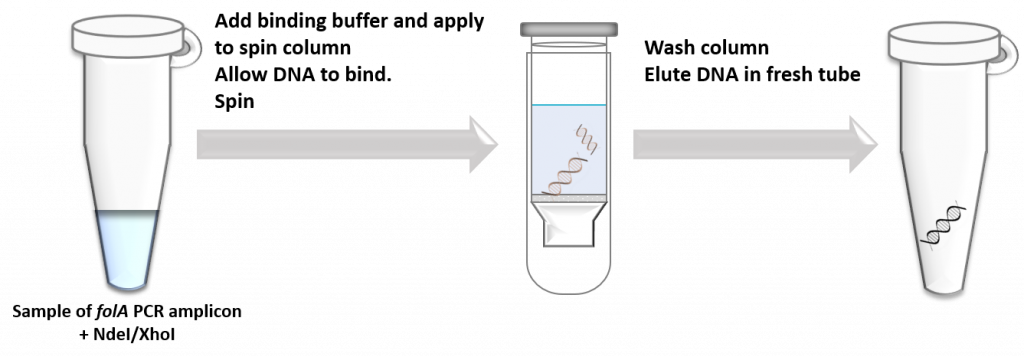
2. Separate the DNA on a gel using agarose gel electrophoresis, physically cut out the DNA band from the agarose using a scalpel, dissolve the gel slice, and use the above “spin column” technology to purify DNA. This technique has a few more steps, but it is very useful if you want to isolate a DNA fragment of a specific size from the reaction mixture.

For our specific case, we will use the direct DNA purification technique to purify the double-digested folA gene product. Why? Because the technique is relatively fast and efficient, and we are not too concerned with the small DNA fragments that also have compatible RE sticky ends as they are so small (7-9 bp). These DNA fragments will most likely not co-purify with our desired folA DNA fragment, and they will most likely not get in the way of our downstream DNA ligation reactions. In our lab we provide you with already digested/purified pET26b plasmid, but if this was not provided for you, then you would need to first separate this reaction on an agarose gel to remove the 128 bp DNA fragment generated form the NdeI/XhoI double digest. This is because the 128 bp fragment also has compatible sticky ends and can get in the way of our ligation reaction.
Ligation of Extracted Vector and Insert
Following purification of your digested folA gene, the folA gene insert will be ligated into the NdeI/XhoI digested pET26b plasmid (provided for you) using the enzyme T4 DNA ligase.
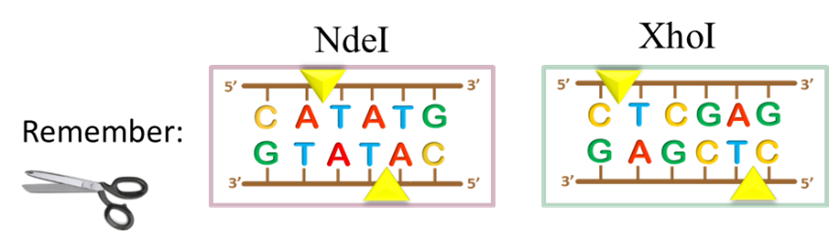
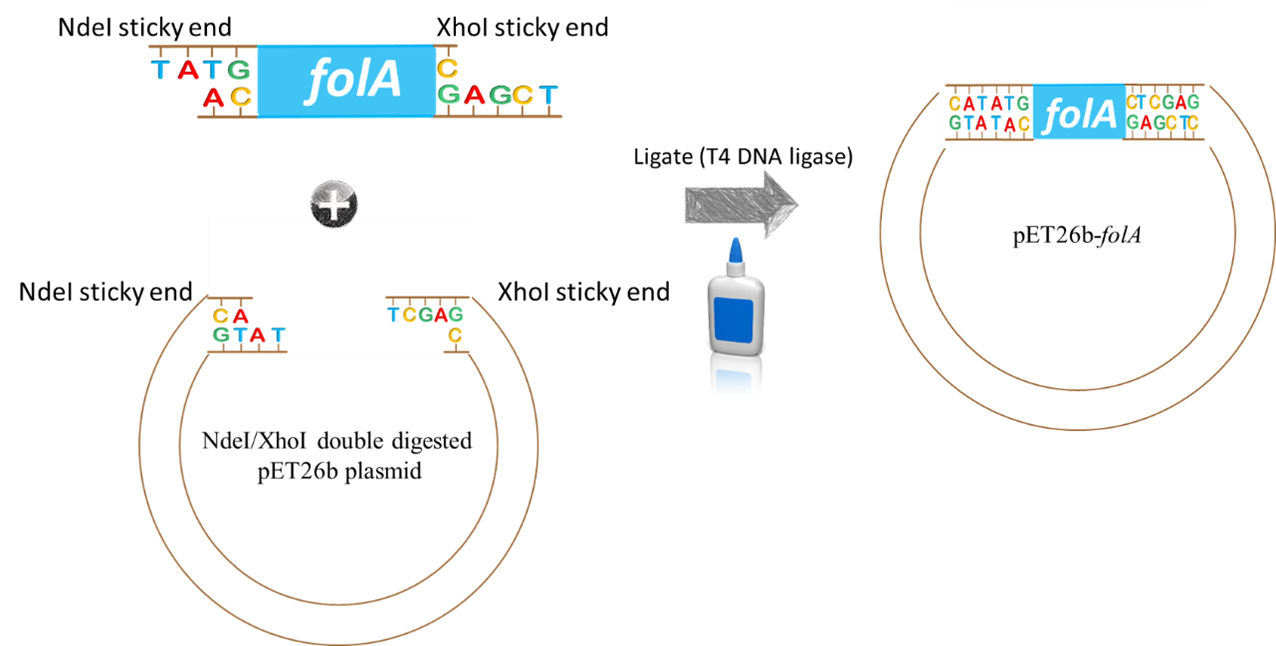
Image created by Felicia. Scissors and glue clipart obtained, with permission, from Presenter Media © 2009-2021 Eclipse Digital Imaging, Inc.
How will this happen? By mixing the insert (aka. digested folA gene amplicon) and backbone (aka. digested pET26b plasmid DNA) into a reaction tube. Both DNA fragments have overhanging ends (aka. sticky ends) that are the result of the NdeI/XhoI digestion reaction. Each DNA fragment has a different overhang on either end because two different restriction enzymes were used. Since both DNA samples were digested with the same two restriction enzymes, the overhangs are compatible with each other and will hybridize to each other.
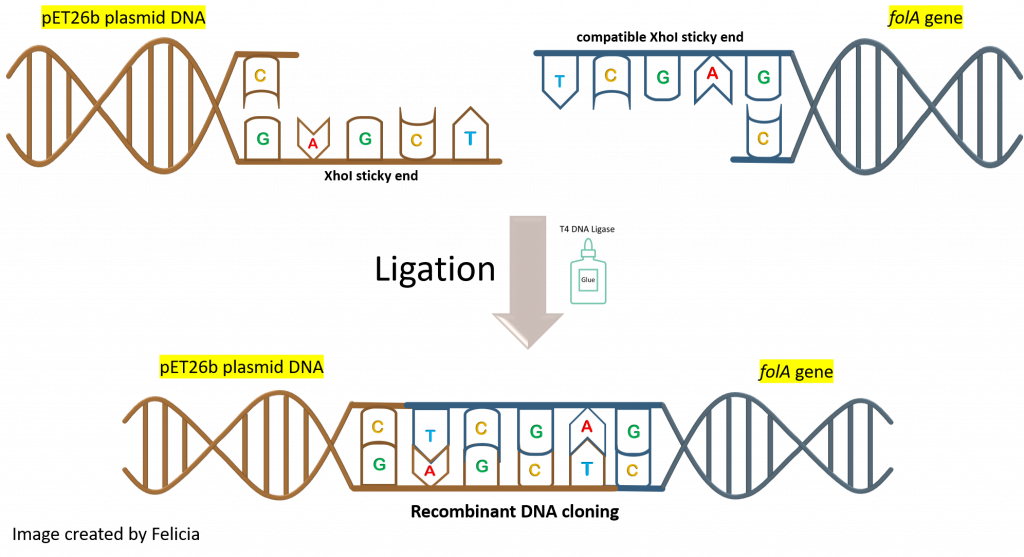
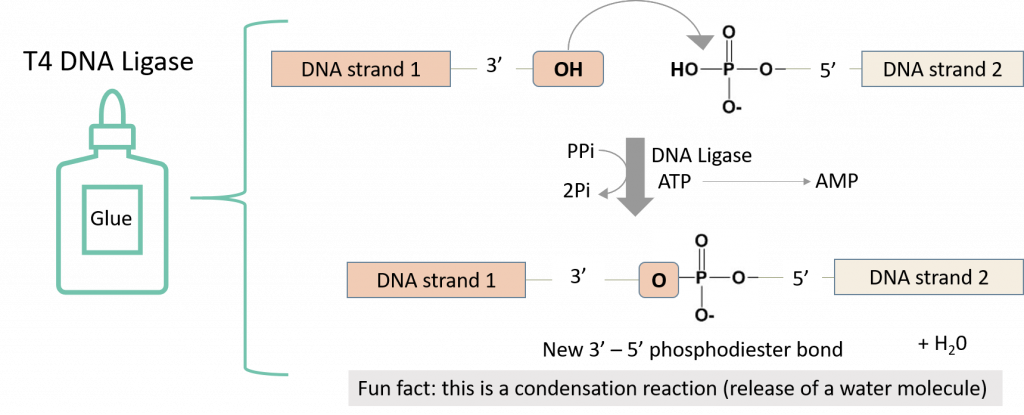
The T4 DNA ligase enzyme will then catalyze a chemical reaction that will create a phosphodiester bond in the backbone of each DNA strand, fusing the fragments together.
Please refer to the AddGene molecular cloning guide: Ligations for more information on this process and some invaluable tips and troubleshooting techniques (4). Click here to access the AddGene guide.
Ligation reactions can sometimes go wrong. One of the more common ways for this to happen is that the plasmid produced after transforming bacteria with the ligation reaction, (the ligation “product”) ends up being unmodified (i.e. undigested) with no insert. This can happen if the backbone plasmid re-ligates onto itself, forming a functional plasmid capable of transforming bacteria even though it contains no insert (let alone the insert you want). How can this happen if you have digested with 2 restriction enzymes with incompatible ends? This is not a likely scenario, unless:
- The digested pET26b plasmid was not fully digested by both restriction enzymes (think about your agarose gel: can you see a ~128 bp fragment?).
- Your digested pET26b plasmid is contaminated with undigested covalently closed circular (CCC) plasmid. You were provided with a sample of already digested/purified pET26b plasmid but you do not know the quality of this preparation.
Think ahead of time about what kind of control reaction you might perform to identify whether or not this is happening with your ligation reaction?
Introducing DNA into a Bacterial Cell
Bacterial transformation is a complex process. In this procedure, a specific strain of E. coli is artificially made competent (chemically). This generally implies that the bacteria are forced to contain temporary “adhesion zones” in their membranes making the membranes “leaky”. This will allow the plasmid DNA to enter the cells. Once inside, the plasmid DNA can replicate as the bacteria divide and multiply (2).
Please click here to see a video on bacterial transformations
Transforming Bacteria video obtained from PBS Learning Media. Rights to use this asset do not expire. Asset Copyright: © 2011 WGBH Educational Foundation. All Rights Reserved. Media Credits Animation by Digizyme Inc., www.digizyme.com. Created with Molecular Maya (mMaya) by Yan Liang, Evan Ingersoll, Campbell Strong, Jeannie Park, and Gaël McGill. Source: Produced by WGBH and Digizyme, Inc. Project funded by Amgen Foundation
To ensure that the plasmid DNA will remain in the E. coli, the cells are grown on LB (Lysogeny Broth) (8-11) supplemented with antibiotic (in this case kanamycin). This creates a selective pressure on the E. coli to hold on to the plasmid as the bacteria that have not taken up the plasmid will be sensitive to the antibiotic kanamycin. Thus, in order for this synthetic bacterial transformation to occur, 2 major areas must be considered:
1. Type of plasmid vector used,
2. Strain of E. coli used.
So let’s look at these requirements a bit more closely:
The basic requirements of the vector (in our case this is a plasmid): The plasmid MUST contain an origin of DNA replication and its associated control elements. “In plasmids, the origin of replication is a defined segment of DNA several hundred base pairs in length: Its set of associated cis-acting controlling elements contains sites for diffusible plasmid- and host-encoded factors involved in initiation of DNA synthesis. A plasmid replicon can therefore be defined as the smallest piece of plasmid DNA that is able to replicate autonomously and maintain normal copy number” (excerpt taken directly from reference 13). The pET26b plasmid copy number is based on the pBR322 ori (pMB1 replicon) and therefore maintains around 15-20 copies/ cell (14). To read a review on the creation of the pBR322 plasmid vector see Balbas et al., 1986, (15).
The plasmid MUST contain a resistance gene. This gene is constitutively expressed in the cell. In this case, the resistance gene is kanamycin. This means that the plasmid contains a gene whose protein product will inactivate the antibiotic kanamycin (which will be supplemented in the growth media). The antibiotic kanamycin is a member of the aminoglycoside family of antibiotics which diffuses easily through the outer-membrane porin channels of Gram-negative bacteria like E. coli (13). It is then transported through the inner membrane and functions in the cytosol to inhibit protein synthesis by interacting with specific ribosomal proteins (16). Thus, bacteria that do NOT harbor a resistance mechanism to this antibiotic will not survive on LB-agar plates supplemented with kanamycin. Bacteria that have successfully acquired your plasmid (pET26b- folA) will have the kanR (R stands for Resistance) gene on a constitutively-expressed promoter, which will transcribe and translate one of the 7 aminophosphotransferases (APHs). APH functions to inactivate kanamycin, thus these bacteria can grow on LB-medium supplemented with kanamycin (13). Note that the resistance gene allows the bacteria containing the pET26b plasmid to grow and thus selects for bacteria that have successfully been transformed with this plasmid vector. This is the system we are using in our project, but in science there are thousands upon thousands of bacterial plasmid vectors in use today, containing many different types of resistance mechanisms to ampicillin, streptomycin, tetracycline, etc. These plasmid vectors also contain different replicons and thus it is important to know what each component of a vector does to determine the optimal combination for your particular experimental design. In other words, the world does not end at the pET vector system … it is just the beginning.
Choosing the E. coli strain of choice
It is important to first determine what the ultimate goal of your experiment is. In your case, your goal is to transform the freshly ligated pET26b- folA plasmid into E. coli, allow the E. coli cells to grow and isolate larger quantities of your pET26b- folA plasmid. Ultimately you want to make more plasmid product in order to check that it contains your gene of interest and store it for future purposes. This means that you must choose an E. coli strain that has been optimized to fit this goal. Another important goal (which you will have in chapters 6-7) is to over-express the protein product by transcribing and translating your folA. This will require another strain of E. coli that contains an inducible system which has something to do with the T7 promoter currently present upstream of your gene in the pET26b plasmid system. This will be discussed in Chapter 6. And so … complexity arises at the level of E. coli strain selection. Let’s take a closer look at what this means.
Remember, we are still in the “recombinant DNA cloning” world, which relies heavily on artificial systems … better yet … systems that we have manipulated and optimized to yield a particular product. Take E. coli for example … what do we mean by strains? In our laboratory world there are lots of laboratory strains of E. coli engineered for specific laboratory purposes; from producing large quantities of vector DNA, to producing large quantities of recombinant proteins, etc. Follow this link to look at some of the strains available for lab use, complete with their genotypes (17): click here to access link
The majority of these laboratory strains were derived from E. coli K-12. This strain was originally isolated from the stool of a convalescent diphtheria patient in 1922 and passaged for 50 years (in the bacteriology department at Stanford University) prior to its use in biotechnology (19, 20, 13). From this parental strain, several derivatives were engineered, each with a specific purpose. A great paper by Durfee (2008) and colleagues describes the workhorse that is E. coli DH10B (18). Look it up and give it a read.
Familiarize yourself with the genotype of your strain as it will let you know whether it is compatible with your plasmid DNA. For example, some plasmids require the presence of certain host proteins that might have been deleted from a strain variant. Some strains are engineered to contain genomic copies or antibiotic resistance mechanism. These strains will do you no good if your vector contains the same antibiotic resistance mechanism.
Sterile/Aseptic Technique
This lab will be the first time in this course that you work with living cultures that need to be kept alive. As such, you need to learn some basic principles about how to prevent your cultures from becoming contaminated, and how to do so safely. This will primarily depend on if your lab uses Bunsen burners or not. The LB-agar plates are supplemented with kanamycin and have already been poured for you. The LB-agar was sterilized by autoclaving the media prior to pouring the plates. You will be using sterile plastic cell spreaders to spread the E. coli DH5a cells evenly across the LB agar plate. Care must be taken not to expose the LB-agar to the open environment for longer than is necessary. Please ensure that you do not touch the LB-agar or the sterile end of the cell spreader that will be used to spread the bacterial cells. Please refrain from breathing or talking over the exposed LB-agar. Your lab instructor will discuss proper aseptic technique practices, depending on your specific facilities.
The following videos demonstrates proper aseptic technique using a Bunsen burner:
Many labs (such as ours) have moved away from using an open flame to decrease the risk of accidental fires. In these labs we maintain sterility through proper handling of reagents, use of appropriate disinfectants such as 70% ethanol and use of designated biosafety cabinets.
