Protocol for Bradford Assay
Please click this hyperlink to access the virtual lab bench

|
Materials and Reagents
|
|
| Reagents: | Materials: |
Protein:
For Bradford Assay:
|
|
Please make sure that you work with liquids in your designated work surface. Do NOT work over your books! Always stay alert and UNDERSTAND what you are doing and WHY you are doing it!
You will be determining the total protein concentration in the flow through, wash, and elution fractions from your DHFR protein purification procedure. Please note that the Bradford assay reports total protein concentration. This assay cannot be used to identify if the protein is DHFR-His-6x protein.
Please click this hyperlink to watch the multichannel pipette video
- Using PBS as your dilution buffer, make 7, 200 µL serial dilutions (1/2) from the stock BSA standard (2 mg/mL). These serial dilutions are performed in 7, 1.5 mL micro-centrifuge tubes. Prior to the lab, please calculate the resulting BSA standard concentrations (in mg/mL). Below is a schematic diagram of this serial dilution. Prior to the lab time, please complete the step-by-step calculations for the first 3 dilutions (note: we have already provided a sample calculation for dilution 1).
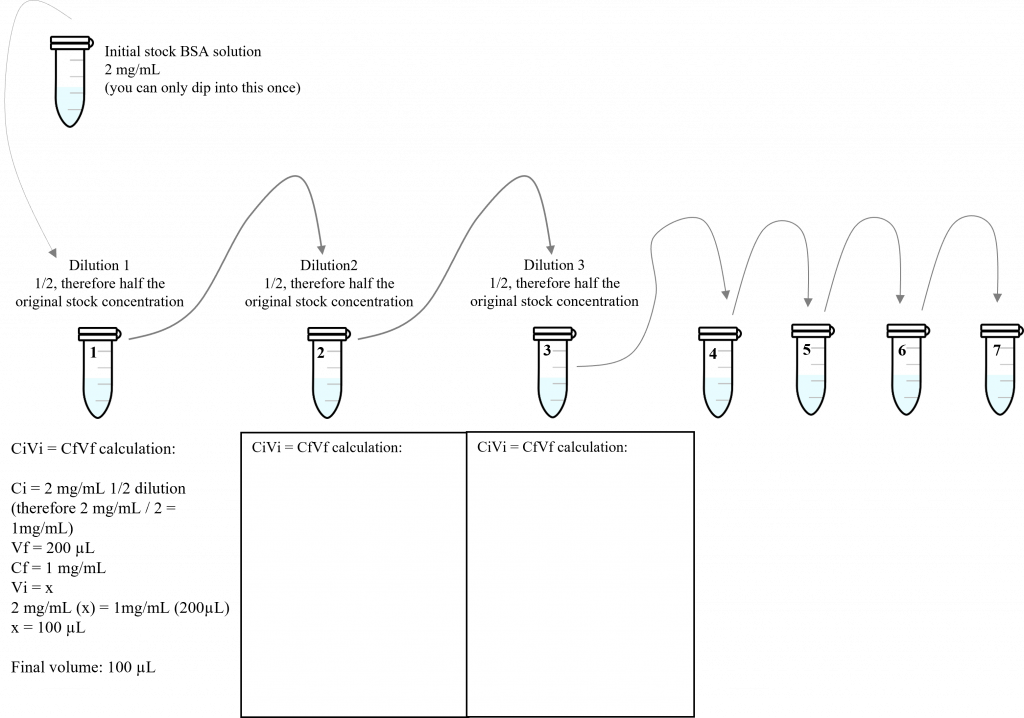
- In your notes, please fill in the diluted BSA sample concentrations required for your standard curve:
|
BSA Dilution |
BSA concentration, Cf (mg/mL) |
|
0 |
2 |
|
1 |
|
|
2 |
|
|
3 |
|
|
4 |
|
|
5 |
|
|
6 |
|
|
7 |
|
Please click this hyperlink to watch the Bradford Procedure Video
- Please use the provided 96-well plate map, procedural video, and written protocol to set up the 96-well plate:
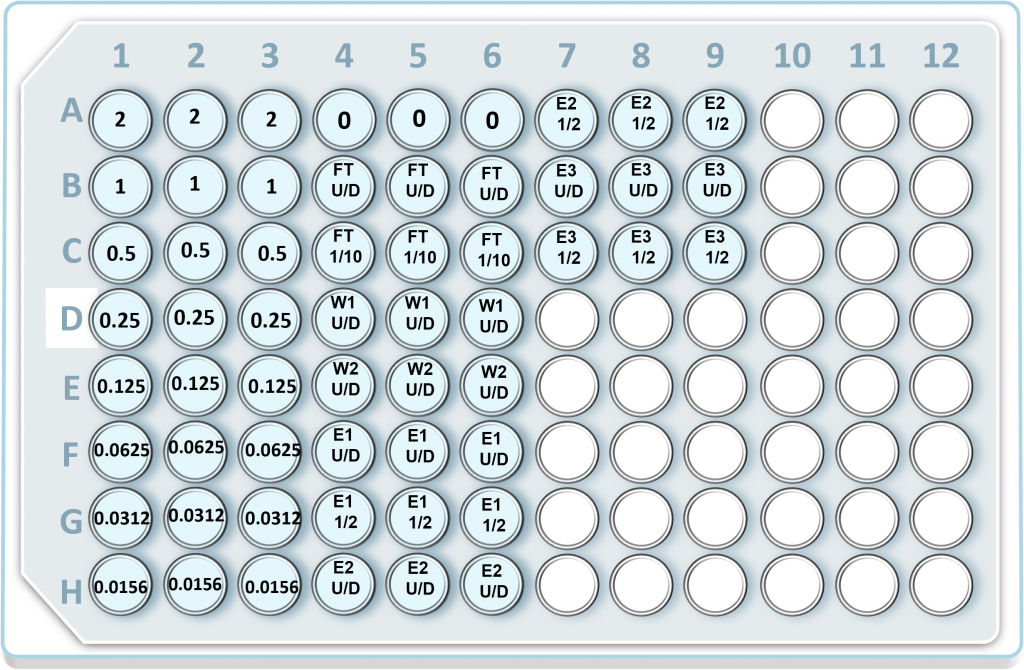
- Prior to setting up the 96-well plate, make any necessary dilutions for each protein purification sample tube. The dilutions depend on the experimental setup. We recommend the following dilutions:
| FT U/D – Flow Through sample, undiluted |
| FT 1/10 – Flow Through sample, 1/10 dilution. This dilution is typically falls within the linear range of the Bradford assay. Don’t forget to take this dilution into account when calculating the total protein concentration in the original, undiluted sample tube. |
| W1 U/D – Wash 1 sample, undiluted |
| W2 U/D – Wash 2 sample, undiluted |
| E1 U/D – Elution 1 sample, undiluted |
| E1 1/2 – Elution 1 sample, 1/2 dilution. This dilution is typically falls within the linear range of the Bradford assay. Don’t forget to take this dilution into account when calculating the total protein concentration in the original, undiluted sample tube. |
| E2 U/D – Elution 2 sample, undiluted |
| E2 1/2 – Elution 2 sample, 1/2 dilution. This dilution is typically falls within the linear range of the Bradford assay. Don’t forget to take this dilution into account when calculating the total protein concentration in the original, undiluted sample tube. |
| E3 U/D – Elution 3 sample, undiluted |
| E3 1/2 – Elution 3 sample, 1/2 dilution. This dilution is typically falls within the linear range of the Bradford assay. Don’t forget to take this dilution into account when calculating the total protein concentration in the original, undiluted sample tube. |
- Add 10 µL of each dilution (BSA and protein purification samples collected) into each designated well of a 96-well plate. Each reaction should be set up in triplicate to ensure accuracy.
- Pipette 10 μL of your PBS dilution buffer into 3 wells. This will serve as the reagent Blank as there is no protein added to these wells. The measured absorbance will be your background “noise”.
- Add 200 μL of diluted Protein-assay dye reagent to the previously loaded wells. Leave undisturbed on your blue underpad for 5 minutes.
Please click this hyperlink to watch the Plate Reader Video
- With the assistance of your instructor, measure the absorbance of the samples in your 96-well plate using the Multiskan Plate Reader. This step MUST be conducted in the presence of your instructor. The raw data should be saved and can be used to calculate aa standard curve.. Please note: when calculating the concentrations using the standard curve, you do not need to take into account the 200 µL of Bradford reagent you added to each well. The only dilutions you need to account for are your BSA and protein purification sample dilutions.
- Properly dispose of the plate according to your lab procedures
Once you are finished please wash your hands!
