Protocol for DHFR-His-6x Protein Expression
Please click this hyperlink to access the virtual lab bench

|
Materials and Reagents
|
|
| Reagents: | Materials: |
|
|
The main goal of chapters 6-7 is to successfully express and purify DHFR-His-6x. The steps involve:
- Expressing DHFR-His-6x protein by growing E. coli BL21(DE3) cells and inducing DHFR-His-6x protein expression using IPTG (Chapter 6)
- Harvesting cells by centrifugation (Chapter 6)
- Lysing cells using BugBuster TM reagent (Chapter 7)
- Purifying DHFR-His-6x using Ni-NTA affinity column chromatography (Chapter 7)
The workflow is as follows:
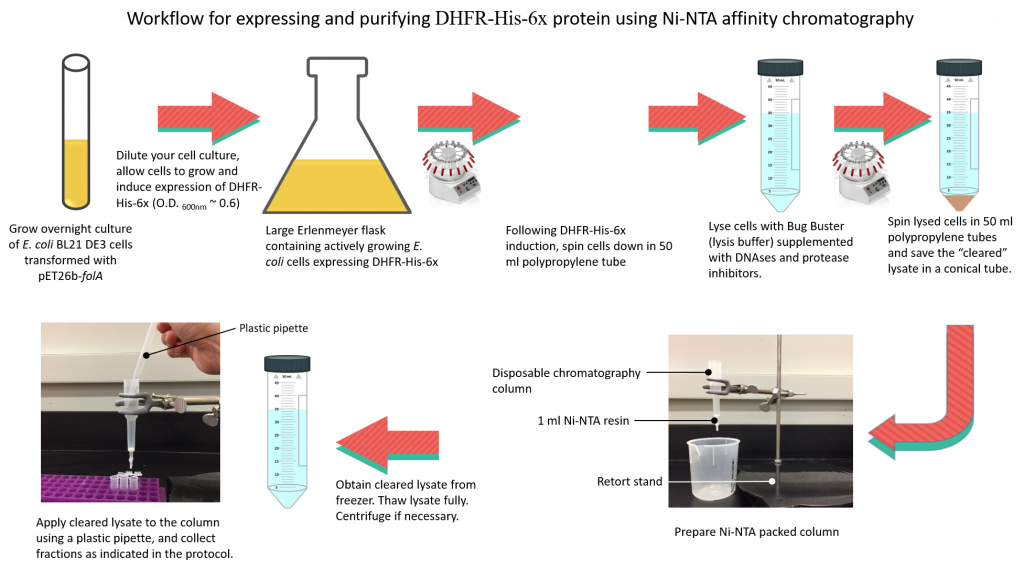
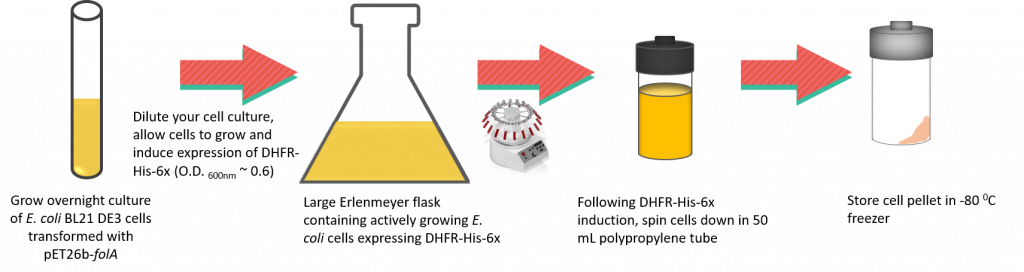
In this lab we will be expressing and harvesting cells using centrifugation. Once harvested, cell pellets will be stored in the -80 0C freezer until next lab.
Protocol for DHFR-His-6x protein expression in E. coli BL21(DE3) cells.
1. Inoculate 5 mL of LB media containing 0.05 mg/mL kanamycin (10 mL of 50 mg/mL stock solution of kanamycin) with a single colony of E. coli BL21(DE3) harboring the pET26(b)-folA plasmid.
Click here to see how to properly streak an LB-agar plate
2. Allow culture to grow overnight at 37 ˚C, shaking at 200 rpm in the large shaking incubators.
3. In the morning, inoculate 500 mL of LB media containing 0.05 mg/mL of kanamycin with the 5 mL overnight starter culture.
4. Incubate in the large shaker at 37 ˚C, shaking at 200 rpm until OD (600nm) reaches 0.6-0.8. NOTE: This step should take about 2-3 hours. During this time, OD (600nm) measurements are taken every 20-30 minutes, as follows:
5. Place 1 mL of LB media containing 0.05 mg/mL of kanamycin in a Spectrophotometer cuvette. This will serve as the blank.
6. Every 20-30 minutes, carefully remove 1 mL from the culture inoculated in step 3 and place in a Spectrophotometer cuvette.
7. Measure the optical density of the E. coli cells in the cuvette at 600 nm using a spectrophotometer. Set the instrument to zero absorbance with the reagent blank prepared in Step 5. Record the data and plot a growth curve.
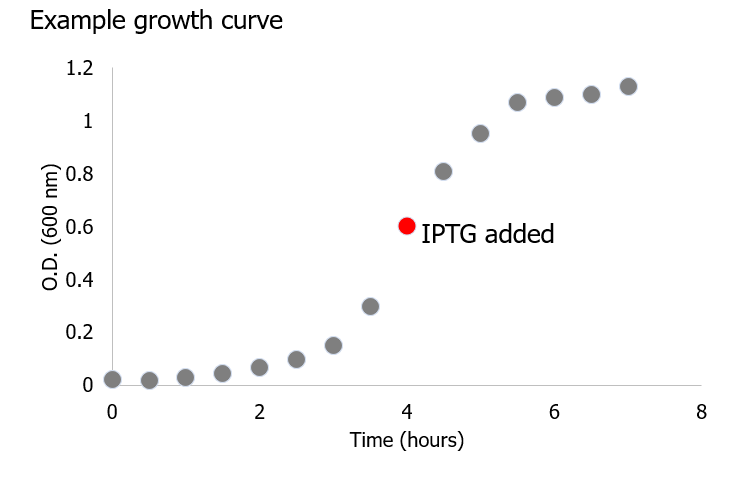
8. When the OD600 of the cell culture is between 0.6 and 0.8 induce the culture by adding IPTG to a final concentration 1 mM (1 M IPTG stock solution).
9. Continue to incubate the cell culture in the shaking incubator at 37 ˚C, shaking at 200 rpm, for 1-3 hours depending on experimental conditions.
10. Obtain 1, 50 mL polypropylene tube, label it using labeling tape (place the tape over the cap, please) and weigh the empty tube (with lids on). Record the weight of each tube in your notebook and include the weights on the label.
11. Transfer 40 mL of the culture (actively growing E. coli BL21(DE3) expressing DHFR-His-6x) into the labeled tube. Please use the pipette aids supplied. Please ensure your tubes are balanced prior to loading them in the centrifuge.
12. Place your tubes in the JA 17 rotor (do not forget to balance your tubes in the centrifuge!) and ask for assistance with programming the centrifuge. You will centrifuge your samples at 5,000 rpm for 10 minutes at 4°C.
13. Once the cells have been pelleted carefully decant the medium and dispose of the supernatant in the waste beakers provided (the contents of this tube will be disposed of in the liquid Biological waste container at the end of the lab period).
14. Repeat steps 11-13.
Preparation, Inoculation, Induction, and Cell Lysis Video
