Protocol for ligating the folA gene into the pET26b plasmid
Let’s take a moment to recap the purpose of this protocol: to ligate the NdeI/XhoI digested and purified folA gene (already performed in the previous protocol) into the NdeI/XhoI digested and purified pET26b plasmid (purified and provided to you).
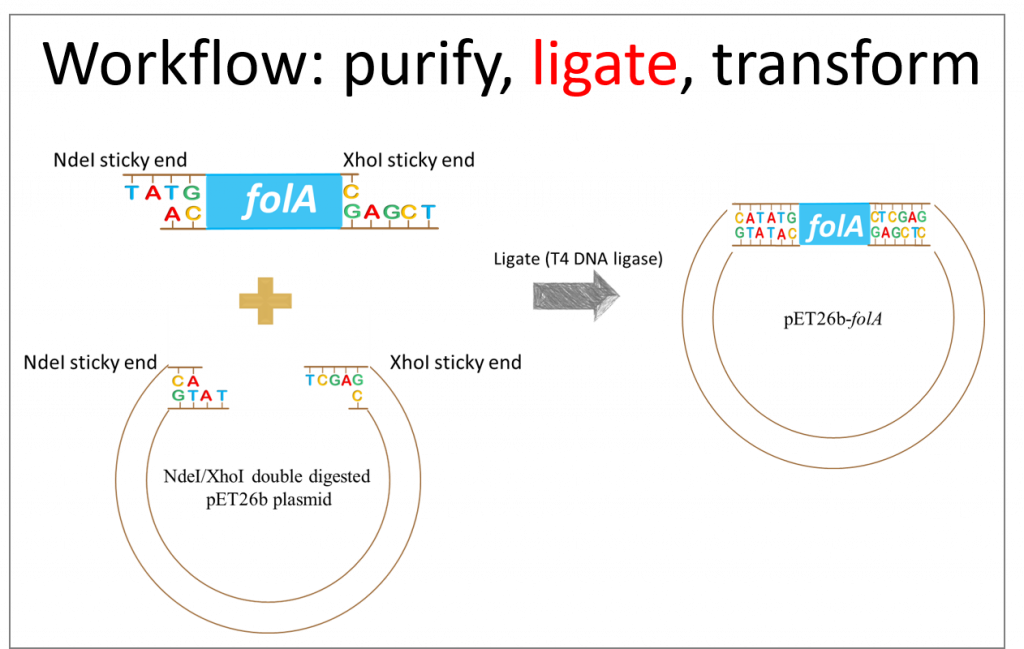
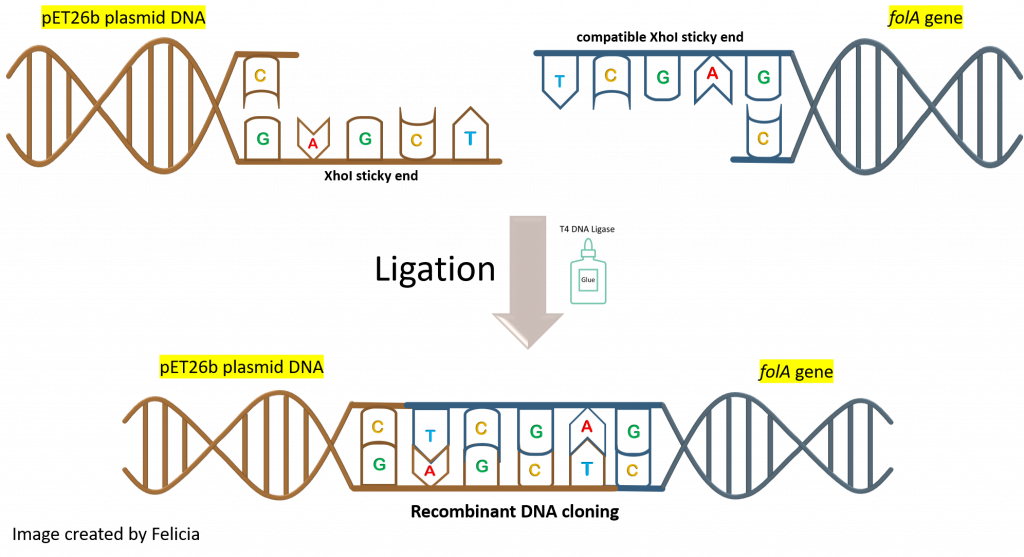
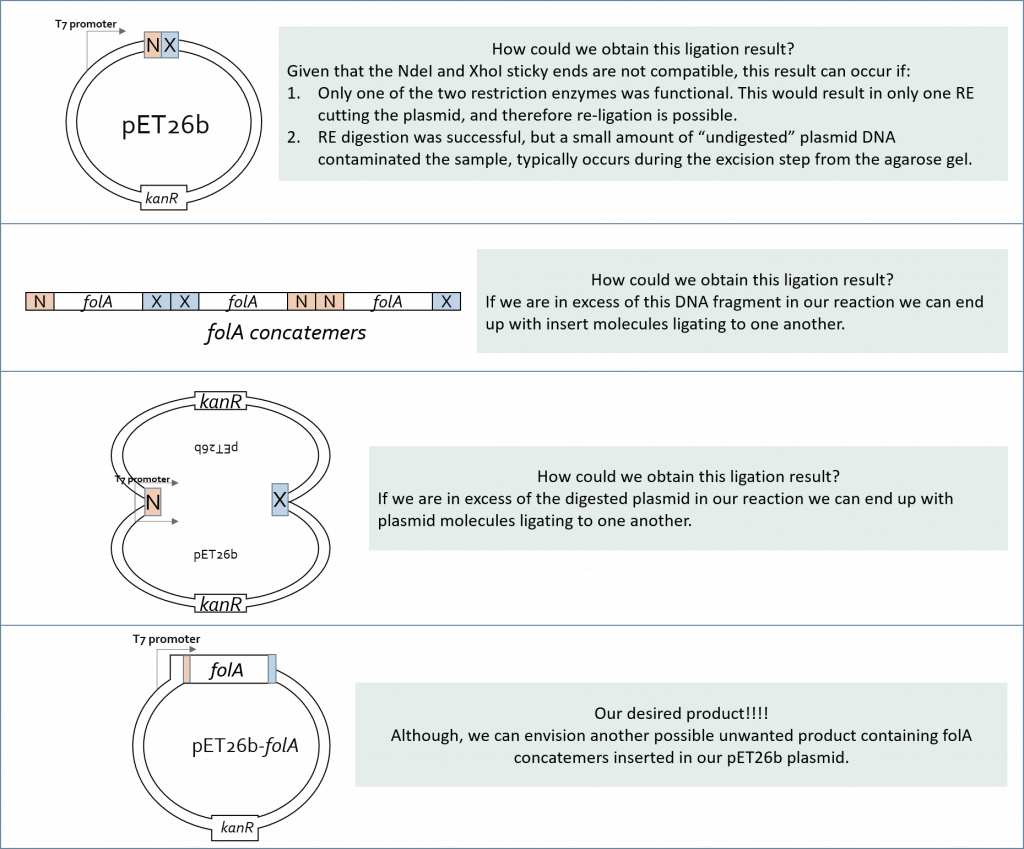
This diagram depicts our desired result, but we need to take a moment to reflect on this ligation reaction. Assuming all our reagents (i.e. T4 DNA ligase) are working properly, there are really only two things we need to keep in mind when designing hypothetical results for a ligation reaction: the NdeI restriction enzyme sticky ends are compatible only to other NdeI sticky ends and not to XhoI sticky ends. Same idea for XhoI RE sticky ends. Analyzing the diagram, above, we see these assumptions to be true.
Also, we need to keep in mind that the ligase enzyme does not distinguish between the insert (aka. folA gene) ends and the plasmid (aka. pET26b) ends. Ligase will not pick an NdeI sticky end from our gene and an NdeI sticky end from our plasmid to ligate these together. The ligase enzyme binds to and creates phosphodiester bonds between two DNA compatible sticky ends.
This latter realization should make us pause when designing a ligation reaction experiment. Why the pause? Because we can see multiple possible ligation reaction combinations that are not all our desired product. In fact, let’s take a look at a few such combinations (keeping the compatible sticky end rules in place):
And so, a ligation reaction – though simple in concept – needs to be thoughtfully designed before we can implement it. At its core we need to increase the probability that an insert (in our case the folA gene) will interact with a vector (in our case the pET26b plasmid) and the two compatible sticky ends will anneal long enough for ligase to “glue” the two fragments together. Over the years scientists have developed a formula to help increase the probability of a desired result. This molar ratio formula requires knowledge of: insert size (in bp) and amount (in ng), vector size (in bp) and amount (in ng). Typically we set up multiple ligation reactions with different insert:vector ratios (i.e. 1:1, 2:1, 3:1). Hopefully one of these reactions will yield our desired ligation result.

Let’s go through a practical example that allows us to implement this ligation formula.
In this example we have the following:
pMAC plasmid vector = ~ 10 000 bp
Gene insert = ~ 700 bp
The concentration of pMAC plasmid was measured using a nanodrop. The absorbance(at 260nm)of 2.0 was determined.
The concentration of the gene insert was measured using a nanodrop. The absorbance (at 260nm) of 0.6 was determined.
Based on this information we first need to calculate the concentration of both DNA fragments. We can use the following conversion:
Abs. (260nm) of 1 = 50 ug/mL double-stranded DNA (50 ug/mL = 50 ng/uL)
Concentration of pMAC plasmid:
Abs. (260nm) of 1 = 50 ng/uL
Abs. (260 nm) of 2 = ?
Solving for ? We obtain 100 ng/uL
Concentration of gene insert:
Abs. (260nm) of 1 = 50 ng/uL
Abs. (260 nm) of 0.6 = ?
Solving for ? We obtain 30 ng/uL
Now that we know the concentrations of both DNA fragments we can move on to the second part of this example. Let’s say we would like to set up a ligation reaction such that we use 200 ng of pMAC plasmid DNA and an insert:vector ligation ratio of 3:1.
Using our ligation equation:
![]()
and solving for the gene insert amount we obtain 14 ng.
This means we add 14 ng of our gene insert and 200 ng of the pMAC plasmid DNA in our ligation reaction to obtain a 1:1 insert:vector ligation ratio.
If we want a 3:1 insert to vector ration, then we need to multiply 14 ng x 3, therefore 42 ng of our gene insert.
The only thing left is to convert our amounts into volumes. How? Using the concentrations we calculated earlier.
Want: 3:1 insert to ligation ratio, therefore:
42 ng gene insert : 200 ng pMAC plasmid vector
Let’s tackle the vector volume first:
pMAC plasmid concentration = 200 ng/uL. We need 200 ng plasmid. What volume do we need? We can tackle this two ways.
first way to look at this problem: let’s think it through. For every 1 uL we have 200 ng of plasmid. So, how many uL do we need to add to our ligation in order to obtain 200 ng final amount? The answer is 1 uL. No need to plug anything into an equation.
Second way to look at this problem:

Now let’s tackle the insert volume calculation using the same reasoning as above.
The concentration of the folA gene insert is 30 ng/uL and we want a total of 42 ng in our ligation reaction. This works out to 1.4 uL of our gene insert.
Need to go over this example one more time? Check out this video: Example – ligation calculation
Please click this hyperlink to access the virtual lab bench

|
Materials and Reagents
|
|
| Reagents: | Materials: |
|
|
Once you have purified your digested PCR product, aliquot the following amounts into a sterile 1.5 mL micro-centrifuge tube as shown in the chart below. Based on the determined folA concentration, please fill in the volume of insert and water required for a 3:1 insert:vector ratio.
![]()
|
Tube 1 – folA insert (obtained using student-designed primers) ligated into pET26b |
Tube 2 – folA insert (obtained using instructor primers) ligated into pET26b |
||
|
Reagent |
Volume |
Reagent |
Volume |
|
vector DNA |
4.0 μL |
vector DNA |
4.0 μL |
|
folA insert DNA |
??? μL |
folA insert DNA |
??? μL |
|
5X ligase buffer |
3.0 μL |
5X ligase buffer |
3.0 μL |
|
T4 DNA ligase |
0.5 μL |
T4 DNA ligase |
0.5 μL |
|
water |
??? μL |
water |
??? μL |
|
total volume: 15 μL |
total volume: 15 μL |
||
![]()
|
Tube 3 – Control ligation reaction with no insert DNA |
|
|
Reagent |
Volume |
|
vector DNA |
4.0 μL |
|
insert DNA |
0.0 μL |
|
5X ligase buffer |
3.0 μL |
|
T4 DNA ligase |
0.5 μL |
|
water |
7.5 μL |
Incubate at room temperature (on your bench) for 20-30 minutes.
Want to know more about ligation reactions? Check out this awesome resource from Addgene!
