Part A: Using a Micropipettor
If you cannot access the above video, please click on this link to learn about pipetting basics: Pipetting basics
The following table is a guide depicting the pipetting range of each type of micropipette. You should NEVER exceed the upper or lower limits of these pipettors.
![]()
|
Pipettor |
Volume Range (in μL) |
|
P-10 |
0.5 to 10 |
|
P-20 |
2 to 20 |
|
P-100 |
10 to 100 |
|
P-200 |
20 to 200 |
|
P-1000 |
100 to 1000 |
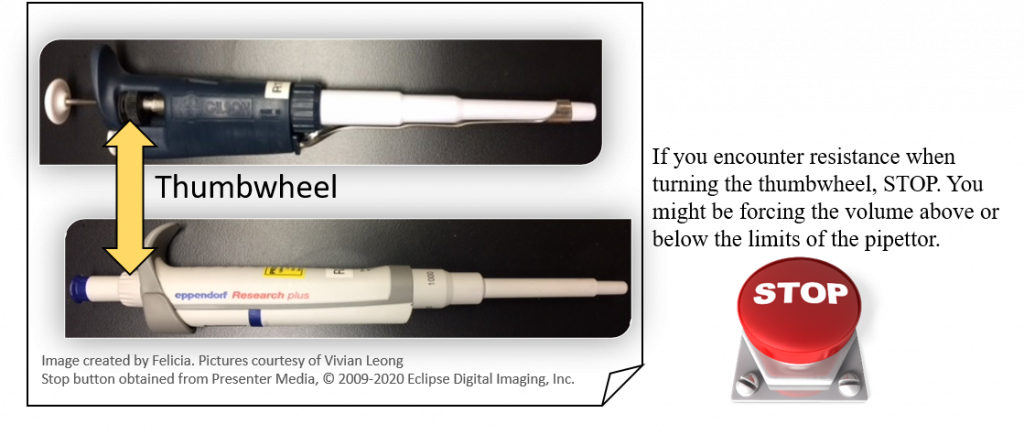
1.Set the desired volume by turning the centrally located rings, or thumbwheels, clockwise to increase volume, or counterclockwise to decrease volume. If you encounter resistance when changing the volume, stop! Are you forcing the volume above or below the limits of the pipettor?
Some examples are provided below:

Figure 2: Volume setting examples. Figure adapted from the Gilson guide to pipetting
2. Place a tip on the discharge end of the pipettor. Note: If sterile conditions are necessary do not allow the pipet tip to touch any object (including your hands). Please do NOT place the pipette over your books.
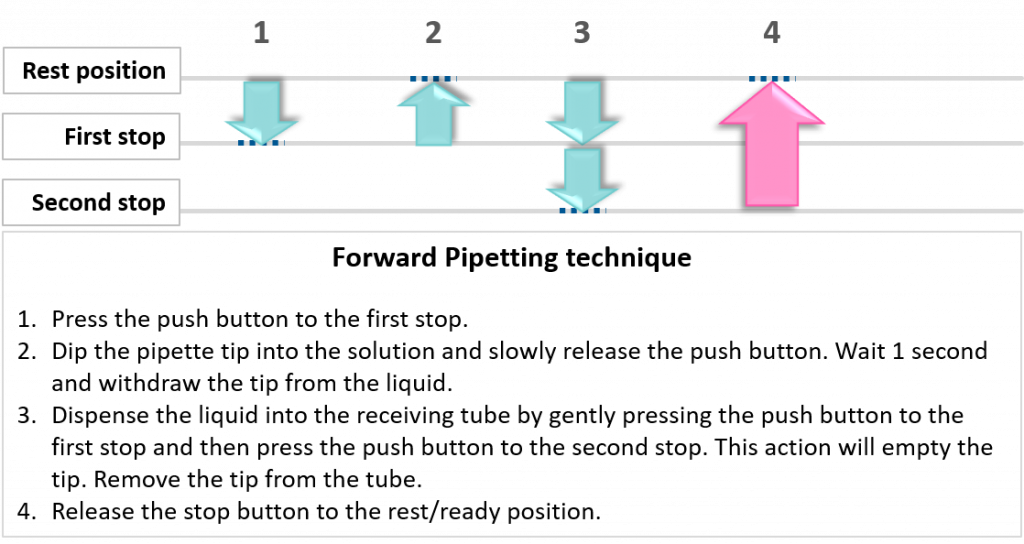
Figure and excerpt adapted from: http://www.pipette.com/public/staticpages/guidetopipetting.aspx
” The plunger will stop at two different positions when it is depressed. The first of these stopping points is the point of initial resistance and is the level of depression that will result in the desired volume of solution being transferred. Because this first stopping point is dependent on the volume being transferred, the distance you have to push the plunger to reach the point of initial resistance will change depending on the volume being pipetted. The second stopping point can be found when the plunger is depressed beyond the initial resistance until it is in contact with the body of the pipettor. At this point, the plunger cannot be further depressed. This second stopping point is used for the complete discharging of solutions from the plastic tip. You should not reach this second stop when drawing liquid into the pipettor, only when expelling the last drop. Before continuing, practice depressing the plunger to each of these stopping points until you can easily distinguish between these points ” (15)
3. Press the plunger to the first stop (i.e. until you feel resistance) and then insert the tip of the pipette into the desired solution. Ensure that the tip is submerged in the solution, about 1/3 to halfway. Please do not submerge the pipette tip all the way to the bottom of the tube as this can create a seal between the tip and tube thereby resulting in the wrong volume pipetted. (15)
4. To allow the desired solution volume into the pipette tip you will need to slowly, and carefully, release the pipette plunger. If you remove your thumb pressure from the plunger too quickly it will yield an inaccurate volume. This is especially true if the solution being pipetted is more viscous than water. (15)
5. Transfer the solution to an appropriate container/tube by inserting the tip into the tube. It is typically recommended that you angle the tip against the tube wall, or, if there is a solution already present in the tube, you submerge the tip in the solution prior to dispensing the liquid (though this is not always the case). To dispense the solution from the pipette tip simply depress the plunger (slowly) until you arrive at the first stop (first point of resistance). Stop here and wait for a second before continuing to the second stop. You can now slowly remove the tip from the solution. (15)
6. Discard the tip in the appropriate waste container by pressing down on the tip ejector on your pipette. Remember to change tips between solutions to avoid mixing or contaminating the solutions used. (15)
When carrying pipettes, never walk around with a pipette containing a sterile tip on it. It is not only a sharps hazard, but the tip is no longer sterile. Never hold the pipette upside down such that the liquid in the tip can enter the body of the pipette. Pipette tips are sterile and located in tip boxes. Be very gentle when opening the box and only keep the box open for the duration of time it takes you to add a fresh tip to the pipette. Keep tip boxes closed to maintain tip sterility.
