Protocol for preparing NdeI and XhoI Double Digest Reactions
Please click this hyperlink to access the virtual lab bench

|
Materials and Reagents
|
|
| Reagents: | Materials: |
For RE digests:
For agarose gel electrophoresis:
* Our lab uses RE reagents from Thermo Fisher Scientific. Buffer R was chosen as the components are compatible with the NdeI/XhoI double digest. The correct buffer can be chosen using the Thermo Fisher Scientific Double Digest Calculator. There are many other companies that sell RE reagents. Please follow the RE buffer recommendations of the company you choose to purchase RE reagents from. |
|
Please make sure that you work with liquids in your designated work surface. Do NOT work over your books! Always stay alert and UNDERSTAND what you are doing and WHY you are doing it!
What are we accomplishing in today’s protocol?
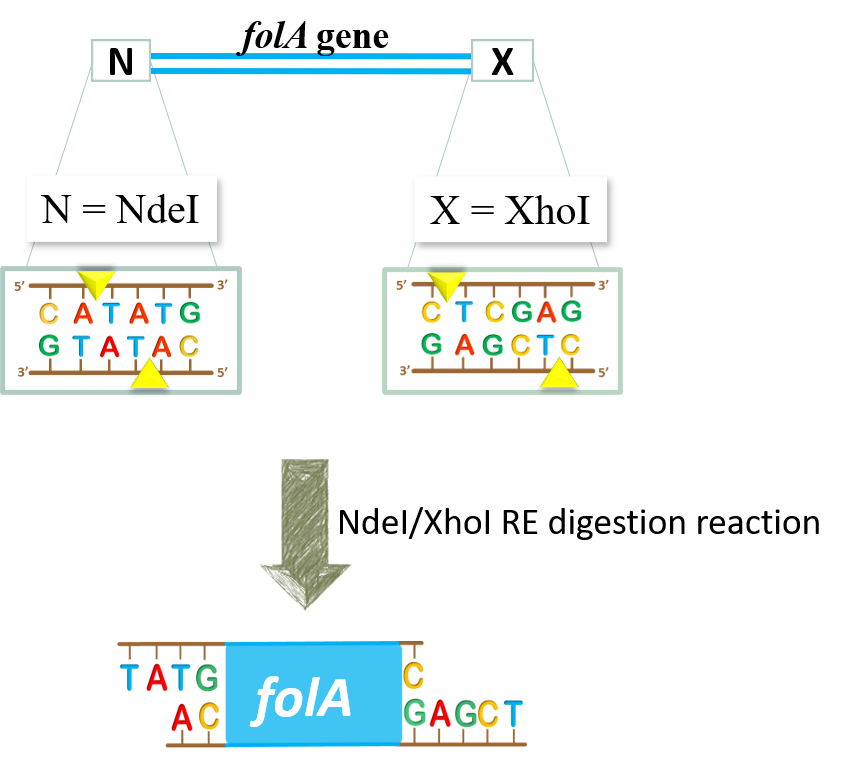
- We would like to set up NdeI/XhoI RE double digestion reactions to generate NdeI and XhoI sticky ends in our folA amplicon:

Once the RE digestion reaction is complete, we will store these reaction tubes until next lab.
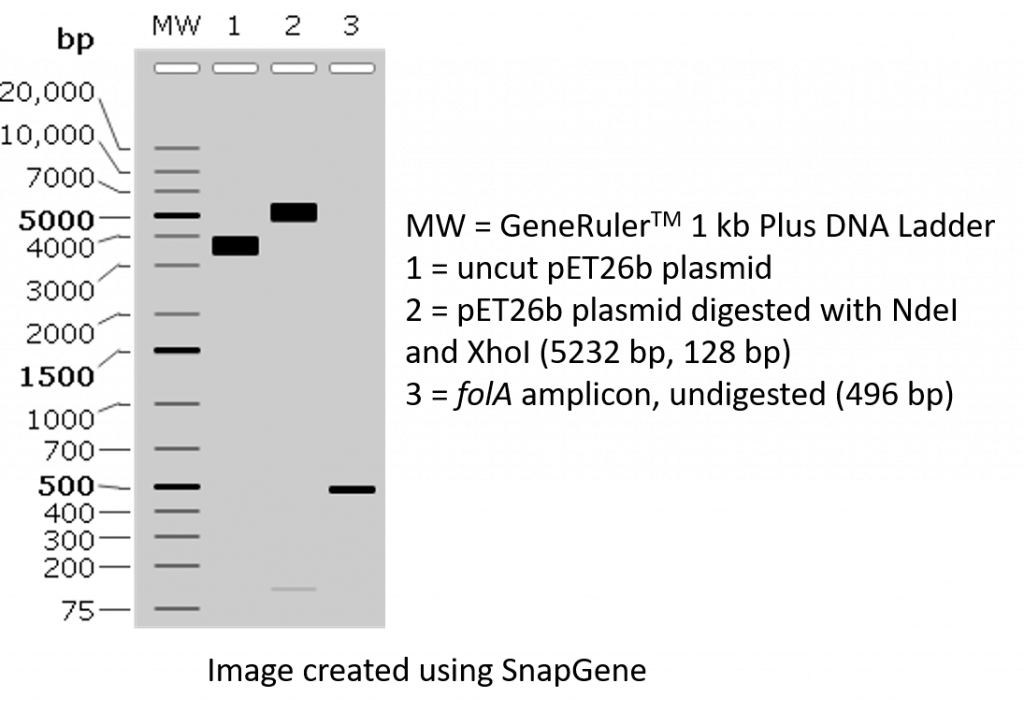
2. We would like to visually confirm that we were successful in PCR amplifying our folA gene using both the instructor-designed primers and the student-designed primers. We will accomplish this task by loading a small sample of our PCR on an agarose gel, separating the DNA bands (based on size) using agarose gel electrophoresis, and visualizing the DNA bands stained with GelRed. We should see something along these lines:

TWO NdeI/XhoI restriction digest reactions will be set-up using the two different folA PCR amplicons (folA amplicon obtained with the instructor-designed primers, and the folA amplicon obtained with the student-designed primers). Please note, both folA amplicons contain the exact same folA gene sequence. The only difference is the primer design. In addition, 2 control restriction digests of pET26b plasmid will also be assembled.
1. Set up the restriction digests in separate 1.5 mL micro-centrifuge tubes using the conditions outlined below (please note the volume differences between these reaction conditions). Prior to the lab, calculate the water and 10X RE buffer volumes required if your final working concentration of the RE buffer is 1X. Please copy the completed table containing all 4 reactions (a through d) in your lab notebook.
|
a. Digestion reaction conditions for pET26b (cut control) Set up 1 reaction tube / mentor team |
b. Digestion reaction conditions for pET26b (uncut control) Set up 1 reaction / mentor team |
|||
|
µL |
H20 |
µL |
H20 |
|
|
10 µL |
pET26b plasmid |
10 µL |
pET26b plasmid |
|
|
µL |
10X RE buffer R |
µL |
10X RE buffer R |
|
|
1 µL |
NdeI |
|||
|
0.5 µL |
XhoI |
|||
|
20 µL total volume |
20 µL total volume |
|||
|
c.Digestion reaction conditions for PCR amplicon (instructor designed primers) |
d. Digestion reaction conditions for PCR amplicon (student designed primers) |
|||
|
µL |
H20 |
µL |
H20 |
|
|
10 µL |
PCR amplicon |
10µL |
PCR amplicon |
|
|
µL |
10X RE buffer R |
µL |
10X RE buffer R |
|
|
1 µL |
NdeI |
1µL |
NdeI |
|
|
0.5 µL |
XhoI |
0.5 µL |
XhoI |
|
|
50 µL total volume |
50 µL total volume |
|||
2. Reactions “a” and “b” above will be loaded on the agarose gel while reactions c and d will be saved for the lab outlined in chapter 3. As such, students should set up reaction “a” and “b” first, followed by reactions “c” and “d”.
3. Place your restriction digest reactions at 37°C for 30 minutes. Please use the provided timer to time your reaction. Please do NOT use your phones in the lab!
4. After the 30-minute incubation, spin down your samples in a micro-centrifuge for 5 seconds at the maximum speed. Please ask your instructor for help with this step.
5. Tubes from reactions c and d can be stored in the -20 °C freezer box until you are ready to use them again in the next lab. Make sure you label these tubes appropriately as you have one freezer box/ lab mentor (i.e. do not label your tubes with generic labels like 1, 2, etc. Record the label of each tube in your lab notebook.
6. For reaction a and b, prepare your DNA samples for loading on the agarose gel by adding 4 µL of 6X DNA loading buffer to each of the 2 digestion reaction tubes.
7. You will also run a sample of your undigested PCR mixture (from the previous lab, chapter 1) on the gel to determine if you obtained a successful PCR product. Remove a 15 µL sample of your undigested PCR mixture from the previous lab (chapter 1) and add it to a clean 1.5 mL micro-centrifuge tube. Add 3 µL of 6X DNA loading buffer to each tube.
8. Vortex your tubes and spin down your samples in a micro-centrifuge for 5 seconds at the maximum speed. Set aside for loading on the agarose gel.
Please click this hyperlink to access a short video on how to balance microcentrifuge tubes

