Protocol for loading your DNA samples
The purpose of this protocol is to load your DNA samples on the agarose gel you prepared, and separate the DNA by size (or molecular weight) using electrophoresis.
Helping students understand how to draw hypothetical gels showcasing the results of their experiments is a great way to bring all these different theoretical and practical components together. It also makes for an amazing Team Think Tank. Please check out Team Think 3: Restriction Enzyme Digests located in the Teacher Resources section. If you wish to learn more about our Team Think Tanks, click here.
A successful result should look like the following hypothetical gel (please note, in this example we are using the Thermo Scientific™ GeneRuler 1 kb Plus DNA Ladder, however you can choose any DNA ladder type from any company, as long as the DNA ladder is compatible with the DNA band sizes you are visualizing).
Take a moment to organize the gel loading. Each student will load two lanes (please note: room must be left on the gel for loading the 1kb DNA ladder). Depending on the number of lanes, multiple students should be able to utilize the same gel.
•One lane for the 1 kb DNA ladder
•One lane for the undigested PCR amplicon 1 sample (instructor primers)
•One lane for the undigested PCR amplicon 2 sample (student-designed primers)
Each gel must also have:
•One lane for the NdeI/XhoI digested pET26b plasmid
•One lane for the un-digested pET26b plasmid
The undigested/digested pET26b lanes serve as controls to test for the quality of our plasmid sample, and to ensure our REs are properly digesting our DNA.
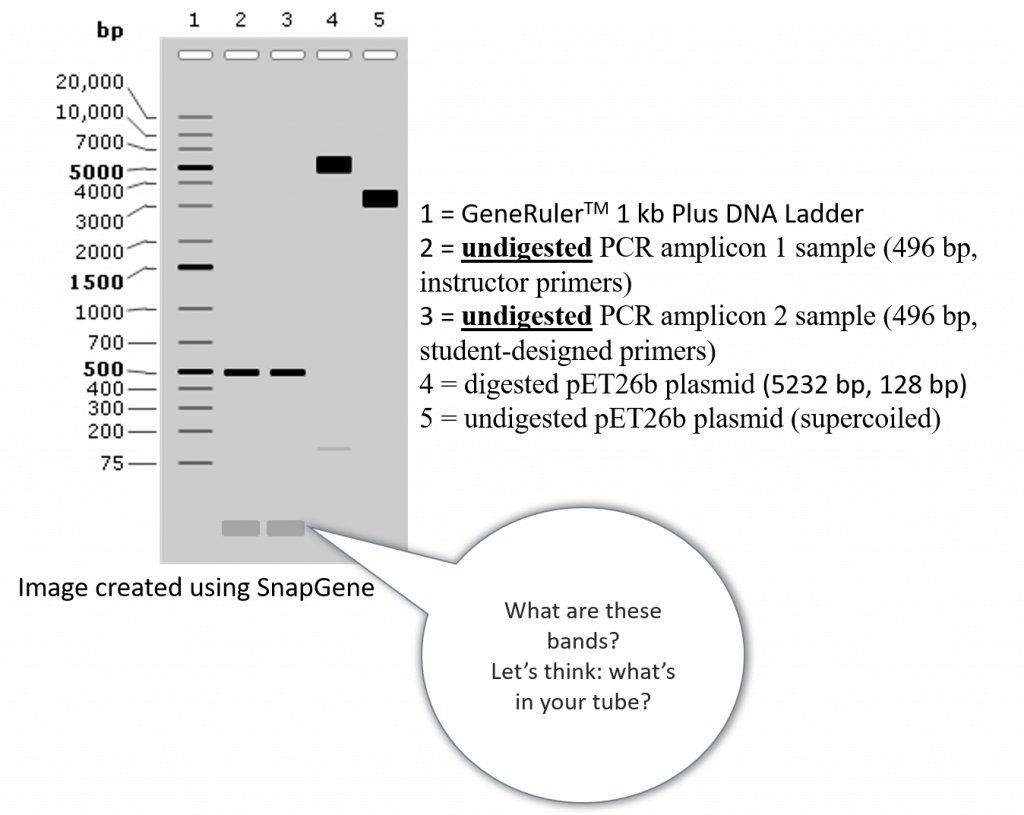
The DNA bands seen in the undigested folA amplicons are most likely unused primers (i.e. extra forward and reverse primers that were not incorporated in the polymerase chain reaction).
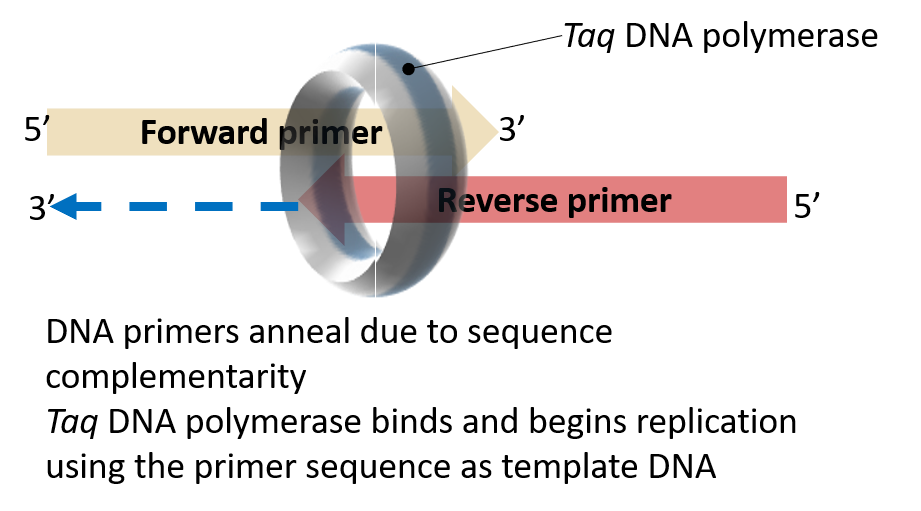
These bands could also be “primer-dimers”. A term typically referred to DNA primers that anneal to one another due to some level of sequence complementarity. The resulting DNA duplex can serve as a template for Taq DNA polymerase. This is an unwanted scenario as it serves to deplete the reaction of primers and polymerase without yielding the desired product.
Protocol:
1. Work out the loading order for all the students using the agarose gel (a lane sign-up sheet works best). Make sure to record the order in your lab notebook.
|
Lane # |
Content (student initials and sample content) |
Lane # |
Content (student initials and sample content) |
|
1 |
|
11 |
|
|
2 |
|
12 |
|
|
3 |
|
13 |
|
|
4 |
|
14 |
|
|
5 |
|
15 |
|
|
6 |
|
16 |
|
|
7 |
|
17 |
|
|
8 |
|
18 |
|
|
9 |
|
19 |
|
|
10 |
|
20 |
|
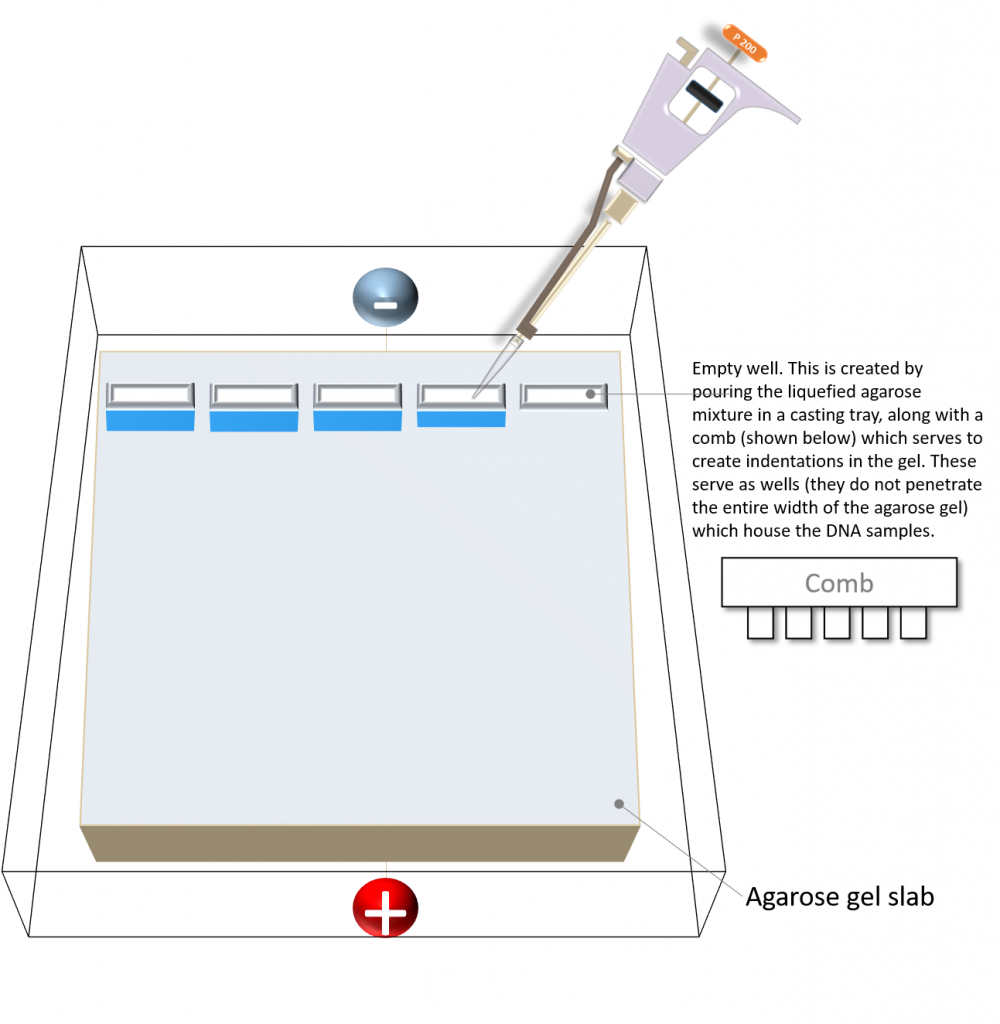
2. Before loading, your instructor will check to see that you have assembled the gel electrophoresis apparatus correctly (i.e. removed the combs and submerged the gel in 1X TAE buffer).
3. Load 15 µL of your DNA samples in the sample lanes and 5 µL of 1 kb DNA ladder in your marker/ladder lane (your instructor will demonstrate how to load your samples). Please be timely with your loading so as to avoid sample diffusion. Also, please be efficient. Bring one pipette (P20), one tip box and one waste disposal bin to the agarose gel loading station. Each student will use this pipette to load their samples, thereby cutting down on the time it takes to bring your own supplies to the bench.
4. Once everyone has loaded their samples, your instructor will run the gel at 100 V for 50 minutes.
5. Your instructor will remove the agarose gel and safely carry it to the UV transilluminator or gel dock. Please follow your instructor so you can visualize the gel on the computer screen. Your instructor will place the agarose gel on the transilluminator, close the shutter and turn on the UV light (please note, a blue light transilluminator, or a Gel-Doc system can also be used to visualized the DNA bands). Students are not allowed to operate the UV transilluminator. Your gel image will be visible on the TV screen at the front of the lab.
6. Prior to leaving, safely dispose of the agarose gel, rinse the gel apparatus, and ensure you retain your PCR tubes and restriction digest reactions (reactions c and d only) in your team’s freezer box. Do NOT discard your digested PCR products!!
Once you are finished please wash your hands!
