Developing the action of the scenes
“I think the process of getting to what was really our message, you know it wasn’t something that was overly guided, and you know, it was our voices that were being heard and that was the piece… It was the process of getting there that made it feel empowering because we were the ones creating it.”
— Performer-advocate, We Need to Talk!
In order to identify the overarching story framework and determine a physical setting for the play, the group had to first create a lot of images. Now, it’s time to see what those images will look like in the setting we’ve chosen and to develop them into scenes. To initiate the scene development process, the facilitator suggests a ‘scene configuration’ to the group. Scene configurations are created by taking images that were derived during previous Image Theatre exercises and linking them together into a kind of scene storyboard.
To create scene configurations:
- Review documentation from previous Image Theatre explorations and conversations with participants to identify core images and ideas.
- Combine and layer several images into a scene storyboard, placing the scene in a physical environment.
- Identify a key Image (a moment of choice making) to act as the focal point for the scene development exploration.
We begin scene development sessions by introducing and discussing the proposed scene configuration or storyboard. This is done both by revisiting the documented images from previous workshops and through a brief verbal description (see below) of the images that make up the scene configuration. This is an opportunity for everyone to review the images and share thoughts, concerns, and questions. Sometimes, these discussions lead to adjustments being made prior to exploring the scene. They can also generate ideas for additional scene explorations to be taken up in the subsequent workshops.
At times, beginning the scene development process can trigger anxiety. A danger, as the group enters this stage in the creative process, is that the anxiety can compel some participants to try to ‘figure everything out’ before trying it out. It’s helpful to remind participants that we’re still exploring and will be using methods that are familiar to them — like prompts and Image Theatre. As participants become comfortable with exploring scenes, they usually become increasingly active in the process of developing and refining scenes.
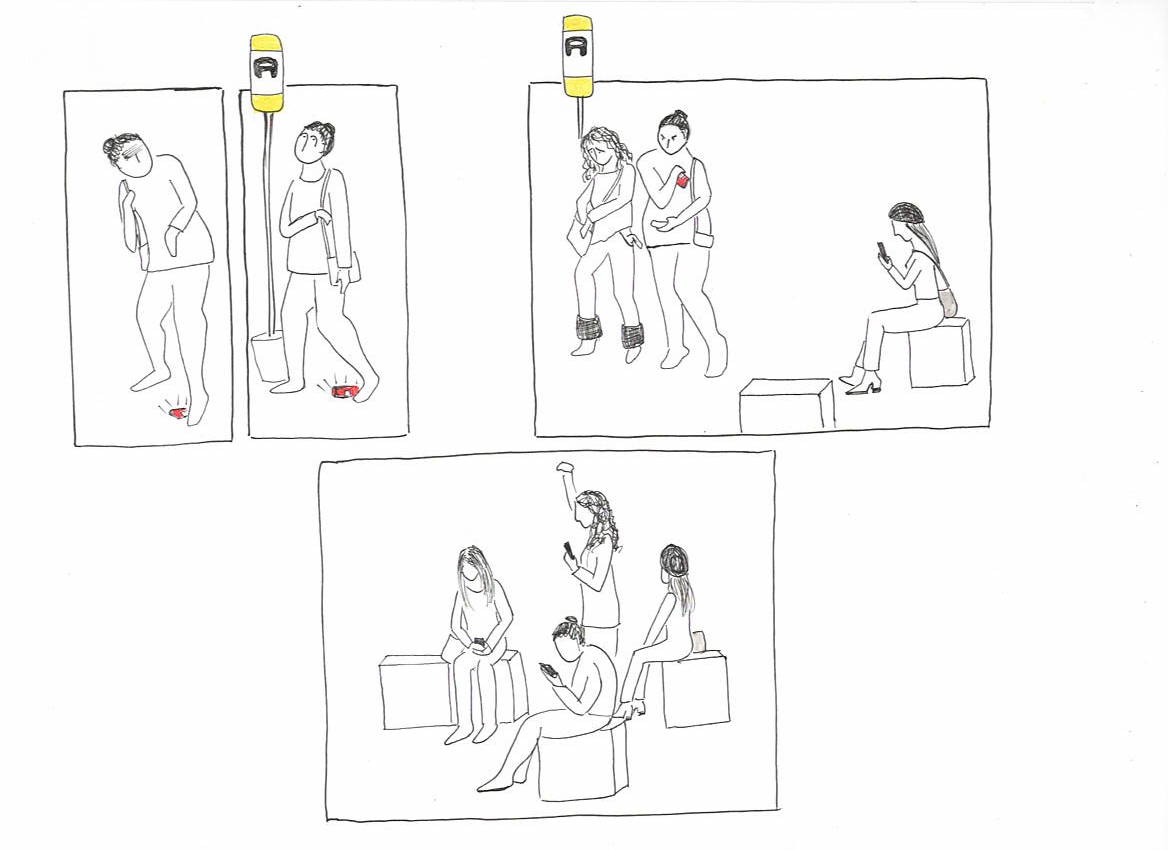
To illustrate how we go about developing a scene we’ll look at a scene we worked on with the youth for the play Choose Your Destination. The proposed scene configuration was composed of two images from previous workshops: One, of a character who finds a wallet on the ground and, after checking to see that nobody is looking, picks it up. A second, of a character who is trying to get on a bus but doesn’t have enough change and is arguing with a bus driver. These two images were combined and layered, and a third concluding image was added to create a three-image scene storyboard:
- Image 1: Character finds a wallet on the ground and tries to pick it up without anyone noticing.
- Image 2 (key image): One character sitting on the bus, a second arguing with the bus driver as they try unsuccessfully to find enough change to pay their fare, and a third person trying to push past them to get on the bus.
- Image 3: We proposed that at the end of the scene, all the characters needed to be seated on the bus to allow them to transition to the scene that would follow (including a fourth character who catches the bus at the last minute).
Once the group is on board to explore the proposed scene, the facilitator explains how the exercise works and guides participants through the process:
Developing the action of the scene exercise
1. Explain that we won’t stage the scene in order but will start with the key image where the performers must make a critical choice of action. This helps performers get a clear idea of what’s at stake in the scene and to think through why their characters do what they do.
2. Ask the performers to create the key image of the scene without speaking, showing us an image that might be a still photograph of the key moment where the choice is made.
One person is frozen in the act of arguing with the bus driver while trying to find change to pay their fare and a second person is frozen in the act of trying to push past them. A third person seated further down the bus, watches warily.
3. Ask each performer to focus on the decision they must make at that moment in the scene. The facilitator then asks every character to speak out loud what might be going on in their own head at that moment. We emphasize that this is not dialogue between characters, but a statement of each character’s inner thoughts. As in brainstorming, it’s important to keep this exercise going long enough that performers have stated all the obvious thoughts their character might have and start to dig a little deeper into their motivations. All the characters speak simultaneously. This helps participants start the process of acting without worrying about being watched, or ‘not doing it right.’
The purpose of this exercise is to deepen our understanding of why the characters are doing what they do. We often make discoveries in this process. In this case, we discovered that the character who is searching for change to pay her fare is frantic because it’s her first day at a new job and if she misses this bus she will be late. We also learned that the person pushing to get on is afraid that someone will notice that she just picked up a wallet she found on the ground at the bus stop. The person seated on the bus is keeping an eye on the situation in case a fight breaks out.
4. Once everyone is comfortable with their character’s action in the key image, the facilitator sets up the opening image of the scene in the same way.
One character is rushing onto the bus, digging in their pockets for coins. The second character is waiting at the bus stop when she sees a wallet, which she pulls towards her with her foot. The third character is already seated on the bus.
5. At this point, the focus shifts to the transition between images. Tell the performers that you will clap your hands five times. Each time you clap, they should move once and freeze. On the fifth clap they should be in the key image they just practiced. Repeat this process three times, to allow performers to remember the pattern of action and deepen their understanding of why they are moving the way they do.
6. Once the transition from the opening image to the key image is clear, repeat the process for the transition from the key image to the final image.
Sometimes we discover new possibilities in these transitions. For instance, we discovered in the movement process that the character with the wallet pays the first character’s fare because it’s the fastest way to get past her. This was not planned before we started working on the scene. The process of solving the problem of the scene through movement showed us something important about how the youth sometimes help each other in order to help themselves.
7. After observing the transitions, choose moments in between the three initial images when a choice is made. This can often be seen in a physical pivot or shift of balance as a character changes direction slightly. Clap through the images again, but this time, freeze at one of these pivot moments and do the inner monologues again.
8. Ask everyone to keep their inner monologue going silently as you tap each person on the shoulder, one at a time. With each tap ask the character to finish a sentence like: “I want…” “I’m afraid that…” “I wish…” “It pisses me off when…” “I’m pretty sure that…” Be sure to give all the characters a chance to finish each sentence before you move on to the next one. Try to alternate more positive (I want…) and negative (I’m afraid…) reactions. This allows performers to demonstrate the mixed or complex feelings their characters may have about the situation and the choice they are about to make. Remind performers again that these statements are not dialogue for the play, but an exploration of their character’s reaction to what is happening.
9. Starting with the opening image, ask the performers to run through the scene (the three images with transitions) from beginning to end, repeating the pattern of action they’ve created. Remind everyone to keep the motivation for their actions clear. In this phase, characters should use as much dialogue as they need to make their choices and actions clear to an audience.
10. Celebrate the fact that you have just written a scene together!
At this early stage in scene development, we encourage participants not to ‘own’ their characters. Instead, we often ask them to perform the scene again with different people playing different roles. Since our responses to situations differ, having multiple people play a single role creates layers of interpretations, and helps us to see and show possibilities that might otherwise have remained unseen.
We finish scene development exercises by asking participants what struck them most about the scene, what seemed important to them, what they would like to explore more, or what they would want to change if they did it again. We often start this reflection process by asking everybody in the room to give the scene a caption, as if it was an image in a newspaper, or to finish the following sentence: “This is a story of people who….”
Sometimes we also ask people who observed the scene but didn’t perform in it to ask one question about the situation (in addition to participants who may not have been in the scene, this includes members of the TSDC team). The point isn’t to have the performers answer the questions. Rather, we consider the questions to be indications of what audiences are likely to focus on in a given scene, and what kinds of contextual information they might need to better understand what’s happening.
Things to keep in mind:
- Participants may be nervous as they enter the scene development process. Remember that facilitator tone and attitude go a long way to convey a sense of confidence in the group and the creative process.
- During scene development exercises prompts are used in a way that’s less about initiating an imaginative process, and more focused on setting up (by describing) a scene that’s based on prior Image Theatre exercises or previous workshop discussions.
- While the prompt sets up the scene, it doesn’t tell participants what to do. Once the scene is set, each character is invited to say or do something in response to embodying the image and in relation to one another.
- Remember to use claps to slow down the movements as participants transition between images. This helps to heighten their awareness of the choices they’re making and gives them time to react to one another’s choices.
- Like all workshop exercises, scene improvisations are performative opportunities to teach performance-related skills. As participants transition between images, remind them that when they’re performing in public, they will need to slow down the movement into a sequence of readable actions so that audiences have time to absorb what’s happening.
a panel or panels on which a sequence of sketches depict the significant changes of action and scene… (Dictionary.com)
