18 Install and Configure the Arduino IDE
Install, Configure, and Test the Version 2.X IDE
In 2022 Arduino released a complete rewrite of the Integrated Development Environment that can make your life easier. (For instructions related to the older 1.X versions see below.) If you have a previous install of Arduino, you probably want to delete the App, delete the Arduino folder from your documents folder (save any of your own sketches first) and delete the Arduino15 folder from /Users/you/Library or Users/you/AppData/Local to get a clean start. (On Mac Cmd-Shift-. will show hidden files and folders.)
There is tutorial support at https://docs.arduino.cc/software/ide-v2
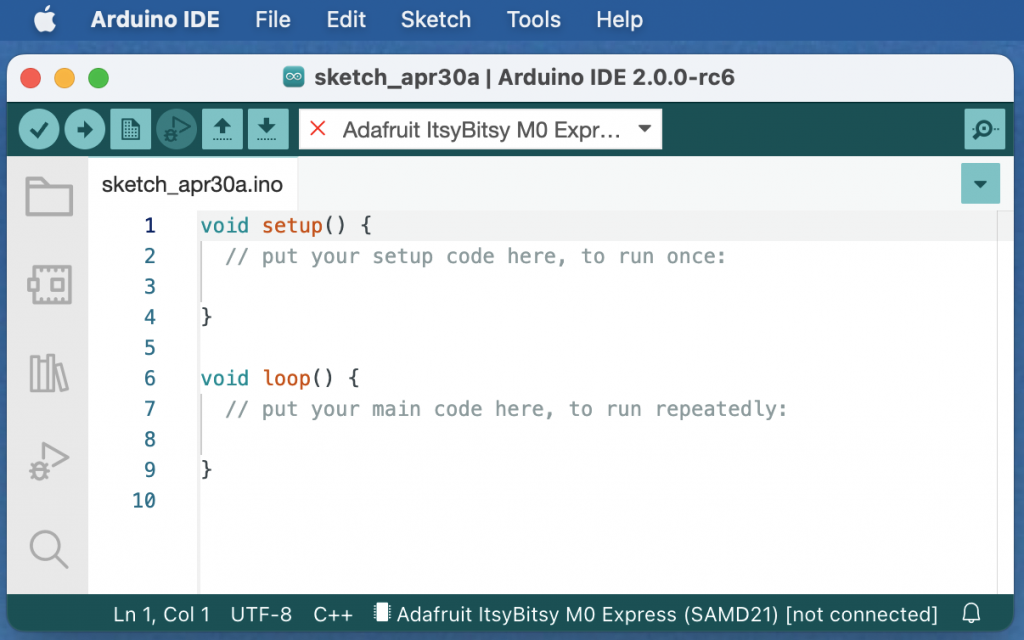
Arduino compatible micro-controllers can all be programmed through the Arduino Integrated Development Environment (IDE) available from arduino.cc. Install version 2.1.1 or higher for your computer and operating system, then use this checklist to add capabilities to your basic install. For Windows, the preferred installation method is the top link in the list. For Mac, choose the Intel or Apple silicon version to match your processor. Once your installation succeeds, and you start the application, you should see a window something like this one:
Install Support for Additional Boards
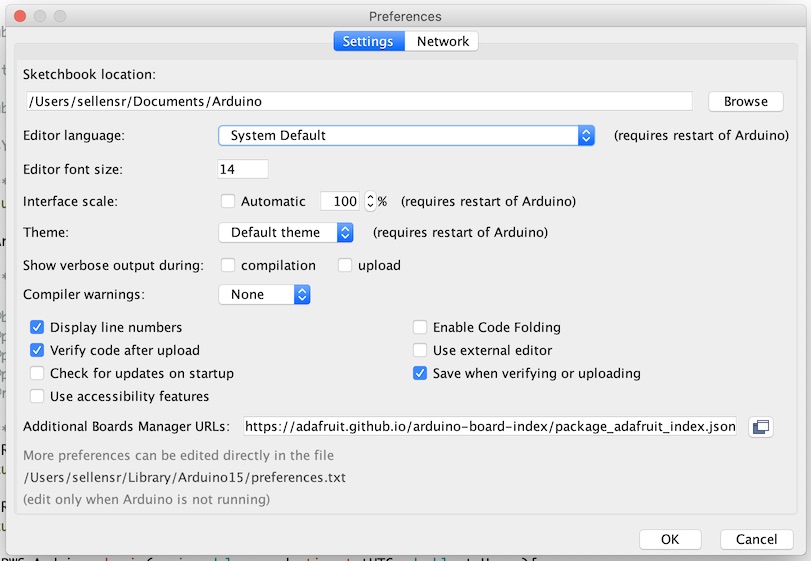
You will need to follow these steps to support your M0 based microcontroller kit. Choose Arduino/Preferences (or Arduino/Settings) and paste this line into the Additional Boards Manager URLs as shown about 3/4 of the way down, then hit OK.
https://adafruit.github.io/arduino-board-index/package_adafruit_index.json

While you are here, make sure that sketchbook location points to a folder that is physically resident on your computer, not in the cloud. Both Windows and Apple versions can run into problems if the Arduino files they are looking for are not currently resident on the computer.
Choose Tools/Board/Boards Manager and type “SAMD” in the search field. Mouse over the “Arduino SAMD Boards” segment and hit install. Wait for the install to complete (which could take multiple minutes), then scroll to “Adafruit SAMD Boards” and hit install. Wait until it completes and hit Close. This installs the support for more advanced boards like the Adafruit Itsy Bitsy M0 Express used in MECH 217 starting in Fall 2020.
Plug your board into a USB port, then Choose Adafruit ItsyBitsy M0 or Arduino Genuino/UNO from the drop down in the tool bar to match the board you are using and the port it is plugged into. The v2 IDE is better at keeping track of Windows COMX: port numbers and should eliminate many past difficulties.
Run Your First Sketch
Cut and paste the code below into the window (replacing what’s already there) then compile and upload it to the microcontroller board by hitting the arrow button, second from the top left.
void setup() {
  Serial.begin(115200);
  pinMode(13, OUTPUT);
  Serial.println("Hello World!");
  delay(1000);
}

void loop() {
  digitalWrite(13, 1);
  Serial.print("Hello Again! ");
  Serial.print("time is now ");
  Serial.print(millis());
  Serial.print(" ms from boot.\n");
  delay(500);
  digitalWrite(13, 0);
  delay(500);
}
If all goes well you should see output on the monitor window and the LED on the board blinking on and off. If you don’t see the first “Hello World!” you may need to add a delay before it prints so there is enough time for the USB negotiation to complete.
You now have a functioning Arduino IDE installation. Try editing the code to print different text and upload the new version by pressing the arrow again. (This code took about 14 seconds to compile and load on a slow 2019 Windows machine, 8 seconds on a slow 2014 Macbook Air, 6 seconds on a faster Quad-Core 2017 iMac, and only 2 seconds on an M1 Mac with the Apple silicon version, almost all of which are long enough to make it worth thinking about your changes before just hitting the button.)
Unplug the USB cable from your computer and attach it to a phone charger or similar power source. The LED should still blink the same way, under control of your sketch with the code executing on the board, independently of your computer.
Installing Arduino Libraries
Some hardware or special capabilities will require you to install additional support libraries. From the IDE choose Tools/Manage Libraries to install from the general collection of 3rd party libraries.
Choose Tools/Manage Libraries… and type RTClib in the search field. Mouse over the “RTClib by Adafruit” segment and choose to install all. Wait for the install to complete (which could take minutes), then hit Close. Including this library enables floating point output in printf() for the M0, which will make your life much easier.
Installing Libraries From Zip Files
- Go to https://github.com/sellensr/RWS_UNO and select Code/Download Zip to store the zip file on your computer.
- In the IDE choose Sketch/Include Library/Add ZIP Library… and browse to find the zip file (probably in Downloads)
Install the Version 1.8.x IDE for Plotter and Serial Capabilities that v2.X Doesn’t Have!
We discovered two faults with Arduino v2.0 that have been reported as bugs, but still not addressed in v2.1.1. The plotter only displays the most recent 50 points printed. Copy and paste from the monitor is limited to only a few lines, which will limit your options to grab output and paste it to a spreadsheet in later labs.
You can still develop your code in the richer v2.0 environment and then use the v1.8.x environment to capture data and screen grabs with these steps:
- Develop your code and get it all to work under v2.0, then quit v2.0 completely so it won’t be competing to connect to your microcontroller
- Start v1.8.x and select the right port under Tools/Port.
- Select Tools/Serial Monitor or Tools/Serial Plotter to display the data that is still streaming off your microcontroller.
You won’t need to do a full install of v1.8.x for this functionality, since you won’t be recompiling your code, just using the serial communications abilities. You could try using v1.8.x for all your work, but we had far fewer students with windows COM port problems when using v2.0 in 2022 than we had in previous years with v1.8.x
Go back to arduino.cc and install the most recent 1.8.X version for your computer and operating system, to provide the additional features for plotting and copying from the serial monitor. For Windows, the preferred installation method is the “Windows app Win 8.1 or 10” available through the Microsoft App Store link on arduino.cc. For M1 and other Apple Silicon Macs you will have to allow Mac OS to install Rosetta.
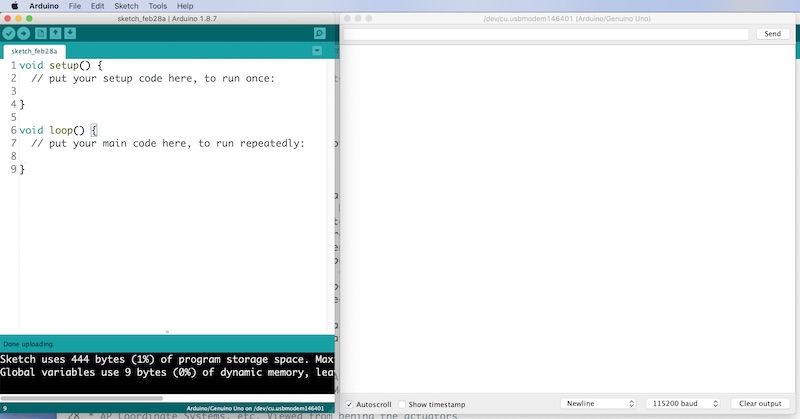
2023-08-17: The newest 1.X version is 1.8.19 and just about any recent version will be fine. Once your installation succeeds, and you start the application, you should see a window something like the one on the left, below:
You will not need to do any further configuration of v1.8.X if you will be working primarily in V2.0.3 or higher.
Configure, and test the Version 1.x IDE (Not Needed 2022 and Later)
Install Support for Additional Boards
You will need to follow these steps to support your M0 based microcontroller kit. Choose Arduino/Preferences and paste this line into the Additional Boards Manager URLs as shown about 3/4 of the way down, then hit OK.
https://adafruit.github.io/arduino-board-index/package_adafruit_index.json
Choose Tools/Board/Boards Manager and type “SAMD” in the search field. Mouse over the “Arduino SAMD Boards” segment and hit install. Wait for the install to complete (which could take multiple minutes), then scroll down to “Adafruit SAMD Boards” and hit install. Wait until it completes and hit Close. This installs the support for more advanced boards like the Adafruit Itsy Bitsy M0 Express used in MECH 217 starting in Fall 2020.
Choose Tools/Board/ Adafruit ItsyBitsy M0 or Tools/Board/ Arduino Genuino/UNO from the menu bar to match the board you are using, plug your board into a USB port, then choose Tools/Port to select the right USB port for communication with the board.
Click on the magnifying glass in the top right to open the serial monitor and arrange the windows side by side as above so you can see the code and the output it generates at the same time.
Run Your First Sketch
Cut and paste the code below into the window (replacing what’s already there) then compile and upload it to the microcontroller board by hitting the arrow button, second from the top left.
void setup() {
  Serial.begin(115200);
  pinMode(13, OUTPUT);
  Serial.println("Hello World!");
  delay(1000);
}

void loop() {
  digitalWrite(13, 1);
  Serial.print("Hello Again! ");
  Serial.print("time is now ");
  Serial.print(millis());
  Serial.print(" ms from boot.\n");
  delay(500);
  digitalWrite(13, 0);
  delay(500);
}
If all goes well you should see output on the monitor window and the LED on the UNO blinking on and off. If you get weird characters, or nothing at all in the serial monitor window, make sure the speed setting in the lower left matches the speed set in the Serial.begin( ) function call. If you don’t see the first “Hello World!” you may need to add a delay before it prints so there is enough time for the USB negotiation to complete.
You now have a functioning Arduino IDE installation. Try editing the code to print different text and upload the new version by pressing the arrow again. (This code took about 14 seconds to compile and load on a slow 2019 Windows machine, 8 seconds on a slow 2014 Macbook Air, 7 seconds on an M1 Mac under Rosetta, and 6 seconds on a faster Quad-Core 2017 iMac, all of which are long enough to make it worth thinking about your changes before just hitting the button.)
Unplug the USB cable from your computer and attach it to a phone charger or similar power source. The LED should still blink the same way, under control of your sketch with the code executing on the board, independently of your computer.
Clean up After any Old Installations (MATLAB)
Get rid of the old preferences.txt file if you have previously installed some Arduino extensions that aren’t compatible with your current processor. In the 2020 offering of MECH 217 we ran into this problem with MatLab extensions installed on some students’ computers to support first year courses. If you see the word MatLab in any of the error messages you get, follow this video (3:31) to walk you through getting a fresh installation. Find the old preferences file (bottom right of the preferences window) and rename or delete it while Arduino is closed to avoid a rewrite of the file later.
Important Controls to Remember on the IDE
Font Size: Use Ctrl+ and Ctrl- (Cmd+ and Cmd- on Mac) to change the editor font size so everybody on your team can read it. This is especially important for instructors and TAs looking over your shoulder or remote viewing.
Load: Use the arrow icon on the top left to compile and load your sketch to you microcontroller.
Serial Monitor: Use the magnifying glass icon on the top left to open the serial monitor display.
Serial Plotter: Choose Tools/Serial plotter from the menu to graph the numbers on the monitor in real time.
Select, Cut, Paste: Ctrl-A, Ctrl-C, Ctrl-V (Cmd on Mac) are standard key shortcuts that will be really useful for grabbing data from the serial monitor.
Installing Arduino Libraries
Some hardware or special capabilities will require you to install additional support libraries. From the IDE choose Tools/Manage Libraries to install from the general collection of 3rd party libraries. This example for the BMP180 pressure sensor walks you through the process in detail. (video 5:49).
Choose Tools/Manage Libraries… and type RTClib in the search field. Mouse over the “RTClib by Adafruit” segment and hit install. Wait for the install to complete (which could take minutes), then hit Close. Including this library enables floating point output in printf() for the M0, which will make your life much easier. At the same time, you may want to install the Adafruit libraries for the BMP085, BMP280, BME280, and LIS3DH. You will also need the Adafruit Unified Sensor library to support some of these. Use the library manager and search on “timekeeping” to find and install a library called “Time by Paul Stoffregen” or “Time by Michael Margolis” (required by RWS_UNO) if it has not been installed automatically.
Some libraries depend on the installation of other libraries to function. For example, you need to be sure to install the Adafruit Unified Sensor library to support many of their sensors. Adafruit BMP085 Unified knows all about the BMP180 and Adafruit Unified Sensor provides the basics for all the other “Unified” libraries.
Installing Libraries Manually
- Locate your Arduino libraries folder on your computer (probably called ~/Documents/Arduino/libraries or something similar).
- Download https://github.com/sellensr/RWS_UNO and unzip the file.
- Copy the RWS_UNO folder into the Arduino libraries folder. (Be sure there isn’t a double folder level e.g. /Documents/Arduino/libraries/RWS_UNO-master/RWS_UNO-master/… produced by windows unzip extract all.)
- Restart the Arduino IDE so that it will recognize the new library.
My Own Personal Checklist and Additional Board Support
You probably don’t need all of this, but here’s what I do to create a new install on MacOS:
- delete Arduino15 from /Users/you/Library or Users/you/AppData/Local to get a clean start
- install latest MacOS Arduino version for IDE version 2.0.2 or higher and go to preferences
- set sketch folder to point to sellensr/Arduino or another local folder
- add https://adafruit.github.io/arduino-board-index/package_adafruit_index.json (as above) to additional boards manager, plus:
http://arduino.esp8266.com/stable/package_esp8266com_index.json
https://raw.githubusercontent.com/espressif/arduino-esp32/gh-pages/package_esp32_index.json
https://www.pjrc.com/teensy/package_teensy_index.json
https://github.com/earlephilhower/arduinopico/releases/download/global/package_rp2040_index.json
with comma-space between.
- Then use boards manager to install the latest Arduino SAMD, Adafruit AVR, Adafruit SAMD, esp8266, esp32, teensy, then restart the IDE.
- Be sure RTClib by Adafruit is installed to provide printf support for %f.
- Go to
sellensr/Library/Arduino15/packages/teensy/avr/cores/teensy3/serial1.c, etc. and raise the size of the RX and TX buffers to 256 to avoid dropping characters.
https://arduino.github.io/arduino-cli/0.29/platform-specification/ provides a lot of information on how other boards get installed for v1.5.3 versions and higher.
Media Attributions
- IDE rc6 Window
- RC6 Preferences
- Arduino IDE © Rick Sellens is licensed under a CC0 (Creative Commons Zero) license
- ArduinoPreferences © Rick Sellens is licensed under a CC BY (Attribution) license
