Getting Started with Circuit Python
These notes will help you with shortcuts and reminders based on the main content available from Adafruit via Circuit Python Essentials. Although I’m writing about my experience with an Adafruit Itsy Bitsy M0 Express on a Mac, the notes should have some more general applicability. At my latest review, 2019-11-07, Circuit Python is still a little rough around then edges, yet shows a lot of promise. More documentation at https://circuitpython.readthedocs.io/
There are also some extra facilities available on the Itsy Bitsy that can be accessed via the Arduino IDE.
Install The Latest UF2 Bootloader on your Itsy Bitsy
Plug your Itsy Bitsy or other UF2 supported board into the USB port and double click the reset button. On the Itsy Bitsy the neopixel should show green and you should see a new disk named ITSYBOOT (or FEATHERBOOT, or [board name]BOOT on other boards). To update the boot loader you need to:
- download a file with a name like
update-bootloader-itsybitsy_m0-3.11.0.uf2from the releases of new bootloaders link at https://learn.adafruit.com/introducing-itsy-bitsy-m0/uf2-bootloader-details (green buttons towards the bottom of the page). It is very important that the file matches the board exactly. Versions for all boards are available at https://github.com/adafruit/uf2-samdx1/releases. Getting the latest version may cure some connection issues. - copy update-bootloader-itsybitsy_m0-3.11.0.uf2 or similar to ITSYBOOT to install the latest bootloader. The drive will eject, then reattach to the file system. When you look at the drive you should see a file named INFO_UF2.TXT that will contain version information.
It is important that the uf2 files match the board you are installing them on, so they should include itsybitsy_m0 in the middle of the name for an Itsy Bitsy M0 Express, or feather_m0_express for a Feather M0 Express, etc.. You can use the same approach to update your board to a newer version of the software. (Note that the RP2040 has a permanent UF2 boot loader.)
Install CircuitPython on your Itsy Bitsy
Plug your Itsy Bitsy or other Express board into the USB port and check to see if there’s a new disk named CIRCUITPY. If it is present, then the software is already installed and you can move on, or update with new versions as below. If not present, you have probably been using the Itsy Bitsy with the Arduino IDE and you need to:
- make sure you have the latest bootloader installed as detailed above.
- download a file with a name like
adafruit-circuitpython-itsybitsy_m0_express-3.1.1.uf2from the release link at https://circuitpython.org/downloads - put the board in boot loader mode by tapping the reset button twice so the neopixel shows green. A new USB drive should appear named ITSYBOOT.
- copy adafruit-circuitpython-itsybitsy_m0_express-3.1.1.uf2 or similar to ITSYBOOT to install Circuit Python. The drive will eject and a new drive should appear named CIRCUITPY.
It is important that the uf2 files match the board you are installing them on, so they should include itsybitsy_m0 in the middle of the name for an Itsy Bitsy M0 Express, or feather_m0_express for a Feather M0 Express, etc.. You can use the same approach to update your board to a newer version of the software.
If you have broken the installation by doing something like copying the wrong files over you can start fresh. Use the Arduino IDE to upload an Arduino sketch to the board, destroying the CircuitPython installation, then start fresh with the bootloader and the CircuitPython installation as above
Install the Mu editor
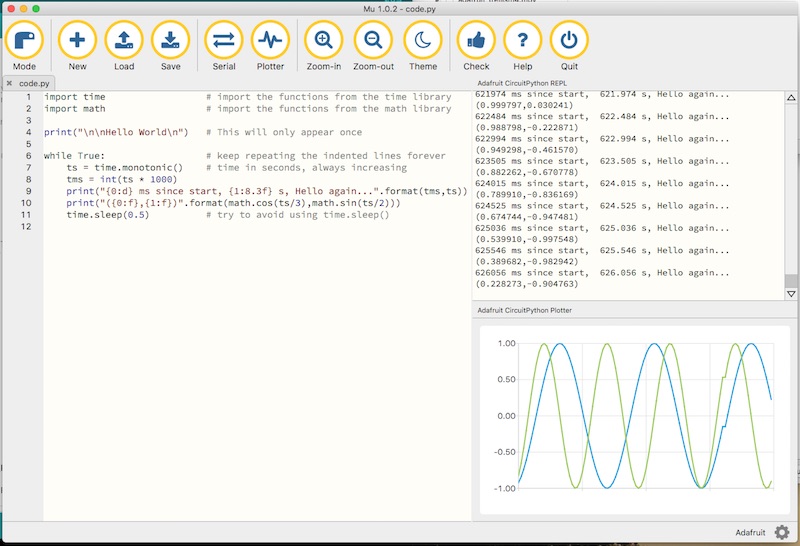
Follow the link at https://codewith.mu/en/download to download and install Mu, or get more info from Adafruit. Run it and copy / paste this code:
import time                  # import the functions from the time library
import math                  # import the functions from the math library

print("\n\nHello World\n")   # This will only appear once

while True:                  # keep repeating the indented lines forever
    ts = time.monotonic()    # time in seconds, always increasing
    tms = int(ts * 1000)
    print("{0:d} ms since start, {1:8.3f} s, Hello again...".format(tms,ts))
    print("({0:f},{1:f})".format(math.cos(ts/3),math.sin(ts/2)))
    time.sleep(0.5)          # try to avoid using time.sleep()
Choose Save to write it out to CIRCUITPY/code.py and it should start executing.
Save code.py somewhere safe
When you save code.py onto your Itsy Bitsy, you should also make sure you keep a copy somewhere on your computer as well. I’m using Documents/CircuitPython/Backups as a storage location for the various .py files I’ve written, each in it’s own named sub-folder.
Install the Latest LIBRARIES
From https://circuitpython.org/libraries download the latest library bundle with a name like adafruit-circuitpython-bundle-4.x-mpy-20191105.zip to match the version of CircuitPython you have installed. “Open the lib folder and find the library files you need to load. Create a lib folder on your CIRCUITPY drive. Copy the individual library files you need to the lib folder on your CIRCUITPY drive.” Copying the whole thing probably won’t work unless you have a board with a large CIRCUITPY drive instead of the 2MB on the Itsy Bitsy.
Usability of Circuit Python in UG Labs (2019)
No BMP180 or BMP280 library is a limitation for working with the pressure transducers that are part of the MECH 217 equipment. It would require about $500 + tech labour to upgrade.
Adafruit Metro M0 Express would provide the same form factor as the UNO, preserving the integrity of past instructions. Don’t know if it has the same level of resilience.
The Mu environment doesn’t let you pause the serial scrolling, so it is impossible to copy output while the code is still printing to the serial port. It is possible, but tricky, to write files out to the circuit python drive. I don’t think it’s a good way to go. Students are comfortable with cutting and pasting from the serial monitor in Arduino and would be similarly comfortable in Mu.
Max data acquisition speed on the M0 is about 1000 Hz, which may limit some applications.
There are no interrupt facilities in CircuitPython, but check out pulsio.pulseIn() for simple pulse counting applications.
1.269531, 1.269000, 0.003906, 0.004000, 0.627, 0.626
1.273438, 1.272000, 0.003906, 0.003000, 0.626, 0.626
1.277344, 1.276000, 0.003906, 0.004000, 0.626, 0.626
1.277344, 1.279000, 0.000000, 0.003000, 0.626, 0.626
1.281250, 1.282000, 0.003906, 0.003000, 0.625, 0.626
1.285156, 1.286000, 0.003906, 0.004000, 0.627, 0.626
1.289063, 1.289000, 0.003906, 0.003000, 0.627, 0.626
1.292969, 1.293000, 0.003906, 0.004000, 0.626, 0.626
1.296875, 1.296000, 0.003906, 0.003000, 0.626, 0.626
1.296875, 1.299000, 0.000000, 0.003000, 0.626, 0.626
suggests that there is an underlying clock update happening every 3.906 ms for time.monotonic() (colum 1) and that time.monotonic_ns is updated at the same time, results to the nearest millisecond (column 2). The resulting time differentials between iterations are unsatisfactory for doing derivatives or integrals wrt time. This impacts the position and inertial measurement labs and is pretty much a deal breaker. https://github.com/adafruit/circuitpython/issues/2077 suggests that there will be permanent problems with time.monotonic() due to interrupts slowing the clock and that time.time will be pulled from the RTC, but that doesn’t provide sub-second resolution. Tested this again on 2022-02-25 with an RP2040 (much faster) processor and the same 3.906 ms incremental rate is there, suggesting it is a feature of the language implementation, not the hardware. Flipping it around, the implementation of time.monotonic is dividing each second into 256 parts.
Media Attributions
- MuStarter © Rick Sellens is licensed under a CC0 (Creative Commons Zero) license
