2. CREATING TABLES
2.1.2: Properties
Each field must have a data type as discussed above. According to the data type, MS Access will present to you a set of field properties that you can tailor for your table. We will discuss the following: Field Size, Format, Input Mask, Caption, Default Value, Validation Rule & Validation Text, Required, Indexed, Show Date Picker, and New Values.
Field Size
Consider a field like deptCode. Suppose the University uses 3-character and 4-character values for department codes. Because of this it is reasonable to set the Field Size to 4, in order to limit the possibility that an end-user accidentally types a longer string of characters and thereby enters incorrect data. In this way we can limit the kinds of errors users make when they enter data and thus improve the overall quality of our database.
Data integrity is a serious issue for databases. Setting Field Size for Text data and Number data is a common thing to do. Often organizations will limit the data they collect for fields such as last name and first name (for example, 30 characters). If the data type is Number, then values selected for Field Size are values such as Byte, Integer, Long Integer, etc.
These kinds of values are associated with increasing number of memory locations used per value. A selection of Byte restricts storage to 1 byte of memory (8 bits), and since the largest positive integer that can be stored in a byte is 255, the values stored in the field are forced to be in the range from 0 to 255. Further information is readily available if you use the F1 function key on Field Size for a Number data type.
Format
The Format property is used to customize the way text, number, dates, and times are displayed to the end user. For instance, selecting Medium Date causes values like January 14, 2013 to be displayed as 14-Jan-13; selecting Long Date results in the display January- 14-13. See figure 2.8 for examples. If you have Text data such as department code, then you could force the display to be in capital letters by specifying > as the format code. An interesting Format specification is @;None. If this is used and if there is no value at all to display, then the word None will be displayed to the user. Another example: suppose the field is for the Canadian SIN. You may have seen these displayed to users with hyphens between the 3rd and 4th digits and the 6th and 7th digits. If the SIN is a Text field of length 9 it can be displayed this way by using a Format specification of @@@-@@@-@@@.
|
Value in field |
Format Property |
Displayed as |
|
barack obama |
> |
BARACK OBAMA |
|
January 14, 2013 |
Medium Date |
14-Jan-13 |
|
January 14, 2013 |
Long Date |
January-14-13 |
|
|
@;None |
None |
|
786456789 |
@@@-@@@-@@@ |
786-456-789 |
|
|
@@@-@@@- @@@;None |
None |
Figure 2.8: Format Examples
Input Mask
The Input Mask property is used to force the user to add data according to some pattern. This is another nice feature to help improve the overall quality of data added to a database. When the cursor is in the Input Mask area a ‘builder button’ appears. When you click this button you will see a list of popular controls. If you were to choose the mask for phone number you will see the control !(999) 000-0000 appear. As a result of this choice, the user must enter a 7-digit phone number with an optional 3-digit area code).
Caption
If there is no caption, then the heading used in displays of data is the field name. Sometimes the field name is not what you want your users to see. For example, instead of the heading deptCode above a list of department codes, you may prefer to use the words Department Code. To accomplish this just enter such a heading in the caption property for the field.
Default Value
If some value for a field is very common, then you should consider setting a default value. For example, if most courses are 3-credit hour courses, then the value 3 can be set as the default for all new courses.
Validation Rule & Validation Text
If a field has a validation rule, then the rule is tested whenever the user enters data. If the test fails the user is prompted with a message containing the validation text. A simple use of this could enforce the credit hours to be less than 10 by entering the rule <10 and the validation text Please enter a value between 0 and 9. Again, this is a nice feature to improve overall data quality.
Required
Consider the deptName field of the Department table. If a user enters data for a new department then it is unreasonable for the deptName field to not have a value. To ensure there will be a value we make the field required – i.e., we choose Yes for the Required property.
Indexed
MS Access automatically creates an index (unique – no duplicates) on a field that is the primary key. A unique index is a special internal data structure that Access builds to facilitate two things:
-
-
- to ensure fast access to rows of data when the user specifies a value for such a field in a query, and
- to ensure in the case of no duplicates that no two rows of the indexed table could have the same value for that field.
-
The index data structure is very similar to the index you see at the back of books. An index comprises several entries where each entry has a value (a term used in the book) and a reference (a page number in a book) – in the case of duplicates allowed there can be several references (several pages where the term appears).
You may choose to have an index on any field. If a field could have duplicate values, then you must choose an index that allows duplicates.
Show Date Picker
If the data type is Date/Time, then this selection enables the user to select a date using a picker – a convenient tool for data entry.
New Values
If the data type is AutoNumber, you can use New Values to specify whether the next value for the field will be the next highest integer, or if it will be a random integer.
Exercises
In the next two exercises you are working with your University database:
1) Consider the Department table. In design view, set the deptCode field to have a length of 4 and use > as the display format. Set the length of the deptPhone field to be 10 and choose the Phone Number input mask. Save the table and switch to datasheet view. Use figure 2.1 as a guide and enter data into the Department table.
2) Create a Course table with attributes for department code, course number, title, short description, and credit hours. The credit hours field should be numeric with no decimal places, and the other fields are Text fields. Set the deptCode field to be Short Text with a length of 4 so that it matches the properties of deptCode in Department. Later it will be important that the deptCode field in both Department and Course are defined the same. Use figure 2.2 as a guide and enter data into the Course table.
The following exercises relate to the Library database:
3) Consider the firstName and lastName fields in the Member table of the Library database. Modify the caption for these fields to be First Name and Last Name respectively. Save the table and reopen in datasheet view. You will see these captions at the top of their respective columns.
4) The Loan table has fields that are defined with the Date/Time datatype. Experiment with different formats for these dates.
5) Consider the id field in the Member table of the Library database. In design view change the increment property of the id field to be random instead of increment. This is a non-reversible action (but you can download the database later to get a fresh copy). Now add some new members. What can you say about the id values that are assigned?
6) Validation rules and validation text are important features to assist database users.
- Consider the Loan table and its date fields. MS Access has many built in functions one of which is Date(), which always returns today’s date. So, to ensure that someone always enters a due date later than today, in the properties section for the date due field enter the following:
-
- Validation rule:>= Date()
- Validation text:Enter a future date.
- In this situation we are entering a field-level validation rule. These rules are useful when we can state a requirement independent of other fields. Test the effect of this validation rule by switching to datasheet view and entering valid and invalid values for the due date.
- To ensure the date borrowed value is less than or equal to the date returned value we construct a validation rule that involves two fields. MS Access will not let you enter this rule at the field level; instead, such a rule must be specified at the table level. To enter a table level rule, you can click Design and then Property Sheet as indicated in figure 2.9a.
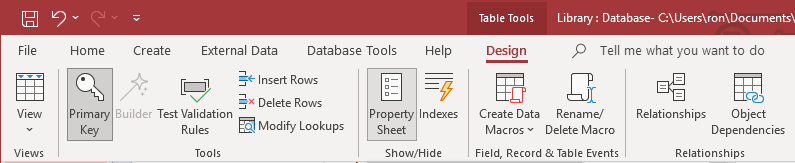
Figure 2.9a: Table level properties
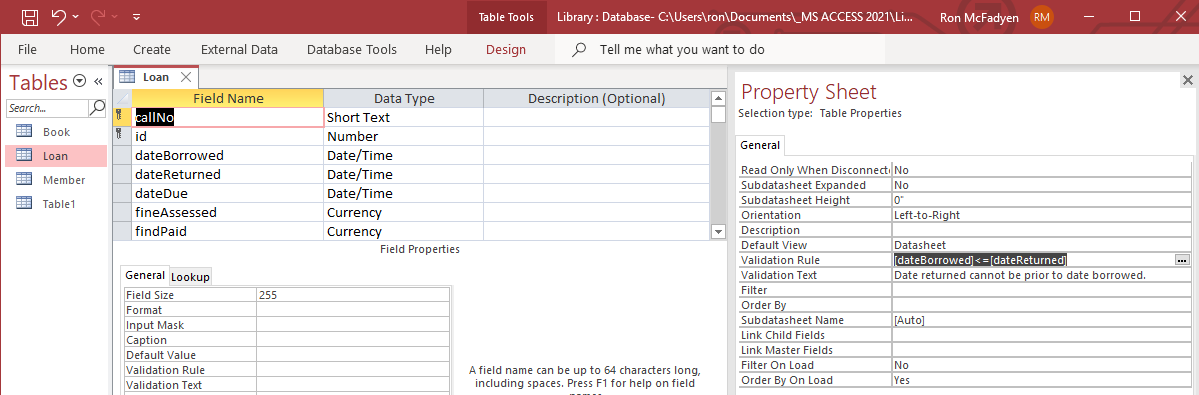
Figure 2.9b: Enter a validation rule
- And, as shown in figure 2.9b enter the properties:
-
- Validation rule:[dateBorrowed]<=[dateReturned]
- Validation text:Date returned cannot be prior to date borrowed.
- The square braces, [ ], that appear in the expression are required. These inform MS Access of references to fields in the table.
- Enter this rule and verify that it prevents a user from entering improper dates.
