1. RELATIONAL DATABASES AND MS ACCESS
1.2.4 Table Design View
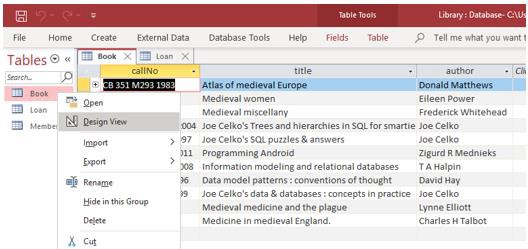
Up to this point we have been opening tables in Datasheet View where we can view and change data in rows of a table. When in Datasheet View we can switch from datasheet view to Design View by right-clicking on Book and choosing Design View (see figure 1.13). When the Design View icon is clicked, the display changes to reveal design information (see figure 1.14).
When you click the Design View icon you will see the display change as shown in figure 1.14 – you will see the field names listed along with their datatype, and according to the field where the cursor is located you see other properties for that field. Datatypes vary somewhat from one database system to another, but of course there are many similarities too. Properties are other characteristics that you can define for a field such as the maximum length of values stored for the field.
Generally, we want data in a database to be reasonable and correct. We can use datatypes and properties to achieve certain types of correctness. Consider the following integrity rules as rules we would like to enforce:
-
-
- Call numbers, titles, and authors are alphanumeric. Any text you can type on the keyboard is acceptable.
- Each call number must be unique (there can be no duplicates)
- Each book must have a title
- A value for call number must be no more than 50 characters long
- A value for title must be no more than 255 characters long
- A value for author must be no more than 255 characters long
- The author field can be left out (it can be null).
-
Now we discuss how these integrity rules are obtained in Table Design View.
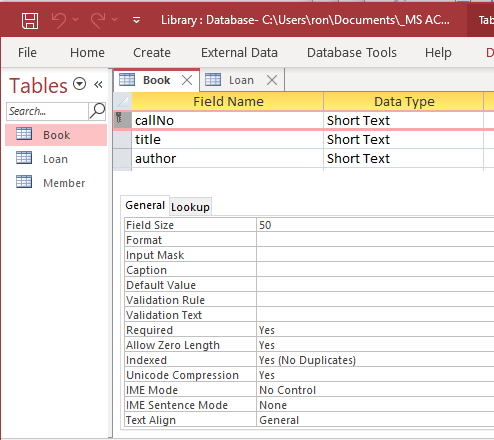
In figure 1.14 the cursor is located on the callNo field; some properties of callNo are circled and discussed below:
-
-
- Beside the callNo field you can see the key icon. This means the callNo field is the primary key. A primary key is a unique identifier – every row in the table must have a unique value in that field. Every table should have a PK specified and there can be only one PK for a table. When a field is defined as the PK then a value must be provided in each and every row.
- The callNo field has a datatype of Short Text and a field size of 50. Any value you can type on the keyboard is acceptable but the overall length, number of characters, is restricted to at most 50.
- The callNo field is indexed and in this case no duplicates are allowed. The index constructed by MS Access is similar in purpose to the index at the back of any book: the index allows MS Access to quickly locate a specified row. However, this index is different from that at the back of a book because it allows only one entry per indexed value (No Duplicates is specified for the Indexed property). Each call number is unique.
-
As you move the cursor up and down you should note the following for this sample table: For title:
-
-
- The title field has a datatype of Short Text with a field size of 255. A text field can comprise any combination of letters, digits, and punctuation. Any value entered by a user cannot exceed 255 characters in length.
- A value is required. When entering data for some book, the user cannot omit the title.
- There is no index on title. For author:
- The author field has a datatype of Short Text with a field size of 255. A text field can comprise any combination of letters, digits, and punctuation. Any value entered by a user cannot exceed 255 characters in length.
- A value is not required. When entering data for some book, the user can omit the author.
- There is no index on author.
-
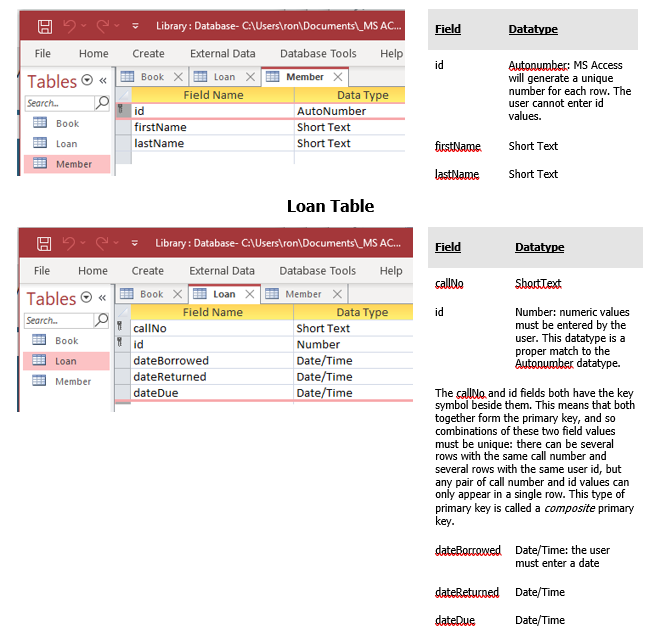
Now, open the Member table and then the Loan table in design view. Examine the properties of each field. For reference see figure 1.15.
Member Table
Later we will examine datatypes and properties in much more detail.
Exercises
1) Use Design View to add fields to the Member table as indicated:
- gender: Short Text field of length 6 to accommodate the values male and female. Make this a required field that is not indexed.
- birthDate: A Date/Time field; required; not indexed.
- Switch back to Datasheet View (You must reply yes to the system prompts to save your changes). You should notice there are no values for gender nor birthDate.
2) Now enter values you deem appropriate in the gender and birthdate fields for each member. Close the table and reopen it. You will see the values you entered are still there.
3) When new members join the library, information about them must be entered into the Member table. Each member is given an id value automatically. Add new members to the library and note how MS Access will not let you enter id values; instead, MS Access generates those values for you – id values are generated sequentially. Close the table and then reopen the table to confirm your additions worked.
4) In exercise 3 you added a new member and in exercise 4 you added fields to the Loan table. Consider that the person you added now borrows a book and so a row must be entered into the Loan table. Enter such a row.
5) Typically, a library assesses a fine the user must pay if they keep a book out past the due date. As well the library needs to track the amount, if any, the member has paid. In this exercise we add two fields to the Loan table so we can keep track of fines that are assessed and the amount the member has paid.
- Open the Loan table in design view and add two new fields named fineAssessed and finePaid. These fields must have a data-type of Currency.
- Save the Loan table and then view the rows of the table. There are no amounts for these fields.
- Choose some row(s) in the Loan table and enter values for the fineAssessed and finePaid fields. Note the values you enter will appear as dollars and cents.
6) After successfully entering data for exercises 3, 4, and 5 you are aware of a member and a book for which there are references in the Loan table.
- View the Member table and try to delete that member, and then view the Book table and try to delete that book. These deletion attempts are unsuccessful because of the references to the Loan table.
- Now open the Loan table and find the loan record you entered in exercise 5. If you delete this row in Loan, then you will find that you are able to delete the member that was referenced by that row (provided you did not enter more loans for this person). These actions mirror the way in which data would typically be deleted from a database: if you want to delete a row you must first delete (or modify appropriately) any rows that reference it.
