Open Content
Spotlight on Accessibility
Accessibility is an essential part of inclusive design. This section will dig a little deeper into its importance — and will offer some practical approaches to creating accessible content for your learners.
Accessible Design
Learners learn differently. The goal of education is to support learners in reaching their full potential. While part of the educational process is to challenge learners to facilitate their growth, many learners experience constraints that make it difficult — if not impossible — to access certain learning resources.
These potential barriers to learning can include:
- sensory, motor, cognitive, emotional and social constraints;
- individual learning approaches or preferences;
- linguistic or cultural preferences;
- technical, financial or environmental constraints.
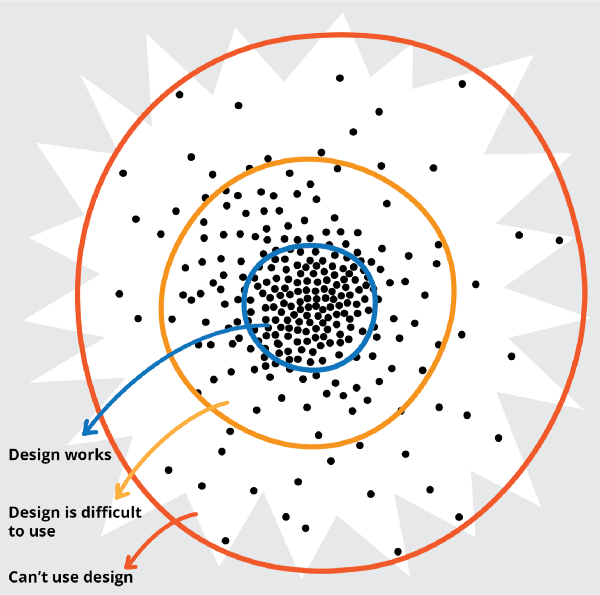
Consider a scatter-plot of the needs of any group of people. Everyone brings a variety of different ways of being and working — and different skills and needs — to the table. This starburst plot features a dense set of dots in its centre (circled in blue) — which represent the majority needs — and dots that are more widely spaced out the father away from the centre they appear (circled in yellow and red) — representing the needs of the minority.
Now think about who may be unintentionally left out? Consider those learners who exist “at the edges” and who “can’t use your design.” A mismatch between how our content is designed — and how a user accesses or uses the content — makes the content inaccessible.
When we have limited time and resources, we tend to follow the 80/20 rule; to tackle the 80 per cent (majority needs) first — and leave the most difficult 20 per cent (minority needs) for later. However, change and innovation are found at the margins. Designing your course for the 20 per cent might take more time and resources at first, but because the result will be dynamically resilient and adaptable, it will pay off in the long term and will end up being inclusive and accessible for 100 per cent of your learners.
This section adapted from:
Where to begin? by the Inclusive Design Research Centre is licensed under CC BY 2.5 CA
The Inclusive Design Guide created by the community members of the Inclusive Design Research Centre at OCAD University is licensed under CC BY 3.0.
Accessible Content
As instructors, we have legal and ethical obligations to ensure our courses are fully accessible to all learners — including those with disabilities. We use digital resources in our courses because we believe they enhance learning. However, unless carefully chosen with accessibility in mind, these resources can have the opposite effect for students with disabilities — erecting daunting barriers that make learning difficult or impossible. For example, consider the accessibility challenges students described below might face.
-
Students who are deaf or hard of hearing are unable to access the contents of a video presentation unless it’s captioned.
-
Students who are blind or visually impaired use assistive technologies such as audible-screen-reader software or braille devices to access the content of websites, online documents and other digital resources. They depend on authors providing alternate text that describes the content of images — as well as headings, subheadings, lists and other markups that help them understand the structure and outline of the resource. To form a mental picture of a video, they rely on a narrated description (described video) to convey information about important non-verbal elements such as setting, costumes and body language.
- Some students who have learning disabilities such as dyslexia use assistive technologies that visibly highlight digital text as it’s read aloud — and are therefore dependent on text being compatible with screen-reader software (as opposed to a scanned image of a text-based resource).
- Students who are physically unable to use a mouse are unable to use interactive web and software applications unless these applications can be operated with a keyboard.
-
Students who are colour blind may be unable to understand content that communicates information solely using colour (for example, a bar chart with colour as the sole means of differentiating between the bars).
Adapted from: Module 9: Accessibility by Open Washington is licensed under CC BY 4.0.
Using Personas
Designers use personas to represent the different types of people who might access a website or product. We will use personas to help you keep in mind the types of students and their various abilities while you’re developing content. These personas will also help to introduce different types of hardware and software that students typically use.
Extend Connections
Please randomly choose one (or more!) of the following learners and read through their persona. Think about some of the content you are planning to adapt/create for your course and consider whether it would be accessible for this learner.
Krish
Krish is 17 years old. He is a future heavy-duty mechanic with a learning disability that was diagnosed in Grade 8. Krish absorbs information best by hearing it and enjoys making and fixing stuff with his hands. He’s in his first semester of college, taking trades courses and loving it. Krish can’t wait to complete the foundation courses and move into his first apprenticeship placement. He lives at home with his family; they all share one computer.
Ability: Difficulty absorbing a lot of information when reading
Aptitude: Basic technology user
Attitude: Prefers to do things himself, but can get easily frustrated or impatient — especially with technology
Assistive technology: MP3 player
Format preference: MP3 so he can listen on the go
Listen to an MP3 recording of a synthetic voice.
Felipe
Felipe is a fourth-year business administration student who is blind and embraces technology. Felipe is 28 years old and can’t wait to get his last few classes out of the way so he can start his career. He shares an apartment with his partner.
Ability: Blind since birth
Aptitude: Skilled technology user
Attitude: Digital native, early adopter, persists until he gets it
Assistive technologies:
- Screen reader (JAWS on his laptop, VoiceOver on his iPhone)
- Victor Reader Stream
- Audio recorder (to take notes)
- Refreshable braille display
Format preference: Electronic text, which he can easily use in JAWS and with VoiceOver; detests PDFs
Watch a student using JAWS (4:08-6:18s).
Listen to a computer-science student’s screen reader.
Amy
Amy is retraining to be a personal coach after she experienced vision loss and was unable to continue working as a bus driver. She is 48 years old and taking many of her classes online. She lives with her husband.
Ability: Gradual loss of vision; can easily read using a magnifier, but her eyes fatigue quickly
Aptitude: Intermediate technology user
Attitude: Has a routine and likes to stick to it
Assistive technologies:
- ZoomText
- TextAloud text-to-speech software
Format preference: PDF or electronic text that she can enlarge on her computer or listen to using TextAloud
Watch a student using ZoomText (0-1:31).
Aisha
Aisha is a college student taking university transfer courses who prefers using print books. An accident left Aisha with several physical disabilities. She is 18 years old and lives with her family.
Ability: Suffers from brain damage, paralysis and has motor issues
Aptitude: Basic computer user, intermediate iPad user
Attitude: Generally dependent on family, so enjoys reading and studying independently
Assistive technologies:
- iPad
- Motorized wheelchair
Format preference: eBook formats, such as PDF, that can be easily loaded onto her iPad
Divya
Divya is a chemistry major with ADHD, a learning disability that makes it difficult for her to concentrate. She is 20 years old and hopes to become a pharmacist. Divya lives in a dorm on campus with two other female students.
Ability: ADHD, has difficulty concentrating
Aptitude: Intermediate computer user
Attitude: Struggles at times, but is very appreciative of how much learning software helps her
Assistive technology: Kurzweil learning software (on laptop)
Format preference: Reading and listening at the same time
Watch a student using Kurzweil on a computer (1:32-4:07).
Steven
Steven is an English major who is deaf. They are 23 years old and like the flexibility of taking online classes. They currently live alone.
Ability: Native language is ASL; can speak and read lips
Aptitude: Intermediate technology user
Attitude: Can get annoyed about accessibility, such as lack of captions
Assistive technologies:
- CART (communication access real-time translation) for lectures
- Captions
- Video chat
Format preference: No preference in regards to textbook formats; but videos without captions are meaningless
Watch a video demonstration of CART. Note: this video is also captioned.
Content in the accordion menu has been adapted from Accessibility Toolkit – 2nd Edition by BCcampus is licensed under a Creative Commons Attribution 4.0 International License
Digital Content and Media Accessibility — Best Practices for Beginners
Please work through the following accordion menu to learn about some accessibility basics that you can start applying to your content right away.
For additional practical information about making your content more accessible, the Accessibility Toolkit – 2nd Edition by BCcampus (CC BY 4.0) is an excellent comprehensive resource.
The text in the first five parts of this accordion menu is adapted from Digital Content and Media Accessibility by the Centre for Teaching, Learning and Technology at UBC is licensed under CC BY-SA 4.0. Links to videos and supplementary resources have been added, as has the sixth section on multiple formats. The content in this accordion menu is licensed under CC BY-SA 4.0, which is different from the licence of the book.
Checklist for OER Accessibility
Although there is no definitive checklist for accessibility, a checklist is a good place to start to get a sense of some key elements that are used to determine the accessibility of content.
Extend Activity
Add Accessibility Design Elements to Your OER Course Plan
Return to Part 4 of your OER course planner and include information about the accessibility elements you will include in your OER. Examine the existing OER you have found and consider ways you can adapt that material to make it more accessible. For the material that you need to create from scratch, make notes about the accessibility elements that will be incorporated right from the beginning of the creation process.
