5 The Digital Experience Design Process: From Ideating to Implementation
Irina Ghilic
In this chapter, you will find…
- How to conceptualize and use multi-dimensional, step-by-step methods for creating digital experiences.
- The Design Thinking Process and the Learning Experience Design framework, along with tools you’ll be able to use in your future learning experience design.
- Tips on incorporating Design Thinking in your day-to-day work.
Why is Design Thinking important?
Design Thinking and creative problem-solving in education “can be seen as an opportunity for you to design new, improved solutions for your classrooms, schools, and communities.” – Design Thinking for Educators.
Full video with transcript [opens in new tab]
Design Thinking is a valuable process to rely on when designing experiences, especially digital ones. It helps us focus on the right problem. It fosters collaboration. The steps within the Design Thinking process also give us a framework for approaching our learning experiences in a multi-dimensional way. More on the 6-steps of the Design Thinking process in the next section: WHAT is Design Thinking?!
What is Design Thinking?
Design Thinking might sound like a new term, but the concept of “design” has been practiced throughout the ages. There are two parts to the field of Design Thinking.
- The theoretical framework: it’s a mindset, an ideology of how we can approach every learning experience design problem in a learner-centric way.
- The process: a 6-step process that is there to help you practice the Design Thinking mindset of learner-centric design.
The design-thinking framework follows an overall flow of 1) Understand, 2) Explore, and 3) Materialize. Within these larger phases fall the 6 steps: empathize, define, ideate, prototype, test, and implement.
What are the 6 steps of the Design Thinking process?
You can find the definitions and explanations for the above video in the accordion below! You can use this content whenever you need a refresher on the Design Thinking process steps.
What are the 6 steps of the Design Thinking process? [downloads in Microsoft Word]
—Adapted from Design Thinking 101 by S. Gibbons, 2016.
For a quick reminder of the Design Thinking process phases and steps, you can explore the interactive image below!
—Click in the TOP-RIGHT corner of the window above to view in fullscreen.
Resource Print: The Design Thinking Process
You can find multiple infographics for the Design Thinking process if you search the internet. We like following the one presented in this chapter (downloadable below) for its clear flow. Keep this resource handy as you’re delving into designing experiences!
“Why would I use these frameworks in my course design?”
New tools and techniques always come at a cost: time. So why would you invest your time in exploring these processes for your course and learning experience design?
To assess their benefits, let’s brainstorm some costs. How much extra work might you have to do if your learners disengage, can’t find content, or if there’s confusion with the assessments? How does that work scale up for a class of 100, 500, or 1000+ learners? Over the course of a learning experience, we inevitably spend time identifying the challenges or friction points in our learning experiences and solving them. In a class of 200, if one piece of information is unclear, your inbox might see 20 emails asking a question about that piece of information.
How might we avoid these stumbling blocks and plan for a comprehensive and great experience for both you and your learners? Since you are dedicating your very valuable time to this chapter/module, we will prompt you to practice some of the skills we’re presenting, and also apply them to your real learning experiences ideas and/or challenges!
Designer’s Tip: Building long-lasting habits
Create a habit of incorporating Design Thinking in your day-to-day work. Watch the video below for some tips on incorporating this content into your daily routine.
Full video with transcript [opens in new tab]
In this chapter, we will introduce “Check-in Point!” and “Your Turn!” activities and templates you can start filling out as you are going through this entire module’s experience. If you don’t have the mental space for the full experience at the moment, please set yourself up for revisiting it at a later time, with tools like calendars reminders, or “to-do” lists!
Check-in Point!
Drag and drop to arrange the labels in the correct sequence of the Design Thinking process!
Honing your Habits: “How Might We…?” (HMW)
For your first “Honing your Habits” prompt this week, you can practice a type of Design Thinking problem framing method: asking questions that start with “How might we…?” (HMW). This HMW way of framing and refining a problem you are trying to solve invites you and others to think about it and take action! It’s a quick Design Thinking skill you can practice anytime!
When you interact with people this week, instead of statements describing a problem or a challenge, ask the question “How might we…?” instead.
For example, if you or someone at home says “the dishes keep piling up”, turn the problem/challenge into an HMW question: “How might we enact a plan for house chores when we’re busy?”. If you’re in a meeting and someone says “There’s too much to learn about Design Thinking for it to be useful in my class”, ask instead “How might we use key, useful, and applicable points of Design Thinking to help improve our class/content design, without it being overwhelming?” (pssst, try to ask yourself this question too!).
How can you connect Design Thinking to Digital Learning Experience Design?
If you’ve missed some of our Digital Experience Design “world” definitions, you may want to take a 5-minute detour to Module 1: Exploring Terminology for the Online Learning Environment [opens in new tab]. The key term to keep in mind for the current module is “Experience Design”. We bring in the “Digital” elements when we design with some technology in mind. When we think about designing experiences with an educational component, we are talking about learning experiences.
Learning Experience Design (LXD or LX) “is the process of creating learning experiences that enable the learner to achieve the desired learning outcome in a human-centered and goal-oriented way.” (Niels Floor, 2021). Take a moment and look at this definition and compare it to the main tenets of Design Thinking. There is overlap, especially for the overarching goals of keeping the learner at the center of our focus.
NOTE: “A learning experience is designed for all who participate in the experience, not just the learner”. – Niels Floor
Niels Floor (the star of the video above) tells us that although the focus in LXD is the learner, it’s called “Learning” Experience Design because we should not forget “the educator, trainer, expert, colleague, client, friend, parent, or anyone else who contributes to the experience. Including and aligning the perspectives of these different groups of people is an important part of creating a learning experience.”
MURAL Community Boards
In this module, we created a public Community Board for each chapter, for you to reflect on the content and share ideas with this course’s community of learners! For our Community Boards, we will be using MURAL. If you’re already familiar with this tool, you can skip the following MURAL video.

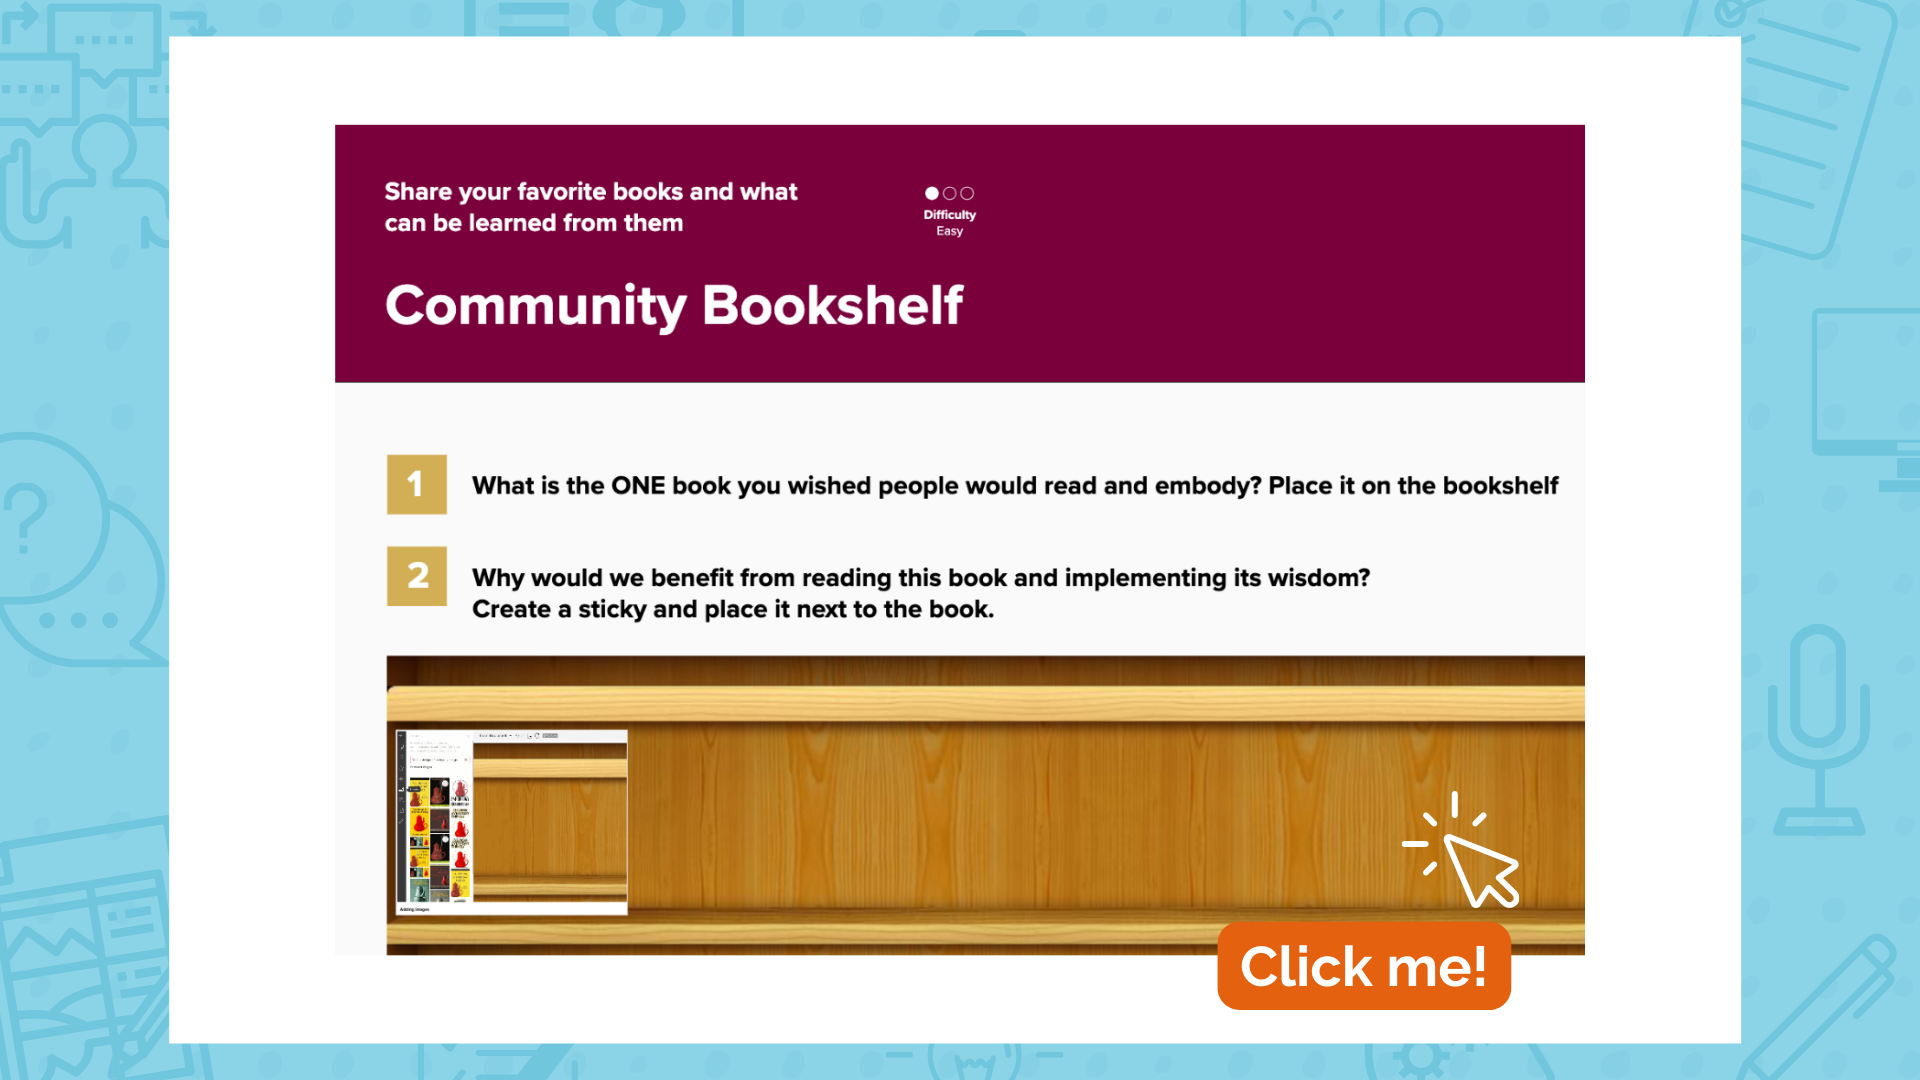
COMMUNITY MURAL BOARD: Share a book! [5-10 minutes]
To get familiarized with MURAL and share some knowledge within this community, please go to our Digital Experience Design Module 2: Community Board Books [opens in new tab]. For this activity, you do not need to have a MURAL account, so please take 5-10 minutes to answer:
-
What is the ONE book you wished people would read and embody? Place it on the bookshelf. While we are thrilled by experience design/education-related books (and we have many favourites!), we welcome any books.
-
Why would we benefit from reading this book and implementing its wisdom? Create a sticky and place it next to the book.
On the left-hand side of the bookshelf, if you zoom in, you will find an animation that explains how you can go about adding your books to the shelf.
Are you ready to think about and share a book title with your community? Visit the Digital Experience Design Module 2: Community Board Books [opens in new tab] link or click the preview image below!
MURAL Example Use Cases!
Need some MURAL help to get you started? Visit the Learning the Basics of MURAL Playlist [opens in new tab]!
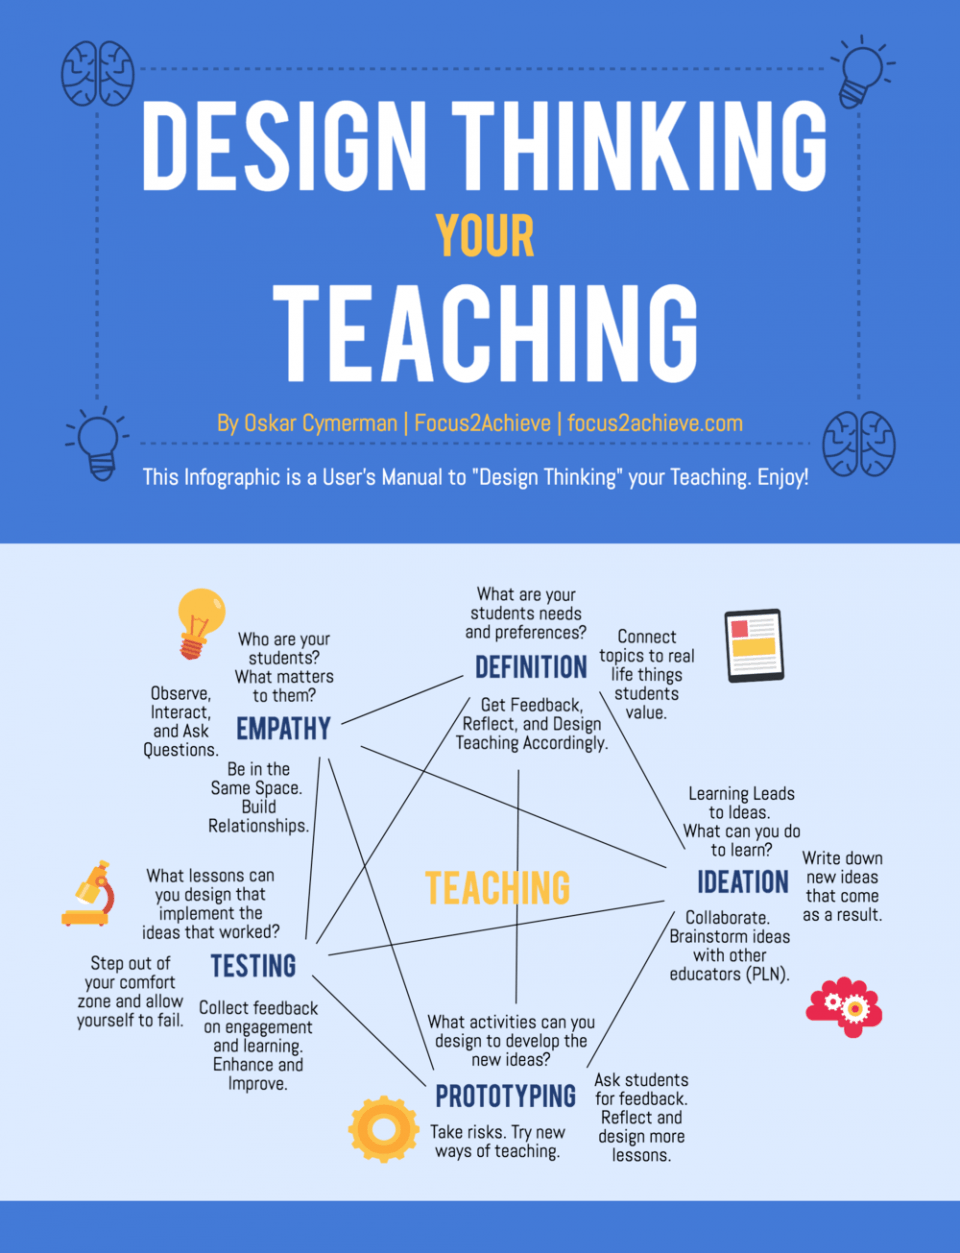
Resource Print: Design Thinking for your Teaching
There was a lot of information and application in this chapter, but you made it through with hopefully some new and exciting ideas! The subsequent chapters in this module will add important puzzle pieces to your existing Learning Experience Design framework and brainstorming.
Explore/print the poster link below for ideas on how to “Design Thinking your Teaching”. How might you use the prompts in this infographic as you’re working on your templated experiences in the next few chapters? A prompt is an actionable phrase mentioned in the infographic, such as “Brainstorm ideas with other educators” or “Take risks”. How can you expand on those?
Your Turn: Design Thinking your Teaching [5-10 minutes]
Your Turn – Design Thinking your Teaching [5-10 minutes] [downloads in Microsoft Word]
NOTE: Save all of the files generated by fillable prompts and start building your Digital Experience Design portfolio!
Chapter Takeaways and Further Resources
—Click in the BOTTOM-RIGHT corner of the window above to view in fullscreen.
Friction is anything that prevents our learners from accomplishing the intended outcomes and goals.
There are two part to the field of Design Thinking:
1. The theoretical framework: it's a mindset, an ideology of how we can approach every learning experience design problem in a learner-centric way.
2. The process: a 6-step process that is there to help you practice the Design Thinking mindset of learner-centric design.
