Resumes
An Overview of Resumes
A resume is a one- to two-page document that sums up a job seeker’s qualifications for the jobs they’re interested in[1]. Your resume includes your relevant experience, skills, education, and accomplishments. It helps you show what you can do, and convinces an employer that you are qualified and would be a good hire [2].
The purpose of your resume is to get you an interview! Your resume is your personal marketing tool: it describes and proves your accomplishments, skills, experiences, and knowledge in a way that is concise and persuasive. Because it is targeted to the reader, your resume needs to be tailored each time you apply for a new position.
Indeed is the #1 job site in the world, with over 250 million unique visitors every month. The indeed.ca web site offers free access to job seekers to search for jobs, post resumes, and research companies. This module includes several sources from the Indeed Career Guide.
A note about Indeed’s videos: You will be invited to like and subscribe to the Indeed web site, but this is not necessary for this module – it’s purely optional for you.
Myths and Facts
Types of Resumes
There are essentially 2 main types of resume. The type you choose to use will depend on your unique circumstances, especially regarding the particular job you are applying for.[3].
 There is no “one best way” to write a resume, whether chronological or functional. In fact, some say there is even a third resume format – the “combination” or “hybrid” resume – that combines the chronological and functional approaches in order to make the resume as impactful as possible for the situation. For example, a hybrid resume can be useful for people with relevant knowledge and experience gained from education and practicum, and provides the opportunity to highlight important job-specific skills and knowledge.
First is the most common type, the chronological resume. This type of resume is organized by your job history over time, and is a good choice if you have strong experience related to the target job.
The second type of resume is the functional resume. This type of resume is organized by categories of your relevant skills and accomplishments. It is a good choice if you have an employment history that is unrelated to the job you’re applying for, or your experience is limited, or contains gaps.
Using headings from resume examples or templates can be a good place to start when developing and organizing your resume. Below, you’ll find an example of both a chronological and functional resume, respectively. You can drag the green slider to compare the two formats. These examples will recur throughout the module and we’ll provide more details later on how they take different approaches to presenting your experience and skills. You may wish to download the examples via the links below so that you can follow along in a way that suits you.
Click here to view the Functional Resume example as a PDF
Click here to view the Chronological Resume example as a PDF
In addition to our examples above, if you’re a student or graduate, we recommend taking a look at the resume reference guide made available by Queen’s University You’ll find examples within the guide that speak to a range of unique histories and specializations. You can also take a look at this resume catalogue from Thompson Rivers University. As with the two examples above, you can download the one down below and follow along as you work through the module.
Resume Format
While the format of a resume can vary depending on the situation, there are some guidelines that can help you develop a standard resume:
- Your resume ought to be between 1 and 2 Letter-sized pages (8.5 x 11”) with 1” margins on all sides.
- Using headings and sections will help give structure to the content of your resume. It’ll also produce an optimal amount of white space, which will make it more pleasing to the eye.
- You’ll want to make sure that your font choice is consistent throughout the resume, that the font size of the body is between 10 and 12 points, and that the text is free of spelling, grammatical, or punctuation errors.
- Make sure you’re using a sans-serif font like Calibri, Arial, Helvetica, Tahoma, Trebuchet MS or Verdana.
- Be sure to establish consistency with things like dates or bulleted lists (don’t switch between bullets and numbers part way through)
TIP: A sans-serif font is a typeface that does not contain any superfluous flourishes—there is nothing extra that has been added.

Baskerville is an example of a “serif” font: its letters have a small line added.
Helvetica is an example of a no-serif or “sans serif” font: Its letters have no small line added.
Keep in mind that you can be flexible with headings—here are a few examples to keep in mind:
- The order and titles of your sections may vary based on whether you use a chronological or functional format.
- You do not have to separate paid and unpaid experience into 2 separate sections (e.g., Employment History vs. Volunteer Work). Instead, you can combine them under 1 “Relevant Experience” heading.
- You can have a separate section devoted to what would be of particular interest or value to the employer. For example, if you are applying for a job in marketing, and you have related experience, you could have a section devoted solely to your marketing skills, knowledge and/or experience (this is the “functional resume” approach we discussed earlier).
 Portfolio Opportunity #10 – Resume Reflection
Resume Content
Every resume can be expected to contain – and should contain – some basic information and sections, including
- Your name and contact information (address, email, phone number, LinkedIn profile URL, or link to your online portfolio if you have one);
- Information about your experiences (employment, work placements, volunteer work, or extracurricular activities);
- Information about your skills and accomplishments; and
- Information about your education.
Generally speaking, Information about key skills and accomplishments is so important that it’s usually presented both early in the resume (as highlights of qualifications or a profile/skills summary) and later on when you discuss your experience and education. The trick is to determine what information to include, what to leave out, and the order in which to place your information. We will discuss additional possible resume sections later on in this module.
Your resume is not the place to list everything you’ve ever done. In fact, the more targeted and concise you can be, the greater impact your resume will have. The greater the impact of your resume means the greater likelihood of your being accepted for an interview.
“When writing your resume, […] make it as easy as possible for employers to identify the reasons why you’re a great candidate. That means featuring the most important and relevant information first and removing irrelevant or outdated information”. [4] Check out this video that provides an overview of what recruiters are looking for in a resume. A Note on Applicant Tracking Systems (ATS)
An Applicant Tracking System (ATS) is a software used by many employers in their recruitment process. This software helps the employer to organize and rank candidates so that they can more easily select a few for interviews. This means that having a basic understanding of how an ATS works – and of what an ATS looks for when deciding which resumes to mark as “yes, interview” versus “no, not the best candidate” – will help you to have a better chance of being selected for an interview.
One thing to keep in mind is that an ATS often uses a job description or posting as a guide to finding applicants that match keywords/skills. This is why it’s important to include those in your resume. Some ATS are quite sophisticated, while others are not. Since you likely don’t know what type of ATS your target employer uses it can be a good idea to organize your resume so that it can successfully pass through the less sophisticated types of ATS, as especially complicated “or over-formatted page layouts with columns, charts or images can be hard for applicant tracking systems to read.” [5]
Here are some best practices to pass through an ATS successfully:
- Avoid headers, footers, page numbers
- Avoid columns, tables, graphs, and images
- Spell out any acronyms
- Use bullet points instead of paragraphs
- Use keywords from the job posting, if there is one
- Submit documents in MS Word format unless instructed otherwise
Portfolio Opportunity #11 – ATS Reflection
You can also save your document in .rtf format to see how it looks in plain text. Go through the document in .rtf format, then check and remove any incorrect symbols that appear in the document. You can then re-save the corrected document in a .docx format. How you save the file will be different depending on your word processor, but we’ve included an example for Microsoft Word that you can follow along with.
Resume Organization
If a recruiter only spends 7 seconds screening a new resume, where are they looking? Watch this video explaining what recruiters are looking at in that short time frame.
The Top Third of Your Resume
While there may be different approaches to crafting a resume, everyone can agree that the resume’s most important “real estate” is the top third of page 1. There are 2 things to know about this all-important section of your resume:
First: the top of page 1 is where the reader will start reviewing your resume. The very top is where the reader expects to be able to find your name and contact information. So, always place your name and contact information first. For example, here is the very top of the Chronological Resume example shared earlier:

Second: as you now know, a person reading your resume will only spend around 7 seconds reviewing it before deciding whether you make a good candidate to interview. So, make it very clear right away that what you have to offer is a good match for what the reader is looking for: do this by providing a Profile or Summary of Skills section immediately after your name and contact information. To illustrate, here is that same example again with some bulleted points as it would appear below the contact information:
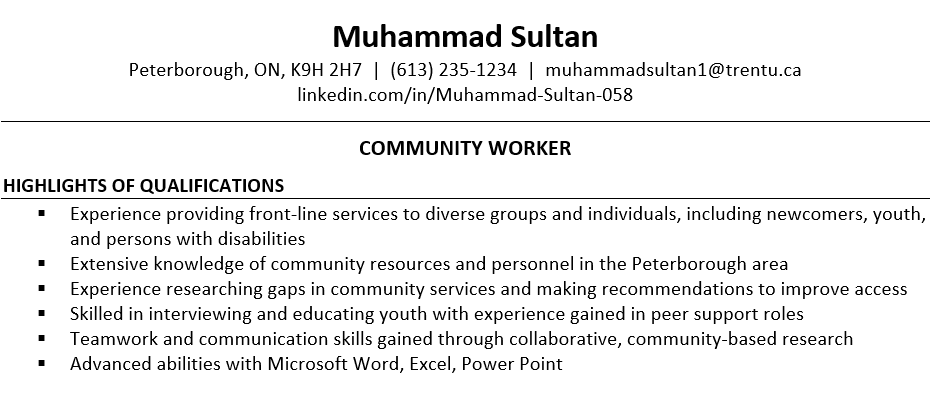
Immediately following their name and contact information, this person has indicated the work they do (or seek to do) and an easy-to-scan list of their best skills and knowledge – the Highlights – that would qualify them for the position they’re looking for.
Here is another example from earlier:
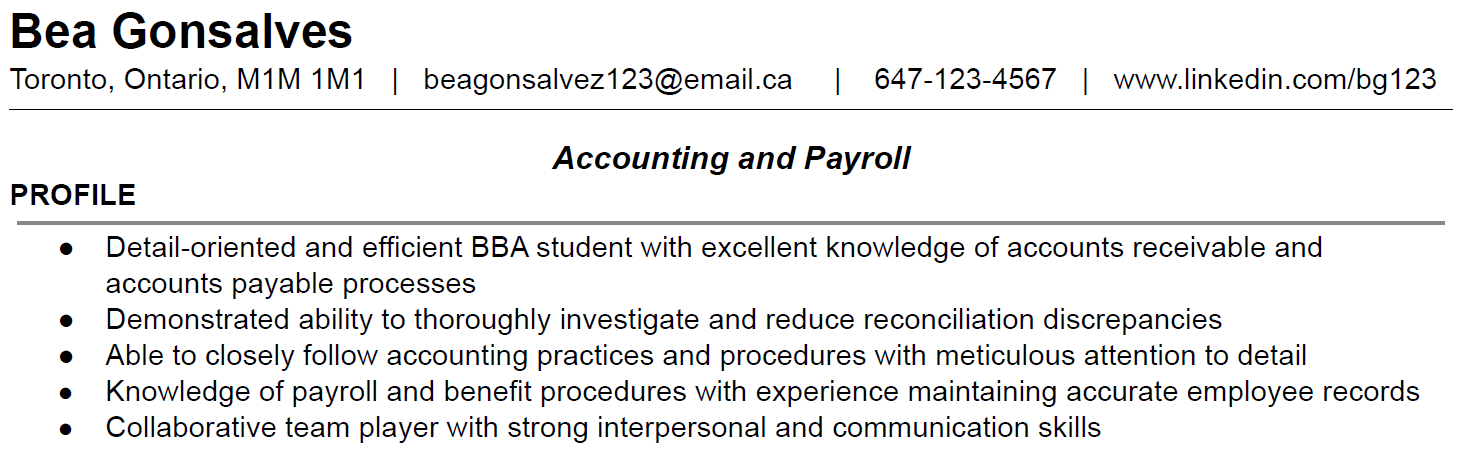
This resume uses the top third real-estate in a persuasive manner by providing their name and contact information, followed immediately by the skills and traits they want the reader to know above all else.
You will probably further elaborate on your key skills or credentials later in your resume. In other words, it’s OK if it feels a bit like you’re repeating yourself. What’s important is to use this valuable space to catch the reader’s attention and make it clear that you are worth a closer look!How to Write Your Highlights of Qualifications
Highlights of your qualifications are just that: highlights. Highlights are bite sized chunks of information designing to give someone the important details fast. You’ll want to limit yourself to 5-7 sentences in length, using bullet points quickly advertise your critical qualifications for the job goal. You can do this by following these 3 steps:
Other Resume Sections
You’ve placed your name, contact information, and summary of skills/profile at the top of your resume. What’s next? That depends on your unique background as well as the job you’re applying for. To begin, there are two questions to consider:
What other information should I include in my resume (and what should I leave out)?
Employers will expect to see information about your education and training, as well as your experience, skills and accomplishments. In some cases, providing additional information – such as certifications, awards, or memberships – can contribute to the positive impression you make. For example, you can include a section about training you have completed, such as First Aid/CPR, WHMIS, or others that show you have the knowledge needed to succeed in the job you’re applying for. Just remember that everything you include in your resume should have a purpose, and it should support your efforts to show the reader why you are the best fit for the job.
When deciding what to include in your resume, try to make sure the information is relevant and recent. Here are some practical tips and examples:
- If you have significant employment experience, you need not list any jobs that ended over 10 years ago. (Exception: If that’s the only job experience you have that is connected to your target occupation, include it.)
- If you have completed at least one year of post-secondary education, you can usually leave your high school education off your resume. If you include non-employment experience, list only those that signal knowledge, skills, or attributes that could be relevant to the job you seek (e.g. “Scouts leader since 2019” indicates leadership and community-mindedness)
- Do not include an Interests section unless you can list activities that are linked to your field of interest. For example, a person seeking employment in outdoor education may include an Interests section to highlight their passion for camping and kayaking.
After my name, contact information, and Highlights of Qualifications, in what order should I arrange the sections of my resume?
It is good practice to place the information or sections that most closely show you are qualified for the job earlier in your resume. For example, if you do not have any experience yet in a dentist’s office but you have just completed studies to be a dental assistant, you may wish to place your Education section before your Experience section.
Education Section
In the Education section, show what formal education you have engaged in. If it is a formal credential – such as a certificate, diploma, or degree – make that clear by providing the name of the credential, the institution, and the date completed (or expected to be completed). Take a look at the visual example below, taken from the earlier examples, to see for yourself:
Experience Section
Experience can come from employment, school projects, volunteer work, extracurricular activities, or experiential learning activities like a placement or practicum. There are many types of experience that you can refer to in your resume.
In the Experience section of your resume, you get to show how and where you have accomplished results in the past through the application of your skills. This section might be organized as a chronological Work History, or it may be organized functionally, setting out your valuable skills in categories or themes.
Many resume writers find it helpful to develop the Education and Experience sections of their resume before composing the Highlights of Qualifications for the top of the resume. As indicated earlier, while you don’t want to be too repetitive, it is common – and completely acceptable – to have similar information appear in more than one section of your resume.
You do not have to provide an exhaustive list of your experiences. In fact, the more selective and concise you are – and the closer you stick to what the employer is looking for – the more impactful your resume can be. “Only include the details of your past work that are especially relevant to the work you want to do next.” [6]
Chronological or Functional
“Resume format matters. Your resume is all about advertising your most valuable qualities as a candidate. If you have gaps in your work experience or are changing careers, the right resume format can help highlight your strengths while downplaying some of your weaknesses as a candidate. In a competitive job market, the right resume format can give you the edge you need to land an interview.” [7]
Chronological Resume Format
The most familiar format to hiring managers, a chronological resume places the focus on your work experience and makes it easy to see what jobs you’ve held and when. “A chronological resume shows growth and maturity by telling the story of where you started, how you advanced and what you are working toward.” [8] This format is good for job seekers with a solid history of employment, in the same or related jobs or industries, and with no significant employment gaps. The chronological resume format shows the growth of your career by talking about where you started, how you have advanced, and where you are going.
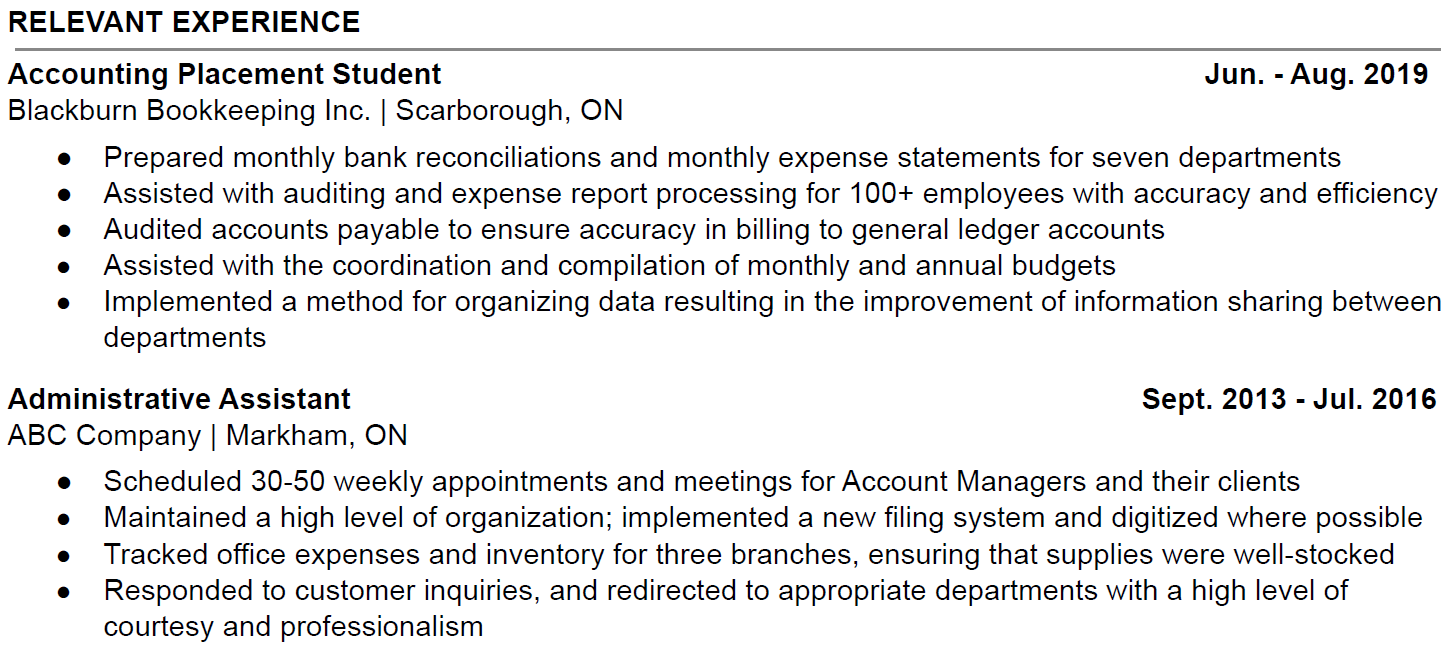
The standard chronological resume begins with your name and contact information, and is immediately followed by a Summary (or Highlights) of Qualifications. Next provide two sections, beginning with the one most closely aligned to your job goal. One is a section for your Education, and the other is your Experience. Your Experience might come from multiple sources such as employment, volunteer work, or extracurricular activities. When listing employment history, go back no further than 10 years and list the positions you have held in reverse chronological order, beginning with your current or most recent position. Be sure to provide the name of the employer, job location (city and province), dates of employment, and 4-6 bullet points with related accomplishment statements (we will look at accomplishment statements shortly).
Example 1 (Experience information in a chronological format):
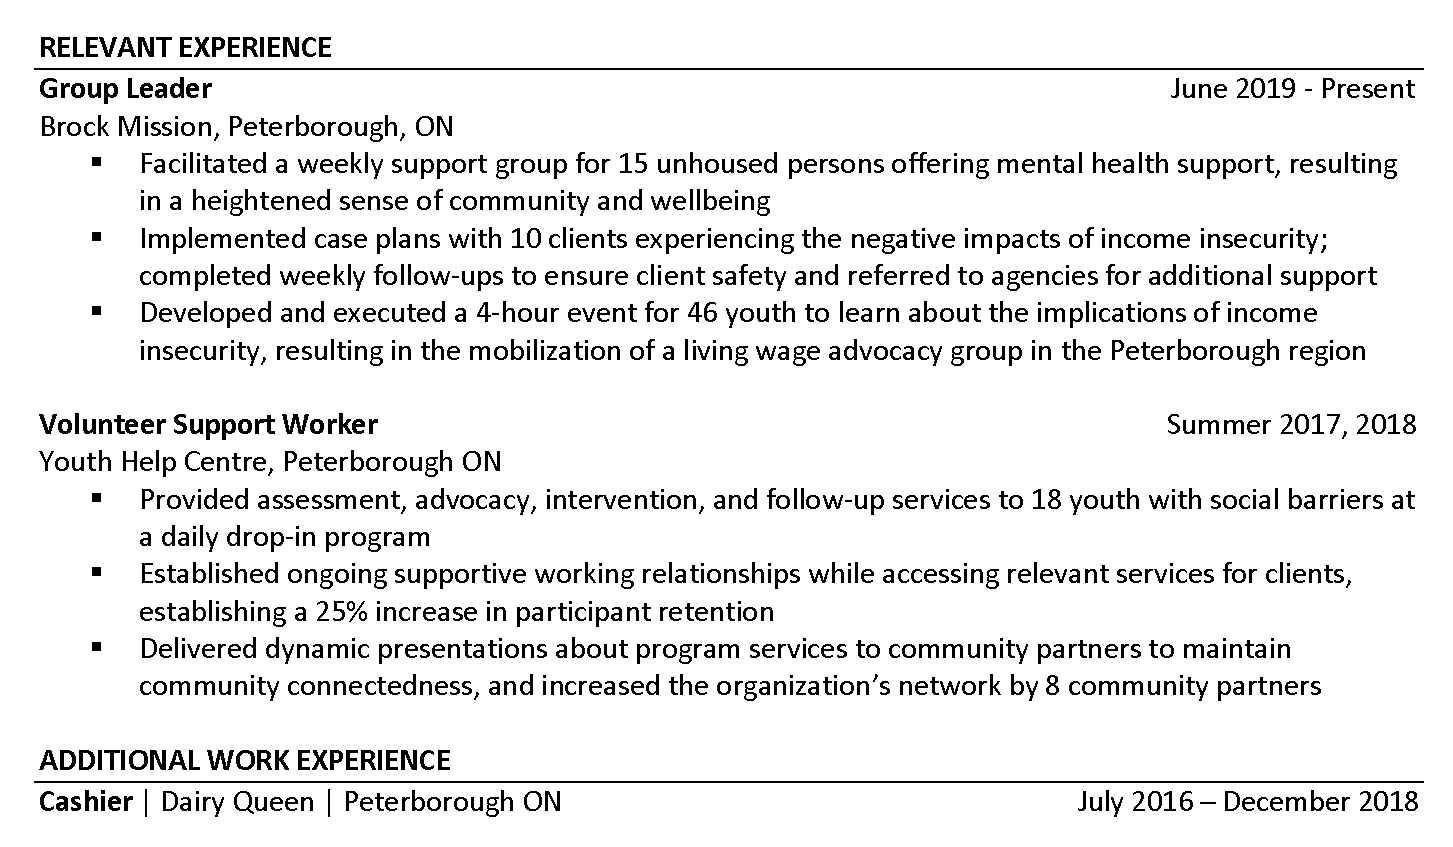
Example 2 (Experience information in a chronological format):
Functional Resume Format
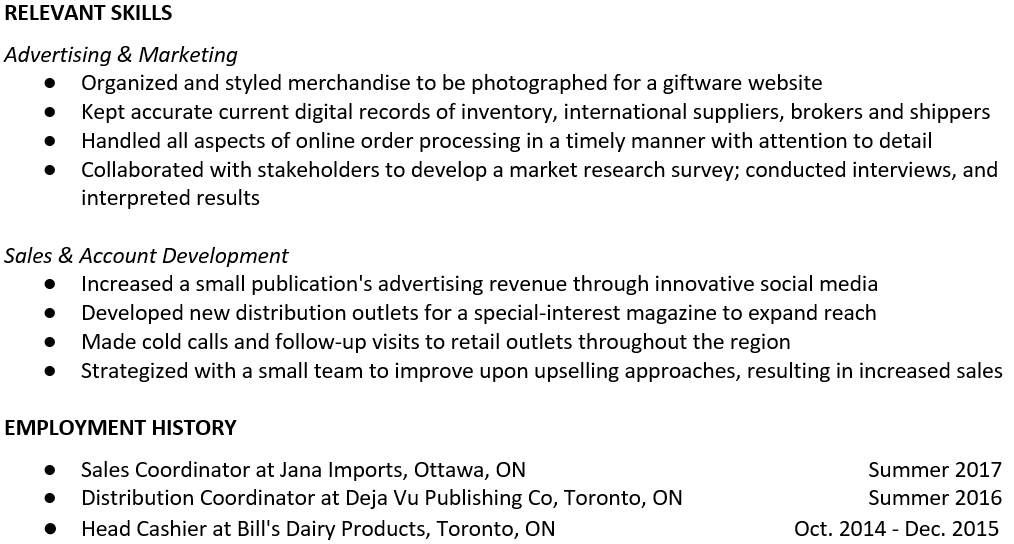
Instead of placing the focus on your work history, a functional or “skills-based” resume emphasizes the skills and experience you have that are relevant to the target job. In a functional resume, “the evidence for your value is not based primarily on your practical experience, but rather on the specific skillset you could bring to the job.” [9] While de-emphasizing where you have been so far in your career, this resume format instead emphasizes your future potential by highlighting the skills you offer. The functional resume format is a good option for people who have limited relevant work experience, have significant employment gaps, or are looking to transition into a new field or industry. The functional resume format helps to portray you as a competent and skilled individual who has the potential to succeed because you are well-equipped to handle the requirements of the target job.
Example: Functional resume (Skills and Experience information):
Earlier, we mentioned a third format: the “combination” or “hybrid” resume. If you’d like to learn more about that format, check out this article about combination resumes or download this sample of a combination resume.
Portfolio Opportunity #12 – Chronological or Functional
Accomplishment Statements
The accomplishment statement is a concept that is explained in Module 1 under the “Articulating Your Skills” heading. This section will seek to position accomplishment statements as something you can make use of specifically within the context of your resume, as they are an excellent source of content for the Experience section of your resume. You might find it useful to complete the associated activity linked above, as it will ask you to craft accomplishment statements for your portfolio that you can use in your resume.An Accomplishment Statement is a phrase that tells the story of an achievement or unique contribution you have made. It’s a success story that helps demonstrate your value to the reader by providing evidence of a past achievement. Accomplishment statements are usually used in the chronological resume format.
Use the CAR acronym to develop an Accomplishment Statement:
C is for CHALLENGE/CONTEXT: What was the challenge/context/problem/issue?
A is for ACTION: What action did you take/What skills did you use?
R is for RESULTS: What was the result/the benefit of your actions? (quantify or qualify where you can)
The example below will show you what an accomplishment statement looks like when it is all put together.
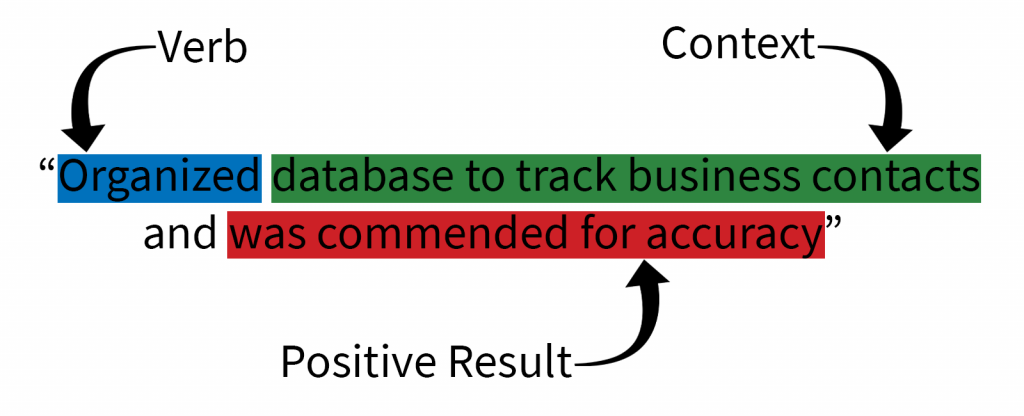
Features of an Accomplishment Statement
- It’s in the form of a single phrase (in a resume, use a bullet point).
- It includes a descriptive Action verb (what you did).
- It shows a positive Result.
- Where possible, the Context and/or Result is quantified (with a number) or qualified (with a descriptor). For example: “Served customers” would become “Served over 50 customers per day”
Accomplishment Statements are not merely a list of duties: instead of saying what you have done, you show the value you brought to the experience – and the value you can bring to your next employer. “Lead with strong action verbs and follow with an accomplishment rather than a task. Employers are interested in what you’ve achieved, not just what you’ve done.” [10] If you’re not sure how to describe your accomplishment, you can make use of this resource from ResumeGenius that lists over 100 resume action verbs!
Portfolio Opportunity #13 – Writing Accomplishment Statements (redux)
Media Attributions
- Lightbulb via Careerspace
- Sans-Serif Font Example via Trent Online
- Document File via Careerspace
- Saving as an .rtf File via Trent Online
- Contact Information Example via Careerspace
- Summary of Skills Example via Careerspace
- Summary Section via Careerspace
- Experience Section via Careerspace
- Experience Section 2 via Careerspace
- Functional Experience Sample via Careerspace
- Accomplishment Statement Example via Trent Online
- https://www.pongoresume.com/articles/391/what-is-a-resume-a-brief-overview.cfm ↵
- https://resumegenius.com/blog/resume-help/what-is-a-resume ↵
- www.indeed.com/career-advice/resumes-cover-letters/how-to-write-a-resume-employers-will-notice ↵
- www.indeed.com/career-advice/resumes-cover-letters/how-to-write-a-resume-employers-will-notice ↵
- www.indeed.com/career-advice/resumes-cover-letters/how-to-write-a-resume-employers-will-notice ↵
- https://www.indeed.com/career-advice/resumes-cover-letters/how-to-write-a-resume-employers-will-notice ↵
- https://resumegenius.com/blog/resume-help/resume-formats ↵
- https://www.indeed.com/career-advice/resumes-cover-letters/chronological-vs-functional-resume ↵
- https://www.indeed.com/career-advice/resumes-cover-letters/chronological-vs-functional-resume ↵
- https://www.indeed.com/career-advice/resumes-cover-letters/how-to-write-a-resume-employers-will-notice ↵
