LAB 5: Gram Stain and Potassium Hydroxide String Test
Learning Objectives
- Perform the Gram stain on bacterial cultures and determine cell morphology.
- Corroborate Gram stain results by performing KOH string test on bacterial cultures.
- Describe bacteria based on cultural morphology.
Introduction
In previous labs, we have been using simple staining. Simple staining uses only one dye and all cells appear the same. It is done to improve visualization of otherwise transparent bacterial cells under the microscope. Today, we will perform differential staining. Differential staining uses more than one dye and is done to differentiate some bacteria from others, based on characteristics of the bacteria.
The Gram stain was introduced in 1884 by Danish pathologist, Hans Christian Gram. Gram staining is often the first step performed in characterizing an unknown culture of bacteria. It allows bacteria to be divided into one of two groups: Gram positive or Gram negative, based on the thickness of the cell wall. There are four steps of a Gram stain. All Gram stains start with a smear.
Making Smears
Making a smear from broth:
- Draw a circle on the slide with a marker. (This gives you a target for searching under the microscope)
- Inside the circle, place two loopfuls of bacteria.
- Allow to air dry.
- Fix with 95% methanol for 2 minutes.
- Flood slide with methanol. Let sit 2 minutes
- Decant excess methanol.
- Air dry slide
- Gently blot the slide dry on bibulous paper.
- Paper towel is not used because it can leave fibers on the slide which can be confusing when looking under the microscope.
- Stain and view under the microscope, starting at 4X objective and working up to at least 40X objective.
Making a smear from agar:
- Draw a circle on the slide with a marker.
- Inside the circle, place two loopfuls of distilled water on the slide.
- Sterilize the loop then use it to pick up a small amount of bacteria off the plate. (If too many bacteria are placed on the smear, it will be too thick to see through under the microscope.)
- Swirl the loop in the water until the water is cloudy.
- Allow to air dry and proceed as above.
Gram Staining
a) Crystal violet (purple) is the primary stain. All cells are stained by crystal violet, as we have seen in previous labs.
- All bacteria that we work with in this lab have a cell wall. The cell wall is made of a mesh work of peptidoglycan (PG).
- Gram positive bacteria have a thick layer of PG, while Gram negative bacteria have a thin layer of PG.
b) Iodine is a mordant; it increases the binding of crystal violet to the cells.
c) Decolourizer contains alcohol, or acetone or mixture of the two, which solubilizes crystal violet and helps to wash it away.
- The crystal violet in Gram positives is not removed as easily as Gram negatives due to the thick cell wall.
- The goal of this step is to decolourize Gram negatives while allowing Gram positives to remain stained with crystal violet.
d) Safranin (pink) is the counter stain. All cells are stained by safranin, but it will only be visible in cells that were completely decolorized by the previous step.
- Gram negatives will show the safranin stain, while Gram positives will show the crystal violet stain when viewed under the microscope.
- Notes: A young culture is used for Gram staining. In older cultures, cells can start to break down their cell walls. This can give misleading results.
e) View the slide under the microscope to determine the Gram reaction.
- If you see very long, thin “bacteria” with pointed ends under the microscope, you are probably looking at stain crystals.
- You will be able to describe cell shape and arrangement.
Using the Microscope
Before you start using the microscope for each lab you should clean it. You cannot be sure that the previous person cleaned the microscope.
Clean the ocular lens, condensor and objective lenses with lens paper only. Do not use other materials as these may scratch the lenses.
When you are done:
a) Remove the last slide being viewed.
b) Clean the lenses and clean the oil from the 100X objective lens. Wipe the stage as it may have oil or other debris on it.
c) Turn the nosepiece so that no objective lens is in position.
d) Lower the stage to the lowest position.
Controls
Last week, you isolated bacteria from an environmental swab. This week, you will determine the gram reaction for the isolate. In order to interpret the results, you need to use a known gram negative culture and a known gram positive culture. The result of test isolate can only be interpreted if the gram positive and negative controls are the correct colours. You will be picking the controls for the experiment.
Cultural and Cellular Morphology
We know that different species of animals appear differently. The same is true of bacteria. In this lab, we will be investigating:
cell morphology– how individual cells appear and how cells are arranged relative to each other
cultural morphology– how groups of cells in pure culture appear in a test tube, on a slant, and on agar plates
By investigating cellular and cultural morphology, we can gain important information about bacteria we are working with in the lab. By being familiar with the morphology of a species you are working with, you can quickly notice if the culture has become contaminated and take steps to obtain a pure culture again.
Cellular Morphology
To examine cellular morphology, you must look at cells through the microscope. Since bacteria are so small, you will need to be using the 40X objective lens at least, and ideally you will use the 100X objective lens. When describing bacterial cells, there are two questions that you are answering:
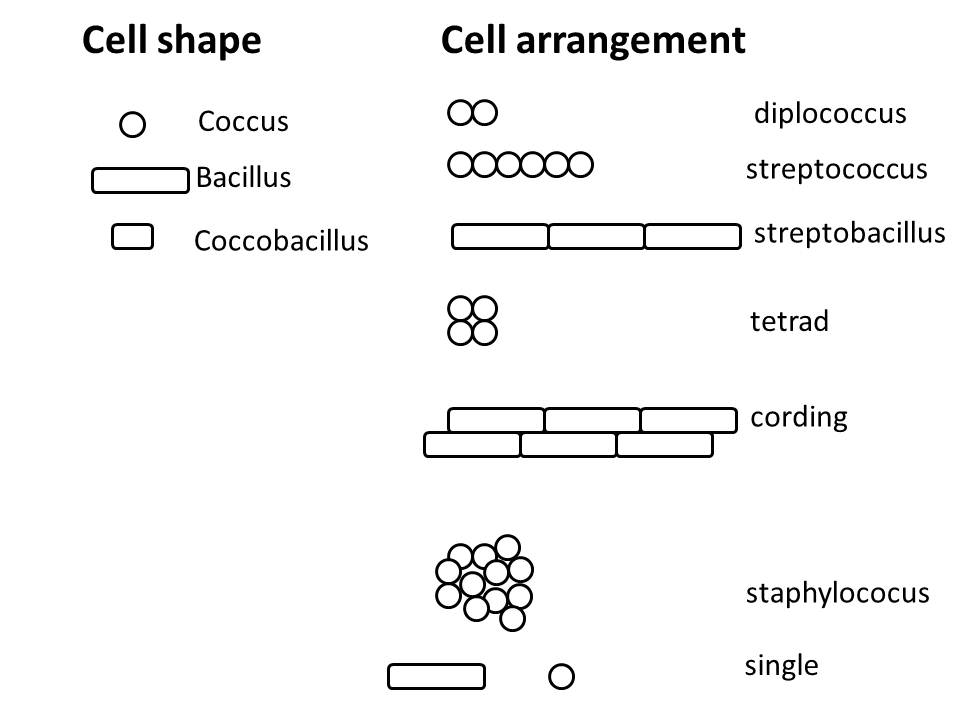
What is the shape of the cell?
Common shapes are: rod (or bacillus), coccus (pl. cocci), coccobacillus (a short rod, looks like a jelly bean), vibrio (comma-shaped), spirochete( flexible spiral), spirillium (rigid spiral)
How are the cells arranged relative to each other?
Common arrangements are: single, diplo- (two), strepto- (chain), tetrad (four cocci in a square), sarcinae (eight cocci in a cube), staphylococcus (random cluster), palisades (rods aligned along long axis)
Determining the arrangement can be difficult with a smear because cells can appear artificially close together. This is just due to cell density on the smear and has no biological relevance. Look to the edges of the smear, where there are fewer cells and they are well spread out. If you think you see an arrangement, all cells should be in that arrangement. For example, if you see two cells next to each other and you think it is the diplo- arrangement, all cells should be in pairs. Refer to figure 5.1 for illustrations of the common cell morphologies we will encounter in this lab.
Cultural Morphology
Cultural morphology can be determined in any growth medium. How the bacteria grow as a group are examined. To determine cultural morphology in broth, the bacteria are grown without shaking the test tubes. When the tubes are examined, care is taken not to disturb the cells as this will destroy the cultural features you are trying to observe.
| Broth growth habit | Description |
|---|---|
|
Turbid |
Uniform growth throughout the broth. Tubes appear cloudy compared to uninoculated media. |
|
Precipitation |
Cells are concentrated in the bottom of the tube |
|
Flocculation |
Cells are aggregated into large flocs (or chunks) throughout the medium. The flocs may settle on the bottom of the tube and can be differentiated from precipitation by the presence of chunks.
|
|
Pellicle |
A skin forms at the air-liquid interface. This is independent of growth characteristics in the tube. E.g. A turbid tube can have a pellicle.
|
|
Ring |
Bacteria aggregate on the glass of the tube where the liquid contacts the glass. This occurs independently of growth characteristics in the tube.
|
On petri plates, each colony on a plate represents a group of related bacteria, all arising from an individual cell. Refer to your lecture notes for descriptions of colony morphology.
| Surface characteristics: the appearance of the colony surface viewed from the top | |
|---|---|
| Colony surface characteristic | Description |
|
Concentric |
Concentric rings of growth |
|
Smooth |
No visible surface features |
|
Contoured |
Random elevation changes in colony |
|
Radiated |
Lines radiating out from centre of colony |
|
Wrinkled |
Surface is deeply wrinkled and looks dry |
| Texture of colony when probed with a toothpick | |
| Colony texture characteristic | Description |
|
Butyrous |
Buttery |
|
Viscous |
Gummy- cells stick to themselves |
|
Dry |
Cells crumble apart |
|
Mucoid |
Slimy |
Before your lab, fill out the table below using your lecture notes.
Table 5.3: Colony morphology on agar plates
|
Colony characteristic |
Description (can include pictures) |
|
Colony shape (form): the overall shape of the colony |
|
|
Circular |
|
|
Filamentous |
|
|
Irregular |
|
|
Rhizoid |
|
|
Colony elevation: observed by looking at the colony from the side |
|
|
Flat |
|
|
Raised |
|
|
Convex |
|
|
Crateriform |
|
|
Umbonate |
|
|
Margin: the shape of the edge of the colony |
|
|
Entire |
|
|
Undulate
|
|
|
Filamentous
|
|
|
Lobate |
|
|
Curled |
|
A note on the strains: Since bacterial strains within a species are heterogenous, often, the results you might find from an internet search do not align with our lab strain’s results. Make observations on your strains in lab.
Experimental Overview
We are doing two labs in one today: Gram staining and morphology of cells and cultures.
Bacterial Isolates
Choose one agar plate culture and a matching tube culture from Gram negatives (column A) and Gram positives (column B), and your streak plate isolate from last week.
- You will have three bacterial isolates: a plate and tube of one Gram negative, a plate and tube from one Gram positive and a plate of your unknown.
|
A: Gram negatives |
B: Gram positives |
Unknown |
|
E. coli (Ec) |
Staphylococcus aureus (Sa) |
Your isolate from last week |
|
Pseudomonas aeruginosa (Pa) |
Micrococcus luteus (Ml) |
|
|
Salmonella typhimurium (St) |
Staphylococcus epidermidis (Se) |
|
|
Proteus vulgaris (Pv) |
Enterococcus faecalis |
|
You will do three smears (one for each isolate) and three Gram stains. Examine the cell morphology during the gram stain. Observe the colony morphology on agar plates, and describe the broth growth characteristics.
Taking pictures on the microscope
- Using the microscope, centre your sepcimen.
- Increase the light source to the maximum intensity.
- Hold the camera lens against the microscope eyepiece. A small circle of light can be seen on the phone’s screen.
- Use the camera’s zoom function to increase the size of the cells.
- Move the camera lens small distances across the eyepiece to centre the circle. The auto-focus should then self-adjust to give a clear image.
- This is the most difficult step.
- Adjust the fine focus of the microscope to maximize image clarity.
- If the image is too dark or grainy, select the “darkness” or “nighttime” setting on your phone camera.
- While holding the camera very still, take a photograph. Examine the image to see if it is satisfactory.
Gram Stain and Cell Morphology Exercise
Materials
- Staining trays
- Slides
- Marker
- 95% methanol
- Gram staining reagents
- Isolates from above
Method
Refer to the beginning of this lab for a detailed procedure on making a smear.
1. On one slide, draw three circles with the marker. You will be testing your unknown strain for its gram reaction. One circle is for the positive control, one for the negative control, one for your test strain.
What are the controls that will go in the other two circles?
Positive control:
Negative control:
2. Over the staining tray, flood the slide with crystal violet. Let sit 1 minute. Gently wash the slide with distilled water by holding the slide on an angle and allowing the water to wash over the smears.
3. Flood with iodine and let sit 1 minute. Wash as above.
4. Destain with decolourizer, holding the slide on an angle and allowing the decolourizer to wash over the slide. Stop this step as soon as no more purple colour washes off the slide (the drops of decolourizer coming off the slide will be clear). Wash with distilled water as above.
5. Counter stain with safranin for 30 seconds. Wash with distilled water and gently blot the bottom of the slide dry (this prevents the slide from sticking to the microscope stage). Examine under oil immersion (you may need to adjust the light and contrast to see the colours well). Record your results below
- If either of the controls are not the correct colours, repeat the process, starting with new smears. These must be the correct colours to determine the Gram reaction for the unknown culture
- 6. View under the microscope.
|
Isolate |
Colour of cells |
Gram reaction |
Cell morphology (shape and arrangement) |
Drawing or image |
|
Control 1:____________ |
|
|
|
|
|
Control 2:____________ |
|
|
|
|
|
Environmental isolate |
|
|
|
|
7. Put the microscope away, referring to the steps outlined above in “when you are done”.
KOH String Test
KOH String test is an alternative test that may be used as a confirmatory test for the Gram stain. Gram negative bacteria cell walls dissolve with 3% KOH while gram positive bacteria cell walls are not disrupted. When the cell walls of gram negative bacteria are lysed, cellular DNA is released which makes the mixture viscous (stringy). The formation of a string in 3% KOH within 60 seconds is a positive test result and an indication that an isolate is a gram negative organism.
Materials
- 3% KOH
- Glass slide
- Culture loop
- Agar plates: Use the same cultures you used in the gram stain above.
Method
1. Place a drop of 3% KOH on a glass slide
2. Mix a loopful of bacteria into the KOH and continue to mix the suspension for about 30 seconds.
- Take bacteria from the first and second streaking area of an agar plate. You cannot take from broth as there will be too few bacteria to give a reliable result.
3. Slowly lift the loop to observe for formation of string. Indicate if the test for each organism is positive (formation of a string) or negative (absence of a string) and interpret your results.
4. Repeat for each culture.
5. Disposal: Glass slides go in the glass tray. Staining trays are dumped in the mixed inorganic waste then returned to the cupboard. Rails go back in the toolbox.
Precaution: False negatives may occur if too few cells are taken and false positive if too many cells are used if bacteria form mucoid colonies.
|
Isolate |
KOH test observation |
Interpretation (Gram positive or negative?) |
|
Control 1:_____________ |
|
|
|
Control 2:____________ |
|
|
|
Environmental isolate |
|
|
Cultural Morphology Exercise
Materials
Cultures from above experiment: gram negative plate and tube, gram positive plate and tube, your unknown
- Ruler
- wooden applicator
- magnifying glass
Methods
1. Broth culture: Observe the growth in the test tube and describe using the terms outlined above. Be careful not to disturb the tubes for other groups.
|
Isolate |
Growth in broth |
|
Gram negative: ______________________ |
|
|
Gram positive: _______________________ |
|
2. Agar plates:
- Measure the diameter of a typical colony in millimeters.
- Note colony opacity (how well light goes through it): transparent, translucent, opaque.
- Note pigmentation presence: are the cells pigmented or is pigment being secreted into the agar? What colour is the pigment?
- Record the four characteristics described in the table (margin, shape, elevation, surface).
- Using a wooden applicator, determine the colony texture.
- Take an image of your environmental isolate’s colonies on agar.
|
Species |
Diameter (mm) |
Opacity |
Pigmentation |
Colony description (4 terms) |
Texture |
|
Gram negative: _________________ |
|
|
|
|
|
|
Gram positive: _______________ |
|
|
|
|
|
|
Your isolate |
|
|
|
|
|
Making a Figure
To document your observations, you will be taking pictures and making figures for lab reports. Here is how to make them.
The specimen (plate, tube, colony) should be in focus and well-lit. Use a light box or photograph against a white sheet of paper.
Crop out the background if it isn’t conveying information.
I like to make figures in PowerPoint to easily align different images, then put the slide in presentation mode and take a screenshot of the slide. Then I crop out the background and paste the single image into Word. The image below is a composite of four images. You can also label the images with text boxes.
(generic) Figure number: Title of figure. Description of items within the figure to guide the reader.
