LAB 2: Basic Techniques
Learning Objectives
The purpose of this lab is to introduce you to skills that you will use throughout the course. You will have a chance to practice these skills today before being evaluated on them later.
- Demonstrate the process of making media and pouring agar plates
- Use a micropipette
- Perform serial dilutions
Introduction
There are many ways to categorize media. One way is to divide media based on whether it is a solid or liquid at room temperature.
- Liquid media, called broth, is usually the type found in test tubes. Bacteria grow throughout this medium.
- Solid media can be solidified with many gelling agents; in this lab, we use agar to solidify media. Solid media can be found in petri plates and in test tubes as deeps or slants.
There are two main ways to make media:
1. The cookbook method involves adding each ingredient separately. This is done when the organism is difficult to grow and needs special nutrients or if the medium is uncommon and not commercially available. This is typically done for chemically defined media where the exact chemical composition of each ingredient is known.
2. The other method involves rehydrating a powder of pre-mixed medium in water (like making a cake from a mix!). This is what is done for most commonly used media and complex media. The chemical composition of complex media is not precisely defined.
Depending on the medium your group makes, you could be making agar or broth, complex or defined, and cookbook or “cake mix” media. Regardless of the medium you are making, you will follow the same steps.
After the media has been mixed, it must be sterilized in an autoclave. An autoclave is essentially a steam cooker under pressure. It is able to achieve 121 °C for 15 minutes using increased pressure. This kills all life, including spores, in the media. If you mixed media and did not autoclave it immediately, it would quickly start to grow bacteria since the media itself, the glassware and water were not sterile.
If you are making solid media and are dispensing it into tubes before autoclaving, the media must be heated. This is to melt the agar, otherwise the agar settles to the bottom of the flask and you would have an unequal distribution of agar in your tubes after dispensing the media (some tubes would have little agar and be liquid and some, with too much agar, would be solid).
You will pour some agar plates in the lab this week:
Media Exercise
Materials
- Medium bottle
- Medium recipe (if required)
- Flask
- Weigh boat
- Metal scoopula
- Hot plate
- Magnetic stirrer
- Graduated cylinder
- Hot hands
Method
1. Carefully read your recipe found in documents in the FOL content folder for this lab. The mass of reagents required is usually given per litre. You will likely be making less than a litre. Calculate below the amount of reagents required:
| Volume of medium being made: | |
|---|---|
| Reagent | Mass |
2. Using the top-loading balance, weigh out each reagent.
- If you are weighing out multiple reagents, empty the weigh boat into the flask and clean the spatula between reagents.
- For this application, you do not need the precision of an analytical balance.
- Clean the balance with a damp paper towel after use as media powders are hygroscopic and become sticky.
3. Using the graduated cylinder, measure out the volume of distilled water required. Add gradually to the flask, stopping to mix periodically.
- A graduated cylinder offers a more precise volume measure than a flask or beaker.
- Since the volumes are large (>100 ml), a graduated cylinder is more accurate than using a 25 ml pipette multiple times.
4. Once all the water is added, drop magnetic stir bar into your flask and put it on a hot plate.
- If you are making broth, stir until the medium is completely mixed.
- If you are making agar, heat and stir. Turn the hot plate heat to maximum. Watch the flask closely because once it starts to boil, it will quickly overflow the flask, start to burn and make smoke.
Smoke will set off the sprinkler system. Please don’t make smoke.
- Once the medium becomes transparent and you see small bubbles rising up to the top, remove the flask from the hot plate.
5. If your medium is going into test tubes, use the peristaltic pump to dispense medium into test tubes. If your medium is going into petri plates, place the flask on the cart to be autoclaved.
Note: All media will be autoclaved. Petri plates will be poured after autoclaving.
6. Once agar is autoclaved, it is cooled to 60 °C then poured into petri plates in the BSC.
Pouring Agar Plates
- Open the lid of the plate like a clamshell (as if it was hinged on the far edge)
- Pour until the agar has just covered the bottom of the plate.
- Cover the plate and allow to solidify in a single layer
- Once solid, the plates can be inverted and allowed to dry before packaging for longer-term storage.
Using a Micropipette
Micropipettes are used to measure volumes less than 2 ml. Each micropipette will accurately pipette a defined volume range; different micropipettes require different tips. Do not try to use a pipette outside of its range. This can damage it. You will be using an air-displacement micropipette frequently in the lab since many experiments require small volumes. See page 6 of the Gilson pdf posted on FOL for terminology.
In our lab, you can find the following micropipettes:
| Pipette | Volume dispensed | Immersion depth |
|---|---|---|
|
P2 |
0.1 µL – 2 µL |
1 mm |
|
P10 |
0.5 µL – 10 µL |
2-3 mm |
|
P20 |
2 µL – 20 µL |
2-3 mm |
|
P200 |
20 µL – 200 µL 50 µL – 200 µL (older style) |
2-4 mm |
|
P1000 |
100 µL – 1000 µL 200 µL – 1000 µL (older style) |
3-6 mm |
You can tell which pipette you have by looking at the top of the push button.
Steps for Using a Micropipette
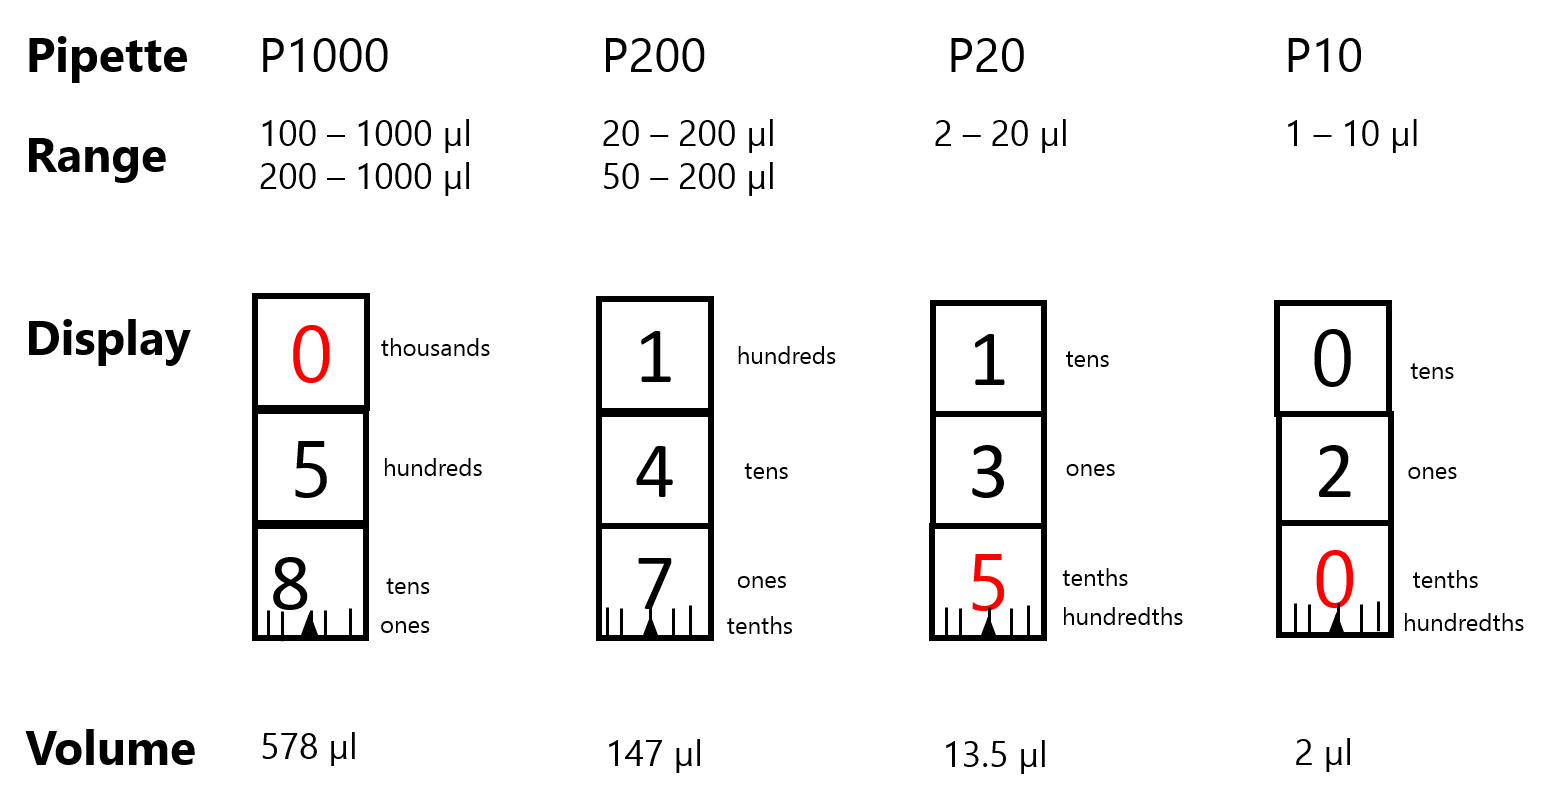
See page 17 of the Gilson pdf posted on FOL for a pictorial representation of the steps below. Figure 2.1 below shows the volume displays of the pipettes.
- Set the volume by turning the volume adjustment knob.
- Open a tip box and with one gentle twisting motion, put a tip on the top holder. Do not tap.
- The volume adjustment knob can be the same as the push button, or it might be a black dial (called a thumbwheel) at the top of the pipette body.
- For best pipetting accuracy: finish adjusting the volume clockwise. This means if you are decreasing the volume, don’t go past the target volume. If you are increasing the volume, go past the target volume then dial down to the target without overshooting.
- NEVER adjust a pipette outside of the volume range indicated. This can damage the pipette.
- Prepare for aspiration: Holding the pipette vertically, smoothly press the push button to the first stop.
- Push button can also be called a plunger.
- Aspirate the sample: Immerse the tip in the sample at the correct depth. With control, release the push button to aspirate the liquid into the tip. Wait one second to allow all the liquid to enter the tip before moving.
- Immersion depth of the tip is critical. Too shallow creates vortexes which cause incorrect volumes to be aspirated. Too deeply causes droplets to form on the outside of the tip, which also cause incorrect volumes to be dispensed.
- ALWAYS hold the pipette vertically once liquid is in the tip. If not, the liquid can enter the pipette body, causing contamination and damage to the components.
- Dispense: Rest the tip at an acute angle to the receiving vessel so the liquid runs down the walls of the vessel. Smoothly press the push button to the first stop to release the sample. Wait one second then press to the second stop to release any remaining sample. Release the tip into the tip dispense waste. Do not re-use tips. This leads to inaccurate results.
Making Dilutions
Since bacteria are small, there are often billions of cells per milliliter. In order to count the number of cells in a culture, we need to dilute the culture to a countable number of cells. Then simple math is done to determine how many cells are in the original culture, based on the dilutions that were done. When making dilutions, the stock solution refers to the substance being diluted (cells in our labs) and diluent refers to the solvent the substance is diluted into (water or broth). Figure 2.2 shows this process.
To dilute a culture, you usually make 10-fold dilutions as follows:
- 100 μl of culture into 900 μl sterile water = 1 in 10 or 10-1
- 100 μl of 10-1 dilution into 900 μl sterile water = 1 in 100 or 10-2
- 100 μl of 10-2 dilution into 900 μl sterile water = 1 in 1000 or 10-3
- This is repeated until the 1 in 100 million 10-8 dilution is achieved.
- This is typically diluted enough that all cultures will be in a countable range by this point.
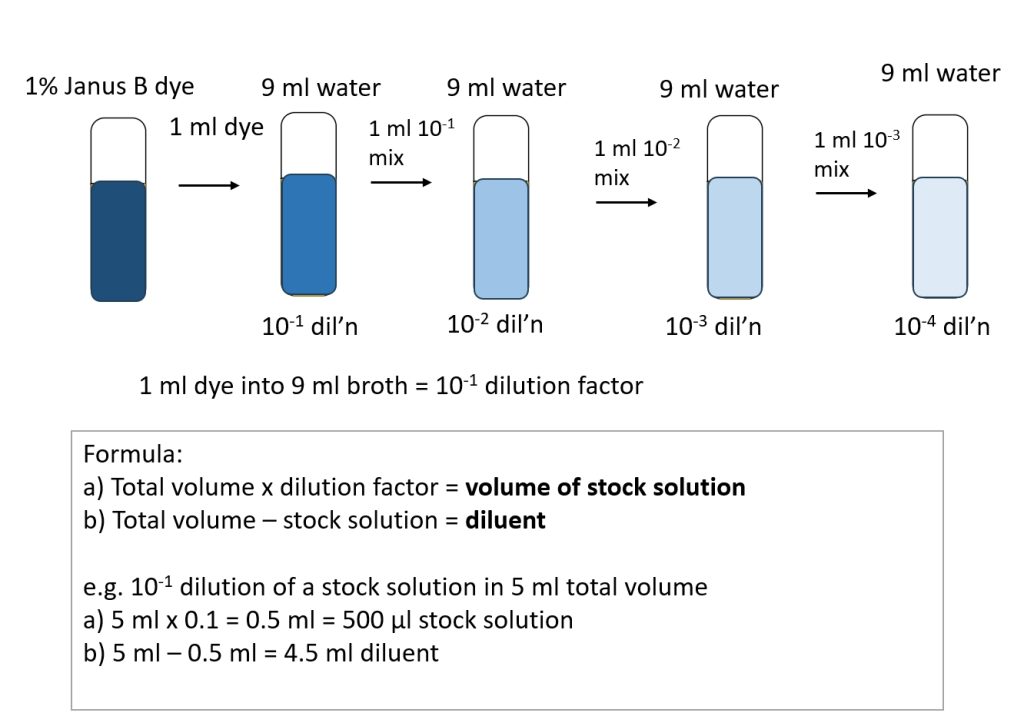
As you can see, you are making one dilution on top of another dilution. These are called serial dilutions because they are in series.
You will practice making dilutions using a micropipette with a dye solution in this lab before using bacteria in the following labs.
Dilution Exercise
Objective
Pipetting accuracy will be measured by determining the mass and absorbance of the solutions pipetted.
Materials
- Deionized water
- 3 per group member Glass test tubes and rack
- 3 x 2 ml microfuge tubes and rack per group member
- 10 ml pipette and pump
- P1000 and P200 Micropipettes and tips
- 1% aqueous solution of Janus B dye
Method
Each group member will perform these activities to get practice.
Dilute a dye solution
- Label one test tube 10-1, a second tube 10-2, and a third tube 10-3
Serial Dilutions
- Tubes 10-1, 10-2 and 10-3 will be part of one dilution series.
- Determine how much water will go into each of the three tubes. The final volume is 10 ml and the dilutions are 1 in 10.
- Add the water to each tube.
How much water and dye is added to the 10-1 tube?
| Volume of dye | µl | P1000 |
| Volume of water | ml | 10 ml pipette |
| Final volume | 10 ml |
- Add the dye to test tube labeled 10-1. Mix by vortexing gently. Be careful that the liquid doesn’t come over the top of the tube.
- The 10-2 tube is a 1 in 10 dilution of the 10-1 tube. The same volumes are used, only the 10-1 tube is used as the dye source. Mix gently by vortexing.
- The 10-3 tube is a 1 in 10 dilution of the 10-2 tube. The same volumes are used, only the 10-2 tube is used as the dye source. Mix gently by vortexing.
- Determine your pipetting precision by measuring the amount of dye in a spectrophotometer. Set the absorbance to 587 nm. Blank with deionized water. Measure the absorbance of the 10-3 tube.
Expected value: 0.129
Your absorbance value: _____________ (enter on worksheet)
To determine the percent error, divide the difference of your value and the expected value by the expected value, then multiply by 100%:
E.g. Your absorbance value was 0.8. The expected value was 0.75.[0.8-0.75] / 0.75 * 100% = 6.7%
If your value was less than the expected, you’d subtract it from the expected value in the numerator.
- Clean up: empty the test tubes into the mixed inorganic waste then rinse in the sink. Invert on a tube rack to dry. Cuvettes can be rinsed and inverted to dry.
Pipetting Exercise
To be completed by each student: This exercise is based on the principle that 1 ml of water is equal to 1 g; 1 µl of water is equal to 1 mg.
- On an analytical balance, weigh 3 microfuge tubes and record the values.
-
- I find it useful to record on the sides of the tubes.
-
- Dispense approximately 100 ml of deionized water into a beaker. Pipette the following volumes into each microfuge tube:
- 800 µl into one tube TWICE
- Pipette used (e.g. P2, P20, etc.):_____________________
- 150 µl into one tube TWICE
- Pipette used (e.g. P2, P20, etc.):_____________________
- 20 µl into one tube THREE TIMES
- Pipette used (e.g. P2, P20, etc.):_____________________
- 800 µl into one tube TWICE
- Re-weigh each tube and determine the volume pipetted. Determine your precision and the percent error like above.
- Microfuge tubes are disposed of in orange biohazard bags.
