LAB 7: Unknown Molecular Lab Part I
Learning Objectives
- Isolate the genomic DNA from an unknown species of bacteria.
- Perform 16S rDNA PCR on an unknown species of bacteria.
Introduction
We know how to isolate bacteria from the environment and how to select out certain species while not growing others (using selective and differential media). Bacteria are divided into species just like higher organisms. Members of the same species can still vary considerably; these are called strains. Consider the case of E. coli: some strains of E. coli may cause hemolytic uremia (destruction of red blood cells), some cause urinary tract infections, while another strain may be a harmless resident of your intestines. If these strains were on petri plates, they would all look similar. How would you tell these strains apart in the lab?
You will be determining the species of an unknown culture by two methods. This week and next, you will determine the species using molecular testing. In the final lab of the course, you will determine the species using culture. Then you can compare the two methods.
One way to determine the species and strains of bacteria is by isolating and testing their DNA. This is the most reliable way to determine bacterial species and is considered the gold standard. Molecular testing is also more rapid than culture, although it requires more technical skill. The results are a DNA sequence that is compared to other DNA sequences of the same gene in a database. This is much less arbitrary than determining results of bacteria cultured on differential media.
Depending on the bacterial species being identified, Public Health Ontario may have a culture-based test or a molecular test.
Let’s examine the process of identifying bacterial based on their DNA.
DNA Extraction
The first step requires you to isolate bacterial DNA from the rest of the biomolecules in the cell. The other biomolecules will inhibit the downstream reactions you will perform.
The bacteria need to be lysed to release the DNA. There are many ways to lyse bacterial cells: sonication, heat, chemicals, enzymes. These methods all work to degrade the lipid membrane and cell wall. We will be doing a boiling lysis preparation. The solution the bacteria are suspended in will being to inhibitors of the downstream reaction (these are the proteins and other small molecules in the cytoplasm). The bacteria are boiled in this solution to break open the cells. At the end of the procedure, pure DNA remains in the solution while other cellular components are bound to a particle (called Chelex) and form a precipitate at the bottom of the tube. We will use the genomic DNA-containing supernatant in the next step.
Polymerase Chain Reaction
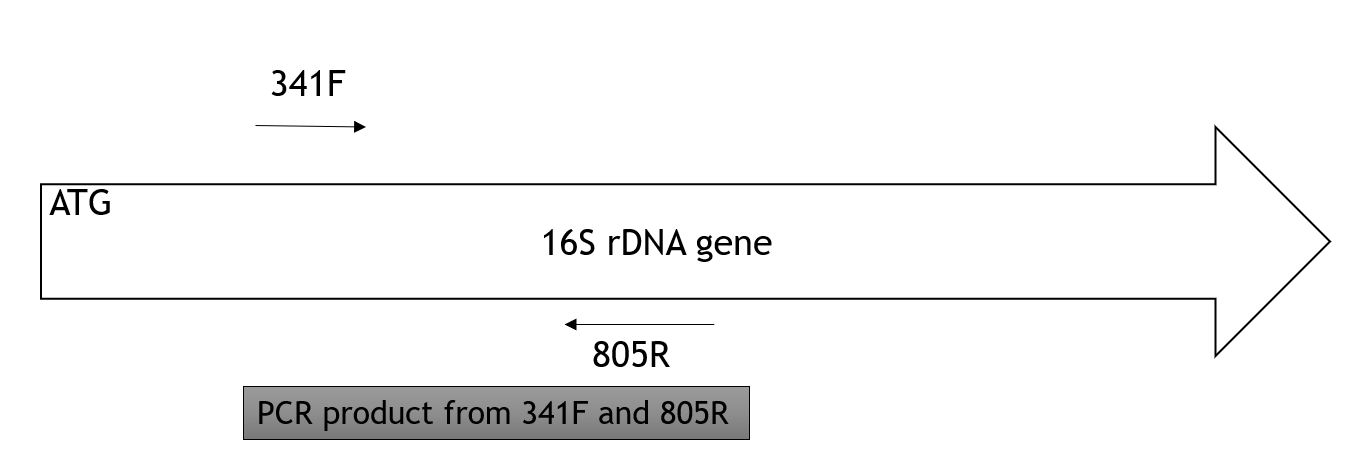
Now, you are going to amplify one gene in the genomic DNA. This gene, 16S rDNA gene, is present and conserved (has a similar sequence) in all bacteria. Remember, the 16S rDNA gene is transcribed into 16S rRNA, which becomes part of the small subunit of the ribosome. This gene is used for molecular testing because it is present and has a conserved sequence. We will amplify (increase the number of copies) of this gene so its sequence can be determined. If the 16S rDNA gene wasn’t amplified, it would exist at the same concentration as the rest of the genes on the genome and it would be difficult to determine the sequence of this gene.
The gene will be amplified using polymerase chain reaction (PCR). This is essentially DNA replication in a tube. You will mix genomic DNA with DNA polymerase (called Taq polymerase), nucleotides (adenine, guanosine, cytosine, thymidine), and short pieces of DNA called primers (ours are called 341F and 805R) that will ensure only the 16S rDNA gene is amplified.
Using a Microcentrifuge
Centrifuges spin samples inside tube at high speeds to separate cellular components. Larger particles will travel faster to the bottom of the tube than smaller particles. We will use a centrifuge today to separate bacterial cells from the solution they are suspended in. Later, we will centrifuge the lysed cells to separate the DNA in solution from the lysis matrix and large cellular debris.
Supernatant is the liquid fraction after centrifugation.
Pellet is the solid fraction at the bottom of the tube after centrifugation.
Pay attention to the lab protocol! We keep the pellet after the first centrifugation today, but we use the supernatant after the second centrifugation!
When using a centrifuge, we need to make sure we:
balance the tubes so that your tube is opposite from another tube of equal mass.
close tubes to prevent
DNA Extraction Exercise
Materials
- BioRad InstaGene Matrix
- Bacterial culture: your environmental isolate
- Micropipettes and tips
- Sterile 2 ml tubes
- Sterile water
Method
- Select bacteria to lyse
- From agar plate: if the culture looks pure, scrape up several colonies with a sterile pipette tip and resuspend in 500 μl sterile water in 2 ml tube.
- From test tube: Resuspend bacteria using gentle mixing of the tube if the bacteria have settled to the bottom. Transfer 500 μl broth to 2 m tube.
- Centrifuge at 13,000 rpm for 1 minute.
- Balance your tube with another group’s tube.
- Gently remove the supernatant by pipetting. A small amount of residual liquid will remain in the tube in either case.
- The cells are in the pellet. We are extracting the DNA from these cells.
- Using P1000 pipette (blue), add 200 μl InstaGene Matrix to the tube.
- The matrix will be stirred to keep the matrix particles in suspension while you withdraw your sample.
- In block heater, incubate at 56 ºC for 15 minutes.
- Vortex at high speed for 10 seconds.
- Place in heating block at 100 ºC for 30 minutes.
- Vortex at high speed for 10 seconds.
- Centrifuge at 13,000 rpm for 3 minutes.
- Remember to balance your tube with another group’s tube.
- DO NOT DISCARD THE SUPERNATANT THIS TIME! This is where the DNA is.
- Determine the concentration of DNA using a UV spectrophotometer (Qubit 4): In a 0.5 ml tube, mix 180 μl of Qbit reagent and 20 μl of supernatant. Measure the concentration of this.
- The Qbit will calculate the ng/μl of DNA in your original sample if it is told the volume of the sample you measured.
- You may need to dilute your DNA if the concentration is more than 5 ng/μl. We can use a maximum of 20 μl template in the PCR. 20 μl x 5 ng/μl = 100 ng
- c1v1 = c2v2
- C1 = qubit result in ng/μl
- C2 = 2 ng/μl
- Carefully transfer the tube to ice while you prepare the PCR.
PCR Exercise
Materials
- The reagents for PCR will be stored on ice.
- PCR mastermix
- Template DNA (from above)
- Forward and reverse primers
- PCR tube
Method
1. Warm up the thermocycler to 95 C.
a. This allows you to immediately start the PCR in the thermocycler.
2. Complete the following table:
|
Reagent |
Stock concentration |
Final concentration |
1 reaction volume (ul) |
|
Template |
|
100 ng |
Up to 20 ul |
|
Mastermix |
|
|
25 |
|
16S fwd primer: 341f |
100 µM |
1 µM |
|
|
16S rev primer: 805R |
100 µM |
1 µM |
|
|
DNA-free water |
|
|
|
|
Final volume |
|
|
50 |
Note: The final volume of the PCR is 50 µl. Use this value when determining the concentration of primers and volume of water in the final solution.
Primers: forward primer is 341F; reverse primer is 805R; product is 464 bp
The mastermix has the Taq DNA polymerase, dNTPs and MgCl2 (required for DNA polymerase to function).
3. Mix the reagents on ice in a PCR tube.
a. The professor will mix the negative control. This is the same as your reaction, only without template DNA.
b. The professor will mix the positive control. This is a strain of bacteria known to produce a product with the primers: E. coli
4. Place the tubes in the thermocycler and run on a program with the following parameters:
- 3 min at 94 ̊C.
- 5 cycles of [30 seconds at 94 ̊C, 20 seconds at 45 ̊C, 30 sec at 65 ̊C]
- 35 cycles of [20 seconds at 94 ̊C, 20 seconds at 55 ̊C, 30 sec at 72 ̊C]
- 5 min at 72 ̊C,
- 4 ̊C hold
Note the placement of your tubes in the thermocycler. Sometimes the markings are removed during the reaction.
Once the PCR is complete, put your tubes in the freezer for next week.
