LAB 3: Bacterial Growth
Learning Objectives
The purpose of this lab is to introduce you to methods of measuring bacterial cell numbers and working with bacteria aseptically.
- Practice aseptic work on the benchtop.
- Use a Biological Safety Cabinet (BSC).
- Calculate the number of bacterial cells in a culture based on colonies in a dilution (colony-forming units on an agar plate).
Introduction
One of the tests done on bacteria is a growth curve. This allows you to determine how quickly the bacteria grow over time. You can also learn about the preferred environment of the bacteria by modifying the growth conditions and observing how growth changes. Bacteria have optimal temperatures, pH, salinity, oxygenation, and nutrient concentrations for growth.
To perform a growth curve, we must take an aliquot (a subsample) of the culture at defined times. This sample is measured in a spectrophotometer at 600 nm to determine the optical density, or relative number of cells in the sample is determined. At the same time, the sample is put on agar plates (called “plating”) to determine the number of colony forming units (CFU) per milliliter.
Typically, growth curves take many hours and up to several days to complete. You must continue to take readings until the bacteria enter stationary phase. Since our lab period is only three hours, we must perform this growth curve in a different way. In this lab, we will use a culture of exponentially growing E. coli. These bacteria were grown overnight in broth. This morning, that overnight culture was used to inoculate a new flask of broth. We will be hopefully sampling the bacteria while they are in exponential phase.
You will be measuring growth in your flask every 30 minutes for two hours. In total each group will take five optical density measurements.
| Sample namea | Reading 1 (min) | Reading 2 (min) | Reading 3 (min) | Reading 4 (min) | Reading 5 (min) |
|---|---|---|---|---|---|
|
E. coli |
0 |
30 |
60* |
90 |
120* |
|
Pre-grown E. coli |
60 |
90 |
120 |
150 |
180 |
* The asterisk indicates the time points for which you will determine cell numbers by plating.
Growth rate calculations
Indirect growth rate
Plot the data on a graph with OD on the y-axis and time on the x-axis. From the complete growth curve, we can determine the growth rate of the bacteria, and the generation time. Generation time (g) is the time for one generation.
The units of time are defined by values used in the equation. E.g. Generation time will be in minutes if you use minutes in the equation or it will be in hours if you use hours in the equation.
Calculating generation time from the growth curve:
Determine where exponential phase is on the graph. We have attempted to align the bacterial growth with your lab period so the bacteria will be in exponential phase during the two hours that you take measurements. During exponential phase, growth is steady, or occurring at a constant rate.
You can determine growth rate by two different methods using a graph.
Method 1 (less accurate)
- Choose two optical densities in exponential phase, one that is double the value of the other.
- Draw a horizontal line from the y-axis (optical density) to the growth curve. Now draw a vertical line from the growth curve to the x-axis (time).
- Repeat this for both optical density lines.
- Subtract the greater time from the lesser time to get the generation time (g).
Example: Growth Rate of Salmonella typhimurium (Method 1)

- The culture is at OD 0.4 around 3.5 hours and it’s at OD 0.8 at about 6 hours.
- Since these optical densities are double, we can subtract the times to get an approximate doubling time: 6-3.5 = 2.5 hours
Method 2 (more accurate)
Use the equation of the line to calculate x intercepts. Determine the equation of the linear portion of the line, then calculate x for two y values that are double each other.
Example: Growth Rate of Salmonella typhimurium (Method 2)
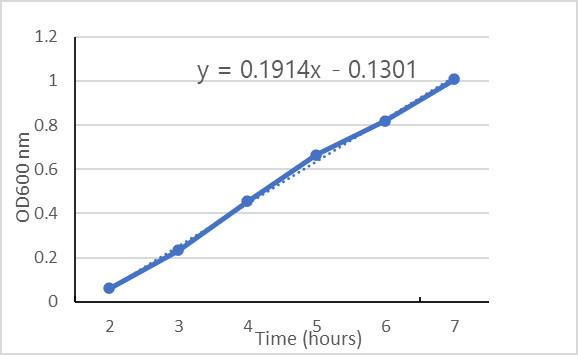
In Figure 3.2, the lag and stationary phase points were eliminated from the graph, leaving only exponential growth.
The equation of the line for absorbance values over time is linear:
[latex]y=0.1914x–0.1301[/latex]
Re-arranged, this is
[latex]\begin{align*}x=\frac{\left(y + 0.1301\right)}{0.1914}\end{align*}[/latex]
Calculate [latex]x[/latex] for [latex]y=0.4\;\text{OD}[/latex]:
[latex]\begin{align*}x&=\frac{\left(0.4+0.1301\right)}{0.1914}\\[1.5ex]x&=2.7\end{align*}[/latex]
Since the [latex]x[/latex] axis starts at 2 and not 1, we need to add 1:
[latex]2.7 + 1 = 3.7\;\text{hours}[/latex]
Calculate [latex]x[/latex] for [latex]y = 0.8\;\text{OD}[/latex]
[latex]\begin{align*}x&=\frac{\left(0.8+0.1301\right)}{0.1914}\\[1.5ex]x&=4.9\end{align*}[/latex]
Since the [latex]x[/latex] axis starts at 2 and not 1, we need to add 1:
[latex]4.9+1=5.9[/latex]
Now subtract to determine the doubling time:
[latex]5.9–3.7=2.2\;\text{hours}[/latex]
Direct growth rate
Generation time can also be calculated from the number of cells at two time points in exponential growth using the following formula:
[latex]\begin{align*}g=\frac{t}{3.32\left(\log N_2 - \log N_1\right)}\end{align*}[/latex]
Where:
- N2 is the CFU/ml at time 2
- N1 is the CFU/ml at time 1
- t is the time difference between N2 and N1
Cell density calculations
You will need to determine the number of cells in the flask for each time point. Since there can be billions of bacteria in a single test tube, we need to dilute the sample in order to count the bacteria. You will be performing serial 10-fold dilutions (you did last week with dye). The dilutions you perform depend on how long the sample has been growing (if the sample has been growing for a long time, you will need to perform higher dilutions).
Each series of dilutions will be plated onto the same agar plate. This technique is called drop plating. You will drop 20 ul of each dilution into its own spot on the plate. After incubation, count those drops that have over 8 colonies and clearly distinct colonies. The upper limit is what you can resolve with your eyes or a Quebec colony counter. You will likely only be able to count one or two dilutions per series.
If there are too many colonies to resolve, record the result as TNTC (too numerous to count).
- In figure 3.3, dilutions 10-1 to 10-4 are TNTC
If there are less than 8 colonies, record the result at TFTC (too few to count).
- In figure 3.3, the 10-6 dilution has only 2 colonies and is TFTC
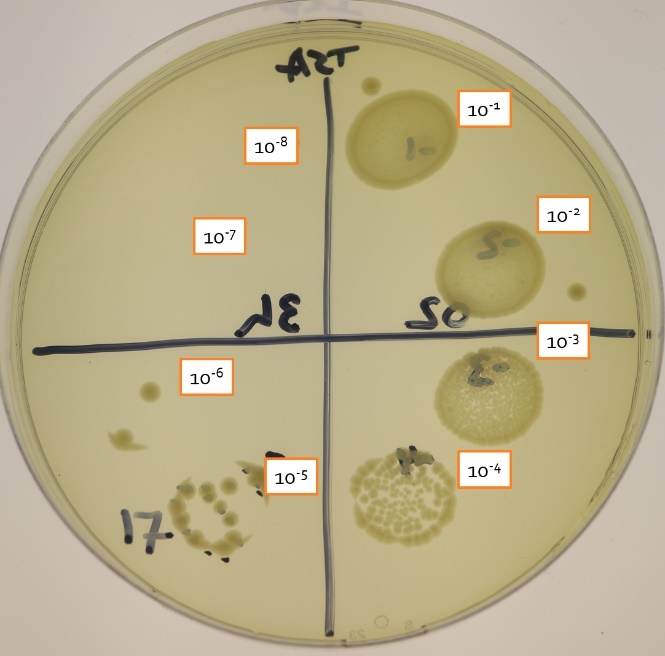
Determine the plating factor. Remember, we are determining CFU/ml. There are 1000 μl in 1 ml. If you plated 25 μl, therefore:
[latex]\text{Convert}\;25\;\mu l\;\text{to}\;ml=0.025\;ml[/latex]
- You must divide the number of colonies you counted by the plating factor to calculate the CFU/ml of the dilution you counted the cells at. In this case, the plating factor is 0.025 ml.
[latex]17\;\text{CFU}/0.025 ml = 680\;\text{CFU per}\;ml\;\text{of the}\;10^-5\;\text{dilution}[/latex]
2. Lastly, account for the dilution that the cells were counted at. This can be accomplished by multiplying by the reciprocal of the dilution (e.g. “per 10-5 dilution” becomes 105 in your equation):
[latex]\begin{align*}680\;\text{CFU}/ml\times 10^5=6.8\times 10^7\;\text{CFU}/ml\end{align*}[/latex]
The general steps for calculating cfu/ml are:
- Account for the plating factor.
- cfu/plating factor = cfu/ml of the dilution plated
- Account for the dilution factor.
- cfu/ml x dilution factor
Aseptic Technique
We need to work in a manner to reduce contamination of our sample with organisms found on our bodies and in the lab environment. To create this environment, we use a practice called aseptic technique. There are four main requirements for performing aseptic technique.
Sterile work area
Before starting work in the lab, wipe down your bench with disinfectant. This kills organisms that have landed on the bench from dust in the air, and from previous students’ work in that lab.
We will be using Bunsen burners to provide a sterile work area. The Bunsen burner is also used to sterilize metal utensils, and to allow sterile containers to be opened by passing the container through the flame.
Additionally, groups will take turns in the biosafety cabinets (BSCs). This is a work area that maintains sterility by the air flow and not through the use of a flame.
Personal hygiene
Although you wear gloves for all activities in this lab, it is good laboratory practice to wash your hands before and after each lab session. Wearing a lab coats prevents organisms on your clothes from contaminating the work area.
Sterile reagents and media
All bacterial media must be sterilized prior to its use to prevent contamination. Media is sterilized in an autoclave, a large unit that uses pressure and steam to achieve an internal temperature of 121 ̊C. Some reagents can be autoclaved, while heat-sensitive reagents must be sterilized by other means.
Sterile handling
When attempting to make a pure culture of bacteria, you must use a bacterial sample and sterile bacterial media. The media must be handled aseptically to prevent its contamination. Only open the media when it is near the Bunsen burner, and only when it is about to be used. If the media is in a glass container (usually a bottle or flask) follow these steps:
a) Pass the neck of the container (the part near the opening) through the flame.
- Do not hold it in the flame or it will heat up and prevent you from opening the container
b) With one hand holding the container on an angle, open the container with the other hand.
Holding the container on an angle prevents airborne organisms from falling into the container.
c) Pass the neck of the now open container through the flame.
d) Perform the desired task: insert a sterile inoculating loop, pipette, etc.
e) Pass the neck of the open container through the flame.
f) Close the container.
You have been holding the lid of the container and a utensil in your other hand since opening the container. Try holding the lid in your pinky and ring fingers, and the utensil with your thumb and index fingers. If the lid is too large, place on the bench near the flame, sterile side down.
Aseptic technique tips
Perform these tasks as rapidly as is possible to limit contamination. In the beginning it will take you longer than after some experience.
Avoid talking, singing and whistling while performing aseptic technique to limit contamination.
Never leave culture media open for even a short time, unless you intend to throw it out after (culture media examples: petri plate, test tube, flask of media).
For most inoculations, you will use a metal loop to transfer bacteria. This loop must be made red hot along the entire length of wire prior to opening the culture media. Cool the loop by touching to sterile media before transferring bacteria.
Keep flammables away from the flame. Frequently, 70% alcohol is used to sterilize glass utensils. Do not place hot utensils in the alcohol.
Using a Biological Safety Cabinet (BSC)
Our lab has two class II BSCs. These are work areas that have regulated air flow. The air inside the cabinet is filter-sterilized and under negative pressure. There is a wall of air preventing air from inside the cabinet from entering the room and from contaminated room air from entering the cabinet.
Procedure for using the BSC.
1. Turn on the blowers 5 minutes before running.
2. Spray the entire inside work surface with 70% alcohol and wipe down.
3. Assemble the equipment you will be taking into the BSC.
- Note: you cannot use a flame in the BSC, so no metal loops can be used. Instead, we can swab with sterile wooden applicators.
- Wipe all objects that are hard-surfaced with 70% alcohol.
- You will probably need pipettes, tips, a waste container.
4. Place the objects inside the BSC.
- Place in a logical order that allows you to work across the BSC from cleanest to dirtiest.
- Keep objects off the front grill and keep space between the objects and the walls of the BSC.
5. When working in the hood, minimize movements to prevent disturbing the airflow. This prevents outside air from mixing with BSC air.
- Especially limit lateral (side-to-side) movements and the number of times your arms enter/exit the BSC.
6. To prevent aerosols in the BSC, keep a lid over open containers of media and bacteria.
7. When you are done in the BSC, remove your items. Wipe down the inside with alcohol and allow the blowers to run for 5 minutes after you’ve exited before shutting it off.
Note: You can use either the Bunsen burner on your benchtop or the BSC to work aseptically. Please try to get BSC experience this lab or next week before being evaluated on this skill.
Growth Exercise
Objective
To determine the growth rate of E. coli in Luria Bertani broth.
Materials
- 16 microfuge tubes
- P100 pipette and yellow tips
- P1000 pipette and blue tips
- 2 older agar plates
- 6 Cuvettes
- Sterile water
- Sterile Luria-Bertani broth
- Flask of E. coli culture
| Reading | Spectrophotometer | Dilution and plating |
|---|---|---|
|
1 (0 h) |
Reading |
|
|
2 (0.5 h) |
Reading |
Prepare tubes for 1 h plating |
|
3 (1 h) |
Reading |
Dilute and plate |
|
4 (1.5 h) |
Reading |
Prepare tubes for 2 h plating |
|
5 (2 h) |
Reading |
Dilute and plate |
METHOD
1. Spectrophotometer readings: Take every 30 minutes for 5 in total.
- Prepare the blank by putting 1 ml of liquid into a cuvette. Reserve this for all your future readings.
- What will be the solution to zero the instrument? What are the cells suspended in?
- Adjust the instrument to 600 nm then zero it with the blank.
- Aseptically transfer 1 ml from the flask to a cuvette. Read immediately.
- If the reading is out of range of the spectrophotometer (>1.0 absorbance), you will need to dilute the culture in the cuvette. If you have 1 ml of culture, add 1 ml broth. Then, you will need to multiply the absorbance value by 2.
- Return the flask to the incubator.
|
Time |
Spectrophotometer reading |
|
1 (0 h) |
|
|
2 (0.5 h) |
|
|
3 (1 h) |
|
|
4 (1.5 h) |
|
|
5 (2 h) |
|
2. Drop plates for cell enumeration: Done at reading 3 and 5 only.
- Label 8 tubes with “10-1” to “10-8”
- Add 900 ul sterile water to each tube
- Add 100 ul culture to the 10-1 tube. Change your tip.
- Vortex the 10-1 tube then transfer 100 ul from this tube to the 10-2 tube. Change your tip.
- Vortex the 10-2 tube. Repeat the process until you have vortexed the 10-8 tube.

- Divide a petri plate into 8 sections by drawing 4 lines across the plate (Figure 3.4). Label each section with a dilution name.
- Starting at the most dilute sample (10-8), place 20 μl onto the appropriate section.
- Keeping the same tip, now drop the 10-7 dilution onto its section. Repeat until all dilutions have been plated.
- Keep the plate open and near the flame until the drops have dried. Then invert the plate.
- Incubate the plate at room temperature for 24 hours (or 37 C for 18 hours). Count colonies if the drop has 8 or more colonies. Determine CFU/ml. Use the Quebec colony counter. It has a magnifying glass to allow you to count smaller colonies within the drops you plated.
