LAB 4: Isolation Exercises
Learning Objectives
- Culture bacteria from the environment.
- Use streak plating to obtain pure cultures of bacteria.
- Outline the components of a Bunsen burner.
- Practice lab techniques that limit bacterial contamination.
Introduction
Our world is full of bacteria. With few exceptions, every surface and every organism in nature is colonized by numerous species of bacteria. The challenge of the lab worker is to separate the species of interest from all the other species present in that environment. To accomplish this task, the lab worker must establish the species of interest in pure culture. Pure culture means only one species of bacteria is being grown in a population. If more than one species is present, the undesired species are contaminants.
To get a pure culture, the lab worker must isolate one bacterial cell from all the rest in an environment. When that one cell is placed in sterile growth medium, that cell gives rise to new cells as it divides. Growth medium is the substrate on which bacteria are grown; it meets all the nutritional requirements of the species it is meant to grow. In this lab, you will learn how to isolate bacteria and grow a pure culture.
Isolation Techniques on Petri Plates
There are many ways to isolate bacteria in pure culture. We will discuss techniques that involve agar plates. The goal of the below techniques is to isolate cells which will then grow into isolated colonies. The isolated colony can then be selected by the lab worker and inoculated into sterile media.
Streak plate
Bacteria are spread on an agar plate using an inoculation loop to get isolated cells. These cells give rise to a colony of clones after an incubation period. The bacteria are usually “picked” from another agar plate from a complex sample and non-isolated colonies.
Streak plates are used in conjunction with other methods of isolation. For example, an environment may be swabbed and put on an agar plate, then bacteria selected off the plate for isolation on a streak plate. This is what we will be doing.
Pour plate
The sample is added to melted agar then poured into a petri plate. Individual cells are isolated and grow into colonies in the agar matrix. The sample may need to be diluted to achieve isolated colonies. For example, if you have one billion bacteria per ml of saliva and you plate 1 ml of saliva on a petri plate, you will not be able to resolve one billion colonies on one petri plate with your eye. This sample would need to be diluted to achieve isolated colonies.
Swab culture
Bacteria in an environment can be cultured by removing them from the environment with a sterile swab. The swab is squiggled across a perti plate, then bacteria are isolated in pure culture using a streak plate. Figure 4.2 shows the pattern of swabbing an object: Swab is passed horizontally first (blue line), then vertically (red line) across the area being swabbed. Next, the swab is then squiggled across the entire width of the plate starting at the top and proceeding to the bottom.
After incubation, bacteria have grown all over the petri plate surface (Figure 4.2 right). Isolated colonies can be selected and purified by streak plating to obtain a pure culture. The bacterial strain that you isolate will be characterized in your following labs.
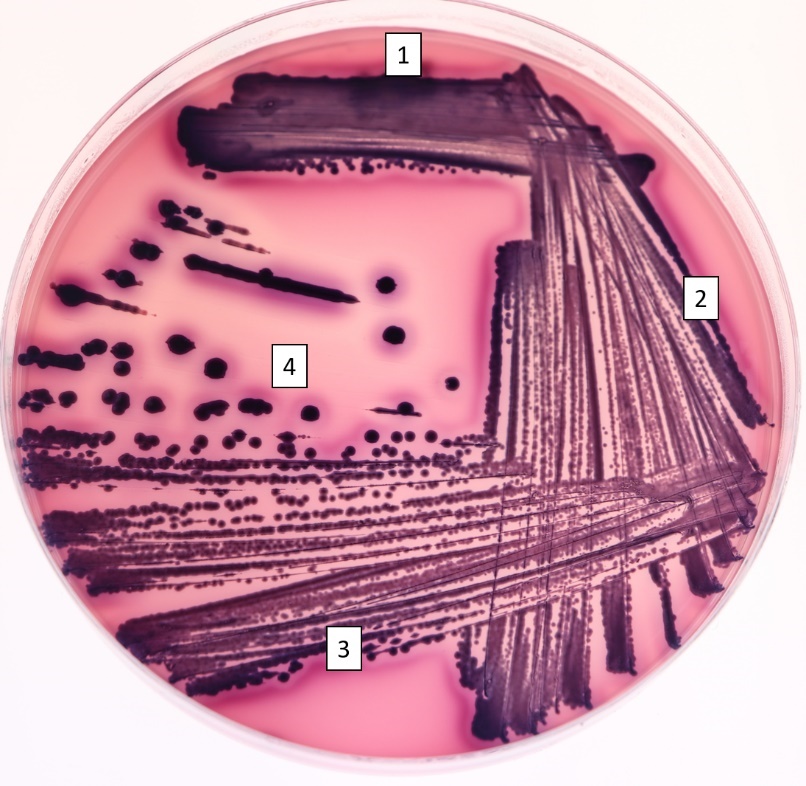
We are going to use an agar growth medium that is selective for Gram negative bacteria because most of the tests we will perform in the coming weeks are for Gram negatives. The medium we will use for swabbing is Violet Red Bile Glucose (or VRBG for short). This medium has glucose and neutral red; fermentation of glucose creates acids which creates pink colonies in enteric bacteria. Gram positive bacteria and non enterics (bacteria that live in our intestines) are inhibited by bile salts and crystal violet. Some nonenteric Gram negatives may have grey colonies. The pink colonies you see should be Gram negative enteric bacteria.

Taking Pictures in the Microbiology Lab
One of the best ways to record observations is through a picture. During this course, you may want to take pictures of plates and tubes. To take pictures safely:
- Remove your gloves and wash your hands then retrieve your phone.
- Your partner keeps their gloves on and manipulates the cultures.
- Place the cultures in the BSC for an image if you must remove the lid of the petri plate due to condensation
- As soon as you are done taking pictures, put your phone away so it doesn’t become contaminated.
- When you are taking the picture, make sure the specimen is:
- in focus
- well-lit: you can use a lightbox that lights plates from the back for this purpose too.
- most of the field of view
To use these images effectively in your lab reports
- re-size small images by dragging from the corner of the image to maintain the correct aspect ratio
- crop the image to remove background
- label the data in the image with a figure legend below the image
Bunsen Burner Exercise
Materials
Bunsen burner
Method
1. Close the collar of the Bunsen burner by turning it clockwise so there is no air gap at the base of the burner. Light the flame.
- What colour is the flame with the collar closed?
2. Slowly open the collar by turning it counterclockwise.
- What colour is the flame with the collar opened?
3. Turn the needle valve.
- What effect does the needle valve have on the flame?
Aseptic Technique Exercise
Materials
- Bunsen burner OR BSC
- Inoculating needle
- Inoculating loop
- Mixed culture of Salmonella typhimurium and Staphylococcus aureus
- Tube of nutrient broth
- Slant of nutrient agar
Methods
1. Set up the Bunsen burner and arrange your lab bench so you can work quickly and efficiently once performing aseptic technique.
- Or alternatively, set up the BSC to prevent air flow disruptions.
2. Tube to tube transfer: Using the inoculating loop, transfer a loopful of bacteria from the culture to a tube of sterile media. Label your tube with the name of your lab group, the date, and the inoculum.
- Test tubes are used for routine growth of bacteria.
- If you are in the BSC, use a sterile wooden applicator instead of the loop
3. Tube to slant transfer: Using the inoculating loop transfer bacteria from the culture to the slant. Streak the loop across the surface of the slant. Label your slant with the name of your lab group, the date, and the inoculum.
- Slants are used for longer term storage of bacteria (weeks or months when stored in the refrigerator)
4. Place all freshly inoculated media in a 37 °C incubator.
5. Check the tube and slant after 24 hours. Check FOL for the times you are designated to come in. S. aureus is non-motile and yellowish. S. typhimurium is flesh-coloured and motile. In the test tube, note if bacteria are on the bottom of the tube or throughout the broth. In the slant, note the colour of the colonies. Take a picture to add to your data in the lab report.
- If not in the incubator, you can find your plates on the bench in front of the windows, beside the incubators.
- Make observations of the slant, broth and streak plates
- take the plates to the biological safety cabinet (BSC) and take pictures of the plates if desired
- discard plates in the orange biohazard safety bags on the benchtops
Isolation Technique Exercise
Materials
- Inoculating loop
- Staphylococcus and Salmonella mixed culture
- One nutrient agar plate per person
- Sterile cotton swab
- Tube of dilute glycerol
- agar plate of culture media selective for gram negatives (VRBG)
- For 48 hour streak plate: one nutrient agar plate
Methods
Streak plate technique: Using NA (nutrient agar), make a three or four part streak plate using the mixed culture as your inoculum. Each lab partner should make a streak plate. Label the plate with your lab group name, the date and the inoculum.
1. The inoculating loop is made red hot by placing in the inner blue flame, holding it at an angle.
2. Cool the loop by touching to a sterile part of the agar.
2. The loop is touched to a bacterial colony then streaked on a new petri plate (Figure 4.1).
3. The loop is sterilized as previously, cooled on the agar, then used to spread the bacteria streaked in section 1 into section 2. Return to the previous streaked area only three or four times.
4. Step 3 is repeated once or twice more, returning to the previously streaked section depending on if a three-part or four-part streak plate is made. A successful streak plate has isolated colonies that can be selected for use in future studies.
5. Incubate the plate at 37 °C.
6. Check the plate after 24 hours. Make observations on the bacterial growth and if the plate was a success, based on the goal of a streak plate.
Swab culture technique: Using agar selective for gram negatives, you can choose an object to swab.
- Examples: cell phone screen, door handles in the college, lab bench chairs
- label your plate clearly with your names.
- Examine the bacterial diversity that grows. Bacterial diversity is represented here by the number of different types of bacteria present.
1. Aseptically remove a sterile swab by opening the paper at the handle end of the swab.
2. Wearing gloves, remove the swab.
3. Dip the swab in sterile dilute glycerol. Remove excess glycerol by turning the swab against the inside of the tube.
The dilute glycerol helps to lift bacteria off surfaces.
4. Swab a defined area of 50 cm2: 10 cm wide by 5 cm long. Swab in one direction then in the direction perpendicular to the first direction. (Figure 4.2, left image)
- Hold the swab at 30⁰ to the surface.
- Rub the surface slowly and thoroughly
- Go over the surface three times, reversing direction between the strokes
5. Place the swab in the sterile tube to transfer it back to the lab.
6. Aseptically pass the swab across the surface of a blood agar plate in a squiggling pattern.
- Write the object on your plate, along with your group’s name and the date.
7. Incubate at 37 ⁰C for 24 hours.
- Make observations on bacterial diversity (number of different bacterial colonies present).
8. After 24 hours, make a streak plate in the BSC using tryptic soy agar (TSA) or nutrient agar (NA) to isolate one bacterial colony from your swab culture.
- Pick a colony to streak
- Make observations of the type of colony you are trying to isolate and how abundant it is. This way, you will know if you were successful in your isolation.
- If your plate doesn’t have a colony, pick a colony off another group’s plate
- See the box below for streaking in the BSC.
9. At 48 hours, observe the streak plate. Do you have a pure culture? Is the colony the same as the one you tried to isolate? Are the colonies isolated?
- Wrap in parafilm then store this plate in the prep area’s fridge A. We will be using it in the coming weeks.
Streak Method in BSC
- In the BSC, use a sterile wooden applicator to pick a colony off the plate and streak it onto 1/3 of the new plate. Discard the applicator into the ‘used’ container.
- Pick a new sterile applicator and streak from the first 1/3 to the second 1/3 of the plate. Discard as before.
- Pick a new sterile applicator and streak from the second 2/3 to the last 1/3
- Put the plate in the 37 °C incubator on the tray labeled ’24 h streak plates’
- Label your plate with your name and section number
