Pressbooks: Starting Your New Book
Learning Objectives
In this chapter, you will learn about the following:
- options for creating a new Pressbook
- how to clone an existing Pressbook
- how to import content from MS Word
- privacy options for your Pressbook project
Getting started with a new book is easy! Click on the My Books menu in the top left corner of the Pressbooks dashboard screen. You have two options: create a new book from scratch or clone an existing Pressbook. Read on below to explore these options.
Options for Creating Your Book
You can create a book by importing an existing document from the following file types: EPUBs, Word docs, XMLs, or URLs.
- Complete the Create a New Book steps listed above.
- Select Tools from the left menu in the Pressbooks dashboard, then the Import option.
- Select the appropriate file type that matches the document you will be importing.
- Locate the file on your computer OR import from a URL.
- Click the Begin Import button.
- Depending on the size of the file, this may take some time.
Tip: When importing a Microsoft Word document, ensure your document is formatted as simply as possible and ensure that appropriate heading styles have been applied to chapters/sections.
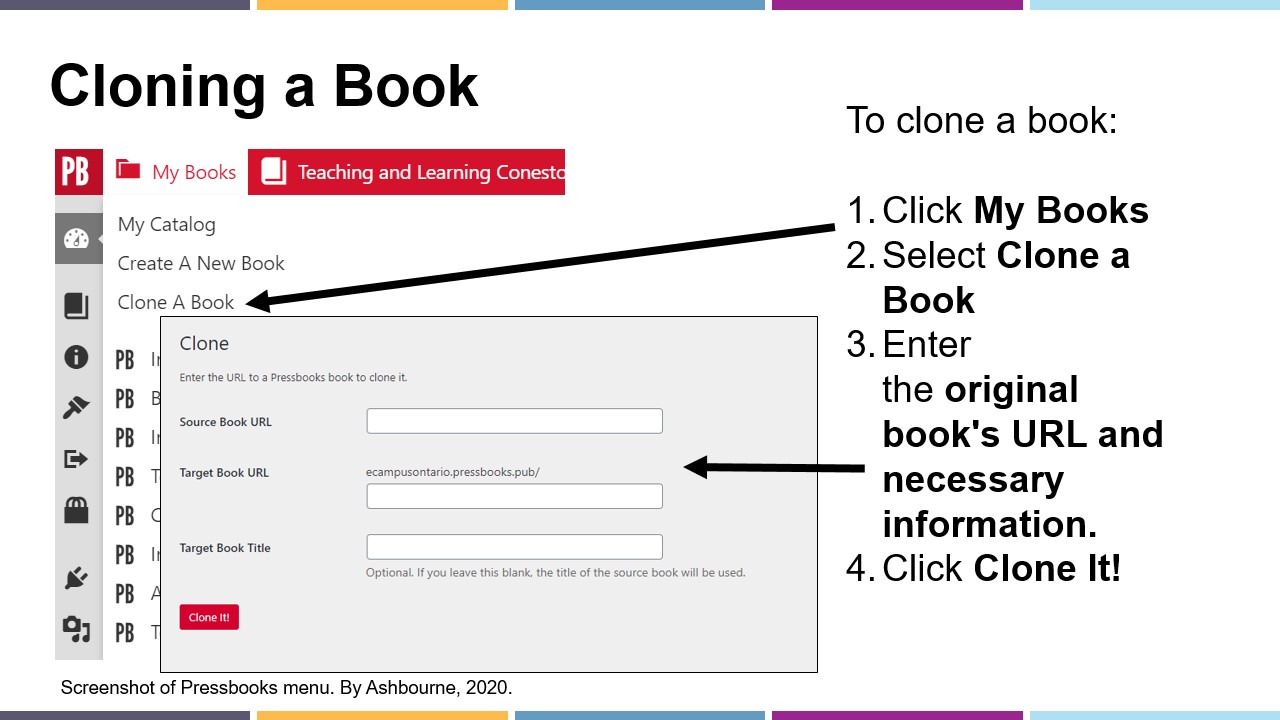
If you are adapting or updating an existing Pressbook, use the Clone function to copy the Pressbook into your account for customization.
- Click the My Books button in the top left corner menu.
- Select Clone a Book.
- Enter the original book’s URL.
- Enter your book’s custom URL and title.
- Click the Clone It! button.
You can keep your book private until it is complete so it isn’t visible to the public. You can also control privacy at the chapter level.
Book-level (Global) Privacy
- Click on the Dashboard button.
- Click on the Organize button.
- Select Private or Public at the top of the page. You can change this at any time.
- Any book with a public status will eventually be displayed in the Pressbooks Directory.
Chapter-level Privacy
You can control chapter-level privacy from the book’s dashboard or chapter editor interface. For more information, visit the Privacy Settings: Global and Chapter-level chapter in the Pressbooks User Guide.
To access the Dashboard:
- Click on the Organize button.
- Check or uncheck the Show on Web check box to make that part/chapter public or private, respectively.
To access the Chapter Editor Interface:
- Access the chapter/part you are interested in editing.
- Check or uncheck the Show on Web check box to make that part public or private, respectively. This is found in the Status & Visibility box on the right side of the editing interface.
- Click Save.
Pressbooks. (2020, March 28). Getting started with PressbooksEDU webinar. [Online video]. YouTube. https://www.youtube.com/watch?v=gQwWesSEjXc
Chapter Summary
In this chapter you learned various methods of starting a new Pressbooks project: importing from Word, starting from scratch, and cloning an existing Pressbook. You also learned how to control the privacy of your Pressbooks project.
Check Your Understanding


