8 Lab 3: Magnetic Forces
liyuchon
Acknowledgment
This project is made possible with funding by the Government of Ontario and through eCampusOntario’s support of the Virtual Learning Strategy. To learn more about the Virtual Learning Strategy visit: https://vls.ecampusontario.ca.
PHY137 Stay-At-home Experiment 3
Magnetic Forces and Electric Motor
What you will do
Construct two different designs of homopolar motors using a battery, a magnet, and a segment of wire.
What you will need
- Copper wire (more than 1 foot in length)
- 2 AA batteries
- 1 round neodymium magnet
——- Warning ———
The wire may heat up VERY quickly when connected to the battery. Be careful not to burn yourself!
————————–
Demonstration Video: https://youtu.be/bjHXUYU8GEw
Procedures
Part 1 – Coil Motor
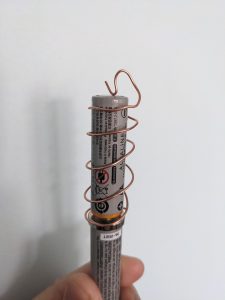
1- Bend the copper wire into the shape in the following picture (“coil motor”):

2- Notice that the tip of the coil rests on the negative end of the battery (this is to prevent the structure from falling off easily) and has a loop/bend near the bottom that will be in occasional contact with the neodymium magnet.
3- Adjust the size of the wire structure with the help of an AA battery (without the magnet) so that the structure is well balanced and the bottom loop/bent can get in occasional contact with the magnet once the motor is assembled. Do not attach the magnet while you adjust the height, because it may cause your wire to heat up.
4- Attach the magnet to the positive end of an AA battery. Use another AA battery to hold the first battery up as in the photo above. (This is to keep the wire from experiencing friction between a tabletop. If you have a thick stack of magnets, you may rest the motor on a tabletop.)
5- Put your wire structure onto the battery. Rest the tip on the negative end of the top battery. If your wire does not spin or falls off easily, remove the magnet and adjust the wire (to avoid burns).
* Tips for improving the motor: (1) create more loops/bends near the bottom to increase the chance for the loops/bends to get into contact with the magnet; (2) loosen the coils, loops, and bends in the structure to reduce friction (the wire only needs occasional contact with the magnet); (3) try wrapping a piece of paper tissue around the magnet and then reshape the bottom loops/bends; (4) try flipping the magnet to the other direction.
6- Try to create a motor that can rotate at least 3 full turns. Use your phone to shoot a video of your motor rotating. DO NOT leave your motor rotating for an extended period of time, the wire will heat up and your battery will run out very quickly.
7- Convert your video to a gif file using this online tool https://ezgif.com/video-to-gif. Cut your video to 3~5 seconds showing the rotation of the motor, use 320xAUTO size and 20FPS frame rate, check “optimize for static background”.
8- (This is worth 2/10 marks) Post the converted gif file to the course Discussion Board under “Lab 3: Coil Motors” as an image (NOT as an attachment). Take a screenshot of your post and attach the screenshot in your lab report.
9- (Qualitative question, 1/10) Take a photo of your motor with the tip of the wire near the battery but NOT in contact. Label the direction of currents in the wire in the photo if the wire were to be connected. State the direction of rotation when viewed from above. Use your labeled photo to determine the polarity of your magnet (i.e., whether the north pole is facing up or down) in the photo.
Part 2 – Loop Motor
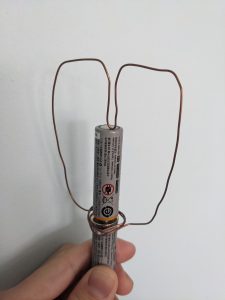
1- Reshape the wire structure into the following shape (“loop motor”).

2- Keep the negative end of the battery on top. Try to make a motor that can rotate at least 3 full turns. Use your phone to shoot a video of your motor rotating. Convert the video to a gif file (3~5 seconds in duration, 320xAUTO size, 20fps).
3- (This is worth 2/10 marks) Post the gif file to Quercus Discussion “Lab 3: Loop Motors” as an image (NOT as an attachment). Take a screenshot of your post and attach the screenshot in your lab report.
4- (Qualitative question, 1/10) Take a photo of your motor with the tip of the wire near the battery but NOT in contact. Label the direction of currents in the wire in the photo if the wire were to be connected. State the direction of rotation when viewed from above. Use your labeled photo to verify again the polarity of your magnet.
Additional Questions for Discussion
- (Qualitative question, 1/10) Suppose we make another motor with a thicker copper wire but with exactly the same shape, would the new motor accelerate quicker or slower? Explain with brief derivations.
- (Qualitative question, 1/10) Watch the gifs posted by other students. Discuss how the shape of the wire affects its acceleration.
- (+1 Bonus mark) If your motor runs well and attracts many comments on the discussion board, you can earn +1 bonus for making a nice motor.
Tips for data analysis:
- Attach all photos that are required in the procedures above. Do more tests and add more photos if you think they can help you explain better.
- Answer all questions in the procedures above. Because this lab is mostly qualitative, try to explain your answers in more details.
- Attach graphs, drawings, or diagrams when necessary.
Suggested topics for discussion:
- Can we do some simple quantitative calculations using the same experimental components?
- Can we do some quantitative calculations with some additional components at low cost while staying at home?
We value your feedback!
Did you enjoy this experiment? What are the aspects that you dislike the most about this experiment? – Let me know in the “Student Feedback Survey for Lab 3” on the discussion board on Quercus! We may award the most helpful inputs with +1 bonus mark for the lab report!
This work is licensed under a Creative Commons Attribution-NonCommercial 4.0 International License.

