Lab 1: Introduction to MS Project 2013
In this lab you will learn:
- How to enter tasks into a project and create a summary task.
- Select different views for a project.
- Make a print-out that effectively conveys information about your project with a minimum number of pages.

Getting Started
Watch the Introduction to MS Project video to get a basic introduction to MS Project (follow along using your own copy of MS Project if you have it). As you are watching, try to answer the following questions (answers are at the end of the exercise):
1. How would you display the View bar?
2. When entering a task, you should always enter the project dates for each task:
A. True
B. False
3. MS Project allows tasks to be manually or automatically scheduled:
A. True
B. False
4. It is important that we make sure that our tasks are set to __________ scheduled.
5. How can we set the default scheduling mode for our tasks?
6. How would you create a link between one task and another?
7. The main window (the area below the tool bars and menus) is divided into two sections. What are they?
8. How would you change views in the Table window?
9. How would you set the start date of the project?
Create Your Project
Based on what you just learned, create a new project. Into this project we are going to enter the information about the first ever Project Management Student party.
The tasks and durations are as follows:
| Task | Duration (days) | Predecessor |
| Planning (figure out food, drinks, and location) | 2 | None |
| Obtain supplies | 3 | Planning |
| Reserve location | 1 | Obtain supplies |
| Mail invitations | 1 | Obtain supplies, Reserve location |
Enter this information into your project. Set the start date for the project to September 15th, 2020. Create a summary task for the project. Save the project using an appropriate naming convention; for example, “JChristiansonL1S2.”
Answer the following questions:
1. When will our project be completed?
2. How many days will our project take in total?
3. Since Obtain Supplies is a predecessor for Mail Invitations, why doesn’t Mail Invitations start right after the supplies are obtained?
4. What type of relationship did we set up between the various tasks in our project?
Task Management
Watch the video on Task Management to take a deeper look at how we can create and organize our tasks and the properties of our tasks.
Formatting and Printing
Follow along with the Formatting and Printing video and answer the following questions.
1. How would you change the scale of a Gantt chart?
2. Both the header and the footer of our printouts can have custom information on them:
A. True
B. False
Exercise: Putting it All Together
Based on what you just learned, create a new project. Into this project we are going to enter the information about an upcoming project. The Tasks, Durations and Predecessors are as follows:
| Task | Duration (days) | Predecessor |
| A | 5 | None |
| B | 4 | None |
| C | 4 | A |
| D | 3 | A |
| E | 5 | B |
| F | 5 | C |
| G | 3 | E |
| H | 3 | D, E, F |
| I | 2 | G, H |
| J | 7 | G |
| K | 4 | I, J |
| L | 3 | I, K |
| M | 5 | L |
| N | 5 | M |
Complete the following tasks:
- Enter this information into your project.
- Set the start date for the project to October 11th, 2014.
- Create a summary task for the project.
- Enter information in the Footer to display your name and “Lab1 Part D” in that section.
- Enter information in the Legend to display the Project Title and Date in that section.
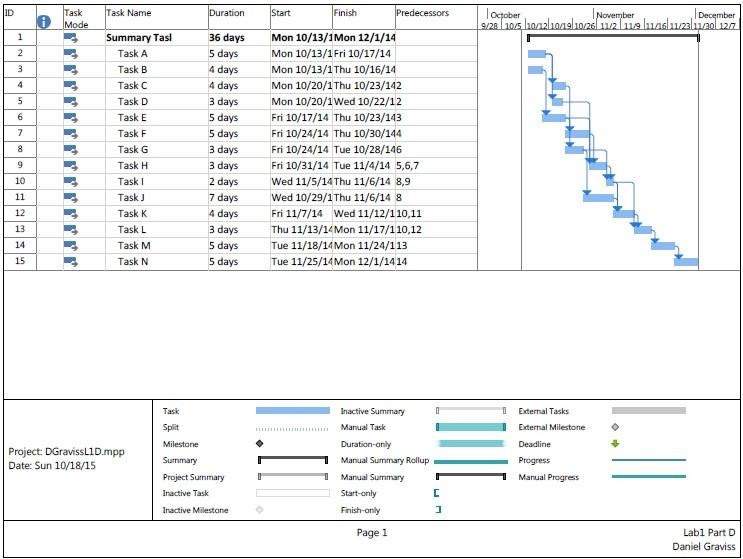
- Print a one page Gantt chart and table showing Task Name, Duration, Start Date, Finish Date and Predecessors. Your print out should look like the image presented in the Answers Section.
Answer Key
Getting Started
1. Right click on the Gantt Chart, select View Bar from the View menu
2. B – False
3. A – True
4. Auto
5. Going to File–>Options->Schedule–>Scheduling options for this project: Select All Projects–>Auto Scheduled
6. Enter the predecessor information in the table or double click on the task and select the predecessor from the Predecessor Tab or Drag a link between the two tasks
7. The Table window and the Graphical window
8. Add and delete columns as you choose or Right click on the “tribble” and choose the predefined Table
9. Open the project information dialogue box and set the project start date
Create Your Project
1. 9/23/2020
2. 7 working days (not including weekends/holidays)
3. Because Reserve Location is also a predecessor
4. FS or Finish to Start
Formatting and Printing
1. Change the Timescale
2. A – True
Exercise: Putting it All Together
Your printout should look like this: