Module 3: Quality course structure and content
3.5 Presenting the content (Event 4)
Select content that supports learning outcomes
Although content is often the first thing we think about when we approach course design, Gagné placed it fourth in his sequential framework, notably after defining learning outcomes(/objectives) and activating prior learning.
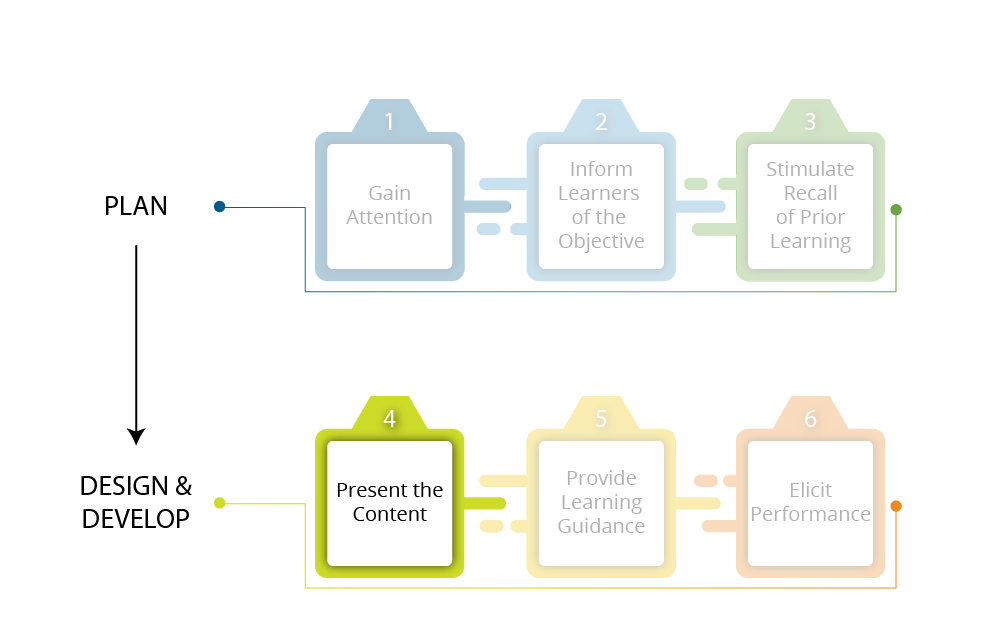
Caption: In Gagné’s Nine Events of Instruction framework, Event 4 focuses on presenting the content.
Credit: University of Waterloo | Image Description
This reminds us that content should serve learning outcomes and build on prior learning. Content should equip learners with the resources and information they need to develop the skills identified in the learning outcomes (Barber et al., 2020) and to build on their prior learning.
Connection to prior learning
Module 1.5 describes how Using backward design ensures that course learning activities (including content), help learners successfully achieve the course learning outcomes.
In addition to supporting the course learning outcomes and building on prior learning, content should also be designed to facilitate learning. The User Experience Design for Learning (UXDL) framework provides guidance on how to do this.
Use the UXDL framework to design learner-centred content
The User Experience Design for Learning (UXDL) Honeycomb is a content design framework developed by the Centre for Extended Learning at the University of Waterloo to provide guidance on how to create quality online content that facilitates learning. The framework was inspired by Peter Morville’s User Experience (UX) Honeycomb (available on Semantic Studio’s User Experience Design page) and adapted for a teaching and learning context with permission from the author.
Each cell in the UXDL framework is grounded in psychological research in cognition and learning and presents evidence-based principles for creating online content that is useful, desirable, accessible, credible, and intuitive (i.e., findable and usable), together with numerous examples of how to implement the principles presented.
Peter Morville is a pioneer in the fields of information architecture and user experience. Read Peter Morville’s biography to learn more about him.
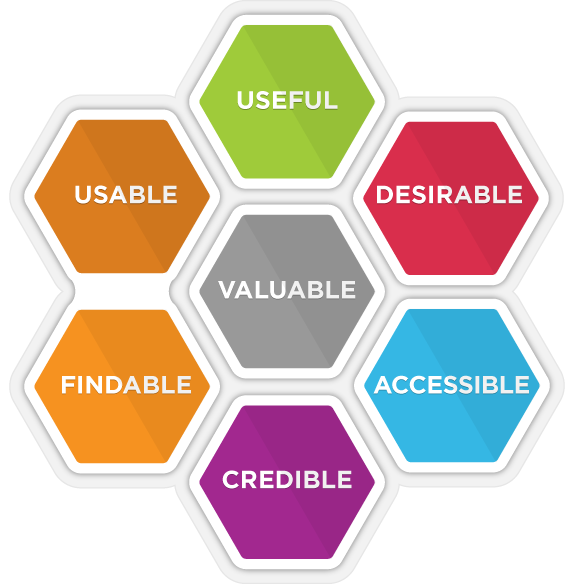
Caption: The UXDL framework provides guidance on how to create online learning experiences that are useful, desirable, accessible, credible, findable, and usable for learners.
Credit: © Peter Morville, adapted by the University of Waterloo with permission
We encourage you to explore the UXDL Honeycomb site in its entirety, but for the purposes of this course, we will focus on creating online content that is useful and accessible.
Design useful online content
In Module 2.6 Building Community Through Activities & Assessments, we looked at ways to engage learners with their peers and with you as their instructor. Here, we turn our attention to ways to engage learners effectively with online content. The useful cell of the UXDL honeycomb provides guidance on how to design online content that is useful for learning.
Why the design of online content matters
As described by educational psychologist John Sweller (1988), the ability of humans to process information in working memory is extremely limited; if the information exceeds our ability to process it, cognitive overload occurs, which impedes learning.
Presenting information in ways that avoid cognitive overload is therefore an important goal when designing online content. But it’s only the first step.
In order for meaningful learning to occur, cognitive psychologist Richard Mayer (2009) explains that online content should further be designed to facilitate the cognitive processes of
John Sweller is an educational psychologist who formulated cognitive load theory (CLT). Read the biography of John Sweller to learn more about him.

selecting relevant information,

organizing it into a coherent framework, and

integrating it with prior knowledge.
Caption: In order for meaningful learning to occur, learners should be able to select relevant information, organize it into a coherent framework, and integrate it with prior knowledge.
Credit: University of Waterloo, UXDL Honeycomb, How Do We Create Useful Online Learning Experiences? | Image Description
According to Mayer’s cognitive theory of multimedia learning, when learners select, organize, and integrate information, they are better able to construct meaning and retain knowledge (Mayer, 2009). For more information about Mayer’s cognitive theory of multimedia learning, see the How Do We Create Useful Online Learning Experiences? page of the UXDL Honeycomb site.
Below we present some simple strategies for designing online content in ways that avoid cognitive overload and help learners effectively select, organize, and integrate information.
Richard Mayer is a cognitive psychologist who developed the cognitive theory of multimedia learning. Read Richard Mayer’s biography to learn more about him.
Content design strategies to avoid cognitive overload and help learners select, organize, and integrate information
Minimize distraction
To minimize distraction
- get right to the point, leaving out unnecessary words, sounds, and pictures (the coherence principle);
- point out important information (the signalling principle);
- avoid duplicating narration with on-screen text (the redundancy principle); and
- place images and related text close together (the spatial contiguity principle) and have them appear at the same time (the temporal contiguity principle).
Help learners process new material
Cognitive overload can also occur when essential material is complex, or when learners are novices. To help learners process complex (and essential) material more efficiently
- break content into shorter segments (the segmenting principle),
- introduce key terms and concepts first (the pretraining principle), and
- pair narration with images, not text (the modality principle).
Why is segmenting important? Nilson and Goodson (2018) explain that
[s]egmented chunks reduce complexity, prevent students from feeling overwhelmed, and make the content easier to grasp, even if the amount of information remains the same” (p. 42).
Help learners construct a model/schema
To help learners organize and integrate information with relevant prior knowledge,
- use a mix of media: pair words with images rather than using words alone, and when selecting images, focus mainly on organizational and other visuals that are conducive to learning (the multimedia principle);
- use a conversational style (the personalization & voice principles); and
- use human demonstration when it supports the learning task (the image principle).
Quality Advanced
An example of how the multimedia principle works
The following video, from the University of Pittsburgh’s Centre for Teaching and Learning does a good job of both describing Mayer’s principles of multimedia design and using the principles in the design and creation of the video.
Transcript for Mayer’s Principles of Multimedia Design is available on YouTube. | Video length ~ 9 mins.
Provide worked examples and opportunities for retrieval practice
Worked examples (demonstrating how to arrive at solutions to problems) reduce cognitive load by making problem-solving techniques visible (Ayres, 2015). As learners progress, this scaffolding can gradually fade to partially worked examples and finally to open-ended questions.
Retrieval practice (i.e., assessing learners, or providing opportunities for them to test themselves) helps leaners retain new knowledge longer, and transfer it to new contexts better (Roediger & Butler, 2010). Interpolating opportunities for retrieval practice throughout content has also been shown to help learners sustain their attention to learning material, reduce mind wandering, and increase note-taking activities (Szpunar et al., 2013).
Examples of how designing content with UXDL principles could work
The How Do We Create Useful Online Learning Experiences? page of the UXDL Honeycomb site provides examples of each of the principles outlined above. In addition to these discrete examples, below we offer examples of online modules designed with UXDL principles.
Quality Advanced
Example 1: The scientific method module
The Scientific Method module is an open resource describing how the scientific method works by using global climate change as an example. It uses the following UXDL principles to help learners select, organize, and integrate relevant information:
- multimedia: the resource includes a combination of text, images, video, and interaction, which helps learners to attend to and stay focused on the material but also to learn it efficiently, as they organize and integrate the visual and verbal representations and actively engage in meaning-making;
- coherence: content is well-structured and uses lots of white space; images do a great job of depicting spatial relationships and are used to enhance understanding or otherwise contribute to the experience of reading the text;
- segmenting: text-based content is broken into easily readable chunks with images, video, and interactions interspersed throughout to aid understanding; and
- signalling: done with icons and call-out boxes.
Credit: Dr. Keith Delaney, Faculty of Earth and Environmental Sciences, and Centre for Extended Learning, University of Waterloo
Quality Advanced
Example 2: Introduction to experimental uncertainty for physics lab courses
Introduction to experimental uncertainty is a series of open modules designed to prepare learners for physics lab courses. They use the following UXDL principles to help learners select, organize, and integrate relevant information:
- multimedia: organizational visuals paired with text help learners construct a schema of the concepts introduced, actively engaging them in meaning-making
- coherence: content is well-structured and uses lots of white space; images are used to depict spatial relationships, and to signal and segment content
- segmenting: text-based content is broken into easily readable chunks with images interspersed to aid understanding
- signalling: done here with definition call-out boxes, bolding, and images
- retrieval practice: learners have the opportunity to get feedback on their learning through “Test your understanding” concept-check questions
Introduction to Experimental Uncertainty
Credit: Dr. Meg Ward, Department of Physics and Astronomy, and Centre for Extended Learning, University of Waterloo
Quality Advanced
Strategies for synchronous sessions
If you are using live sessions, these can create an opportunity to use strategies like helping learners process new material, constructing models and schemas, and providing worked examples, all in real time. For instance, consider working through a problem together with the students, inviting questions along the way. Or have students help construct a model of the course content together. Or simply invite students to identify their greatest points of confusion with course concepts, using their feedback to help clarify the muddiest points in the course in real time.
Keep in mind that highly structured live sessions will help reduce distractions for students. Focus on having a clear plan for your time and sharing your plan with your students.
Synchronous sessions are also a great way to build community and create social presence in your course. For more information about how to design synchronous sessions for these purposes effectively, see Using Synchronous Sessions in Module 4.5 Fostering Social Presence During Term.
Activity: Create an online content storyboard for one topic
Learning outcomes:
This activity is directly aligned with Course Learning Outcome (CLO) 6: Structure and present your online content and assessments in ways that facilitate student learning and foster a sense of community.
Instructions:
Build on the Attend to This Topic! activity in section 3.4 by designing a content storyboard for one of your course topics.
What is an online content storyboard?
The term storyboard comes from the film industry where storyboards are used as planning tools to visualize film sequences using a series of still images. In an online learning context, a storyboard is a document that presents your plan for how a topic will be presented in your course, including the on-screen text and how it will be segmented with headings, visuals, video, audio and/or other interactive elements.
Start with your text, and clearly indicate where you will add
- gain-attention elements (quotes, visuals, video, etc.) to introduce the topic;
- headings and subheadings (if using Word, use Styles to format heading levels);
- signalling elements (e.g., bolding, definition/key concept call-out boxes, etc.);
- video or audio components, including alternative/accessible options; and
- activities (e.g., concept-check questions, reflections, discussions, etc.).
You may use any tool you are comfortable with to create your storyboard, including Word (and equivalents), PowerPoint (and equivalents), or other programs/applications with which you are familiar.
Download the Content Storyboard [DOCX] to create a Word version to complete offline.
Please note that this activity doesn’t have an in-line counterpart.
Design accessible online content
The Accessible cell of the UXDL honeycomb provides guidance on how to design online content that is accessible for learning. Accessibility is a primary consideration when designing online content, because learning is a nonstarter if learners are not able to access it.
As highlighted in Module 1.3 What is Quality in Online Learning? , an important starting place when designing learner-centred courses is to recognize that our learners are diverse, with various needs, goals, and constraints. To ensure that we address this diversity in ways that minimize barriers to learning, we create flexible paths to learning, paths that give every learner meaningful opportunities to learn. That’s the essence of the Universal Design for Learning (UDL) guidelines: UDL provides a research-based framework to help us design learning experiences that provide meaningful content, activity, and assessment options for learners.
Below, we focus on UDL strategies that provide learners with meaningful options for online content.
Strategies for designing accessible online content
Provide multiple means of representation

In other words, we need to present content and information in different ways.
This includes
- providing options for displaying information, including alternatives for audio and visual presentations (e.g., captions and transcripts);
- providing options for language, mathematical expressions and symbols, including using examples, summary visuals, and clarifications of vocabulary, symbols, and syntax; and
- providing options for comprehension, including
- stimulating recall of prior knowledge (see 1.7 Learning About Your Learners );
- signalling important information (see Design Useful Online Content above); and
- enhancing transfer (see Enhancing Retention and Transfer below).
Examples of each of these strategies are available on CAST’s UDL Guidelines site, on the Provide Multiple Means of Representation page.
A (meta)example of how to provide multiple means of representation
How we did this in this module
In this module, we
- provided options for displaying information, including transcripts for all video content and descriptive and alt text for visuals (e.g., see the image description for the Course Pathways Organizational visual );
- provided summary visuals for core concepts as an option for comprehension (e.g., the visual, “Making the structure of a field of knowledge explicit helps learners retain new knowledge and connect it to prior knowledge” in Module 3.3 Structuring Your Course) ;
- provided clarification of vocabulary in the Key terms section of the Module Overview page;
- stimulated recall of prior knowledge with “connection to prior learning” call-outs throughout the module; and
- enhanced transfer by presenting information in an organized structure (using the Nine Events framework), offering examples across disciplines and contexts and including opportunities for learners to apply their learning to their own course throughout the module.
Provide multiple means of engagement

In section 3.4 above, we looked at ways of gaining learners’ attention. Here, we consider ways of sustaining learners’ attention. In other words, how do we motivate learners to persist and stay engaged in their learning throughout their online course?
Below, we briefly explore the UDL guidelines for
- recruiting interest,
- sustaining effort and persistence, and
- self-regulation.
Strategies for increasing engagement and motivation
Ensure alignment
As mentioned previously, a good starting point in keeping learners engaged in their learning is to ensure that course content, learning activities, and assessments align with course learning outcomes.
Connection to prior learning
Module 1.5 describes how using backward design ensures that learning activities and assessments are aligned with course learning outcomes.
Be sure to remind learners that what they’re doing is contributing toward the overarching goal of the course. Showing them the relevance of what they’re doing will increase their motivation to continue to engage in course activities.
Design authentic learning activities
Provide opportunities for learners to apply their learning to real-world scenarios and toward solving real-world problems, or other meaningful practical applications.
Connection to prior learning
See Examples of How Authentic Assessment Could Work in Module 2.4 Eliciting Learner Performance for some ideas of how to do this.
Provide options for how to achieve learning outcomes
Allow learners to choose how they will demonstrate their learning, including offering multiple topics and formats for activities and assessments.
Connection to prior learning
Connection to prior learning See Example Online Activities and Assessments in Module 2.4 Eliciting Learner Performance for examples of various types of assessment.
Provide opportunities for self-assessment and reflection
Self-assessment helps learners recognize when they are making progress toward learning goals, which can be highly motivating. Providing opportunities for learners to reflect metacognitively on their developing understanding, including which concepts they’ve mastered, which still need to be learned, and the effectiveness of their approach to learning, boosts both motivation and performance (Barber et al., 2020).
Be an engaged instructor
Your active teaching presence in the course plays a significant role in learner persistence. When learners sense that you care about their learning, they are more likely to want to persist (Robb & Sutton, 2014, as cited by Nilson & Goodson, 2018, p. 111). For ideas of how to increase your teaching presence, take a look at Module 4.4 Building Teaching Presence During Term.
Create a learning community
Providing meaningful opportunities for learners to engage with course content, their peers, and their instructors helps learners to feel part of a community, which increases their motivation to persist in online learning.
Connection to prior learning
For ideas of how to build community in online courses, take a look at Module 2.6 Building Community Through Activities and Assessments.
Examples of each of these strategies are also available on CAST’s UDL Guidelines site, on the Provide Multiple Means of Engagement page.
Examples of how providing multiple means of engagement could work
Quality Essential
Example 1: Options for authentic learning
In his Shakespeare courses, Dr. Ted McGee presents opportunities and options for his learners to engage in the kinds of authentic activities practiced by theatre and literary professionals—directors and editors—that allow them to explore (a) how Shakespeare’s plays speak to audiences today and (b) how to solve textual problems in early manuscripts.
In the Director’s Chair activities allow learners to don the persona of director as they make (and defend) staging decisions that allow them to explore the plays in light of contemporary issues relevant to audiences today.
At the Editor’s Desk activities invite learners to play the role of someone preparing a trustworthy edition of a play, deciding (with evidence) which early version of the text should be followed, and how to deal with issues that seem problematic, incomplete, or nonsensical in the only early text that survives.
For each of these activities, learners choose to work on four out of the seven plays covered in the course.
Credit: Dr. Ted McGee, Department of English Language and Literature, University of Waterloo
Quality Essential
Example 2: Options for engaged teaching
Nudge students who are falling behind
Send targeted, personalized messages to learners who are falling behind, offering suggestions for what they can do to make up lost ground in the course. (See Module 4.4 Building Teaching Presence During Term for more options in this vein.)
(Darby & Lang, 2019, p. 150)
Quality Advanced
Example 3: Options for self-regulation
Learning contract activity
A learning contract is a strategy designed to give learners ownership over their learning, which helps to foster self-regulation. Learners are prompted to reflect on how they learn and are asked to establish clear goals and timelines for achieving their goals. Instructors contribute a list of expectations to which learners must agree.
See Self-Directed Learning: Learning Contracts from the Centre for Teaching Excellence at the University of Waterloo for information about how to use this strategy, including a learning contract template and completed sample contract.
Credit: Centre for Teaching Excellence, University of Waterloo
Quality Advanced
Example 4: Options for sustaining effort and persistence in a blended course
In a blended course (or online course with synchronous elements), reflection questions are provided periodically throughout each module of online content. Learners select a question to respond to at the end of each module and compose a short 1–2 paragraph reflection on a theme that piques their interest, which they submit online prior to a live/face-to-face session. During a subsequent synchronous session, these reflection questions can be utilized in different ways to engage learners. For example, instructors can choose specific questions from the reflections for small topic-based group discussion, or additional questions can be posed that build on the ideas from the original reflection questions. Overall the reflection questions provide learners with the opportunity to think through their ideas on the module topic before the live session.
These strategies encourage learners to persist and stay engaged in their learning, provides the opportunity to think through their ideas on the module topic before the live session, to explore particular interests with peers, and gives instructors insights into learners’ evolving understanding of course content while also allowing them to pivot the direction or facilitation approach of synchronous sessions in response to learners’ needs and interests (while still achieving the intended learning outcomes). This approach works equally well with professional and novice learners.
Credit: Dr. Peggy DeJong and Dr. Amber Hastings-Truelove, HPE 806: Indigenous Health Professions Education, Master of Health Professions Education, Queen’s University
An EDII perspective: Understanding the AODA
While UDL is designed to improve learning for everyone, we have a particular ethical and legal responsibility to ensure that learners with disabilities have equitable access to our learning spaces. The Accessibility for Ontarians with Disabilities Act (AODA) is a law enacted in 2005 by the Legislative Assembly of Ontario to ensure full accessibility for Ontarians with physical and mental disabilities to all public establishments by 2025 (see What is the AODA? for more information).
The purpose of the AODA is to develop, implement, and enforce accessibility standards or rules so that all Ontarians will benefit from accessible services, programs, spaces, and employment. The standards help organizations to prevent or remove barriers that limit the things people with disabilities can do, the places they can go, and the attitudes of service providers toward them.”
(Thomson, 2018)
The AODA Postsecondary Education Standards Development Committee propose a number of recommendations for decreasing barriers and ensuring publicly funded postsecondary education is more accessible to people with disabilities. Many areas are covered, but highlighted themes include reducing barriers to accessible online learningand addressing accommodations through a UDL approach.
Refer to the AODA Education Standards site for more information, and if you are interested in exploring the recommendations directly, read the Postsecondary Education Standards Development Committee’s initial report: Development of Proposed PSE Standards – 2021 Initial Recommendations Report.docx.
An EDII perspective: Understanding the difference between accessibility and accommodation
It is likely that if we do not experience a visible or hidden disability, then we might think that the terms accessibility and accommodation are interchangeable terms, but this is incorrect.
Definitions
Accessibility “is what we should expect to be ready for us without asking or planning ahead. It can be provided by following an easy to implement set of standards and practices that make ‘adaptation’ unnecessary. We can benefit from accessibility without announcing or explaining our disabilities” (Pulrang, 2013).
Accommodation “is for adaptations that can’t be anticipated or standardized. They are different for each individual. Although we should expect there to be a general willingness to accommodate us wherever we go, we can’t expect actual, specific accommodations unless and until we ask for them. We do have to announce, and may have to explain our disabilities a bit in order to get accommodations” (Pulrang, 2013).
Accessibility is the baseline of equal service, and accommodation is the second step to take when accessibility alone isn’t enough.” (Pulrang, 2013)
UDL provides a strong framework for proactively ensuring that a majority of our content and design is accessible, and the need for reactive individual accommodations is reduced.
Develop accessible online content
It is important to ensure that course content is as accessible as possible when it is created in an online platform.
Strategies for organizing and formatting accessible course content
Making your content accessible can seem like a daunting task. The following three considerations are a good place to start:
Universal Design for Learning (UDL)
All learners benefit when you use the principles of Universal Design for Learning in organizing and formatting your content (see Design Accessible Online Content above and Provide Multiple Means of Action and Expression in Module 2.4).
Consider assistive technologies
Some learners will use assistive technologies to access online content. Blind and visually impaired learners may use screen readers, while learners who are hearing impaired rely on live captions and transcripts (WebAIM).
Use an accessibility checker
Use an accessibility checker: Many applications and learning management systems have built-in accessibility checkers that will flag accessibility problems, such as insufficient colour contrast or incorrectly formatted headings. Microsoft Word, PowerPoint, and Excel come with built-in accessibility checkers, while you can download apps to check the accessibility of Google Slides, for example. It is also possible to make fully accessible PDFs. For websites, you can use WAVE, the Web Accessibility Evaluation Tool.
Accessible content organization
Headings: Headings define the hierarchy of content, and screen readers and other assistive technologies rely on properly formatted headings to navigate a web page or document. Ideally, there should be one h1 per page or document, used for the title of the document/page. For subsections, use h2, h3, h4, and so on to nest content. Headings should follow logically and should never skip a level (i.e., do not go from h1 to h3). For example:
- <h1> Course syllabus </h1>
- <h2> About this course </h2>
- <h3> Course description </h3>
- <h3> Meeting time and location </h3>
- <h3> Contact information </h3>
- <h2>Course content </h2>
- <h3> Required texts </h3>
- <h3> Weekly topics </h3>
- <h2> About this course </h2>
Typically, when composing text in an application (rather than directly coding), the application will have a “heading” section where the h1, h2, h3 formats are prepopulated and it is as easy as selecting the heading to insert it in your body text.
Where possible, arrange text linearly and avoid using tables to display information. Screen readers and other assistive technologies struggle to make sense of information presented in tables unless very specifically formatted.
Accessible font and colour choices
Avoid relying only on bolded text, coloured text, or font changes to indicate important information or emphasis. Screen readers and other assistive technologies do not interpret bolded or coloured text as hierarchical or of greater or lesser importance. Headings should be used to structure content, and any visual cues signalling key information should be accompanied by written cues.
When you do use colour, make sure the text and background colours have strong contrast and are presented in a legible font and font size. Avoid using busy images or bright patterns as background for your text as it is distracting to the learners’ ability to read text and may result in areas of the text with insufficient contrast for readability. If not using a solid-coloured background, consider backgrounds with images or strong colours and patterns only around areas where the text will not be present or use a gradient of appropriate colours or muted images/patterns that have been “blurred out” or out of focus, so the learner can access the text. Sites like Colour Safe, the WebAIM Contrast Checker, and the University of Sussex’s Accessible Colour Contrast page can help you make accessible design choices.
Also, be sure to avoid strobing, flickering, and flashing text and animations as they could trigger seizures in learners with photosensitive epilepsy. The Web Content Accessibility Guidelines (WCAG) stipulate that
. . . if the content flashes more than three times per second, is notably large (a small animating image would not cause a seizure), and has bright contrast in the flashes (especially if the colour red is present), it may cause a seizure and must be avoided” (WebAIM, n.d.-a).
Accessible links
Ensure links and buttons contain descriptive text (refer to the list of key terms on the Module Overview page for a definition of descriptive text). When naming links, avoid generic phrases such as “click here,” “here,” “more,” “more information,” “read more,” etc. Link names should match the title of the page they’re linking to, and links should be visually differentiated from other page content (WebAIM, n.d.-b).
Accessible multimedia

Videos and audio (live or archived) must have captions and a transcript.
For live sessions, some video conferencing applications provide live captioning. This can be more or less accurate based on a number of factors, such as content area (technical or niche language is less likely to be appropriately interpreted) or accents. To increase accessibility, and to accommodate any learners who may have difficulty connecting to a session or cannot otherwise attend, live sessions should be recorded, captions should be edited, and then posted for class access in the LMS or course web page. Note that this may not be an appropriate option if sensitive or personal topics are being discussed to help protect learners who are being vulnerable in a safe space.
For prerecorded content, you are not expected to create these captions or transcripts from scratch, though some video conferencing or multimedia recording applications have AI that automatically generates captions, which you can then proofread before adding to your multimedia file. Some institutions provide enterprise-level media players that can generate captions once multimedia is uploaded or offer automatic captioning services or captioning support, often through accessibility service units or centres for teaching and learning. These services vary, so inquire at your institution. You may also seek to pay a company for captioning and transcription services, and often educational rates are available.
Ensure all audio and video elements are controllable by the learner. This means they have, at the very least, the ability to start and stop the video/audio at any time. Most media players also allow the learner to jump forward/backward through the multimedia as needed and change its playback speed.
All these elements provide learners who need more time to perceive the content with control over their learning experience and the ability to review or pause material as needed. This assists not only learners with disabilities, but learners whose first language is not the language of instruction and any learner who might be struggling with learning the content. It is also best practice to provide learners with an indication of how long the multimedia will be before they click to play the item. This allows learners to decide whether they have enough time to effectively review and learn the content that will be presented before proceeding (WebAIM, n.d.-b).
lmages that convey information that is useful for understanding the content should have associated alternative text (alt text). If an image is just decorative and doesn’t convey meaningful information, the alt text can remain empty (refer to Easy Checks – A First Review of Web Accessibility for some beginner tips).
An EDII perspective: Working with alt & descriptive text
Note that generating alternative text or descriptive text is a gained skill and takes time to develop. Often, a good approach is to try to put oneself into the shoes of a learner who has never experienced the content before and also may not see the image itself. Consider what elements are most important and key to understanding the concept being presented, and describe them first in a concise way so learners can quickly grasp the key ideas and then work through the details.
Suggested resources for learning alternative text and how to make math accessible can be found through the DIAGRAM Centre, including
- image description resources for helping make images accessible and
- accessible math tools, tips, and training.
Avoid putting text on images unless necessary, so that it remains accessible to a screen reader. Text that is in the main body of your document/web page is called “true text.” We’ve provided some examples below.
Quality Advanced
Example 1: Placing text on an image
If you want to put a quote on an image, it would be better to present the quote as regular text (true text) and put the image beside it, rather than overlay the text as part of the image. If you really needed to include the text as part of this image, then the alternate text for this image would include a description of the image and include the exact quote that was used.

Caption: In this example, the quote is overlaid on the image to create a “picture” element, therefore alternative text for this image would be something like as follows: “Image of horse sleeping with quote ‘The willing horse is always overworked’ by Charles Darwin.
Credit: Tahira Mursleen, University of Waterloo
Example 2: Using captions
You may need to include labels or text descriptors on an image for it to make sense. In this case, you could have a caption that describes the general ideas or concepts described by the image (improving comprehension and accessibility of the image for all learners) and supplement with either alternate text or descriptive text, which provides a detailed description of all image elements and labels. Avoid including titles and captions as part of the image. In some cases, legends could be inserted into the caption or in the main body text.

Caption: In this example, the quote is part of the main text and is accessible by a screen reader. Therefore, the alternate text for the image would be “Decorative image of a horse sleeping.”
Credit: Tahira Mursleen, University of Waterloo
Summary: Creating accessible online content
The “Web Accessibility for Designers” resource from WebAIM provides a nice summary of, and some additional tips for creating accessible online content. Some of these tips are specific to web page design; however, most principles apply across the mediums you might use for content creation, organization, and formatting. For a text version of the image and additional resources, click the infographic, which will take you to the WebAIM website.
 (WebAIM, n.d.-c)
An EDII perspective on additional accommodations
The benefit of applying the principles discussed so far in this module, including course and module organization, structure, visualization, and ensuring content is accessible, is that not only do they improve the learning experience of all learners but they anticipate some of your learners’ accommodation needs. Creating accessible content also sets you up for success with learners who require additional accommodation.
Some learners may need course content transformed into another medium, such as Braille. Having your content developed as accessibly as possible ahead of time allows learners to have their material converted to the appropriate format, enabling them to effectively participate in the course. Learners are responsible for notifying accessibility services of their needs, and a staff person is often the one who will reach out to ask for your content so it can be transformed. This process often takes weeks (or months) and providing an accessible Word document of your content can speed up the process significantly.
