25 Teaching
Reading time: 13 minutes
Overview
By the end of this Chapter, you will be able to identify various ways to communicate with the course professor, students, and other TAs. You’ll learn about how to communicate in the common context for teaching: the tutorial session.
Sections in this chapter
- Communicating with the course professor
- Communicating with students
- Working with other TAs
- What to do if you get sick
- Your role
- How to prepare for a tutorial
- What to include in a tutorial
- Synchronous facilitation options
- Asynchronous facilitation options

Communicating with the course professor
The course professor will typically contact you in the week before classes start. You don’t have to wait, though! Do feel free to contact them first. During an initial meeting with the course professor, you will ideally receive a copy of the course syllabus, access to the course’s learning management system (OnQ at Queen’s), and have a discussion about roles and responsibilities in the course. Remember that you are supported by a union, that can also provide you will answers to questions.
Questions to ask:
General
-
- What are my responsibilities in the course?
- What are the timelines for accomplishing each task (e.g., responding to students’ emails, marking)?
- What are the dates and times I am expected to be teaching?
- What are the safety procedures in the department?
- What technologies will be used in the course (e.g., Teams, Zoom)?
- What should my level of expertise be in using these tools?
- Where do I go to learn to use these tools?
- Do I have access to be able to share digital materials with the professor and students?
- Should I attend classes?
- If so, what is my role during classes (e.g., attendee to learn the material and expectations, facilitator to help monitor and respond to questions in the chat, help facilitate breakout groups)
- What are some ways I can balance my TA position with my academic obligations?
- What are my responsibilities in the course?
Tutorials
-
- How do you envision tutorials to be run?
- Are there examples of past material that I can use?
- Other TAs can offer insight from their experiences and provide feedback and resources
Marking
-
- What kind of marking will be involved?
- How is the marking done and returned to students (e.g., marking scheme, rubric, marking software)?
- What are the timelines/deadlines?
Communication
-
- What is the best way to communicate with you?
- Would you like to receive feedback about how the course is going? If so, how should I share that feedback (e.g., survey, email every week with ideas)?
What to do if you get sick
If you get sick, email the course professor as soon as possible to tell them that you are sick and what aspects you will not be able to complete. It’s helpful if you can find yourself a replacement for the task you will be missing; ask another TA in the course if you can trade a session.
Communicating with students
You can tell students in the course both the methods they can use to communicate with you and the response times to expect. For example: you might say that students can email you with questions and that you check email every 24 hours. You can ask for the course code to be included in the email subject line (e.g., CHEM112 Tutorial question). Alternatively, you may say that you prefer that communication goes through another channel, such as a discussion forum set up by the course professor.
Sessions
Hold tutorial sessions or office hours either in person or via videoconferencing (e.g., Teams, Zoom, Mondays 1–2 pm EST). For virtual office hours or tutorials, audio connections can be challenging and uneven, so some students may not be able to follow live presentations reliably. It’s a good idea to record sessions and post them later on the course’s site. This way, students can access materials even if they are in different time zones or have challenges at home that prevent them from participating at scheduled times.
In science, it can be difficult to communicate without drawing. For in-person tutorials, make sure your room is equipped with a chalkboard or whiteboard, and use this instead of creating PowerPoint slides. It’s important to get the students drawing and writing with you because this helps improve memory.[1] If your sessions are online include some way to illustrate concepts visually. The minimalist approach is to draw something on a piece of paper and hold it up in front of a webcam. Better approaches would rely on having a whiteboard or blackboard on a wall behind you, or you could use digital writing (e.g., connect an iPad to your computer, and share the screen in Zoom).
Discussion forums
- Be present by regularly answering questions at scheduled times.
- You don’t have to answer every single question or answer immediately. Waiting even a few hours can give other students a chance to reply. You may want to have a faster response rate the day before a major assessment.
- Encourage students to answer each others’ questions. For example, you could respond to a post asking about how to study with: what have others found works for them? What are others focusing on?
- As with email, be clear about the response times to expect and what happens on weekends (e.g., that you check the forum on weekdays only).
- You may want to summarize key errors, questions, or messages that you are seeing or receiving repeatedly. A summary message can help those who are on the forum less frequently or who are feeling overwhelmed with knowing what to focus on.
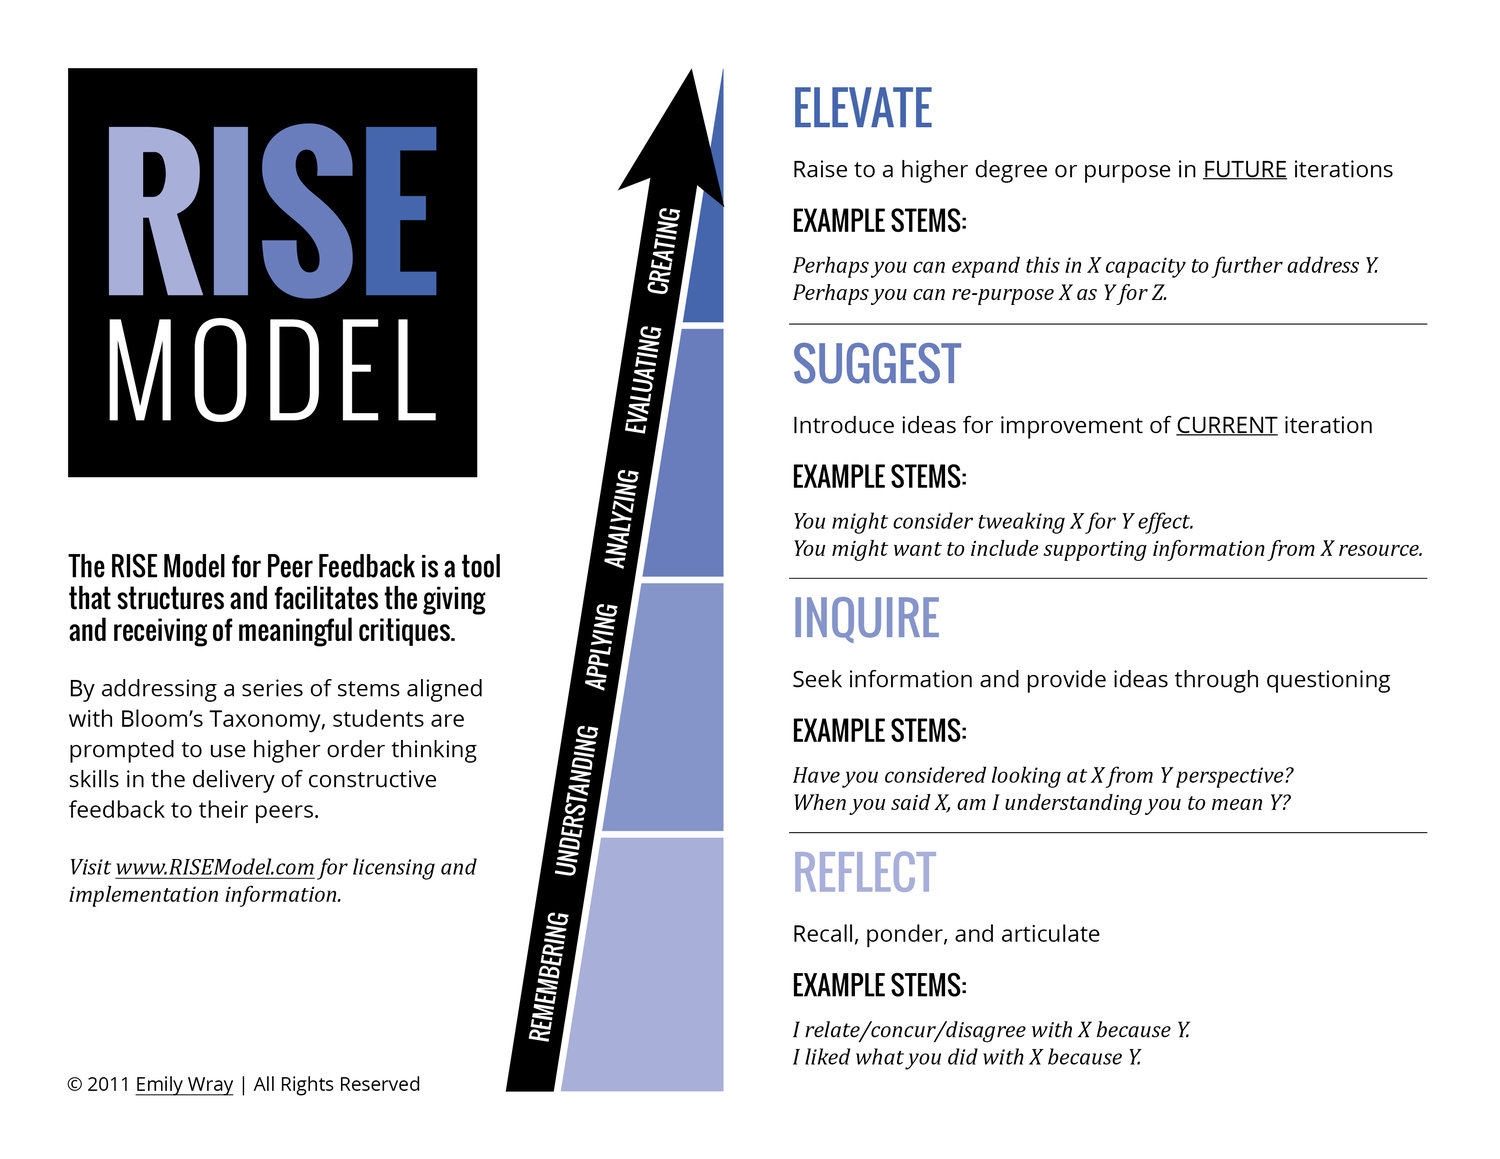
- You can give more strength to students’ contributions with simple statements such as “I agree!” or “Thank you for that contribution”. The RISE model below (Figure 25.1) provides ideas to give even more constructive suggestions.
- Share information on feedback with students to promote helpful and respectful online discussions and reshare when a refresher is needed, such as the RISE model below.
Working with other TAs
You may be working with other TAs in the course and to give a tutorial. If that’s the case, meet ahead of time to plan how you want to give the session, your vision, timelines, and each person’s roles. Meetings can be done using videoconferencing (e.g., Teams, Zoom), which have a chat function to share documents/links and allow screen-sharing. Some TAs you might work with could have more experience in a particular course, however, most TAs won’t have much experience with remote courses.
Your role as a TA
As a Teaching Assistant (TA) your role is to work with students to help them learn and apply the course content to various types of application problems and to answer their course-related questions. You can include a review of the course content and solve application problems within a tutorial session — the relative amount of each depends on what the students need most to learn successfully and will be decided by you and the course professor, with input from students. Get familiar with the software used in the course (e.g., OnQ, Teams, Zoom). Most of your time is spent preparing for and conducting the tutorial, however, you are also expected to answer student emails and proctor exams.
Keep things simple by starting with the essentials and introduce new aspects slowly, such as new technologies or questions types. Look into this website for tools to help science students improve their own learning: https://www.learningscientists.org/
What’s different in remote sessions?
Tutorials conducted remotely require that all in-person communication with students will be replaced by online-only communication (e.g., emails, discussion forums), Tutorials are a community built among students and TAs, so special attention to building a community online can help maintain this important support for students in a remote course. Remember that most students, professors, and other TAs will also be unfamiliar with participating in a remote course. For example, students may not know the appropriate way to ask a question in a remote session. Patience and clear communication are key. Asking for regular feedback from students and modifying your approach accordingly can help.
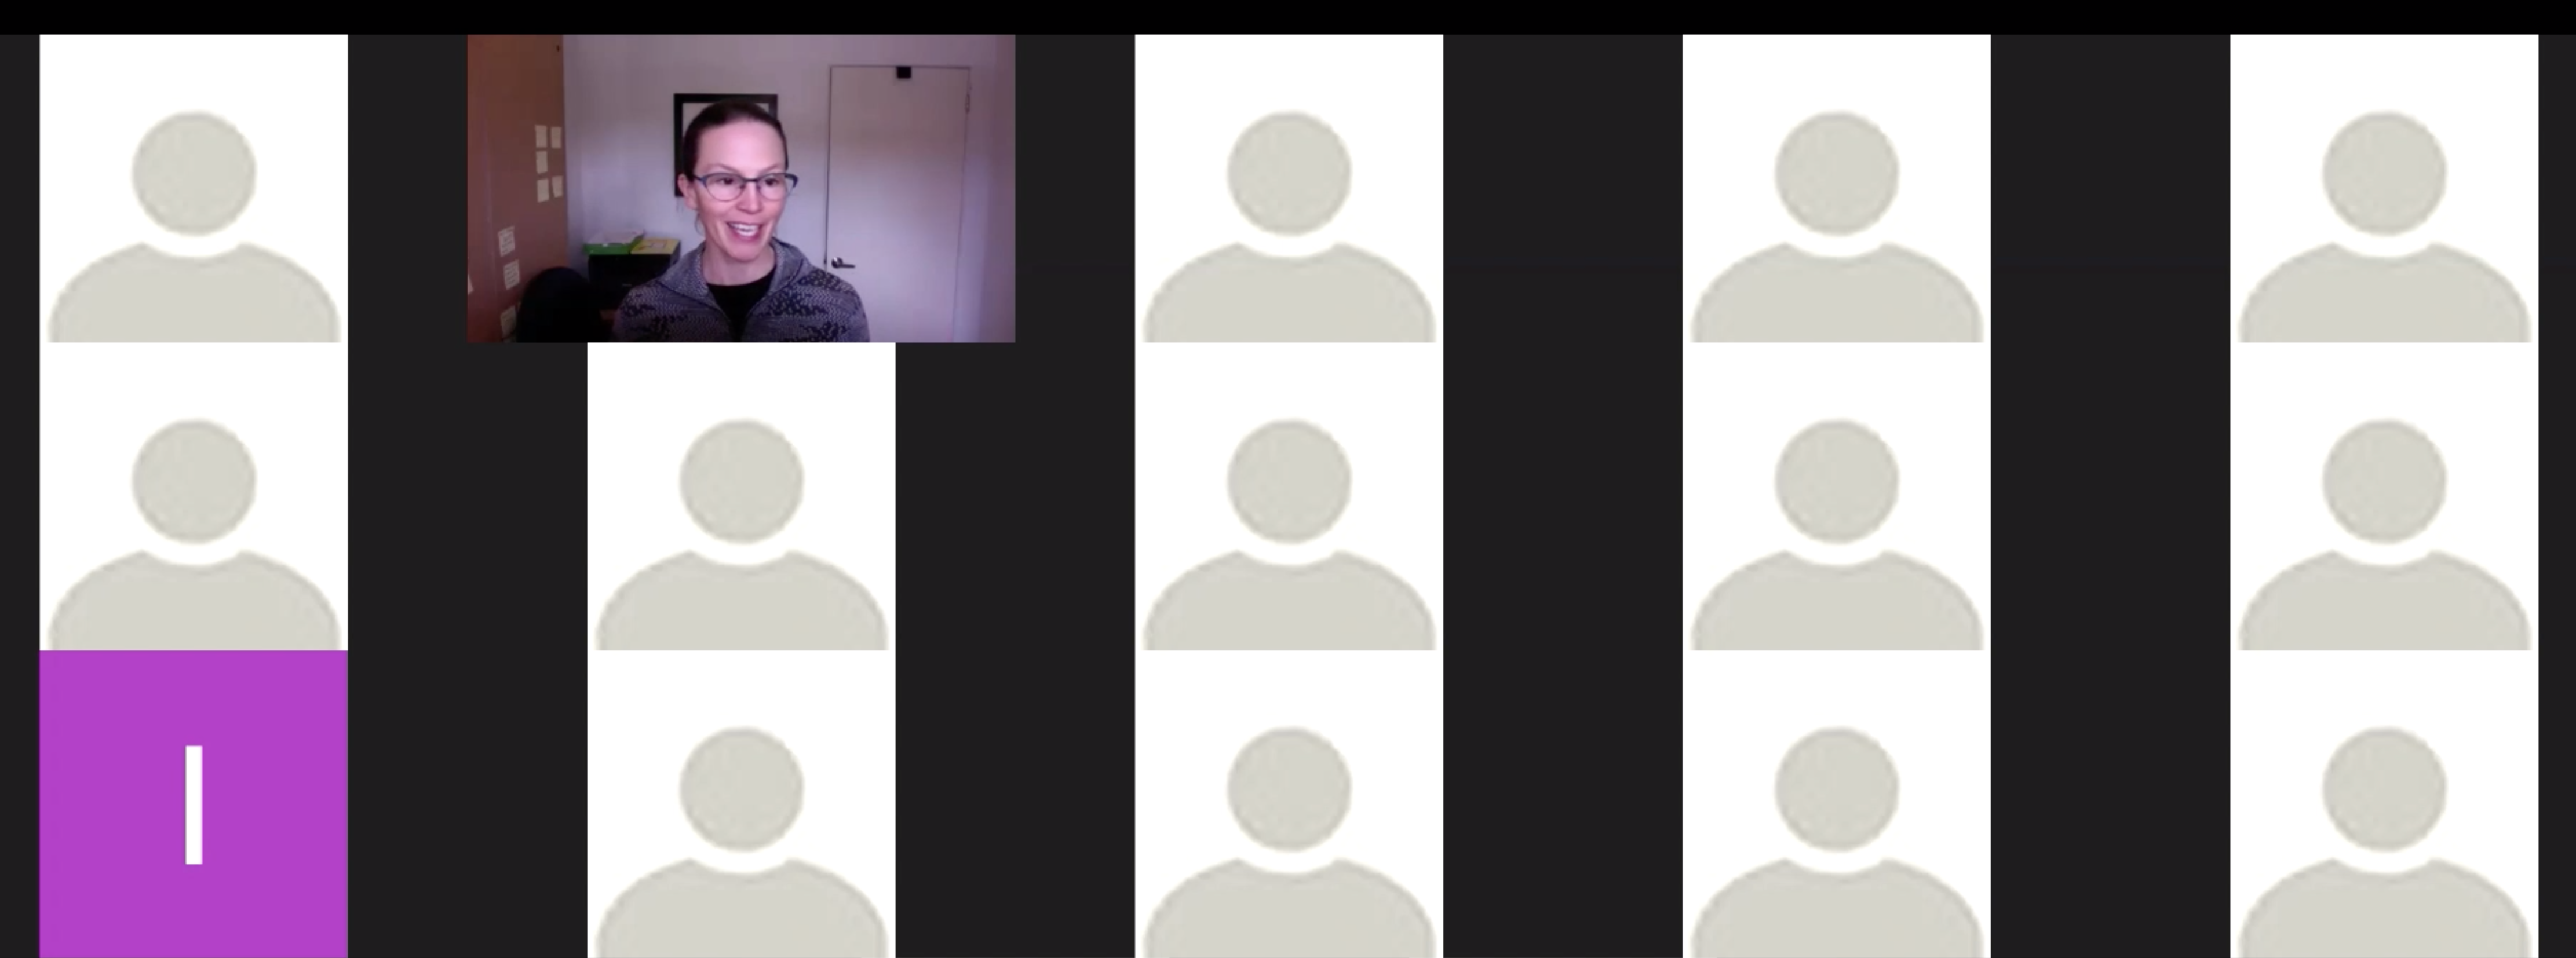
In a remote learning environment, explaining concepts to a purely digital classroom can feel strange. For example, you might be speaking to dozens of people whose cameras are all switched off and whose microphones are muted. In other words, you will be teaching in the absence of any audio or visual feedback from your audience that they are following along with your presentation (Figure 25.2.), or even being able to tell for certain that anyone is paying the slightest attention. This is simply disconcerting.
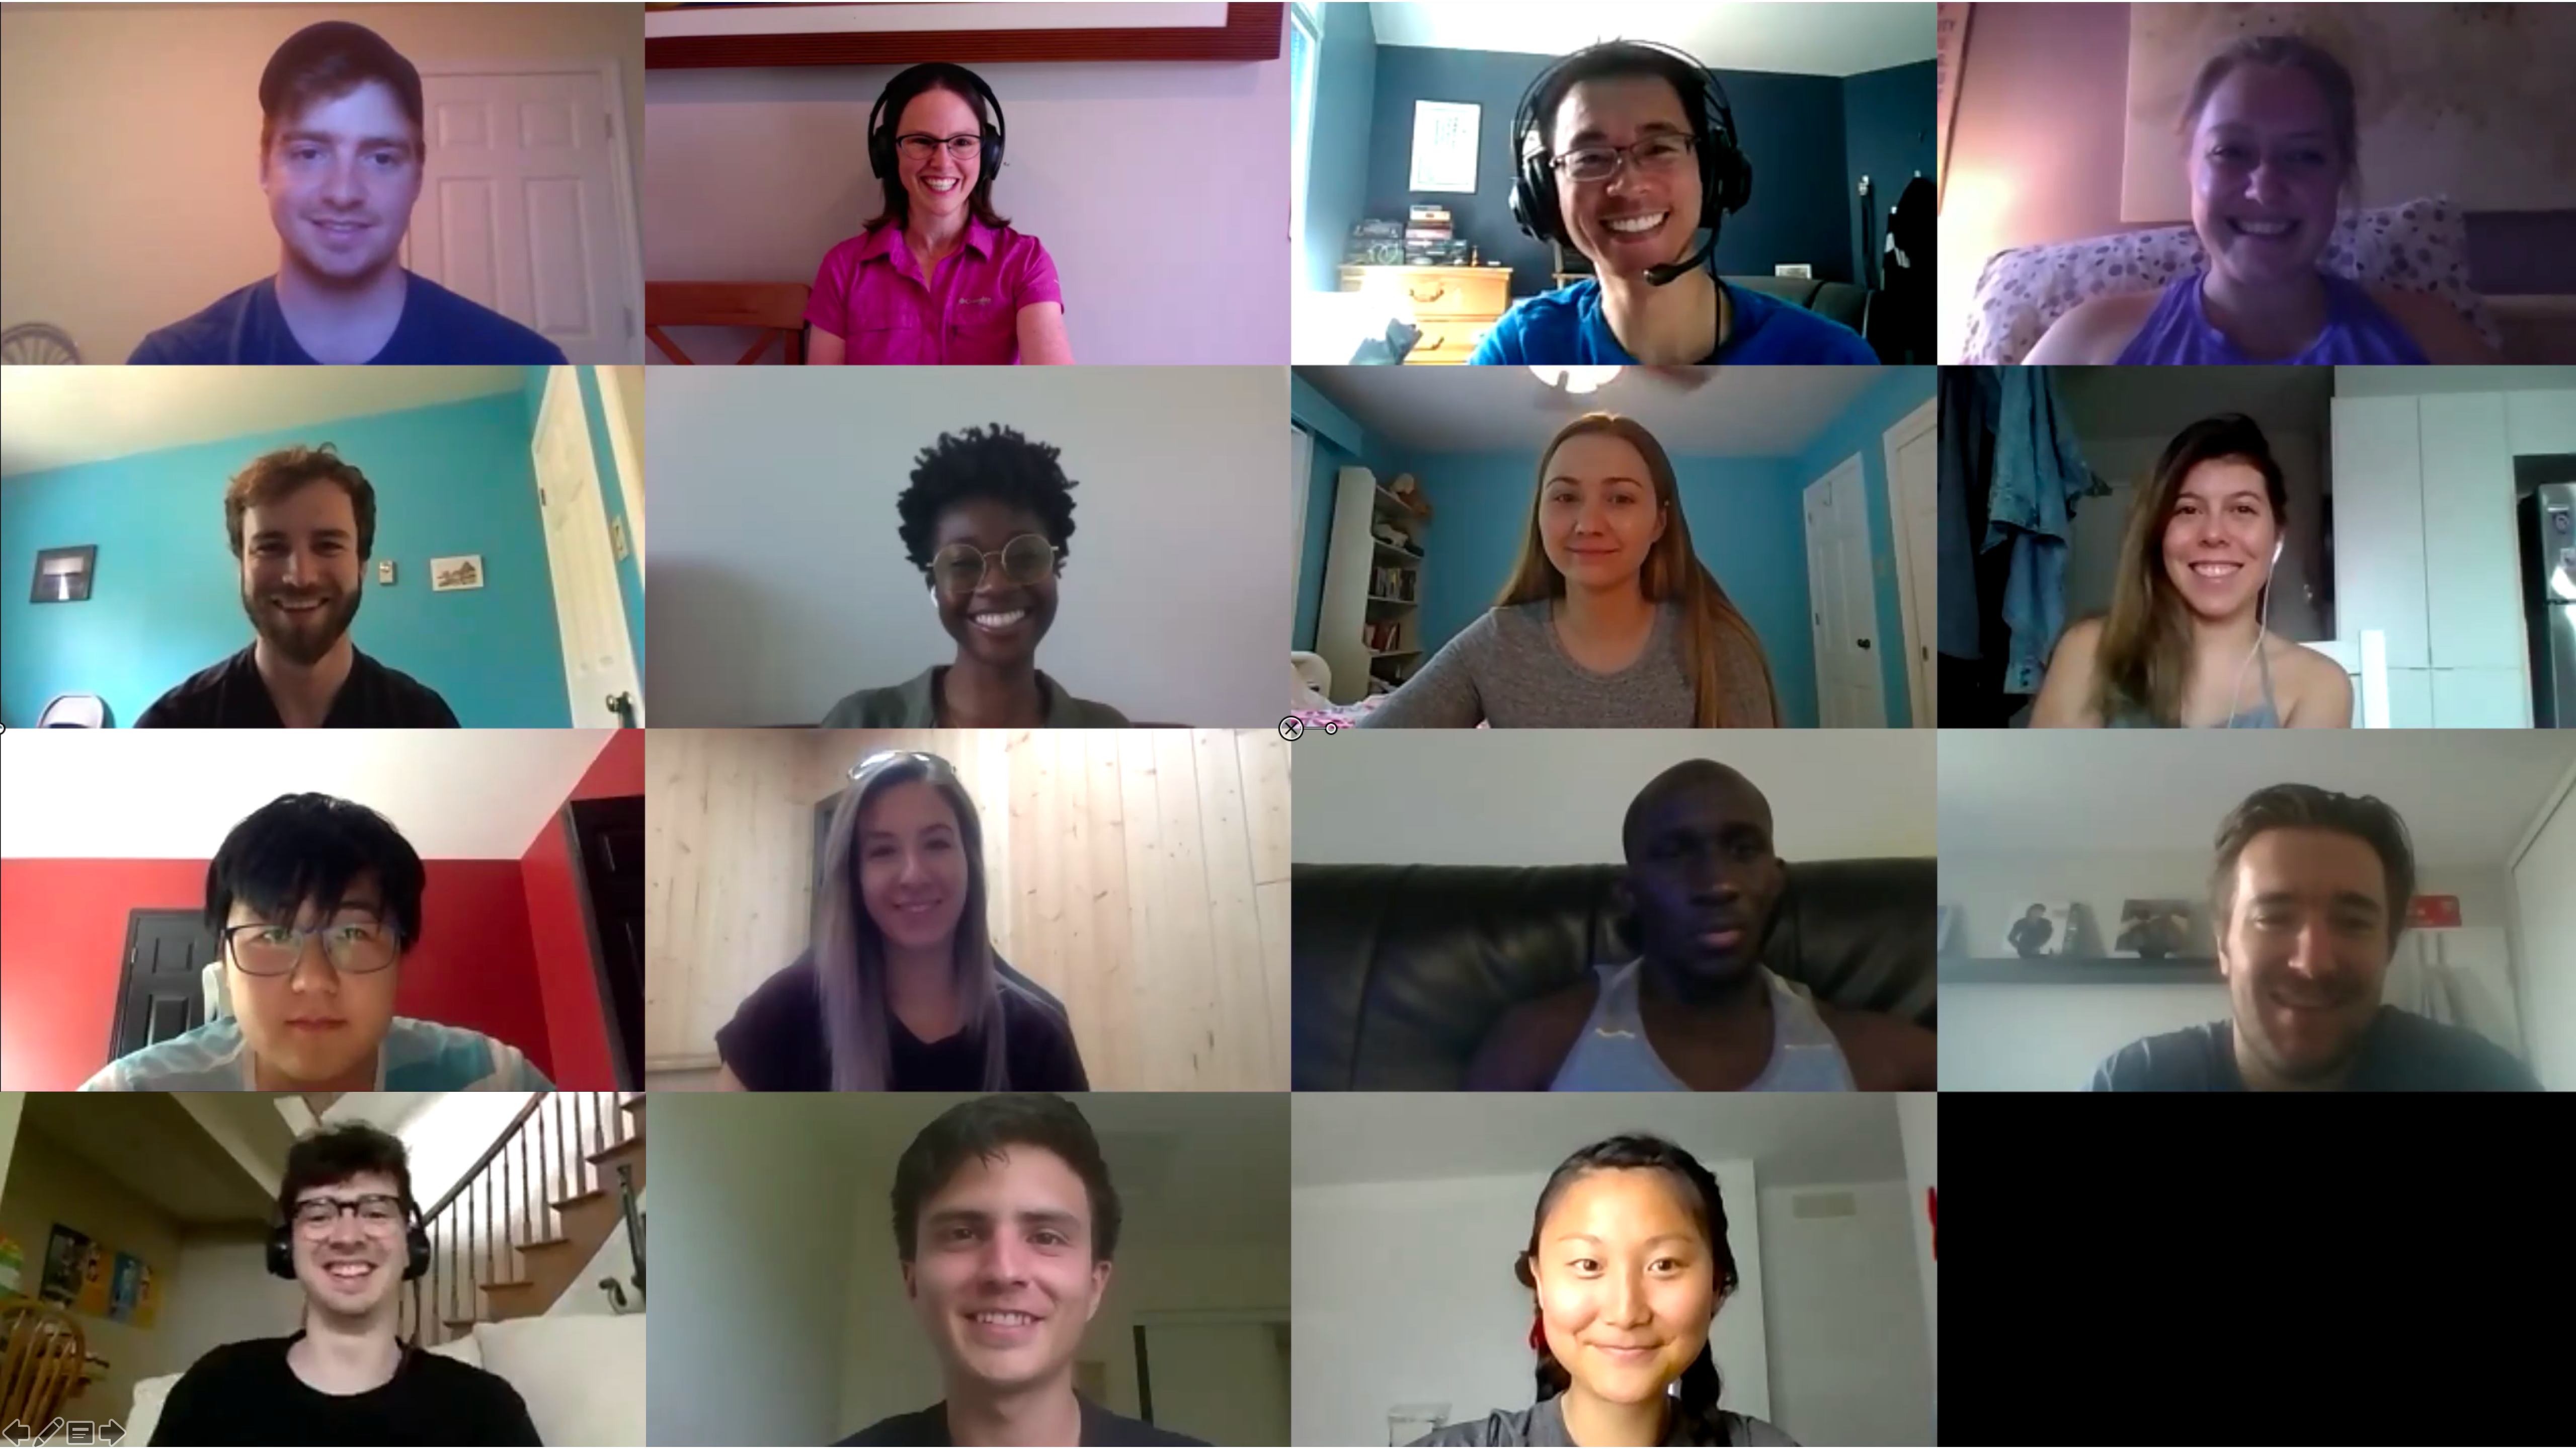
A simple thing to do is to ask students to keep their cameras on so you can tell that there are real people on the other side of your digital connection (Figure 25.3.), although it is always okay for students to decline to use video. You can also use strategies to make sessions more interactive, occasionally asking questions (e.g. “Are you following along with concept X? Please respond in the Chat space.”) or adding informal interludes where students answer a poll (e.g., Menti) to participate in a questionnaire to assess whether they are grasping concepts. More details about interactivity can be found below.
Prepare for a tutorial
Five aspects to consider :
- Communication: make sure you have clear expectations from the course professor about your role and communicate clear expectations to the students.
- Course information: read through the course syllabus, identifying key learning outcomes, and review the course calendar.
- Content: figure out what course content is available to you (e.g., course notes, problem sets, practice exams, textbook, previous tutorial content from other TAs)
- Technology: determine your access to the necessary equipment to conduct the tutorial and to complete related TA requirements (e.g., answering emails, online office hours).
- Videoconferencing apps, webcam (built-in or external), microphone (built-in or external), headphones, video-recording device, video-editing software, screen-recording software, digital writing software, tablet, scanner.
- Method of facilitation: choose how you want to conduct your tutorial based on the course, the students’ needs abilities, your personal preference and abilities, and your access to the relevant technologies
- Once you choose a method, you can always modify it as you go depending on feedback (formal or informal) to tailor the tutorial to students’ learning needs.
What to include in a tutorial
First, identifying the learning outcomes you would like to address helps to organize the general content. Learning outcomes are normally listed in the course syllabus or associated course texts (e.g., textbook, PowerPoint notes). Next, choosing how you can best help students achieve these learning outcomes can maximize the time spent in tutorials. Consider how to balance the review of relevant theories and topics with hands-on practice problems.
Reviewing theory can look very similar to brief lectures (e.g., Ellipses and Kepler’s Laws). Content for theory review can be adapted from the course notes, textbook, or any other relevant physical or online text. Providing students with different exposure to the course material than that from their lectures or notes can help fill gaps in their understanding. Digging deeper into some concepts, providing a broader view of others, or connecting a series of concepts may help students depending on the specific content and student. In general, keep the review brief and leave plenty of time for practice problems.
Practicing application problems can look very similar to exams (e.g., How To Draw An Ellipse). Practice problems can be copied from textbooks, problem sets (posted by the professor or from previous courses), or a variety of online resources. Having the associated answer key can simplify your preparation for the tutorial. Remember, the goal of going over practice problems with students is not just to reach the correct answer, but also to teach them how they can complete similar problems on their own. Pay special attention to how you choose to solve the problems and explain this with audio and visual cues to the students. Helping students prepare to solve problems on their own will require you to review your answers for each problem prior to the tutorial, making sure you understand each step well enough to explain it in detail. This preparation can also help you identify potential issues or mistakes, which you can also include in your explanation.
Once you know what you want to accomplish in a tutorial, you then need to choose how you will do that. Online facilitation options (below) discusses the synchronous and asynchronous options for remote tutorials.
Teaching Resources
Discipline-specific teaching approaches and resources can help you map the materials needed to create an tutorial. These approaches mainly focus on chemistry but could be transferrable to other disciplines.
Beginner: use PhET simulations and ACS virtual stimulations. Use ChemDraw to draw out mechanisms. Share screen with students and vice versa.
Take a look at the compiled list of resources for organic chemistry.
Intermediate: the ChemCollective is a collection of virtual labs, scenario-based learning activities, tutorials, and concept tests that TAs can use as content for pre-labs, alternative practice problems, and for in-class activities for individuals and teams. They include resources for chemistry topics in stoichiometry, thermochemistry, kinetics, equilibrium, acid-base chemistry, solubility, electrochemistry, analytical chemistry/lab techniques, physical chemistry, and properties of solution.
Advanced: CSD Teaching Subset can provide students the chance to visualize and manipulate molecules in 3D and to work with real measured data. There are several entries in the Teaching Subset that have been classified by various concepts such as: fundamental chemistry, drug molecules, symmetry, MOFs.
Additionally, the chemical engineering series of Wolfram System Modeler allows you to design, construct, and analyze process machinery.
Online facilitation options
Synchronous options
A synchronous tutorial involves live streaming (videoconferencing) and is great for increasing student engagement and building community, although such a format can be hard on learners and TAs with limits to their technology, or in different time zones. Further, students’ can be overwhelmed with too many things to keep track of. The synchronous format also imposes a fixed pace onto students, who may find it too fast or too slow.
- Set up and check your webcam and microphone. If you will be using digital writing, check your digital writing software and tools.
- Review the activities and timeline
- If you have slides to screenshare, ensure they are open and ready on your computer.
- If you are answering practice problems, have them ready for use — consider sharing these with students beforehand
- Get set up early — start the videoconferencing session 5 – 10 minutes early. This can help avoid late starts due to technical issues and gives you and students a chance to chat in an informal setting.
- Monitor the chat (and waiting room if this feature is used).
- Start on time (end on time, too)
- Introduce yourself to the class.
- Review your expecations for online communication with the students (new environment = new expectations!)
- Review how students can best participate and follow along (e.g., how to ask a question, how to prepare, how to take notes)
- Use check-in activities (in breakout rooms for large groups) to promote community among students.
- Discuss common questions or problems from students that you have seen in emails or the discussion forum.
- Quickly review content covered in the last tutorial and state intended learning outcomes for this tutorial
Asynchronous options
An asynchronous tutorial involves recording audio and/or visuals or providing additional notes for students without any online student presence during recording. Asynchronous options are great for reducing individual barriers to learning because students can watch/listen on their own time, pausing when needed. This format can be hard for learners and TAs because of reduced student engagement with their TAs and other students and difficulties adapting to self-paced learning.
- Set up and check your webcam and microphone. If you will be using digital writing, check your digital writing software and tools.
- Review the activities and timeline for the tutorial
- If you have slides or a PDF to screenshare, ensure they are open and ready on your computer.
- If you are answering practice problems, have them ready for use —consider sharing a version without any answers with students beforehand
- Preparation will improve the flow and reduce the amount of video editing required after the tutorial is recorded.
- Introduce yourself to the class
- Explain how you would like to receive questions or feedback from students (e.g., discussion forum, email, anonymous questionnaire)
- Review how students can best follow along during a recorded tutorial (e.g., how to prepare, how to take notes).
- Discuss common questions or problems from students that you have seen in emails, the discussion forum, etc.
- Remember, students can’t ask you questions in real time in this format, so you might need to take extra time to review questions from previous tutoprials.
- You can also consider breaking the video into two recordings: one for previous content and one for new content.
- Quickly review content covered in the last tutorial and state intended learning outcomes for this tutorial.
Attribution
This chapter was adapted from Remote teaching: a guide for teaching assistants by Meredith Allen, Alisha Szozda, Jeremy Kerr, and Alison Flynn which is licensed under a Creative Commons Attribution-NonCommercial-ShareAlike 4.0 International License.
- Memory research ↵
