21 Poster Presentations
Read time: 8 minutes
Overview
This section will outline how to communicate your scientific research in the format of a poster presentation, and provide guidance on designing your poster.
Sections in this chapter
Environment and audience
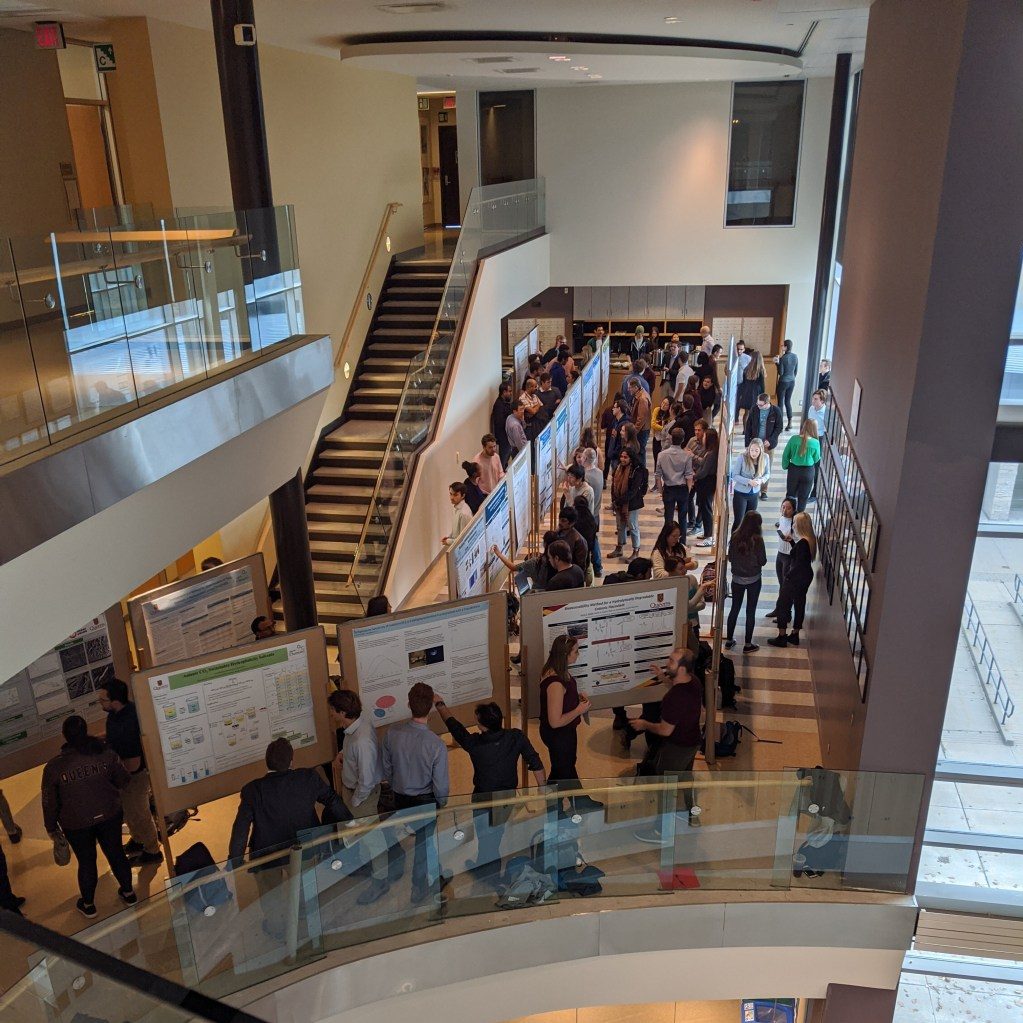
Many conferences have poster presentation sessions along with oral presentations. The poster presentation is a format introduced into the American Chemical Society meetings in the 1970s. This format allows more people the opportunity to present their work since many posters can be scheduled for the same time period and in one large room.
The format of a poster presentation allows for a one-on-one and in-depth discussion between the presenter and viewer. For this reason, poster sessions are often combined with social mixers, where people can walk around and browse the posters.
Theoretically, the poster audience is more broad and diverse, since many disciplines present in one large room. For this reason, your poster should be readable or understandable in less than 5 minutes by someone not in your field, who has only general knowledge of the research area. People browse posters and look for something that interests them, and on average spend around 90 seconds viewing a single poster. However, the people who actually attend your poster will likely be those who are interested in your work or work in a similar area.
Attaching business cards and one-page copies of your poster allow viewers to contact you later and get the information without having to take notes.
Poster vs. Talk
Table 21.1. Differences between posters and oral presentations (talks)
| Poster | Talk | |
| Mode | Mainly non-verbal, visual | Verbal and visual |
| Audience | More diverse, passive | Captivated, expressed interest |
| Content | Contained body of work, a single set of experiments | More broad, with a critical literature review |
| Presentation | 1-5 minutes, but available to view for hours or days | A single 15-20 or 45-50 minute timeslot |
| Questions | One-on-one, extensive and lively discussion, likely to be interrupted | After the talk, involves the entire audience |
| Afterwards | Posters can be put on semi-permanent display | Slides archives and used for future talks |
| Acceptance | All submitted posters are usually accepted at conferences | Abstracts for talks are not always accepted to some conferences |
Verbal aspect
Posters are mostly non-verbal and visual, so most of this chapter will discuss poster design. However, the verbal aspect of the poster presentation is where many presenters struggle! The most common mistake is for presenters to launch into a detailed overview of the slides, starting at the introduction and working their way through the poster all the way to the acknowledgements. Even a 5-minute overview is too long at a poster! The issue with this approach is that the viewer cannot listen to you and think critically at the same time, and they lose the autonomy of exploring your visuals at their own pace. Follow these tips for a successful poster presentation:
- If someone shows interest in your poster, smile and introduce yourself, then wait.
- If they start to intently view your poster, let them do this silently without interruption.
- If they turn to you, ask if they would like a short overview of your work.
- Give them a very, very concise overview of your work (30 seconds maximum):
- Start with the key finding, from your conclusion, and state it in a single sentence.
- Then move on to your motivation and methods and details about the results.
- Make sure to pause and make eye contact, which will let viewers ask questions.
- Ask your viewer questions to gauge their interest and background, and encourage discussion
- Point to relevant things on your poster as you present.
There are some aspects of etiquette to giving poster presentations. First of all, you should be at your poster during the specified times. Socializing with friends should be a lower priority, so if your lab members are hanging around your poster you can politely ask them to give you some space. Stay tuned to social cues from your viewer, and let them view the poster silently if they seem to want that. Lastly, consider waiting until after the presentation for drinks.
Poster design
Format and Size
Posters should be concise, organized, and self-explanatory: the best way to achieve this is to have a central and obvious message. Beyond that, a poster should be easy to view from 1-2 meters away, which means you should limit text to short paragraphs (<20 lines) or bullet points. Remember that you are not writing a full paper! Any text should be in a simple Sans-Serif typeface (e.g., Arial, Verdana, Calibri) with adequate spacing, and large enough to easily read. Consider using a different font style for the title and headings than the main text. Follow this guide for minimum text sizes:
Title
100 pt (Verdana, bold)
Authors
36 pt (Arial, bold)
Headings
54 pt (Verdana, bold)
Main text
32 pt (Arial)
References
28 point (Arial)
Instead of text, use figures, graphs, and charts to visually communicate of your work. Make sure the text labels and axes are large enough to easily read, following the guide above.
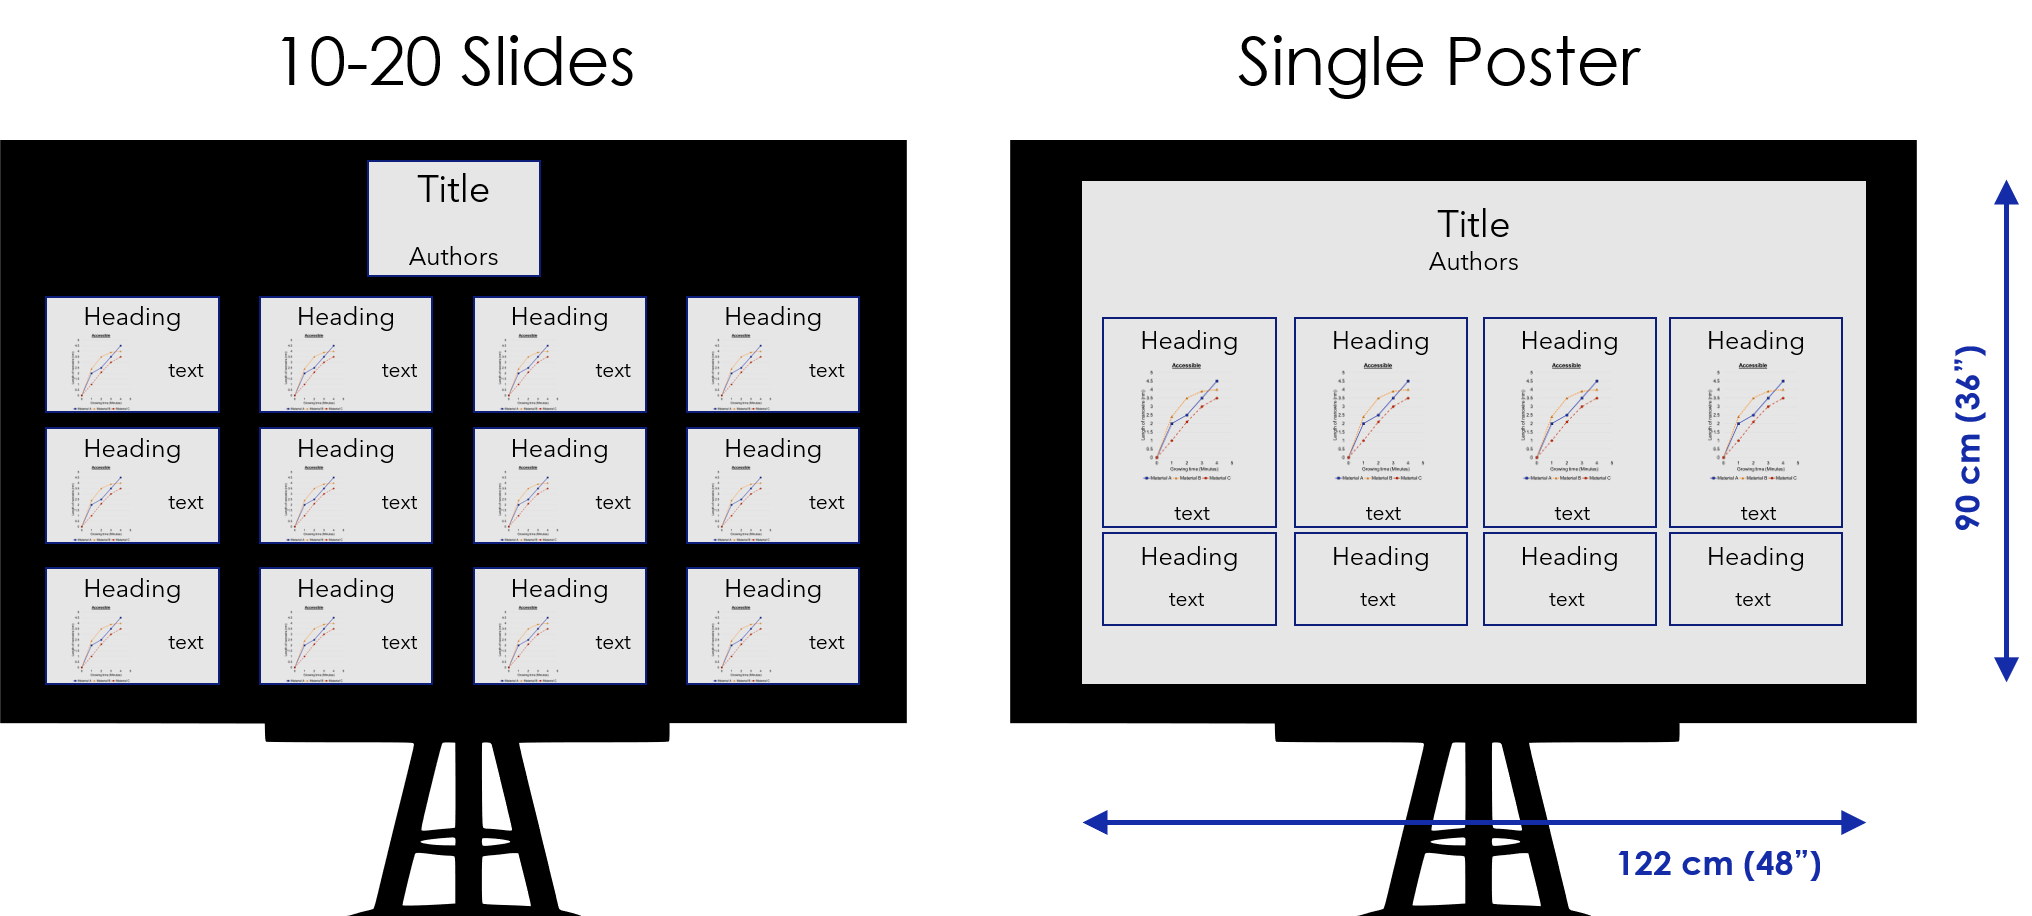
Check the conference website for instructions on the acceptable dimensions for posters. The typically allowed dimensions are 90 cm (36”) high x 122 cm (48”) wide. There are two ways to create your poster (Figure 21.1): 1) print 12-20 regular slides on 8.5″ x 11″ pieces of paper, and arrange them; 2) create a single large poster sheet, either printed on paper or fabric, to fill the whole space.
Sections
Posters have all the components of a paper, organized into sections. These sections are not always separate on your poster (see below ‘Layout’), but they should be present in one way or another. See Table 21.2. for a list of sections and their descriptions.
Table 21.2. Poster sections
| Title and Authors |
|
| Introduction |
|
| Methods |
|
| Results |
|
| Conclusions |
|
| References |
|
| Acknowledgements |
|
Sections in your poster are outlined by headings. Instead of using section titles like “Introduction”, use descriptive headings that tell the viewer the key message of the section (Table 21.3).
Table 21.3. Replacing poster headings with descriptive headings
| Title: “Impact of Greenways on Bird Habitat” | ⇒ | “Can Suburban Greenways Provide High-quality Bird Habitat?” |
| “Introduction” | ⇒ | “Birds of concern are in decline” |
| “Objectives” | ⇒ | “Objective: Greenway for the birds” |
| “Results” | ⇒ | “Nest predators less common in wider greenways” |
| “Conclusions” | ⇒ | “Potential solution: Wide corridor, trail near edge” |
Layout & Design
A thoughtful layout will provide a natural flow that guides people through your poster. It is best to arrange your poster in blocks of columns, so that the audience reads from left to right, top to bottom using “reader’s gravity”. You can number each section block or heading to help the reader to follow the flow of the material.
Posters with symmetric layouts and plenty of ‘white space’ are more visually pleasing, and can also help with flow. Also, place graphics and text to create a symmetrical balance.
Instead of headings like “Introduction”, use descriptive headings to clearly communicate your main points. A lack of headings, plus an asymmetric layout of the material, makes it difficult for the viewer to follow the flow or find a particular section of the poster.
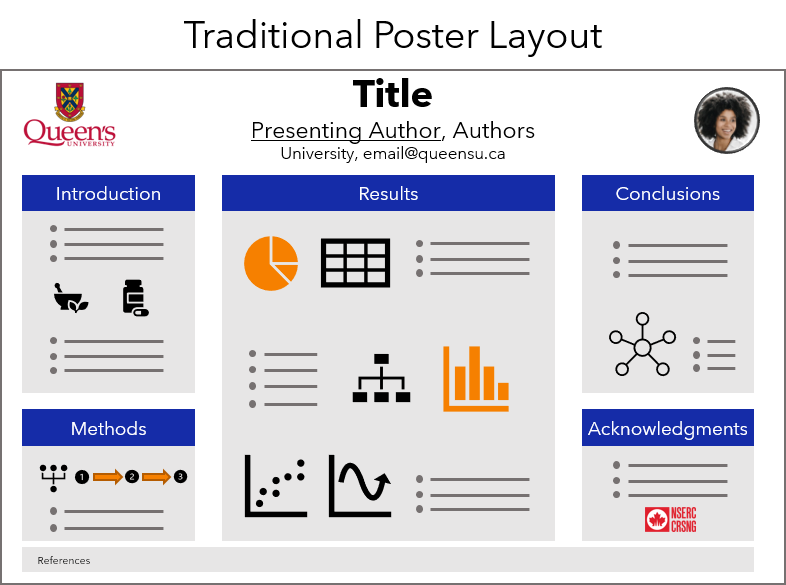
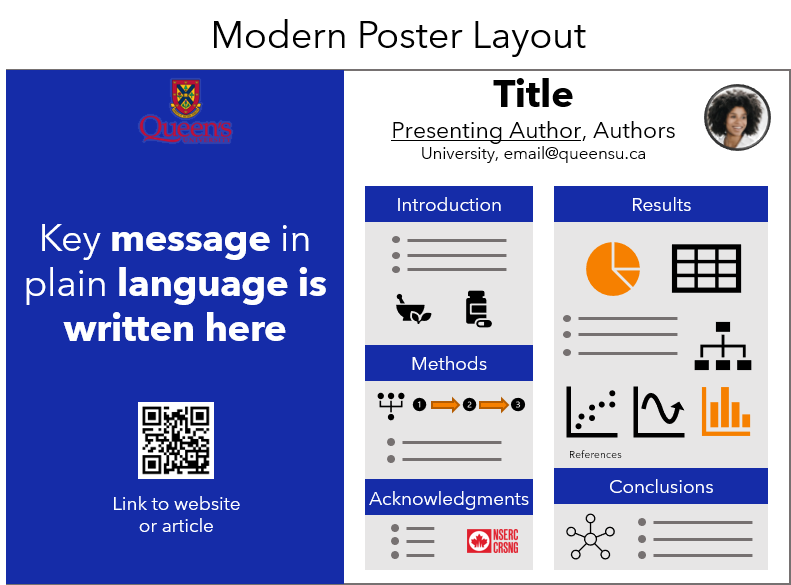
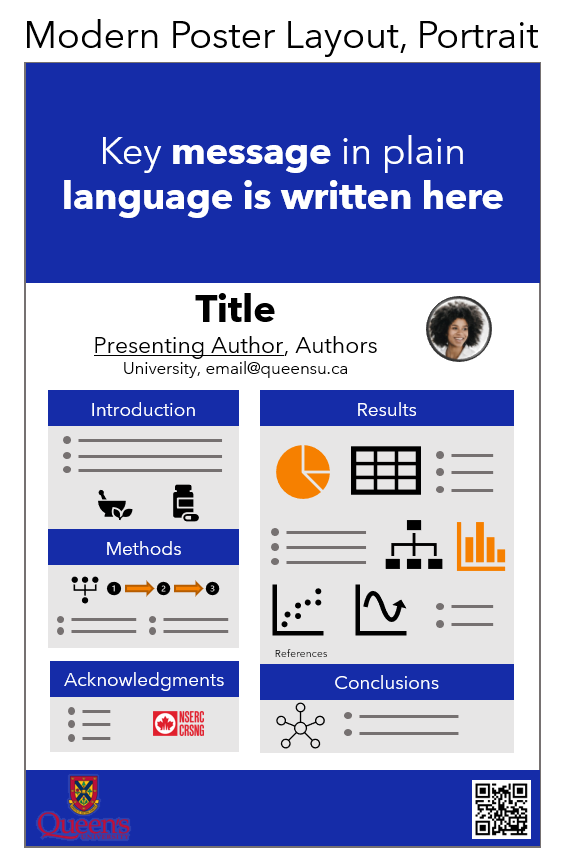
A popular traditional poster format (see Figure 21.2) has a landscape layout and three columns: 1) Introduction and Methods, 25% width; 2) Results arena, 50% Width; 3) Conclusions and Acknowledgements, 25% width. A more modern landscape layout (Figure 21.3) was designed by Mike Morrison,[1] which features a large takeaway sidebar with the key message, and a QR code that links to the paper or a website. This modern poster format also works well in a portrait format (Figure 21.4).
Colour
Stick to a theme of 2 or 3 colours, using an accessible colour scheme, and be consistent with the use of colours that have meaning (e.g., in legends). Don’t be afraid to use bright colours to attract attention, but if you overuse them you will wear out readers’ eyes. For the body of your poster, use a light coloured background and dark coloured text. Dark backgrounds with light letters can become tiring to read but are often used for headings.
Don’t start from scratch
There are many poster templates available online! Here are some PowerPoint templates and guides:
BetterPosters.blogspot.com landscape template
BetterPosters.blogspot.com portrait template
BetterPosters.blogspot.com Twitter template
Queen’s Chemistry Landscape Poster Template
Queen’s Chemistry Portrait Poster Template
Virtual posters
Online conferences and symposia are becoming more common, including virtual poster sessions. Virtual posters can have animations, videos, and audio narration. These posters can take many formats, but one common format is for the RSC Poster Day on Twitter. They published this guide to creating a version of your poster on Twitter, and how to identify your work using the right hashtag (e.g., #RSCOrganic, #RSCAnalytical).
Here are some links to the 2020 winners of #RSCPoster Day.
Super excited to share my research on the use of electrochemistry as a tool for drug detection in complex matrices as a #comicsforscience for my first #RSCPoster#RSCAnalytical #RSCPhys #electrochem @DennanyChem @PamelaAllanChem @CarnegieUni @StrathChem @StrathForensics pic.twitter.com/ISzJ55Hbqh
— Kelly Brown (@kellybrown_94) March 3, 2020
Excited to share my first #RSCPoster and looking forward to interact with all the #chemtweeps to discuss magnetic photocatalysis 🧲💡 #RSCCat #RSCNano #RSCMat pic.twitter.com/XzwxnIYJyh
— Julio Terra, Ph.D. (@_julioterra) March 3, 2020
Here we go again!
NEON can deny, oops I mean no-one can deny Hydrogen's BRIGHT future for renewable energy!
Here is my fun twist on my LIGHT weight hydrogen storage for mobile fuel cell applications research at @lborouniversity @LboroScience #RSCEnergy #RSCPoster pic.twitter.com/8DzRUHobiA
— Lizzie Ashton (@LizzieRAshton) March 3, 2020
- "Critique: The Morrison billboard poster", Zen Faulkes, April 11, 2019, Better Posters. Accessed 2020-08-31 ↵
