5 Creating and sharing content (e.g., videos)
In this chapter
- Suggested weekly overview
- Building the course in Brightspace
- Deciding how to share content
- Curating content
- Creating content, particularly videos
- To go deeper
Suggested weekly overview
Ideally, each course decision will be aligned with:
- The intended learning outcomes
- Your intentions for the course, such as the learning experience you hope students will have
- Abilities: both yours and the students’
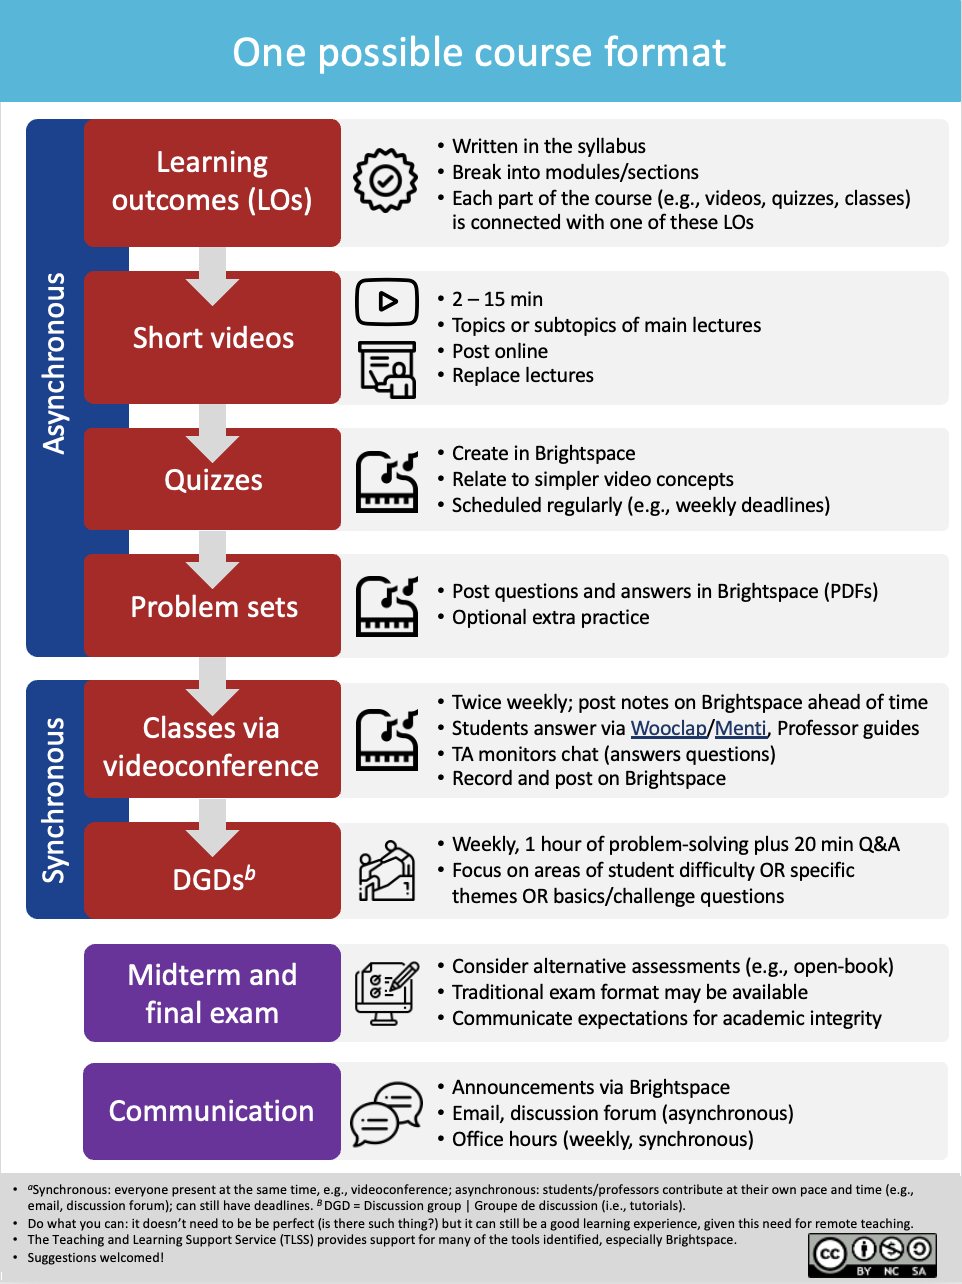
The following graphic depicts how the various elements can play out in a course. Please feel free to adapt and share with students; the PPT file can be found in the chapter: Quick start overview and resource documents. PDF version here.
Building the course in Brightspace
The TLSS offers guides and support for creating each aspect of the course in Brightspace. You could also use the Brightspace template that we created—including the template of a syllabus—and adapting it to your own course’s needs. These files can be found in Quick start overview and resource documents.
In the sections below, we describe how to make specific decisions about sharing content, plus ways to curate and create the content you want for your course, such as how to make videos.
Deciding how to share content
Synchronous versus asynchronous
Ideally, the remote course will have a mixture of synchronous and asynchronous learning options.
A purely synchronous remote course would involve live streaming lectures without recording them. Such as format is hard on learners, teaching assistants (TAs), and professors for many reasons:
- Technology limits access: students with poor/no wifi struggle to hear, see, and participate. Dropped connections mean missed information. Working in different time zones make attendance difficult.
- Many students will have a poor experience if they can’t connect efficiently. Long, live lectures are difficult to engage in. These issues can lead to poor student experiences and they will understandably complain. These issues could lead to problems of recruitment and retention down the road if courses gain bad reputations.
- A solely synchronous course creates obstacles to learning. Students’ cognitive loads can get too high with too many things to keep track of. Problems with equity can grow larger. The online format imposes a fixed pace onto students, who may find it too fast or too slow.
Often, explaining basic concepts works well asynchronously (e.g., recorded videos).
Synchronous time (e.g., videoconference) can be used for students to practice in groups and receive immediate feedback. Videoconferences can be very useful in courses, but require high bandwidth and immediacy.
Considering bandwidth and immediacy
Bandwidth limitations will cause students (or you!) to lose access to the livestream intermittently or for a long time. Bandwidth problems are likely to arise for any number of reasons. Students (or you) will be working from locations that may be subject to wireless interference, remote, or they may not have access to high speed connections. Bandwidth problems can interfere with every part of synchronous teaching, like posing questions for students to discuss in a breakout room (like in Zoom). Students with bandwidth problems may need extra time to download materials before they can use them.
Challenges with immediacy can create or exacerbate equity issues. Immediacy refers to how quickly we expect responses from each other when interacting. For example, when present in person, we anticipate an immediate response when asking someone else a direct question (high immediacy); when we email, a delay is normal (low immediacy).
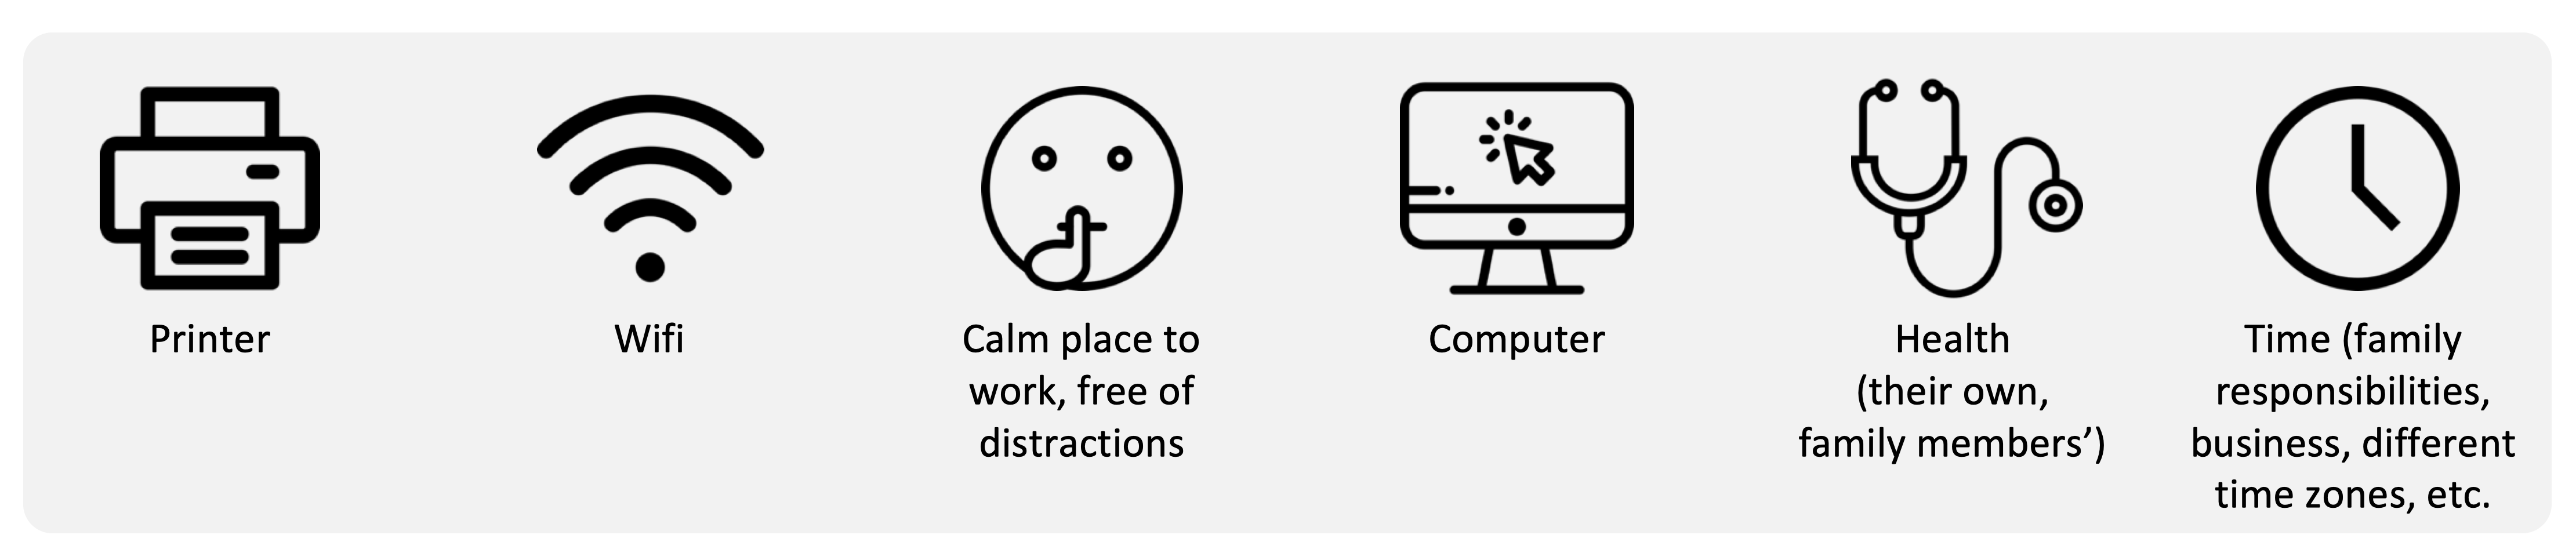
Immediacy requirements can present challenges. If students must work remotely, they may be working in an environment that is not particularly effective for studying at all times, or one in which there are many distractions or obligations; child care is one example. These issues apply both to students and professors.
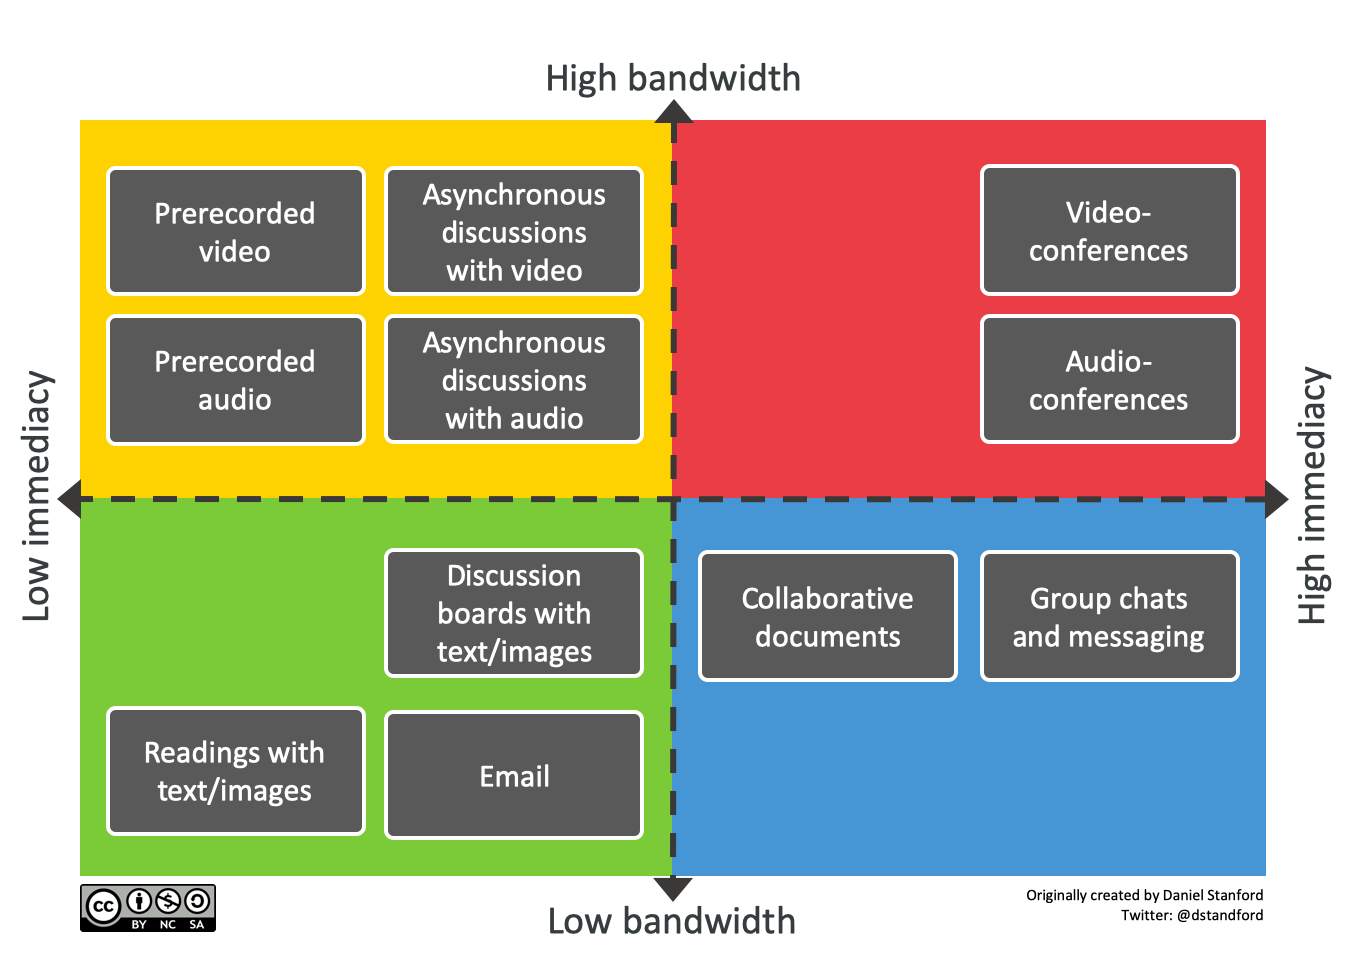
We recommend against extensive use of high immediacy/synchronous approaches. Ideally, students will have choices in when to attend to course obligations so that they can also balance their current life obligations. The figure below shows some examples of how various course activities rank in terms of bandwidth and immediacy. PDF version.
We created a series of examples that suggest ways to find reasonable tradeoffs between immediacy and bandwidth. Our intent here is to take some of the pressure off both students, TAs, and professors.
Examples
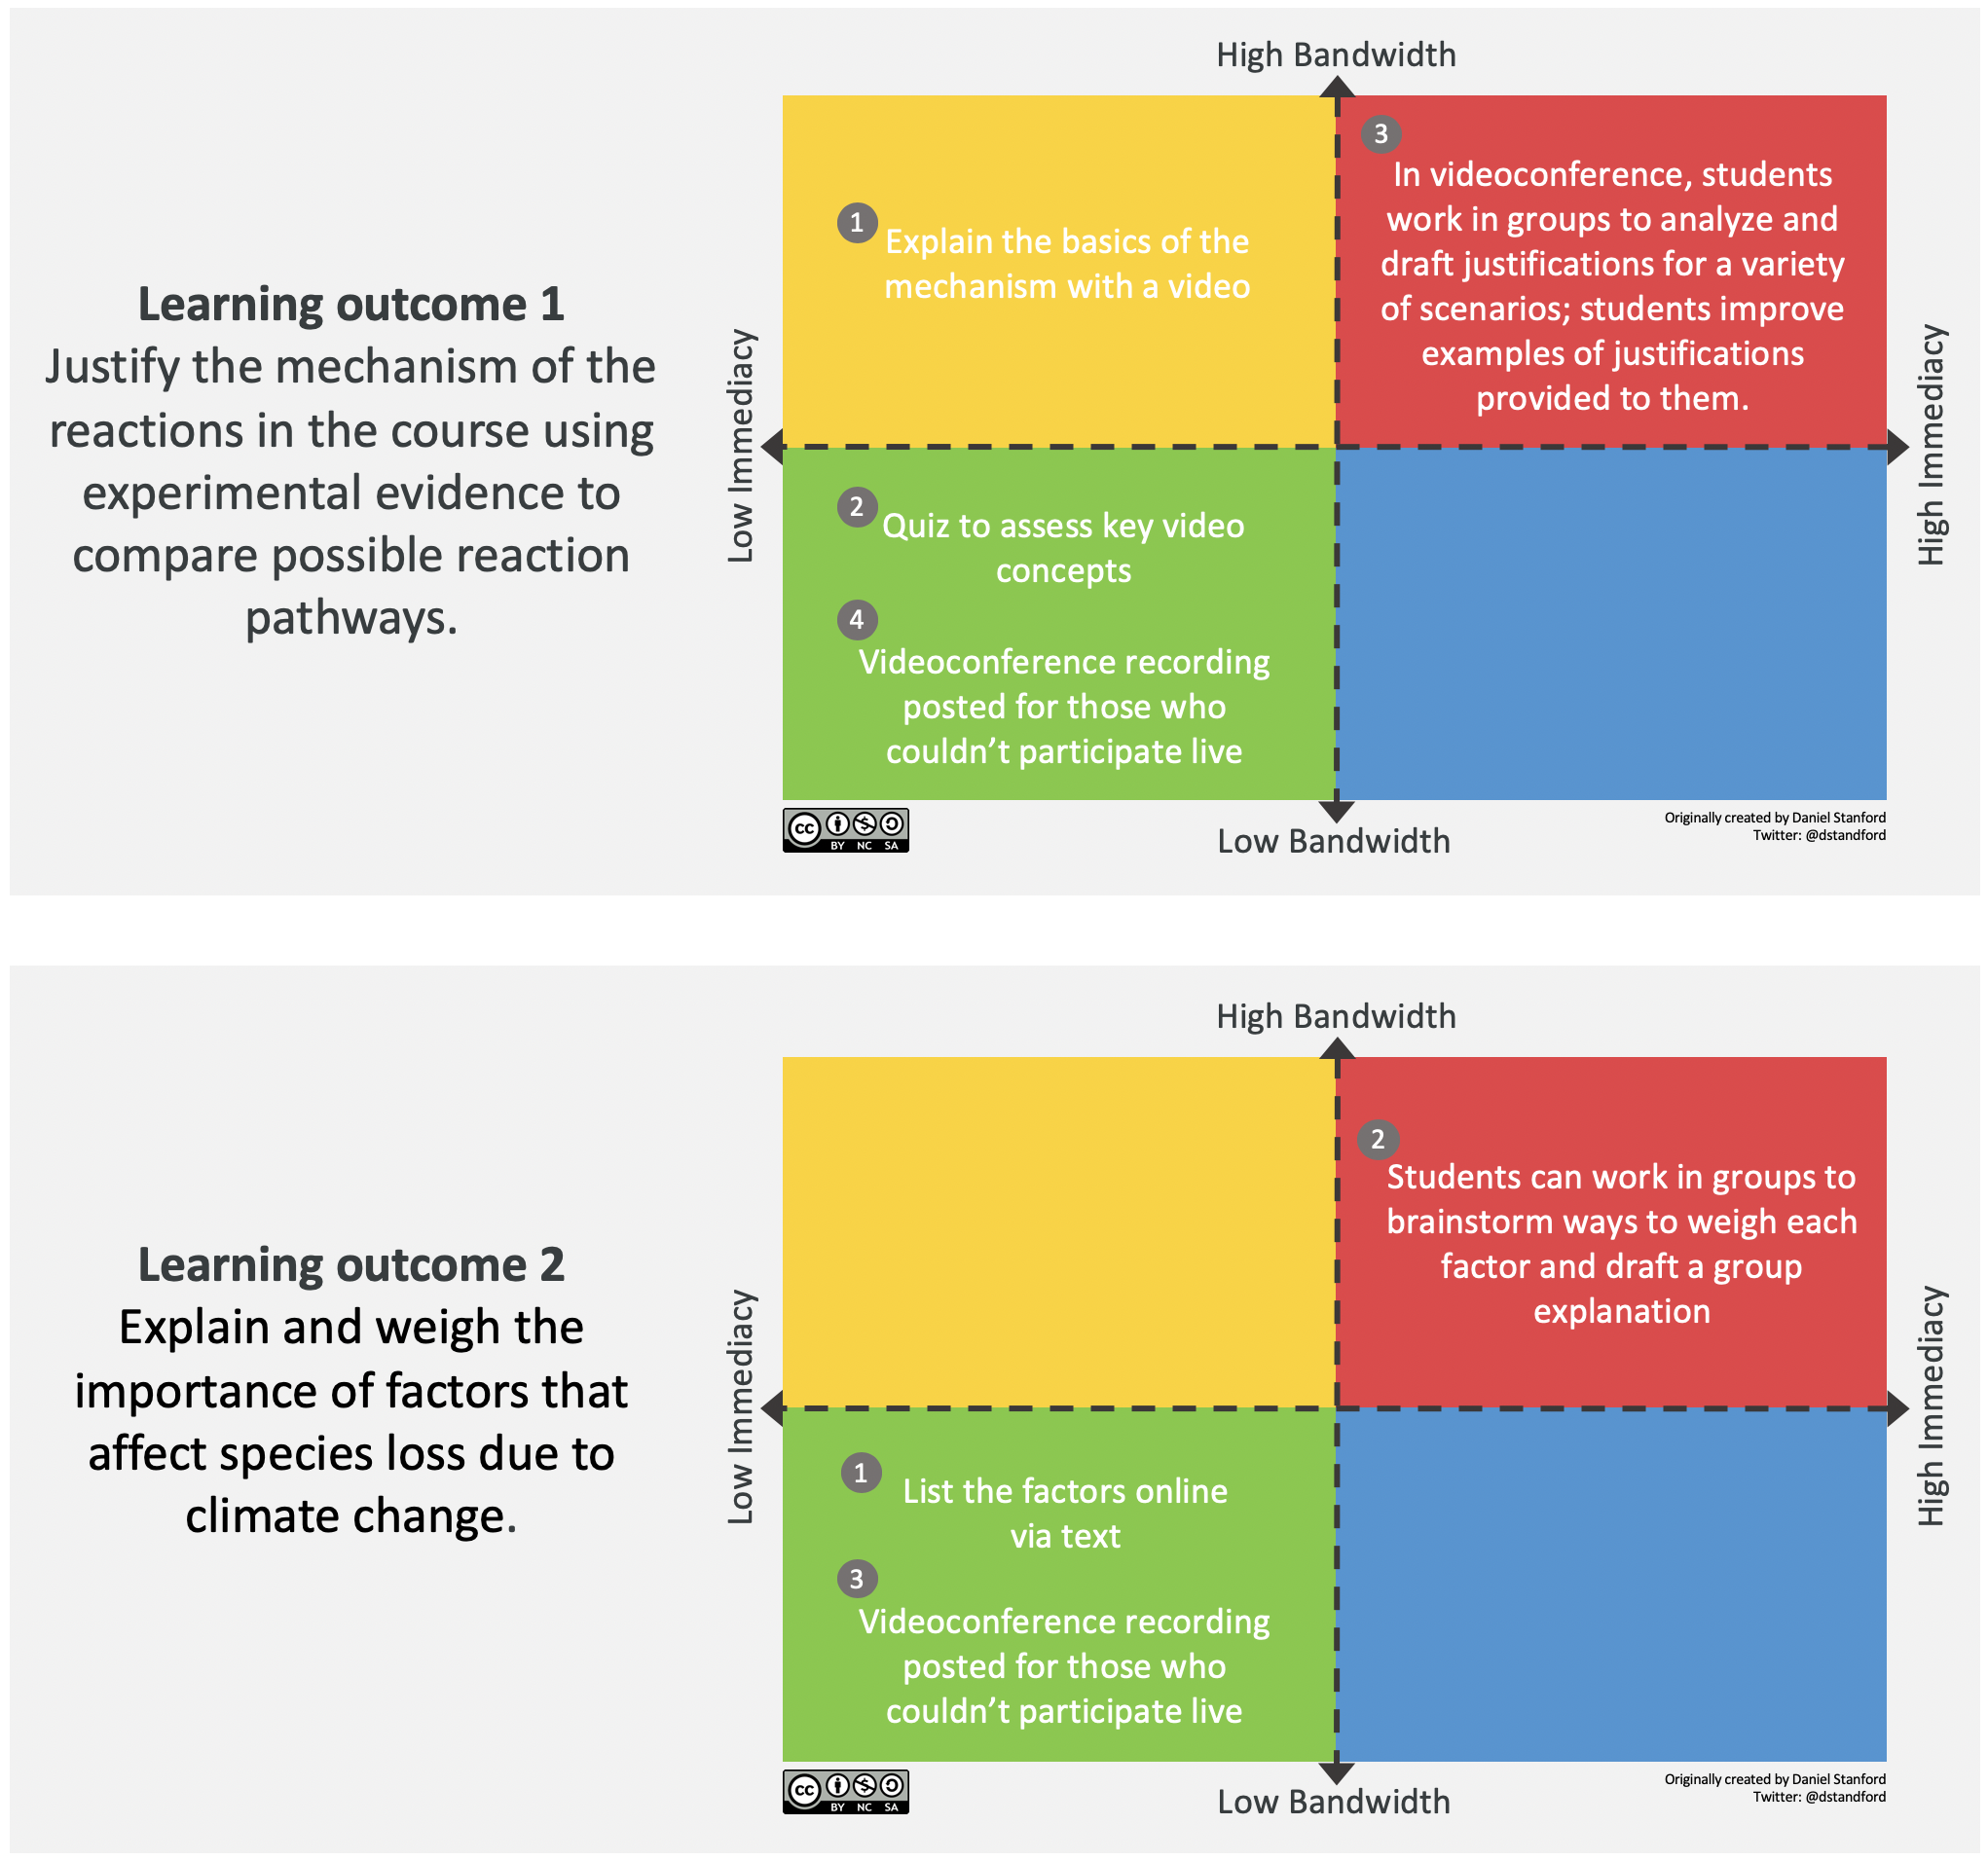
Each example that follows is a learning outcome followed by teaching decisions that reflect a specific compromise between high and low immediacy, and between high and low bandwidth requirements. PDF version.
Determine how much time students will spend
Emphasize the time students spend on task over “contact hours”. Design opportunities to engage deeply with learning in authentic contexts, rather than superficial approaches. Here is a useful calculator for estimating course time. The University of Windsor’s Office of Open Learning recommends that students should spend 6 – 9 hours per week on learning activities in a course, including lectures, watching videos, readings, working on assignments, independent research etc.
Curating content
Curate before creating
First, gather all the material you already have available to re-use if possible. Curating will save you time! There are many sources of content:
1. Seek alternatives to copyrighted materials, including public domain, open access, creative commons, links, and insubstantial use.
A main source of resources are Open Education Resources (OERs), which are “teaching, learning, and research resources in any medium—digital or otherwise—that reside in the public domain or have been released under an open license that permits no-cost access, use, adaptation, and redistribution by others with no low limited restrictions.” –UNESCO Some sources of OERs include:
- Ask librarians. uOttawa maintains a list of OER repositories
- eCampusOntario has an Open Library plus other teaching/learning resources
- Discipline-specific repositories exist, including for laboratories (e.g., ChemEdCanada.com)
- Video sources such as Khan Academy
- Image sources, such as Pixabay, Flickr, and Flaticon
2. Copyrighted materials (video, text) may be desired sources. For these items, you could:
- Send students directly to the source by sharing a link
- Request or require that students purchase the material (e.g., course textbook)
- Explore exceptions to copyright through uOttawa’s Copyright Office
Writing text or preparing slides
When you are writing stand-alone text in online courses, full sentences are preferable to bullet points. Bullets on slides can be explained in person or in video but the meaning can often be unclear when seen out of context in stand-alone text. That said, be a brief as possible an avoid being redundant–repeating key points is important face-to-face as students may have missed the message or not realized the importance. Online, you can emphasize the key messages and they can always return.
Did you know? The library can help with scanning text and other course materials to help ensure that the resources are accessible and follow copyright regulations.
Creating content, particularly videos
General guidelines
As needed, create new material. There are great explanations for creating instructional videos (e.g., professors, Columbia, Edutopia, TechSmith). We also provide a series of examples in the section: Specific examples of video set-ups. In short, videos should ideally:
- Keep it brief (2 – 15 minutes, like TED talks). Ideally, videos will be centred on a single topic or sub-topic. Long video recordings (i.e., > 20 min) are difficult for many reasons, as they make it hard to: keep students engaged for that amount of time (in fact, viewing drops rapidly after ~6 min), find information later, update or clarify content, or point students to specific sections of relevance. If there’s a mistake in an 80 minute video, it’s a lot harder to fix than a mistake in a 3-minute video.
- Identify a key message, such as by learning outcome, topic, or sub-topic in the course.
- Have accompanying visuals that can be annotated, such as slides. Share these with students so that they can annotate, too (e.g., post the slides on Brightspace, use an editable format, like Powerpoint). More on creating videos and cognitive load from Vanderbilt University.
- Be engaging: use a conversational tone; making mistakes is okay!
- Let students see you in video recordings to increase engagement and impact.
- Design for accessibility as part of the process. Doing so supports learners who need it right from the start, saves you time in the long run, and benefits all learners in the class.
- E.g.,: a decent transcript can be made using transcription software such as Otter.ai (free 600 minutes/month); a quick revision and your transcript is done!
- Follow copyright rules
- Lab videos:
- Record the lab portion without the sound (labs are loud so original sound quality is usually poor)
- Record the audio separately, in a quiet space
- Wear proper personal protective equipment
Tools
Here are some set-ups you can use. However, there are many options out there, so you can always look into others. There are additional explanations and a few specific example videos of how each choice would turn out in the section: Specific examples of video set-ups.
- Hardware – these are optional, aside from a computer to do the recording
- Webcam: your laptop/desktop’s built-in camera or a separate webcam, such as Logitech’s 960 or C615
- Tablet for digital handwriting: an iPad with pen or the Wacom pen tablet
- Microphone: the Snowball, Blue Yeti, MXL Tempo, or MXL conferencing; the built-in microphone on most computers is noticeably lower quality
- Headset: the Logitech wireless and wired versions are excellent value; a head-set is helpful if you plan to do lots of editing or doing more advanced recording
- Software
- uOttawa recommends and offers technical support on: Powerpoint slides recorded using Echo 360 (in a classroom or using personal capture) or using voice-over Powerpoint from a laptop/desktop. Other options include:
- YouTube Studio (simple editing), iMovie (Mac only), TinyTake (good for short videos), Adobe Premiere Pro or Camtasia (record screen, video, and audio; simple to advanced editing, but more expensive), or even Zoom (recording only). As usual, there are many other options if these don’t work for you.
- Notability captures annotations on blank pages or a slide – can be run on a tablet or desktop
- Powerpoint or Keynote, to make and share slides
To make the recording:
- Key principles, from Edutopia (LINK) and TechSmith (LINK)
- Cognitive load theory guidelines, from Vanderbilt University. LINK
- Technology involved, from Shopify. LINK
- The Appendix has examples and video walk-throughs
To share the recording with students
- Upload the video to YouTube Studio (publicly or unlisted) then link to the YouTube video in Brightspace. Going through the YouTube step (i) allows for automatic captions (although expect greater error rates in technical material), (ii) means students can make themselves a playlist to watch offline, and (iii) Youtube automatically optimizes videos for low bandwidth connections.
- Alternatively, post the video directly in Brightspace.
Accessibility
Course content needs to follow the Accessibility for Ontarians with Disabilities Act (AODA). For example, export Word and PPT documents to PDF in the format “Best for electronic printing and accessibility)”, tag images with descriptions or label as “decorative image”, and add captions to videos (YouTube will caption videos roughly).
This article provides simple guidelines for designing an inclusive user experience.
Intellectual property
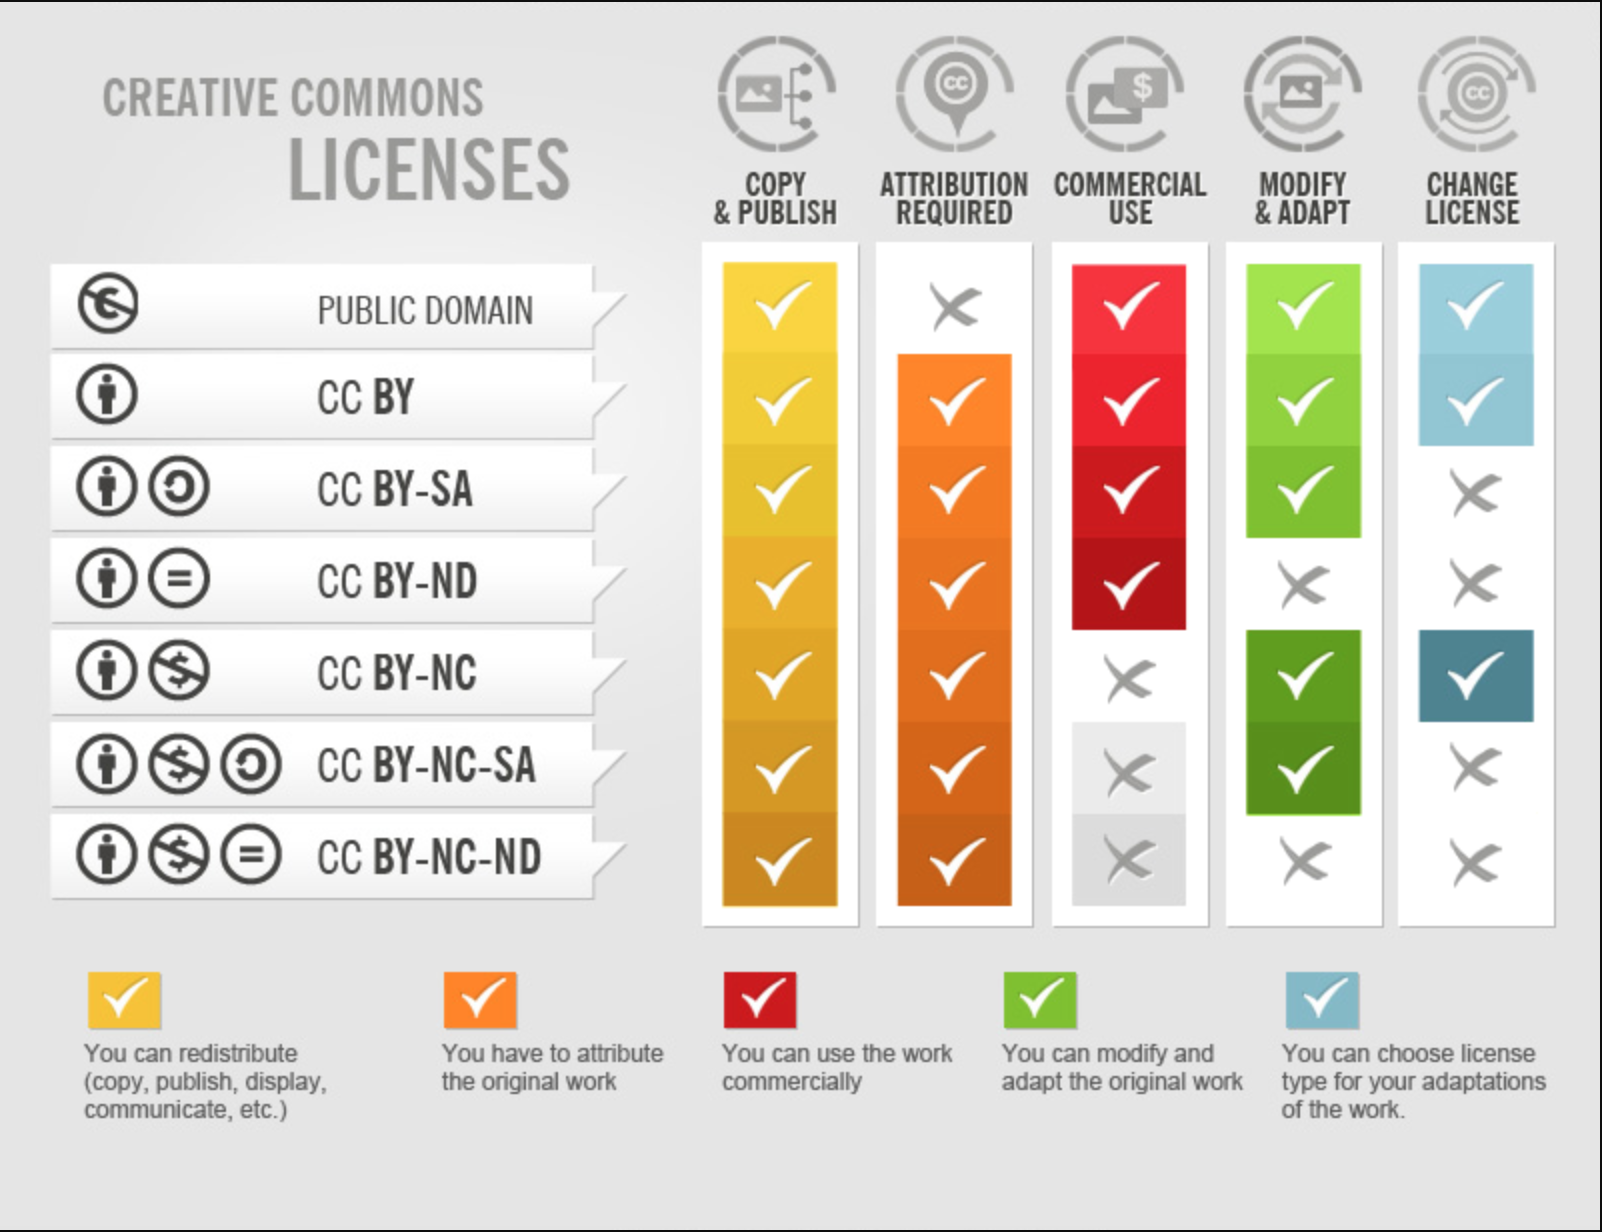
You may choose to follow a traditional copyright route for licensing the materials you create; however, there are other options that make the content more accessible while still retaining some rights.
Creative Commons (CC) licensing is a format that lets you decide how much flexibility to give for use of your work. For example, you may decide that your work may not be used for commercial use and that any adaptations of your work need to be shared forward in the same way. You may also decide to waive all your rights by using a CC0 or Copyleft license. An interactive tool to choose a license can be found here.
To go deeper
The following book delves deeply into every facet of teaching online: Major, C. H. Teaching Online: A Guide to Theory, Research, and Practice; Johns Hopkins University Press, 2015.
As another option, eCampusOntario’s “Ontario Extend is a professional learning program grounded in the belief that the impact of learning should be the primary motivator for creating technology-enabled and online learning experiences. It aims to empower educators to explore a range of emerging technologies and pedagogical practices for effective online and technology-enabled teaching and learning.”
Mayer’s Handbook of Multimedia Learning contains many principles for designing effective learning through multimedia.
The following article describes evidence-based best practices for creating videos, aligned with Mayer’s Handbook. See Table 2 in particular. Students’ satisfaction was higher with some video types than others, but learning outcomes did not differ; all videos were short (3 – 5 min). Choe, R. C.; Scuric, Z.; Eshkol, E.; Cruser, S.; Arndt, A.; Cox, R.; Toma, S. P.; Shapiro, C.; Levis-Fitzgerald, M.; Barnes, G.; et al. Student Satisfaction and Learning Outcomes in Asynchronous Online Lecture Videos. CBE—Life Sci. Educ. 2019, 18 (4), ar55.
Content can become interactive by adding questions to videos using H5P through eCampusOntario’s H5P Studio or other methods, so that students can self-assess as they watch.
To learn more deeply about designing for accessibility, see:
- Accessible Campus, by the Council of Ontario Universities
- Universal Design for Learning
- Accessibility for Ontarians with Disabilities Act (AODA)
Minimizing bandwidth
If you wish to optimize further, this article by Kyle Mackie has suggestions for reducing bandwidth requirements for course materials, including how to optimize video streaming and reduce file sizes.
Synchronous activities
The chapter on Communicating with students offers more explanations about how to facilitate synchronous sessions.
Up next
In the next chapter, we address options for synchronous classes (videoconferences).
Please feel free to contact us at any time with questions, suggestions, and concerns. In particular, we check this form each semester and will continue to update this guide as the situation evolves.
Course alignment refers to the connection between intended learning outcomes, learning activities, assessment, and the course environment.
During synchronous instruction, the professor and students are online at the same time. Synchronous modes can include videoconferencing, discussion boards, etc.
Participants access and work on course materials at different times. Examples include email, discussion forums/chats, and assignments.
Teaching assistants
Temporary storage and processing of information occurs in working memory, which has very limited capacity.
Bandwidth describes the maximum data transfer rate of a network or Internet connection. More info: https://techterms.com/definition/bandwidth
Immediacy refers to how quickly we expect responses from each other when interacting (e.g., professor expects an answer from a student or student expects an answer from a professor). For example, when present in person, we anticipate an immediate response when asking someone else a direct question (high immediacy). In online (and pandemic!) environments, immediate responses can be more difficult when many learners may be taking care of family members, in a different time zone, etc. We can use low immediacy methods to take off some of that pressure, such as email or discussion forums and occasional high immediacy methods such as videoconferencing.
In Canada, copyright protection for most works, such as books and articles, lasts about 50 years after the death of the creator, whether or not the creator still holds the copyright. works may be in the public domain because a copyright holder has chosen to not claim copyrights. The Reproduction of Federal Law Order, for example, permits anyone, without charge or request for permission, to reproduce Canadian laws and decisions of federally-constituted courts and administrative tribunals in Canada.
Some public domain works can be found at the Gutenberg Canada and Project Gutenberg websites. Wikipedia: Public Domain Resources also lists many public domain resources.
After copyright expires, a work becomes part of the “public domain” and can be freely copied, distributed, adapted and performed without having to request permission from the author or having to pay any royalties.
https://copyright.uottawa.ca/what-is-copyright/alternatives-copyright
Open access is a growing movement in the scholarly publishing world, where authors and publishers make their works openly available to others, without a subscription fee. These works may be freely shared, increasing their visibility.
https://copyright.uottawa.ca/what-is-copyright/alternatives-copyright
Creative Commons is an alternative licensing copyright scheme. While traditional copyright, broadly speaking, bars any substantial reproduction unless permission is obtained, Creative Commons licensing offers a “sliding scale” of permissions, which you, as a copyright holder, can adapt to your needs. Documents licensed under Creative Commons offer a wide range of materials which professors can use in their courses, and students can use in their assignments – articles, charts, images, etc. – all without having to request permission.
The easiest way to find documents licensed under Creative Commons is to do a web search which includes the words “creative commons” (include the quotation marks). Creative Commons also provides a more targeted search tool on their site.
https://copyright.uottawa.ca/what-is-copyright/alternatives-copyright
Copying or making use of a portion of a copyright-protected work that is not “substantial” (i.e., even less than the “short excerpt” described in the Fair dealing guidelines) is permitted, and does not require any permission.
The Copyright Act does not define “substantial part”. In determining what constitutes a substantial part, the courts have focused on the quality of what was taken from the original work rather than the quantity that was taken.
https://copyright.uottawa.ca/what-is-copyright/alternatives-copyright
Open Education Resources (OERs) are teaching and learning materials that are freely and openly available. They can be text documents, audio, video, multimedia, tests, software, learning objects, or any other tool used for learning and teaching.
Cognitive load refers to the total amount of mental activity imposed on working memory in any one instant. Working memory is responsible for temporarily holding and processing information (thinking, reasoning).
The Accessibility for Ontarians with Disabilities Act (AODA). For example, export Word and PPT documents to pdf in the format "Best for electronic printing and accessibility)", tag images with descriptions or label as "decorative image", and add captions to videos (YouTube will caption videos roughly)
H5P (an abbreviation of HTML5 Package) is an open source plugin that gives you the ability to create, share and reuse content like interactive videos, interactive presentations, games, and quizzes to engage learners in your course.
