6 Classes (synchronous sessions)

In this chapter
- Facilitating classes (synchronous sessions)
- Disruptions during a videoconference (class)
- Addressing other issues
- To go deeper
Facilitating classes (synchronous sessions/videoconferences)

In this chapter, we describe how to plan, facilitate, and wrap-up synchronous online sessions (i.e., classes). These classes bring significant equity issues with them and it’s not essential to have a synchronous component in order to have an effective and engaging online course. If you do hold synchronous classes, we strongly recommend recording the sessions and providing alternate means of meaningful engagement in the course. Following the recording, you can upload to a streaming service (e.g., YouTube Studio), which creates rough captions, then posting to Brightspace.
As with other areas of a course, there are many options to choose from! Start simple, keeping in mind your students’ learning needs and abilities, course goals (e.g., learning, community-building), and your own abilities and limits.
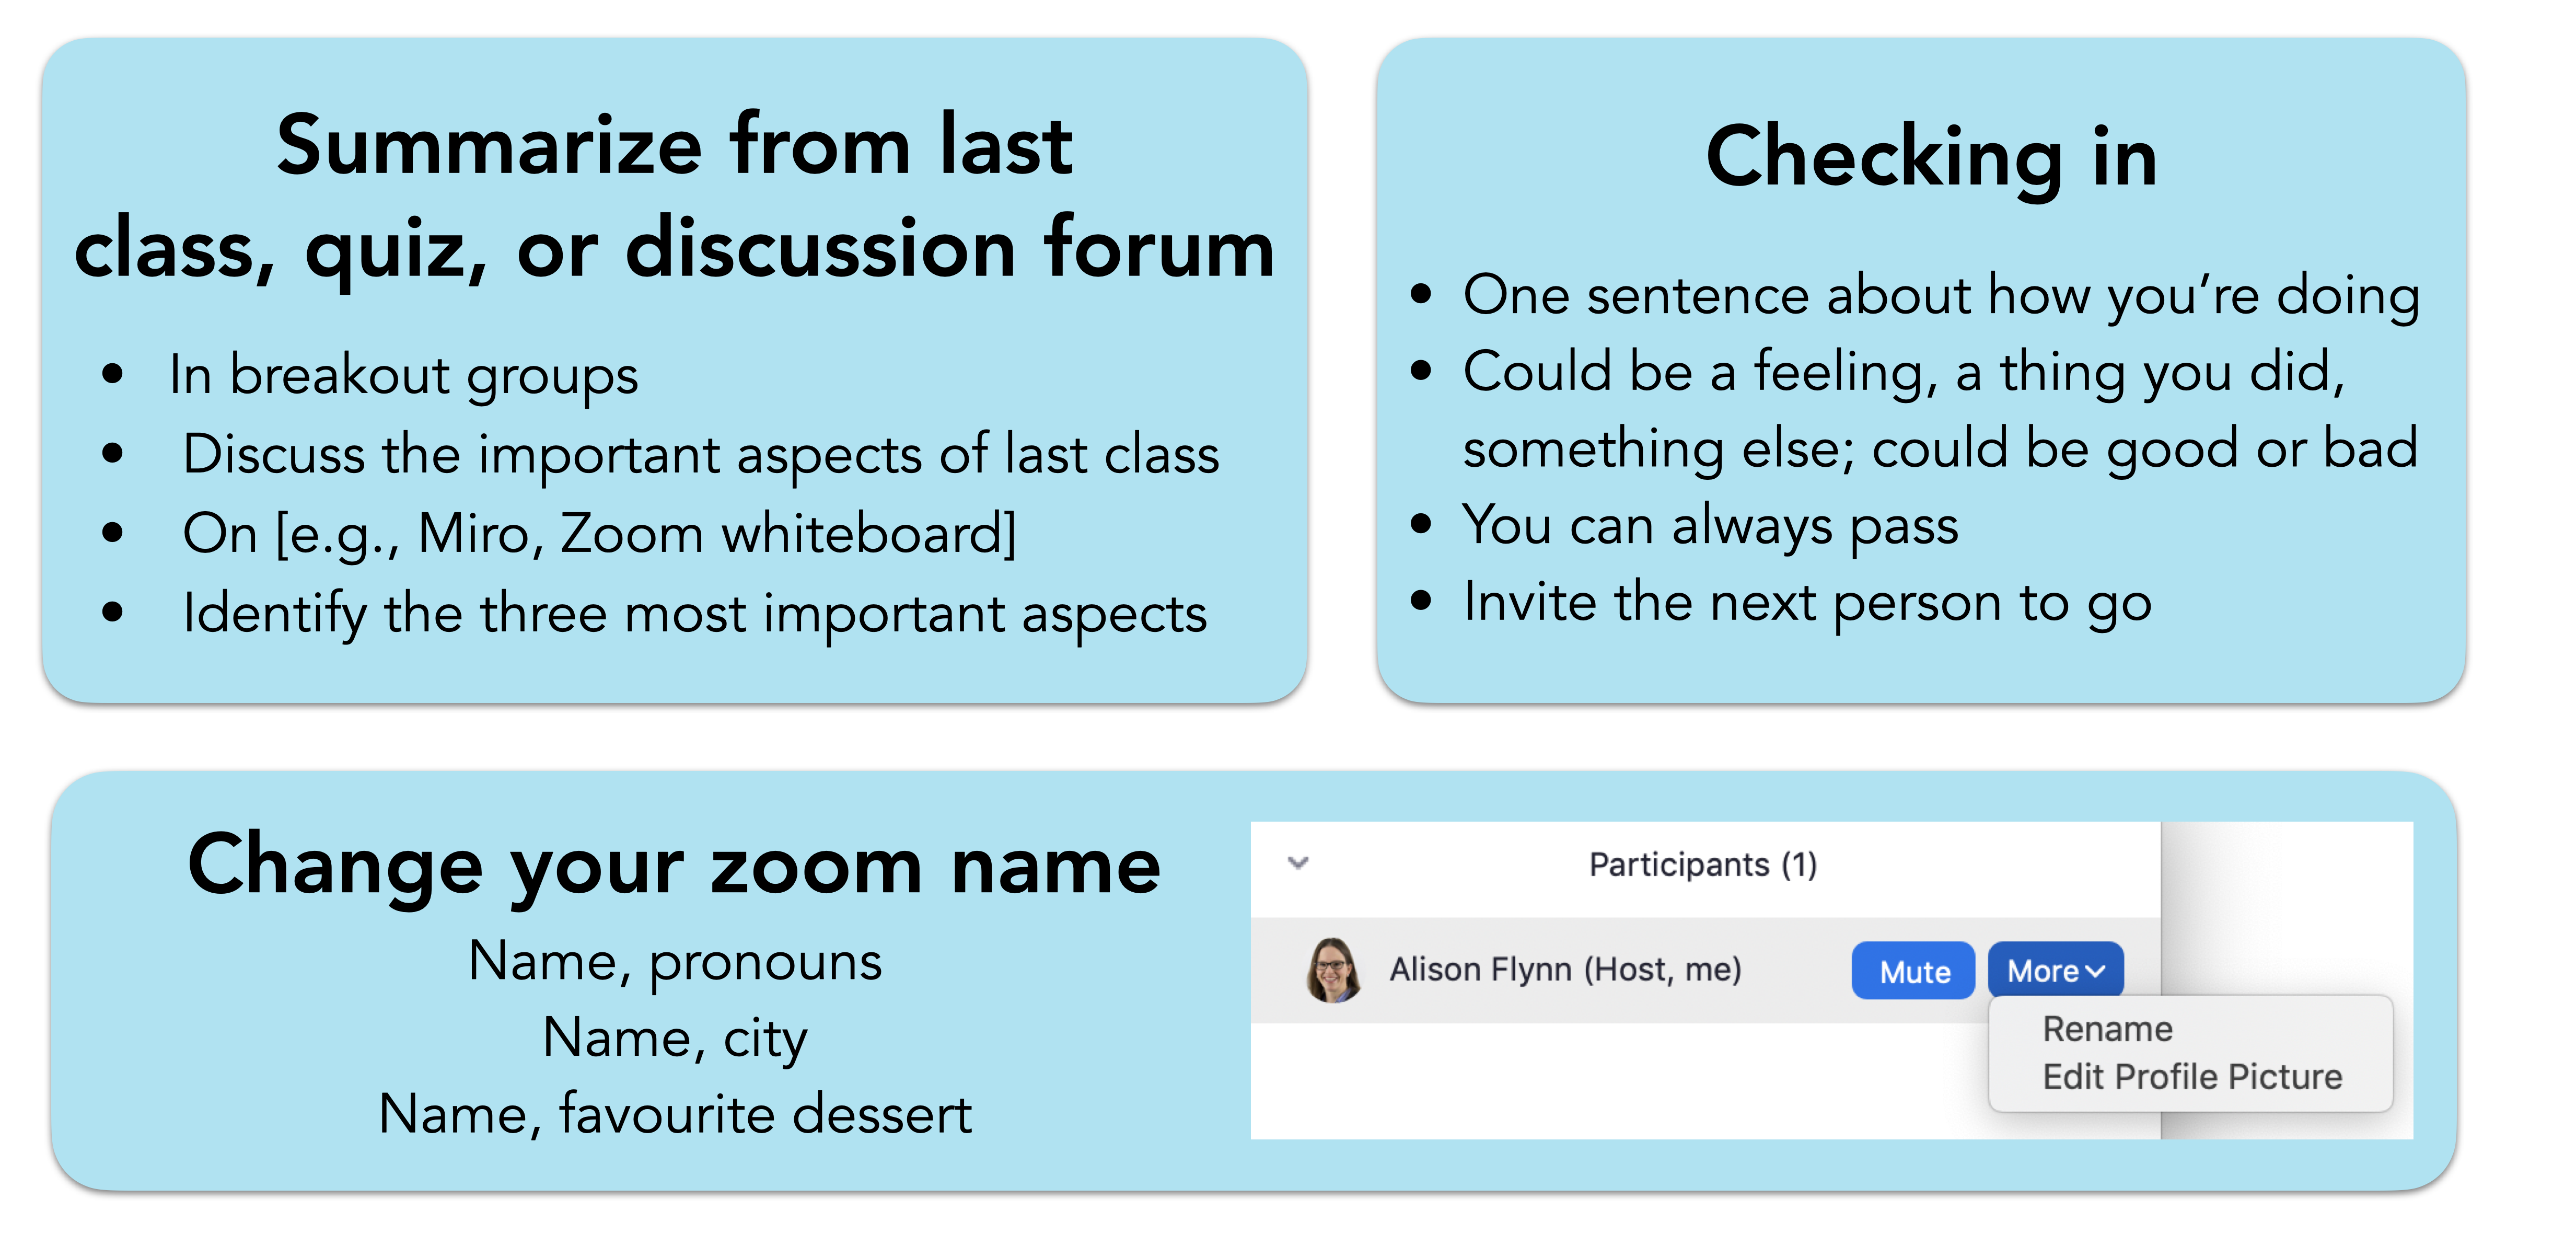
 Planning classes
Planning a synchronous session is a bit like a mini-version of planning the full course (Figure 1). Ideally, start by identifying the essential learning outcomes for that session, and use what learners already know to identify a starting point for the session. From there, decide on the activities that supporting learning, community-building, or your students’ other goals for the session.
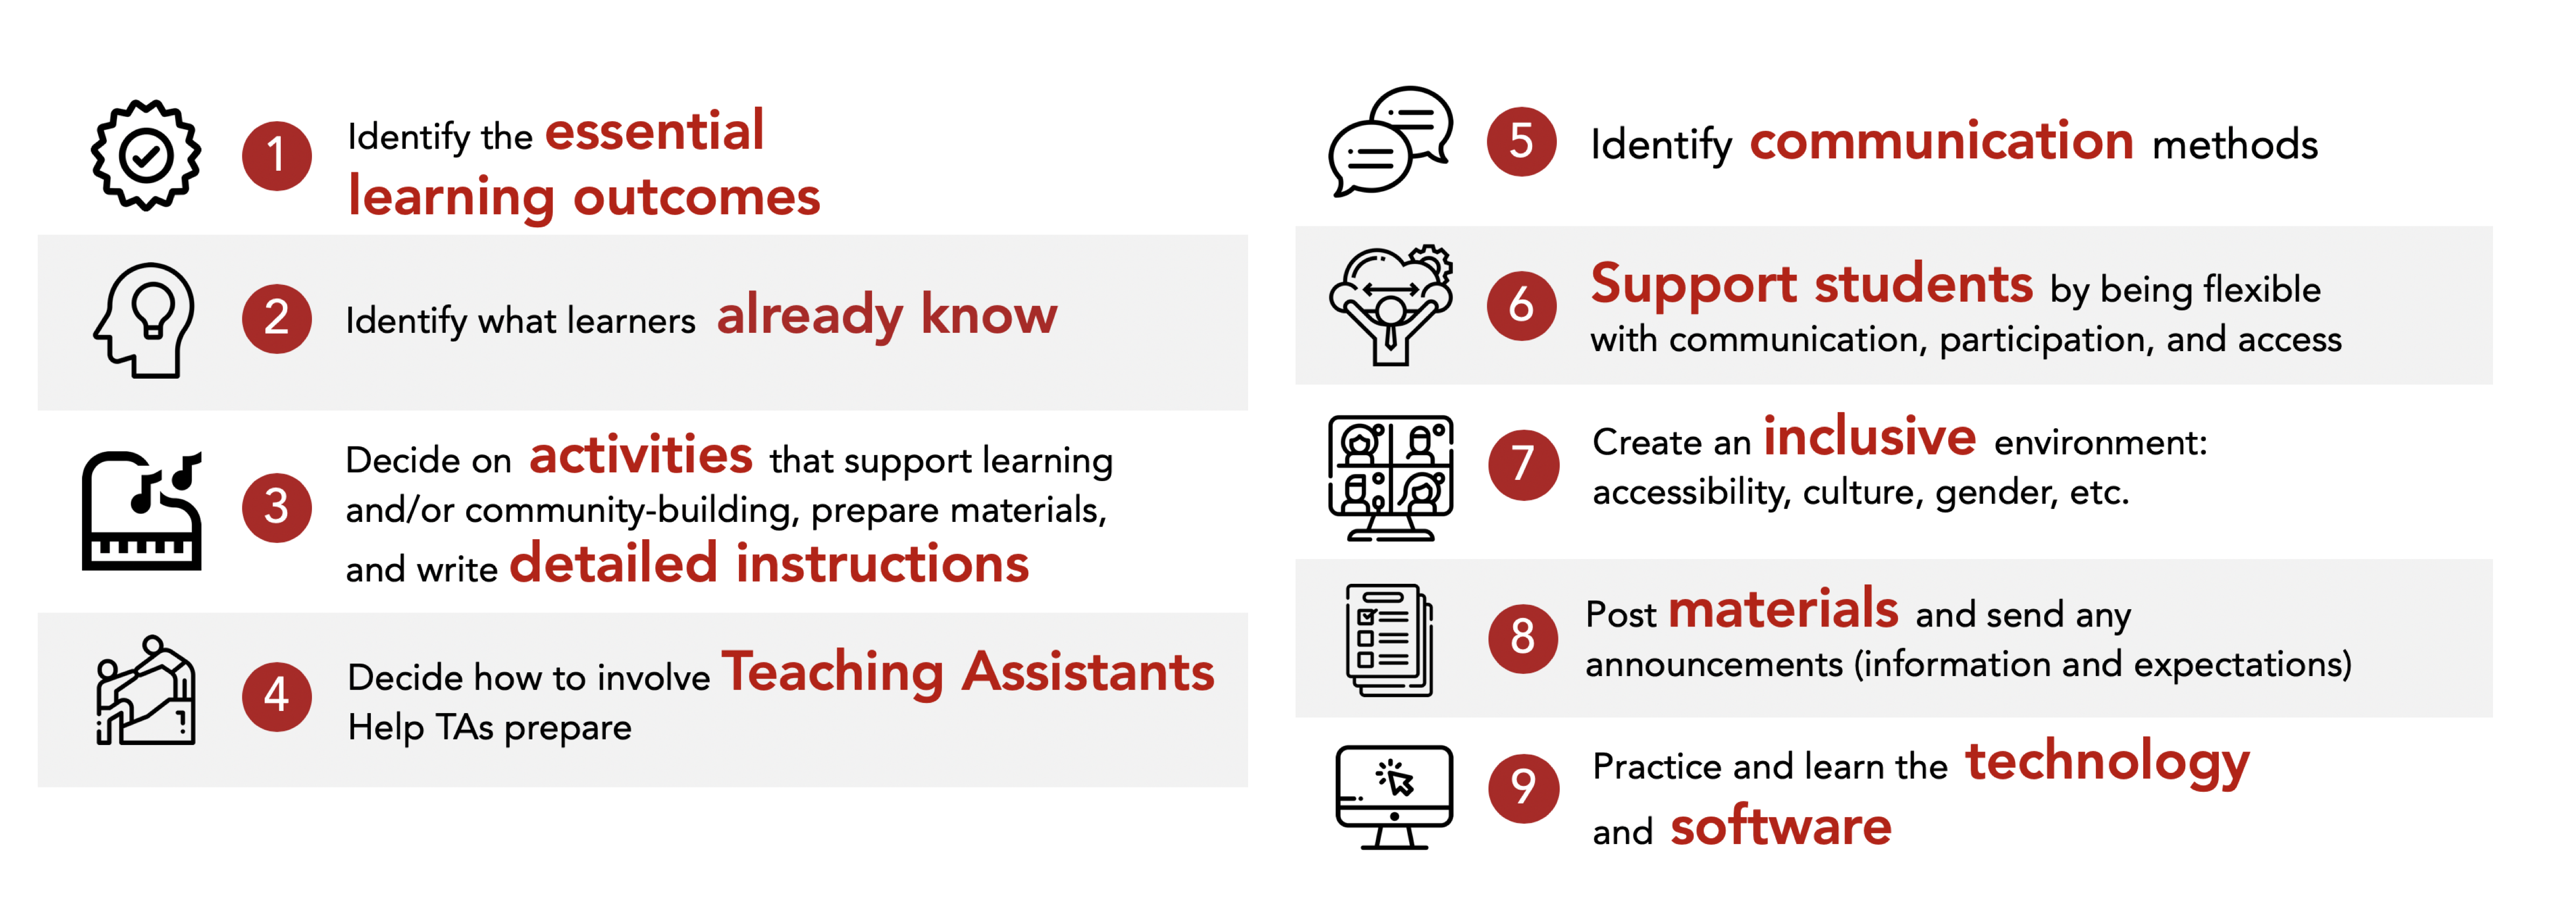
If teaching assistants are working with you in the course, identify ways in which you might want them to support or co-lead the synchronous session (could include monitoring the chat by answering questions and identifying issues to raise with the full group). To help students identify members of the instructional team, the team could also use a common background or identify themselves by adding their role to their videoconference name.
Identify how communication will work during the synchronous session. For example, students could ask questions aloud, through the chat, or through an anonymous poll question. Having a few options makes it easier for students to participate using the way that makes them the most comfortable.
Creating an inclusive environment is an important aspect of the full course! There are some suggestions in the Chapter on equity in an online course and below.
Once you have the class session planned, send students materials ahead of time and communicate any expectations of things they should do ahead of time or bring to class (e.g., install and test software, pre-load any websites). You could also send a video that explains the key features of the tool(s) you intend to use, such as the videoconference software.
Almost ready for the class! Before it starts, test out the software in real action mode. Practice switching between views and imagine scenarios that might arise. You could even ask a few generous colleagues to role play as students and try things out. 🙂
 Minutes before the session starts
In the 15 – 30 minutes before the session (Figure 2),
- Set up and log in to websites (as needed). Load up your slides. Consider playing some music, which lets people know their sound is working and makes can help them feel like it’s okay to talk or make noise, too.
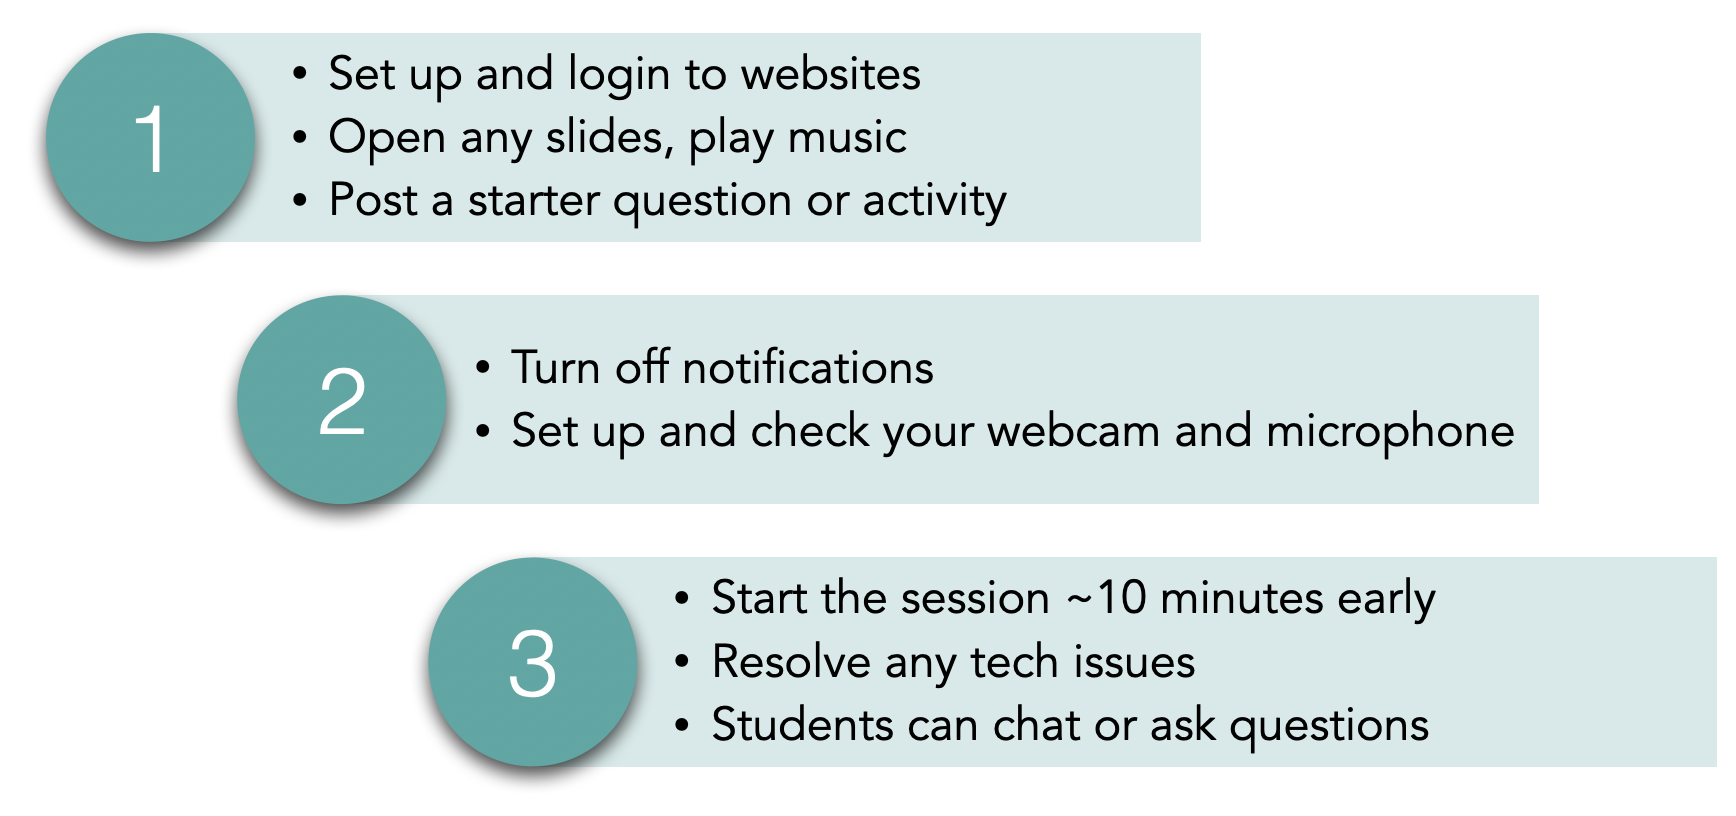
Figure 2. Getting ready for a class. - Turn off any of your own notifications, set up and check that your webcam and microphone are working.
- Start the session about 10 minutes early, to resolve any tech issues (yours or students’) and give a chance for students to ask questions informally.
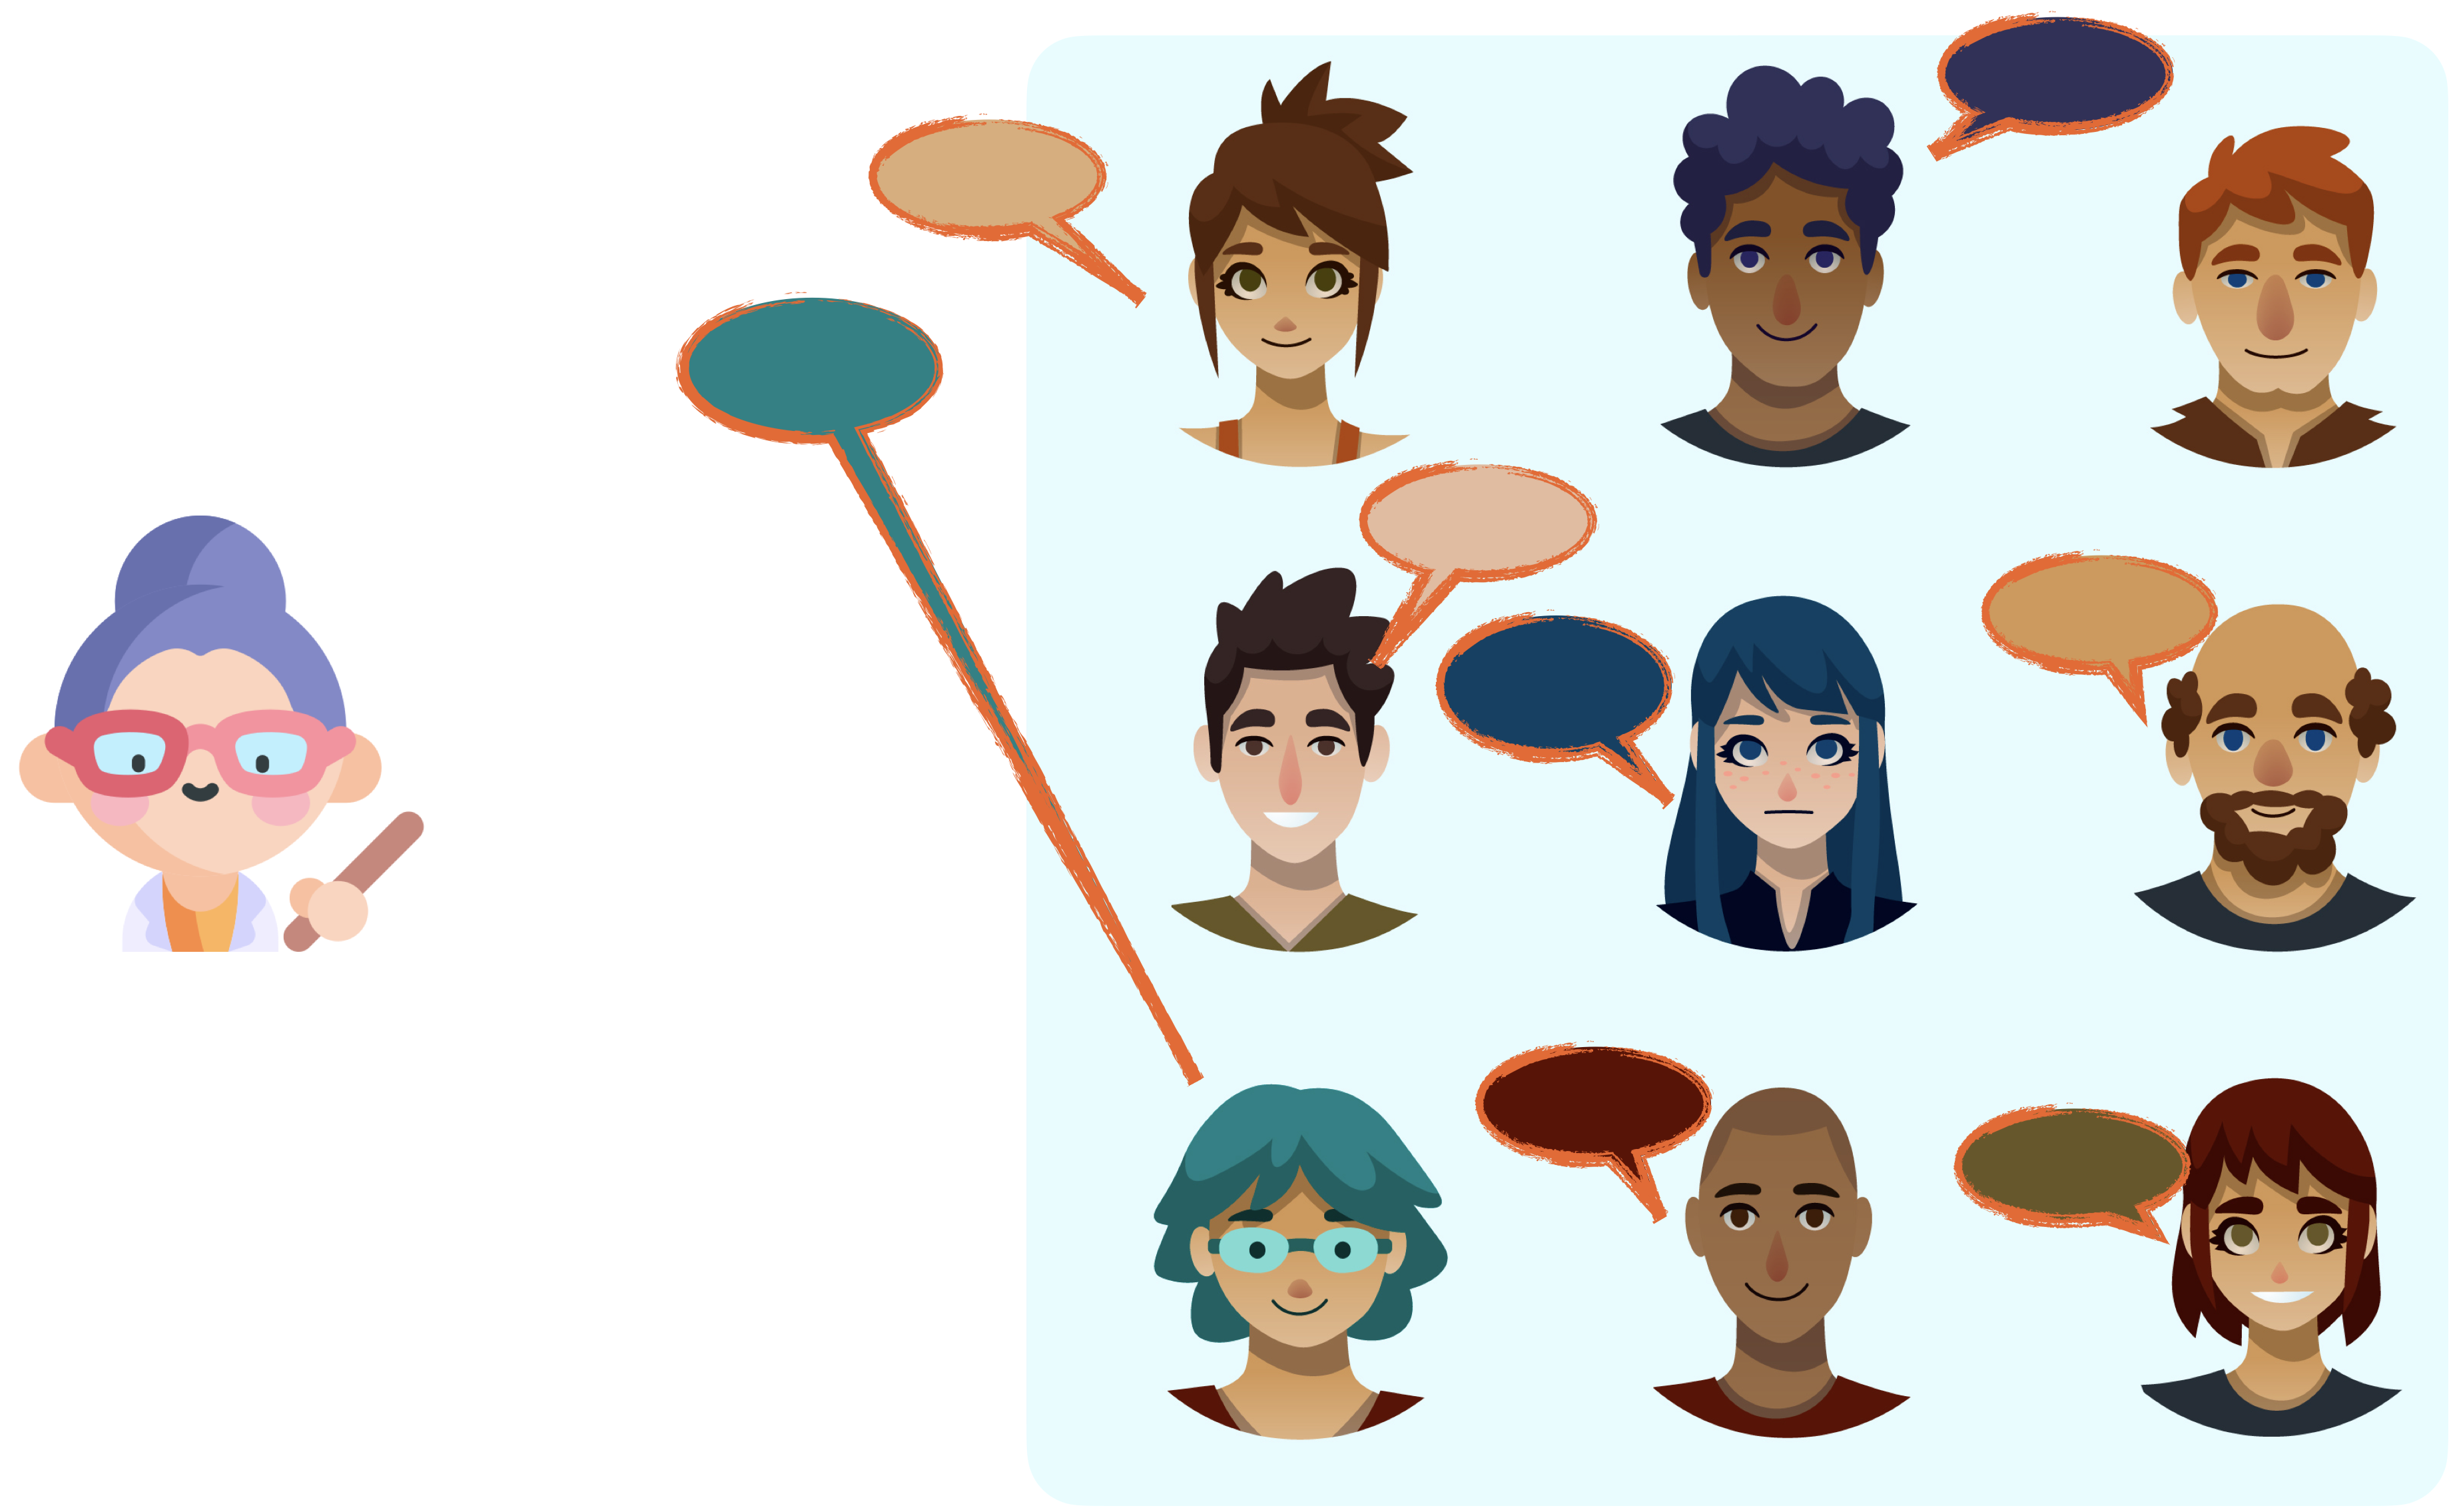
 The first few minutes of class
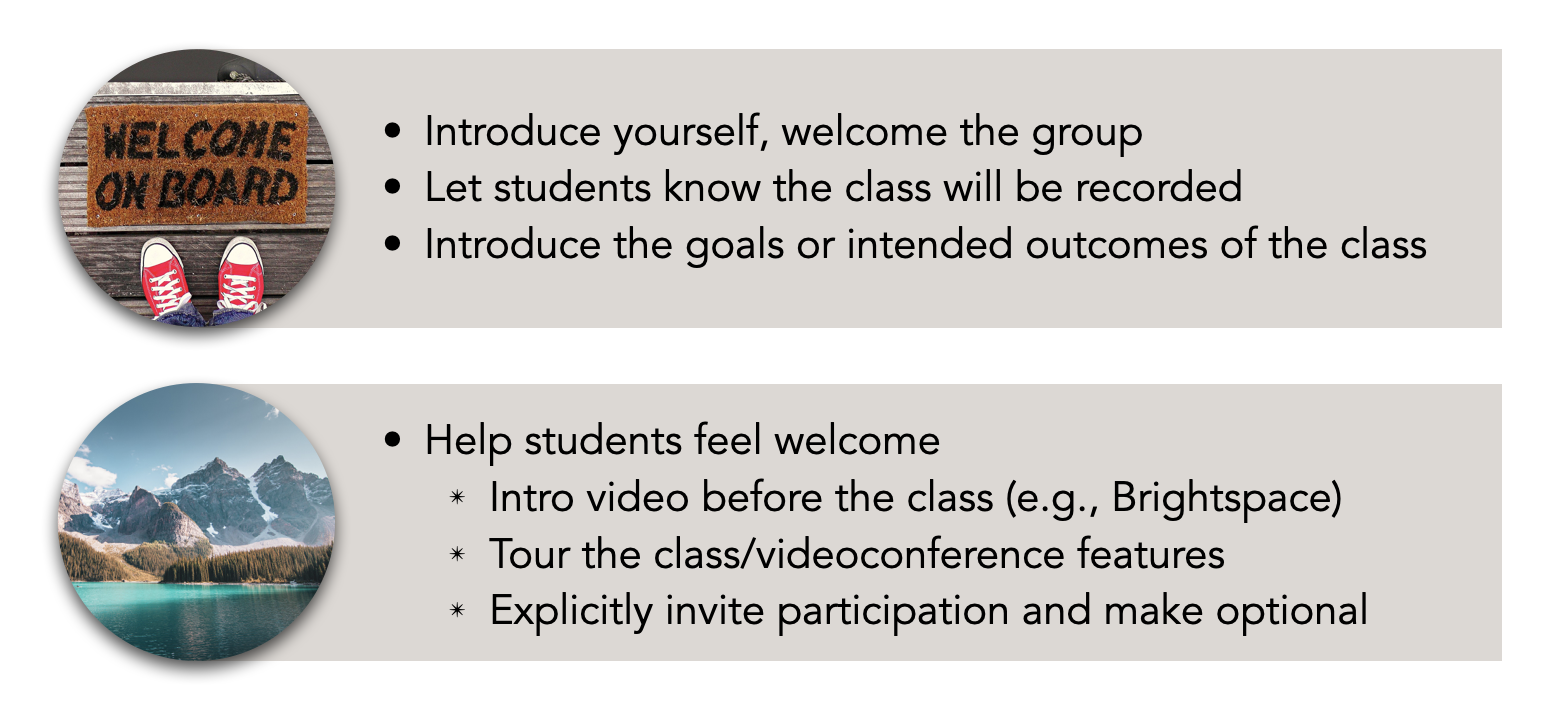
In the first few minutes of class, you can introduce yourself, welcome the group, and let students know that the class will be recorded (Figure 3). Next, you can introduce the goals and/or intended learning outcomes of the class, and ask students to introduce each other.
You may wish to start with a land acknowledgement (Figure 4). NativeLand.ca is an interactive map that can be used to identify Indigenous territories.

You may also wish to explicitly tell students that they are welcome in the course (Figure 5).

Next, you can help students feel welcome (back to that inclusive environment) by giving a tour of the class/videoconference features and explicitly inviting participation (making it optional). Introductions between students work well with everyone together for small classes (<15), and in breakout rooms for larger classes.
Building community and ensuring a good experience in an online environment includes a number of concepts, including building online presence both synchronously and asynchronously.
In the first few videoconference (class) sessions, share expectations for online communication (netiquette) (Figure 6). You could also co-create these with students. For example, you could use or adapt the guide below; the file can be found in “Quick start overview and resource documents“. PDF here.
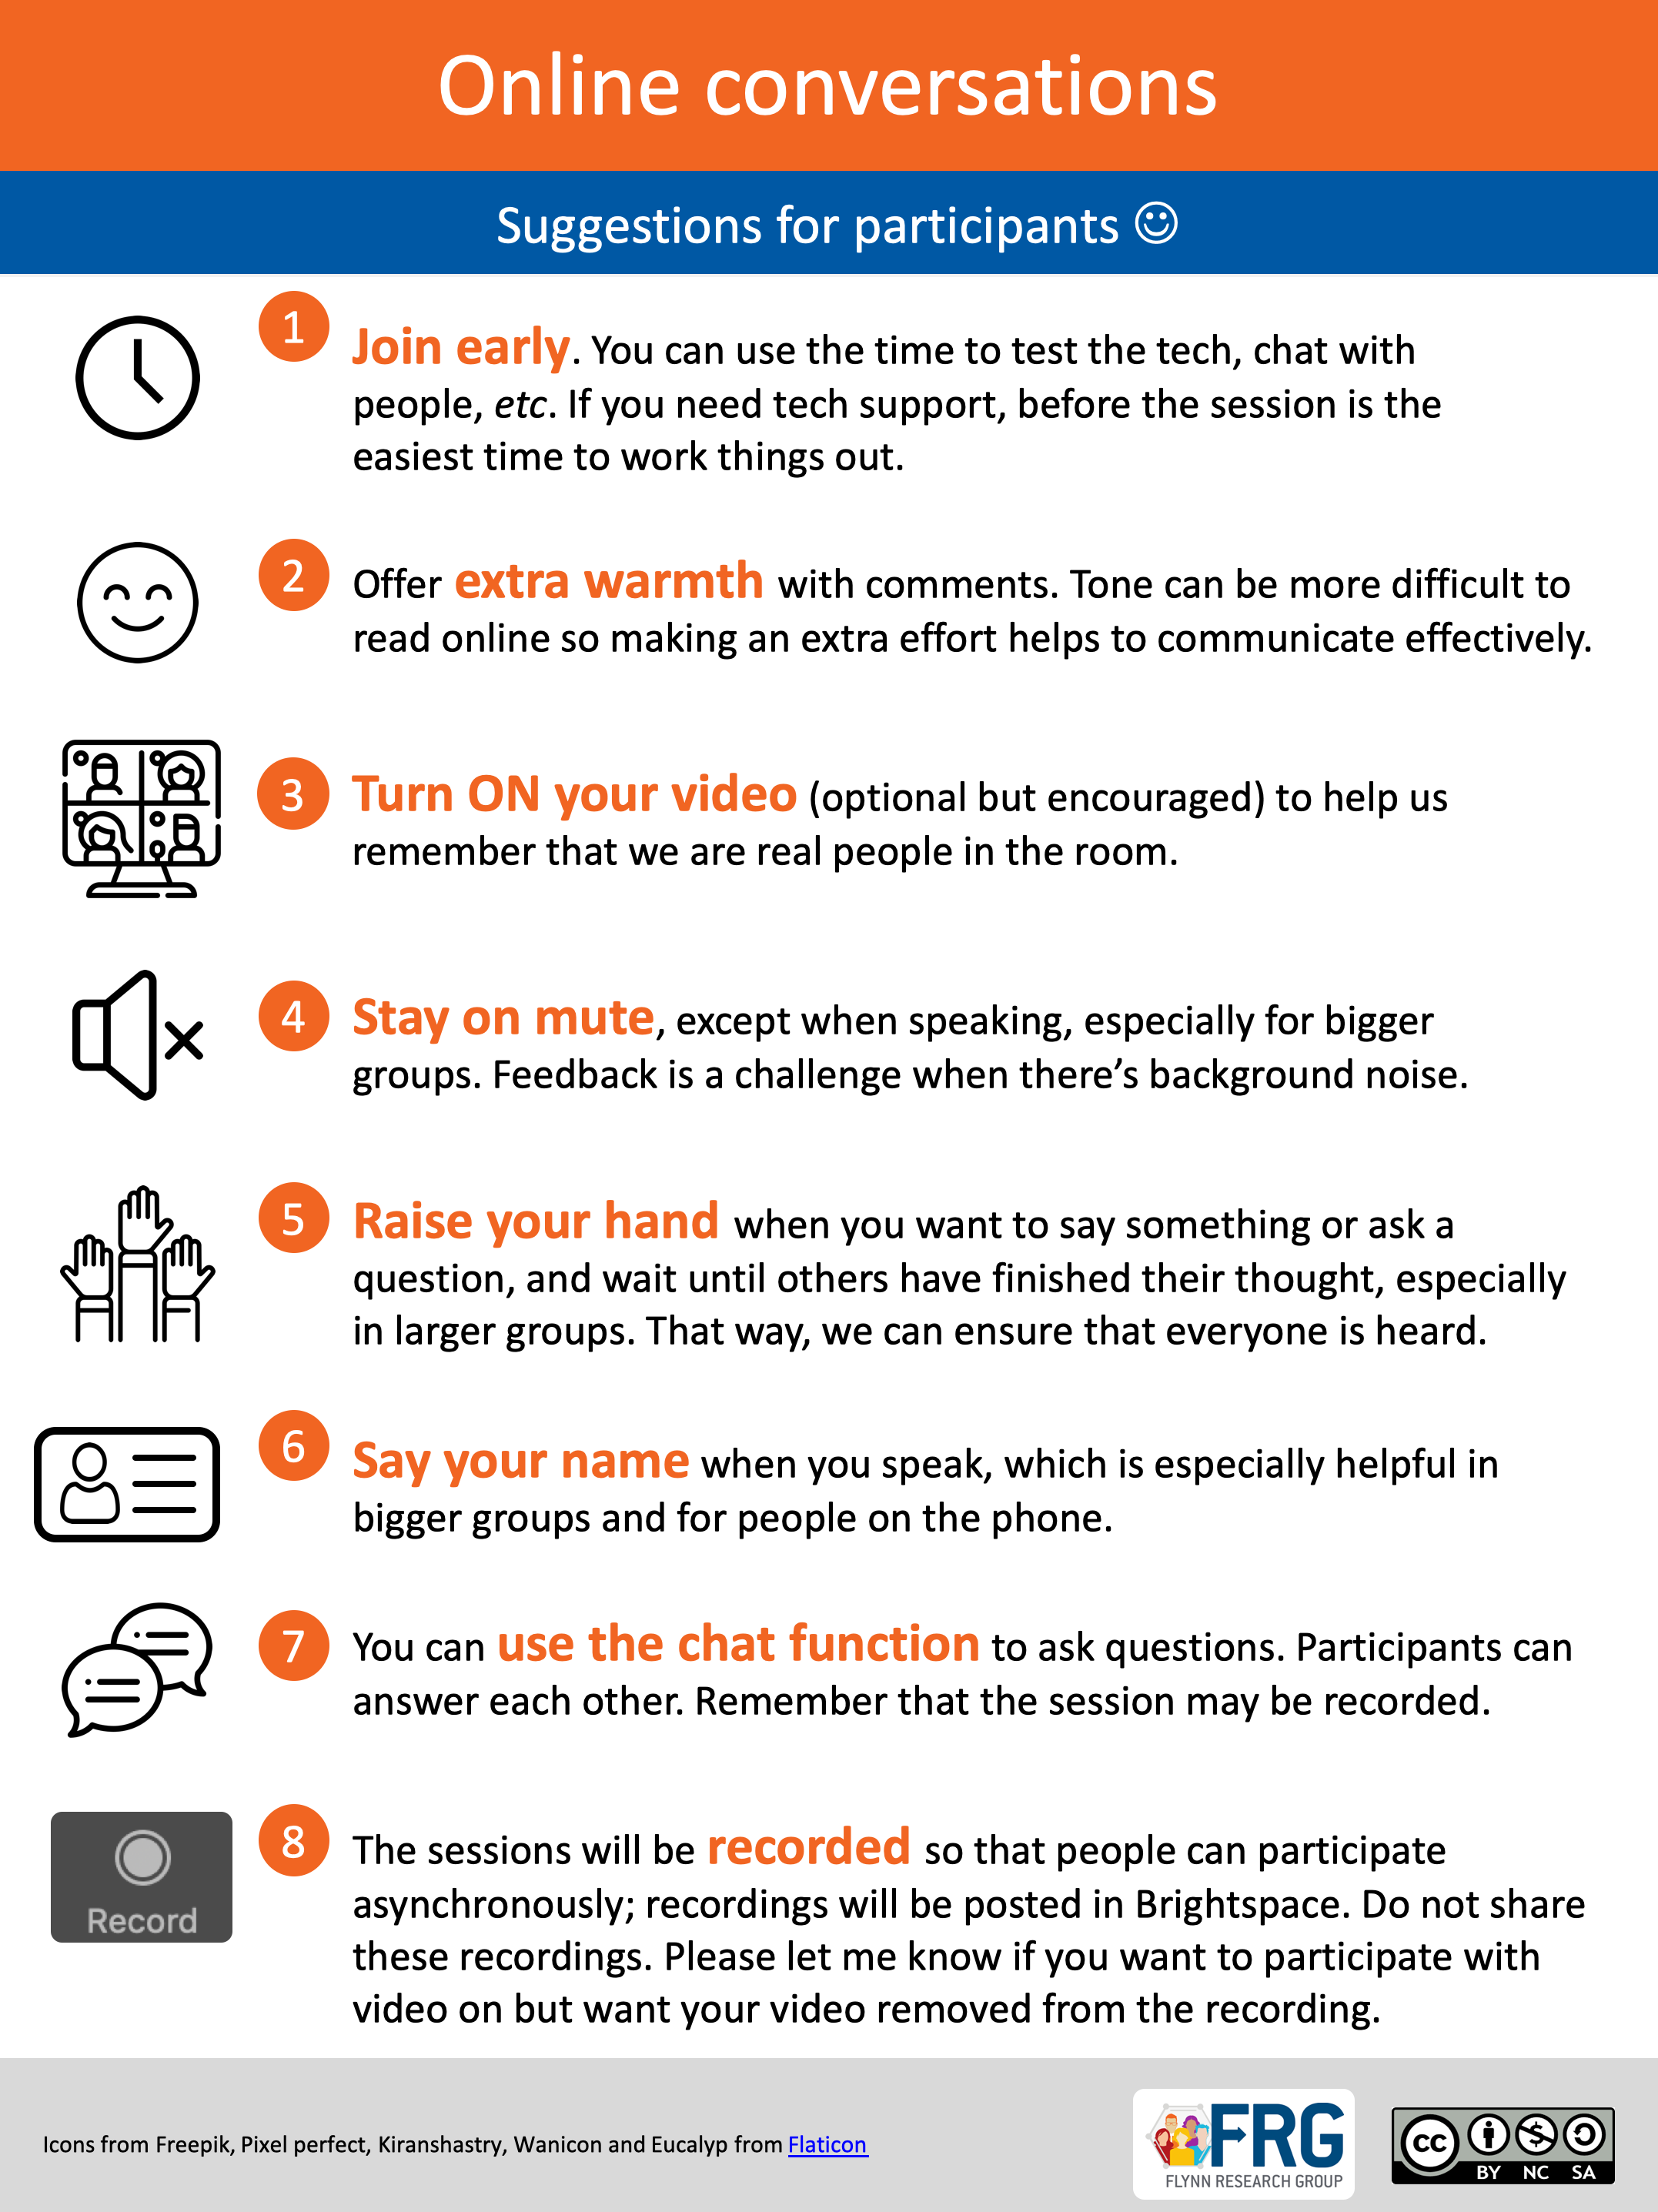
Figure 6. Online conversation skills, PDF version.
Major goals in an online course are often to build community and trust, engage students in the course, and help them take greater ownership of their learning process. When students students and the instructor/TA trust each other, the whole environment becomes more positive and respectful. To that end, we have a few recommendations:
- Students are generally excellent at online etiquette, so they can be trusted to stay on mute if necessary when others are speaking or in large groups and to use the chat function responsibly. We don’t recommend closing the chat as doing so shuts off a main way that students can communicate with each other, ask questions, and build community.
- Encourage students to use their video but make this optional. While sharing our video lets us remember that we are working with real people online, students (or TAs and instructors!) may not want their home environment shared, for a number of reasons.
- Encourage oral participation (i.e., unmute to speak),
- Encourage students to upload a profile photo of themselves on Brightspace, say something about themselves in the chat, etc.
- This course can be an opportunity for professional growth for students. While you may not be explicitly assessing their professional skills, you can ask them to self-assess.
You may also want to have an arrival activity for students to do as they join the class (Figure 7). These activities could include answering questions with a poll, adding information to their videoconference name, checking in, summarizing the last class, etc.
Before introducing any activity, tell students the purpose of the activity and always make participation optional. Some students may not initially feel comfortable participating in interpersonal activities in a course setting, although they may join later.
 The main part of class
Again, there are many options here! Consider the types of engagement and learning you are seeking. Each one has trade-offs and can be appropriate depending on the instructional goals, learning goals, and context. Many courses use a combination of these methods.
This time can be used to explain ideas, model how to solve problems, provide context, etc., analogous to short lectures segments. If you are mainly the one speaking, students may feel more engaged by being in the room in real time, but the same information could also be transmitted using a video.
You could give opportunities for questions aloud, through a chat, or a poll. Q&A allows a few students to participate and may help clarify areas where many students have questions, but most students will be passive during this time. You could also encourage students to answer each others’ questions.
Using classroom response systems (CRS) allows most or all students to engage in the class and questions can usually be left open for students to answer after the class, asynchronously (e.g., Menti, Google Forum, Poll Everywhere). Most CRSs have many question types. For example, Menti has multiple choice/select, open-ended, and slider questions (Figure 8). CRSs can be used to gauge students’ comprehension in real time and make decisions about whether to move forward or spend more time on a concept, for students’ to self-assess, and to learn more about students (e.g., preferences). A drawback is that students are not interacting with each other.

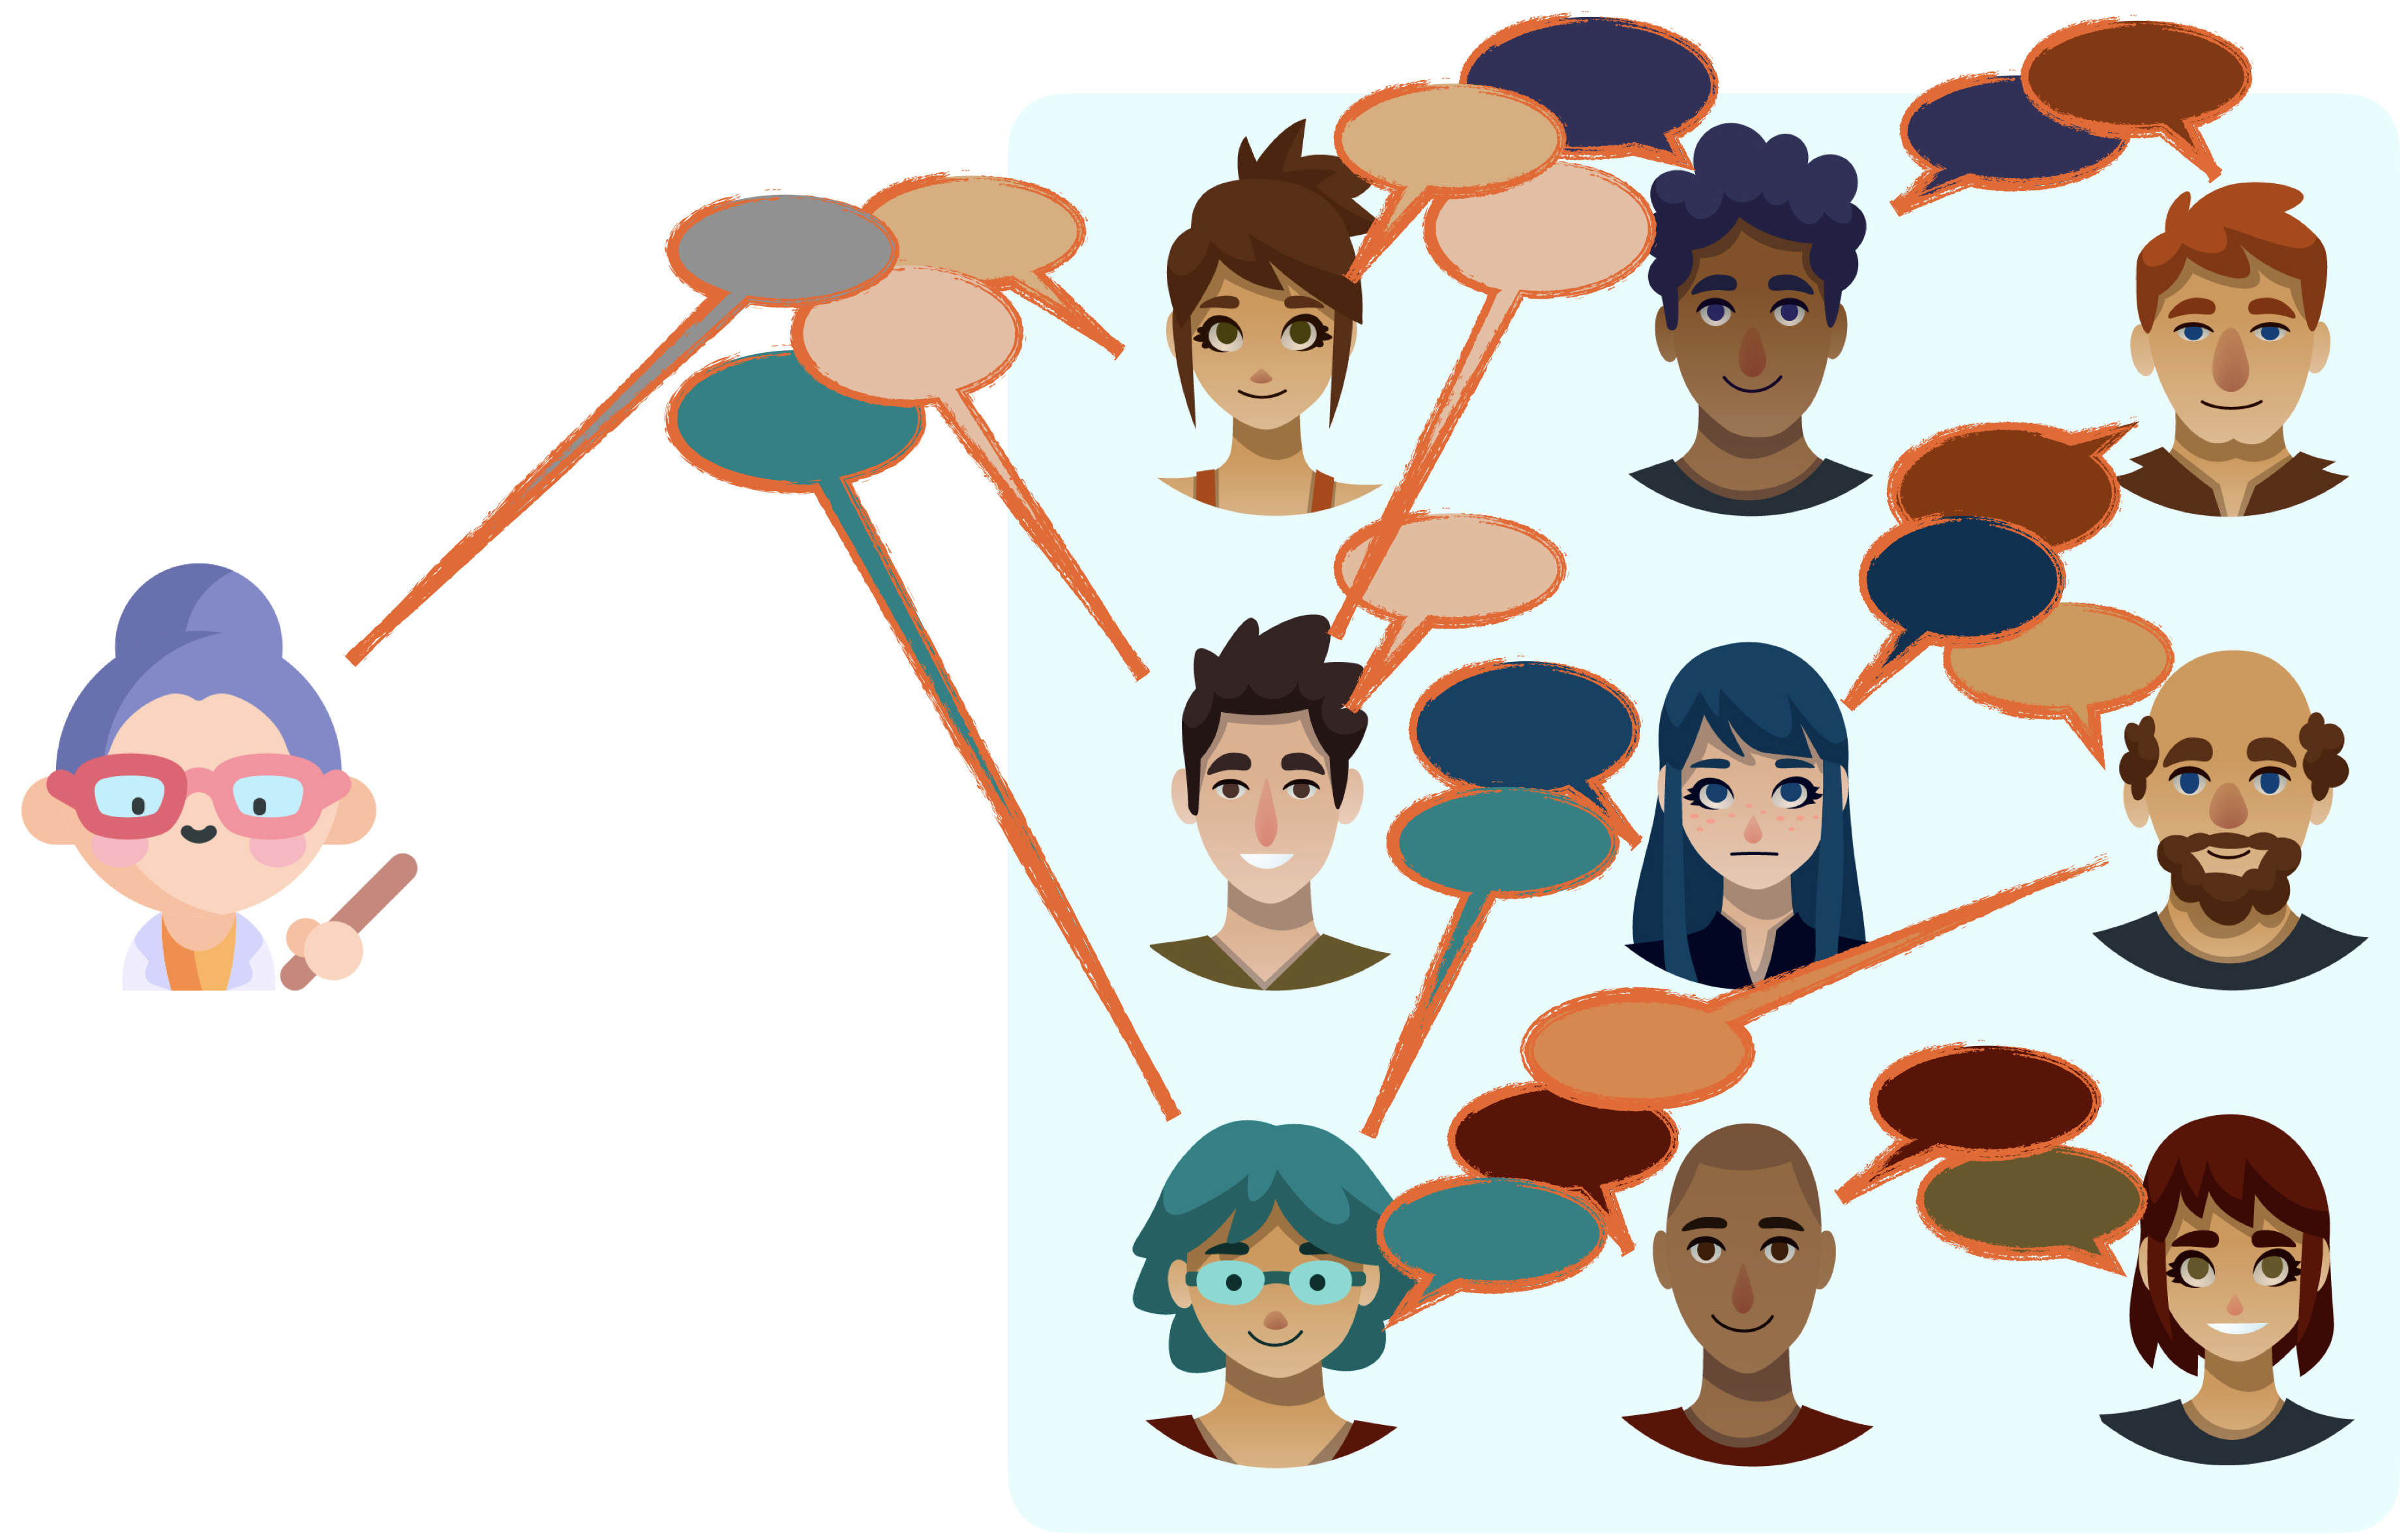
Creating opportunities for students to talk with each other gives a number of benefits: greater learning (see How People Learn II), community-building, confidence-building, and hearing a diversity of perspectives (which may be different academic viewpoints or perspectives from coming from different backgrounds, countries, etc.). Breakout rooms allow students to have a more private (unrecorded) space to have conversations and work well for group sizes of 2 and up. There is additional management to do, however.
Breakout rooms: more details
What?
Breakout rooms are videoconference rooms created off the main videoconference. Different software does this in slightly different ways (e.g., through “channels” in MS Teams, done directly in Zoom—see below). In the breakout rooms, students can discuss a case, work on problems/activities, practice presentations, etc. Usually, all or some of the groups would share a summary of their discussion back with the main group (e.g., orally, in writing, through a poll).
How to run a breakout room
There are many ways to run a breakout room, with a few options described below. You could also watch an example and follow-up discussion.
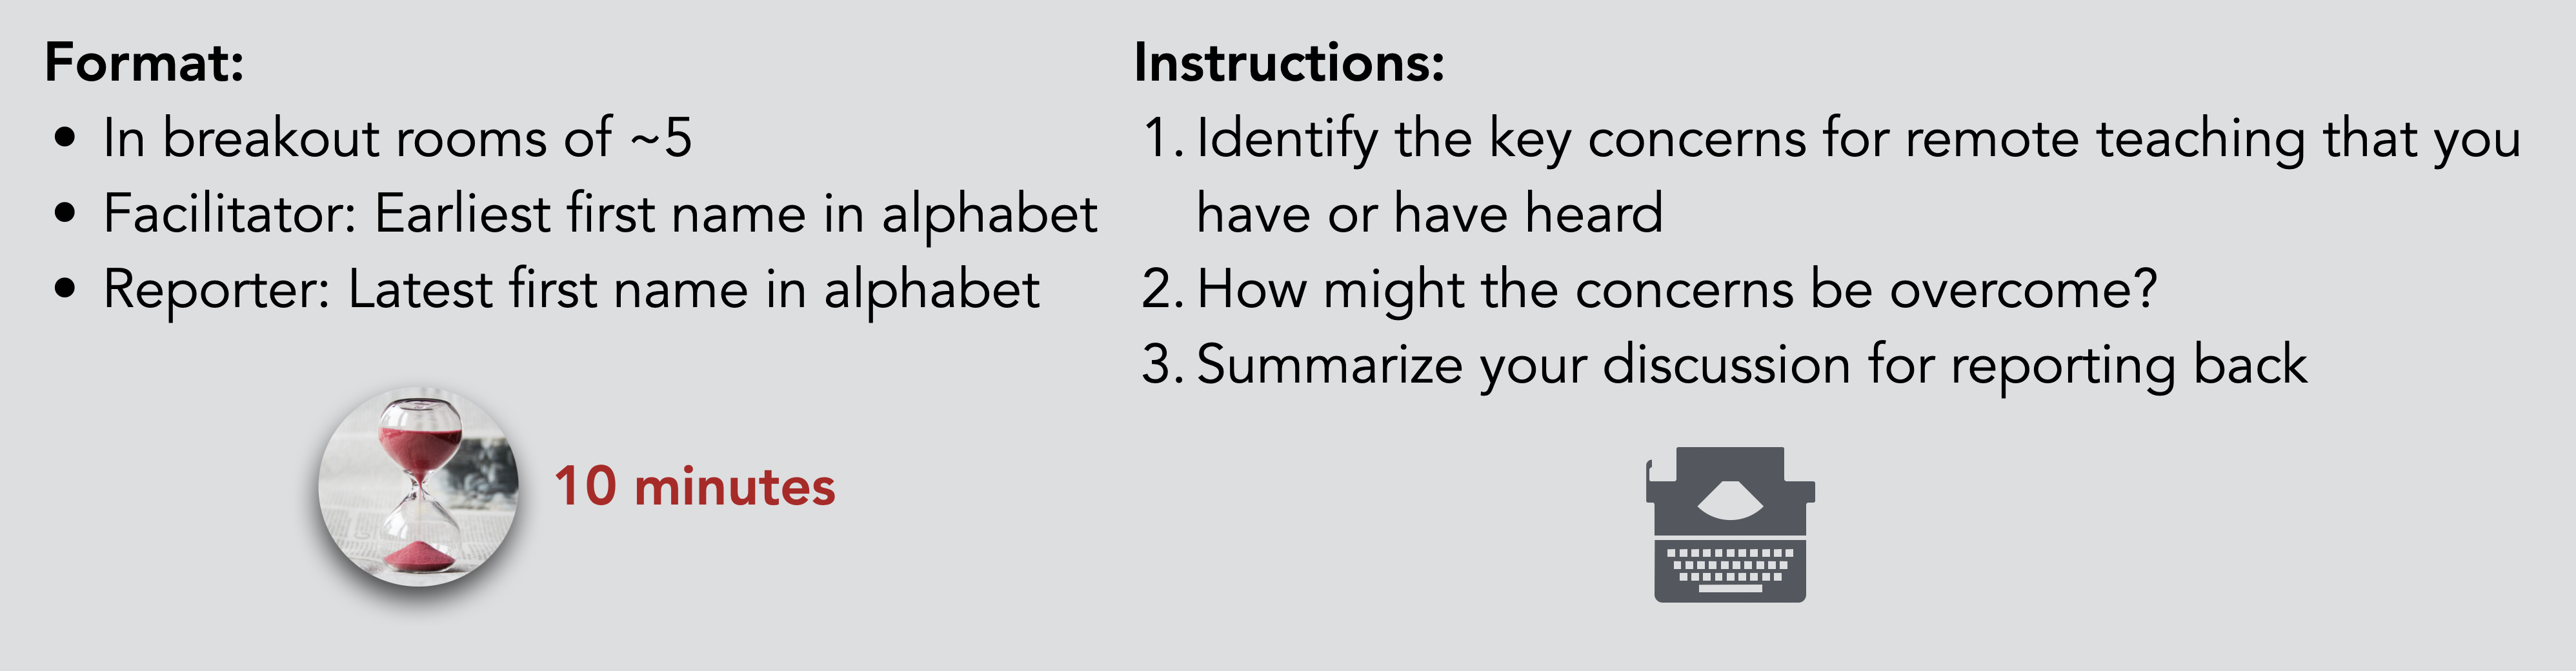
- Explain the activity before students go to the rooms, with written instructions (Figure 9)
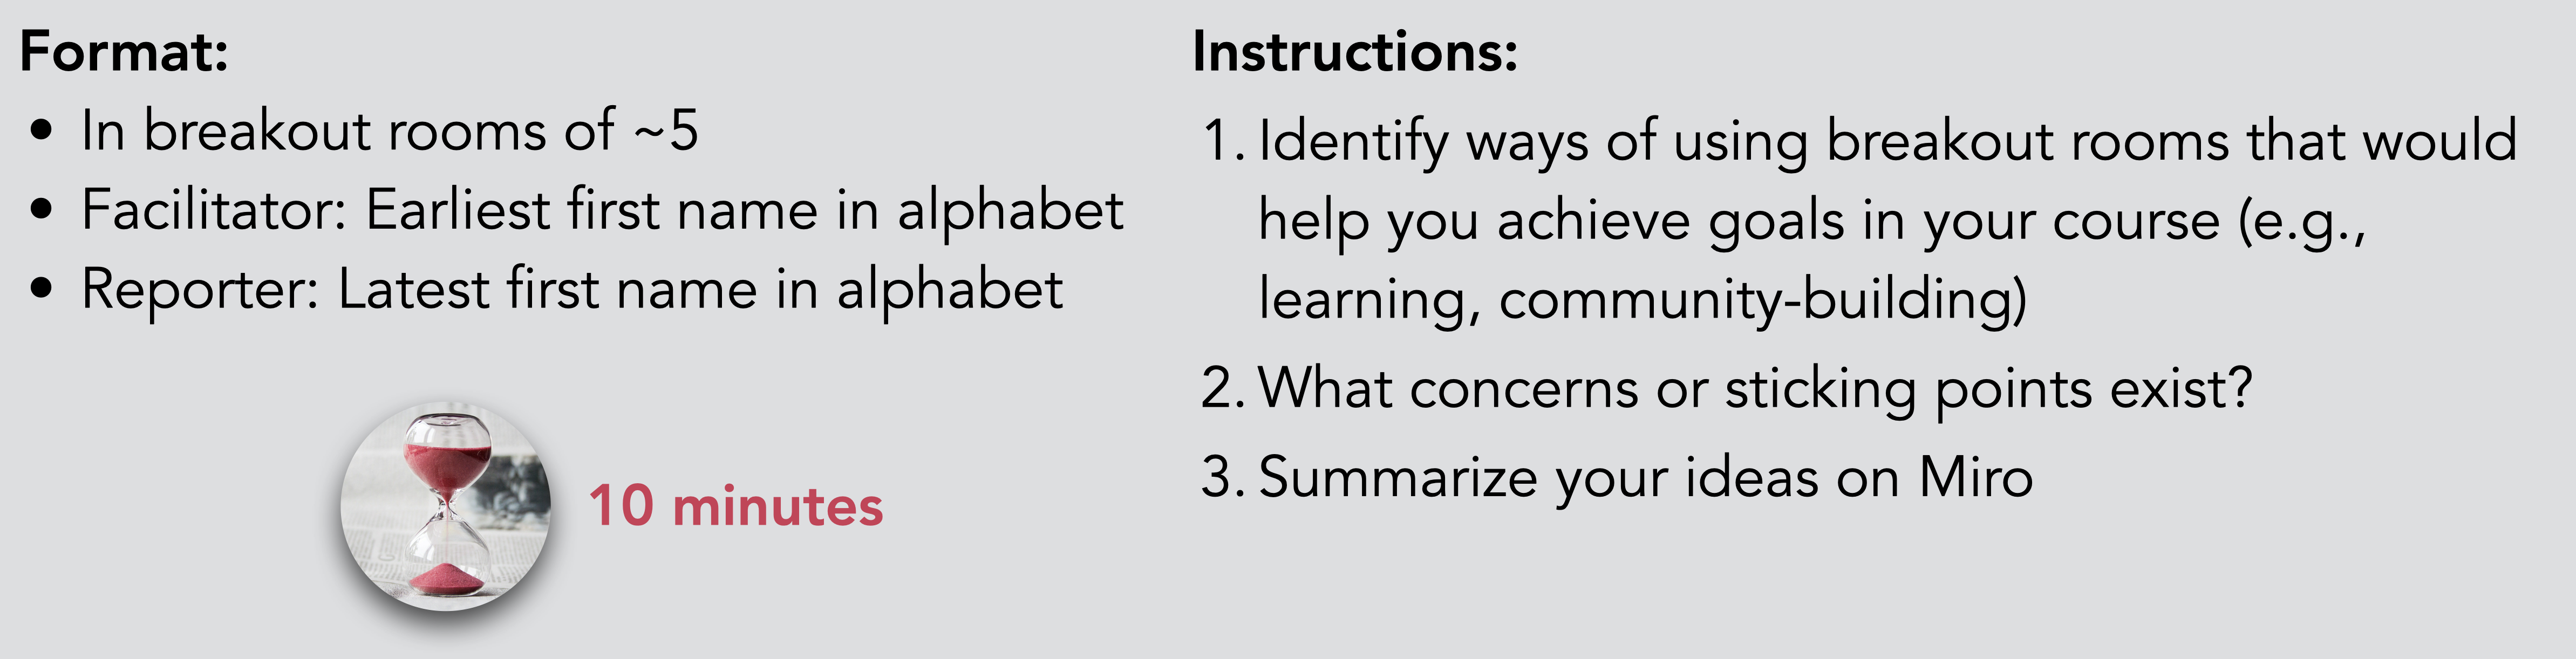
- Ask students to copy the instructions (e.g., screenshot)
- Groups can be made randomly, purposefully (can be done ahead of time), or as students chose (e.g., by theme/topic)
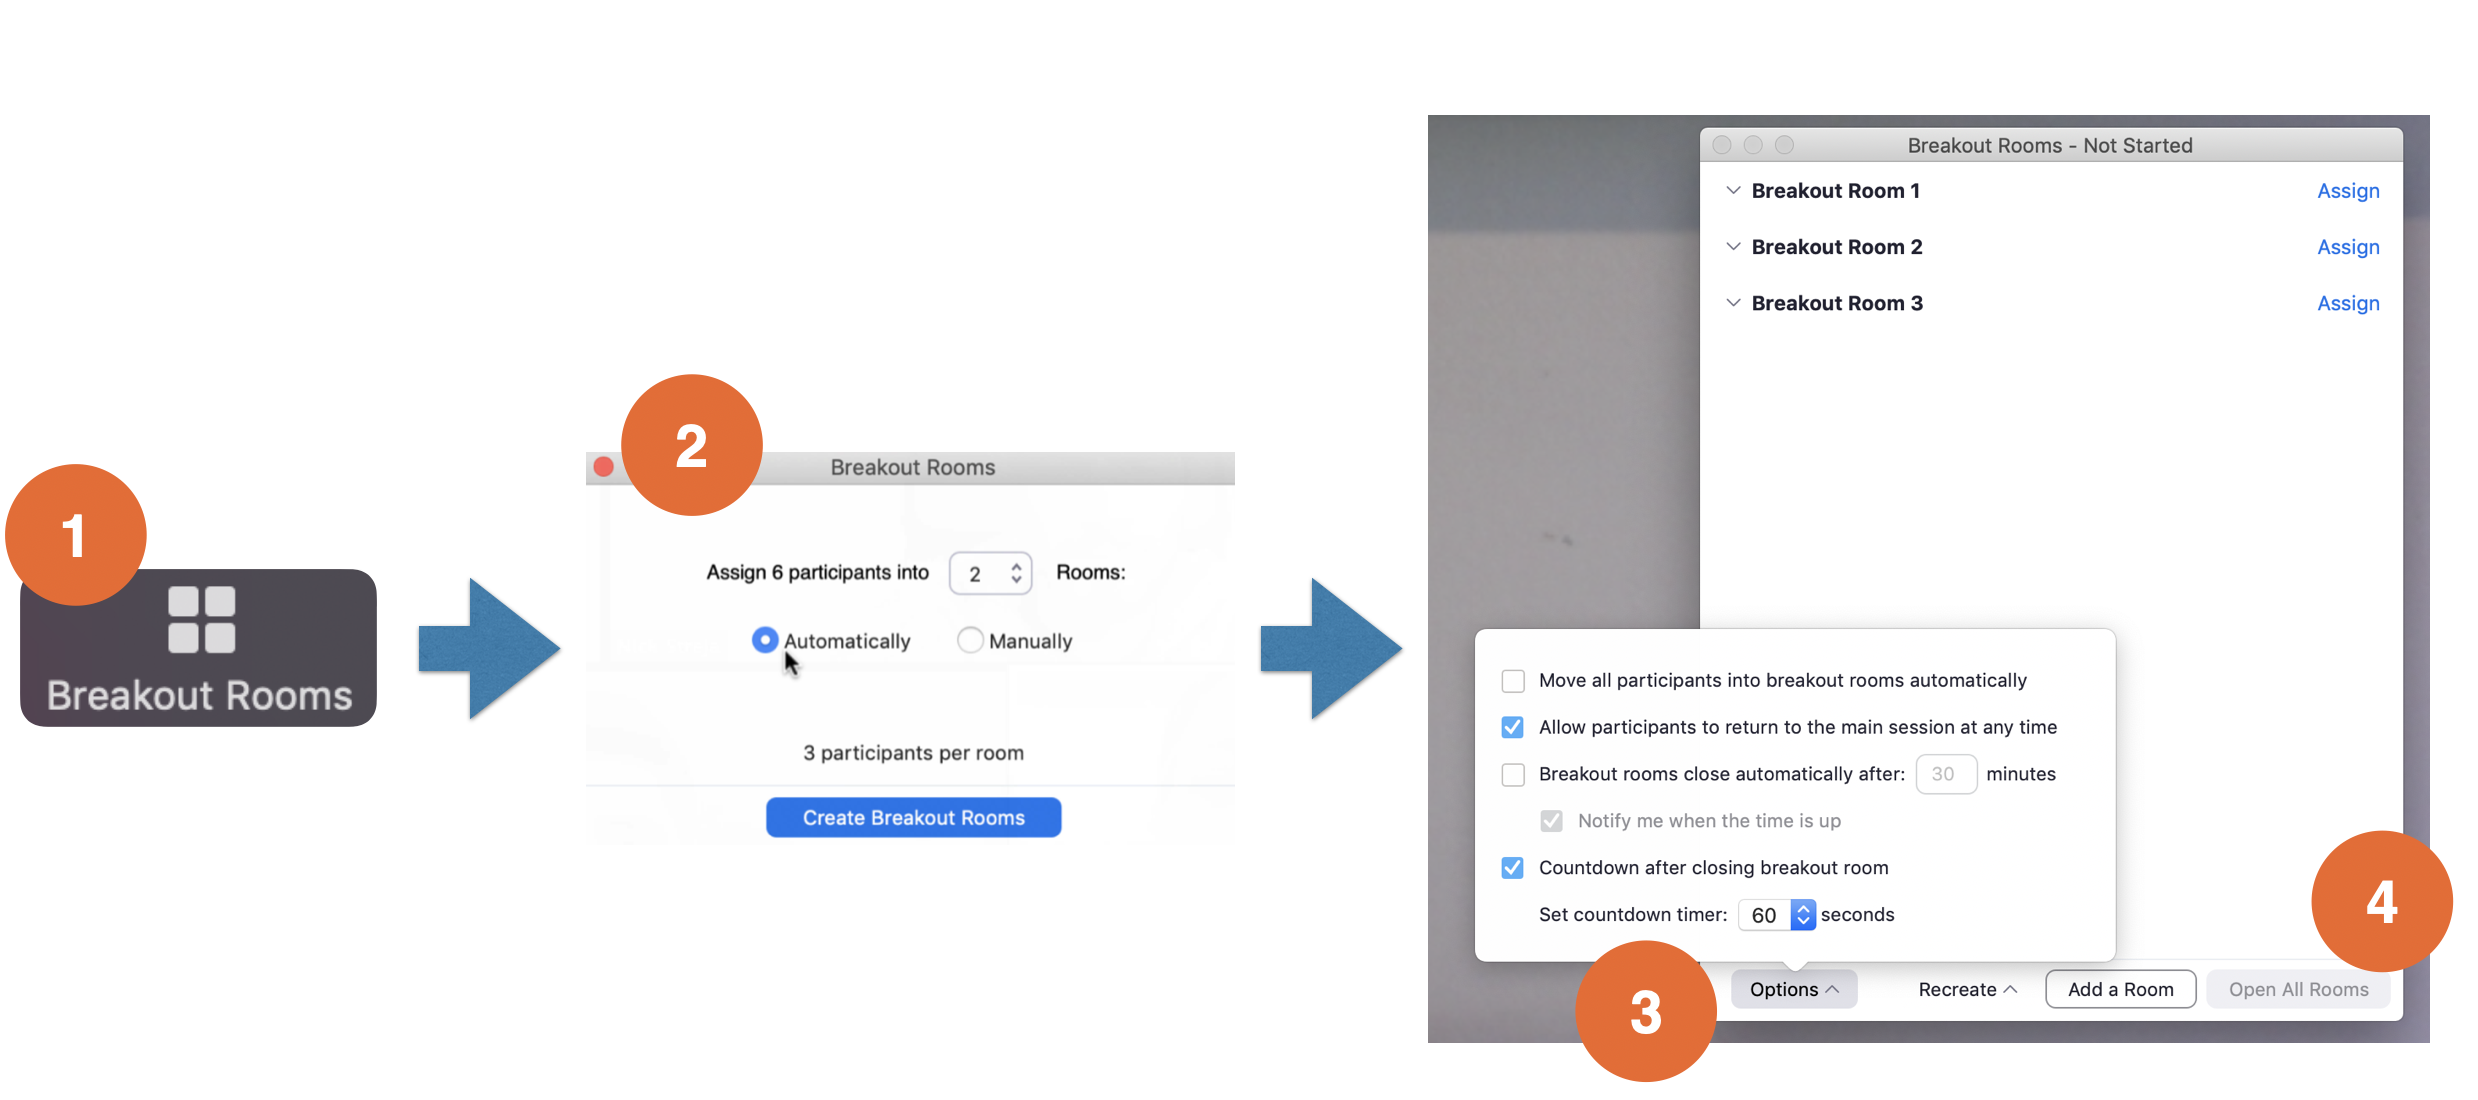
- Open the breakout rooms (example below for zoom, Figure 10)
- Initiate the breakout rooms
- Decide whether rooms will be made automatically, manually, or by participants’ choice, and how many rooms are needed (zoom automatically adjusts the number of participants per room)
- Decide on the options, e.g., you can allow students to chose whether they participate or not by leaving the first option unchecked—”Move all participants into breakout rooms automatically”— and the second option checked “Allow participants to return to the main session at any time”
- Open all rooms when ready
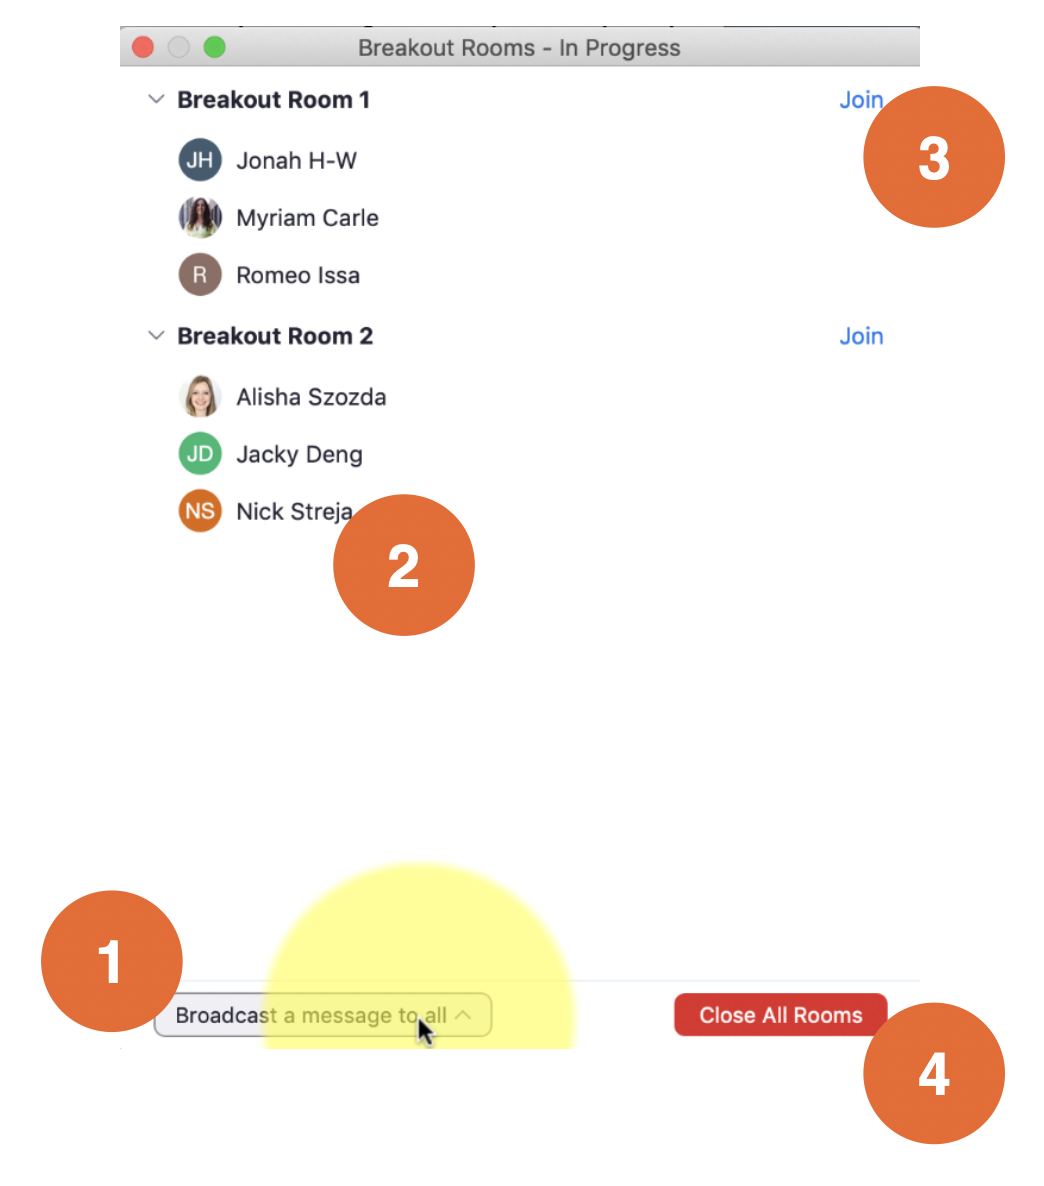
- During the breakout room, you can (Figure 11):
- Broadcast a message to everyone (e.g., reminders, clarifications, time left, request to return to the main room)
- Move people between rooms or add people to room (e.g., if someone joins the class late or whose connection drops and they need to rejoin)
- Join and travel between rooms to check in or respond to questions if students call you in (they can request that you join them). As you travel between groups, you might ask questions to help the conversation go deeper, remind the group of the goal, offer alternatives to consider, just listen, etc.
- Close all rooms—you may want to leave them open and simply broadcast a message for students to return, which would allow students to continue any great conversations they are having rather than being pulled back (both ways have advantages)
- After the breakout room session, you may ask some or all groups to share highlights or important take-home messages. Students can contribute to a collaborative document or put a summary in a collaborative space. They could also share their summary with another group for that group to then add to. Again, many options!
What group size is appropriate?
Group size depends on the context! Two person groups are great for meeting each other and engaging in deep conversations. Groups of 3 – 5 work well for group conversations or role plays and are small enough for everyone to have a chance to be heard. Larger groups can work if people are giving/practicing presentations or pitches and other group members are giving feedback.
Consider also how many people will join the group to which they are assigned, which will take some experimentation as every group is a bit different. In some groups, almost everyone participates (even in large groups); other times, only half of participants engage.
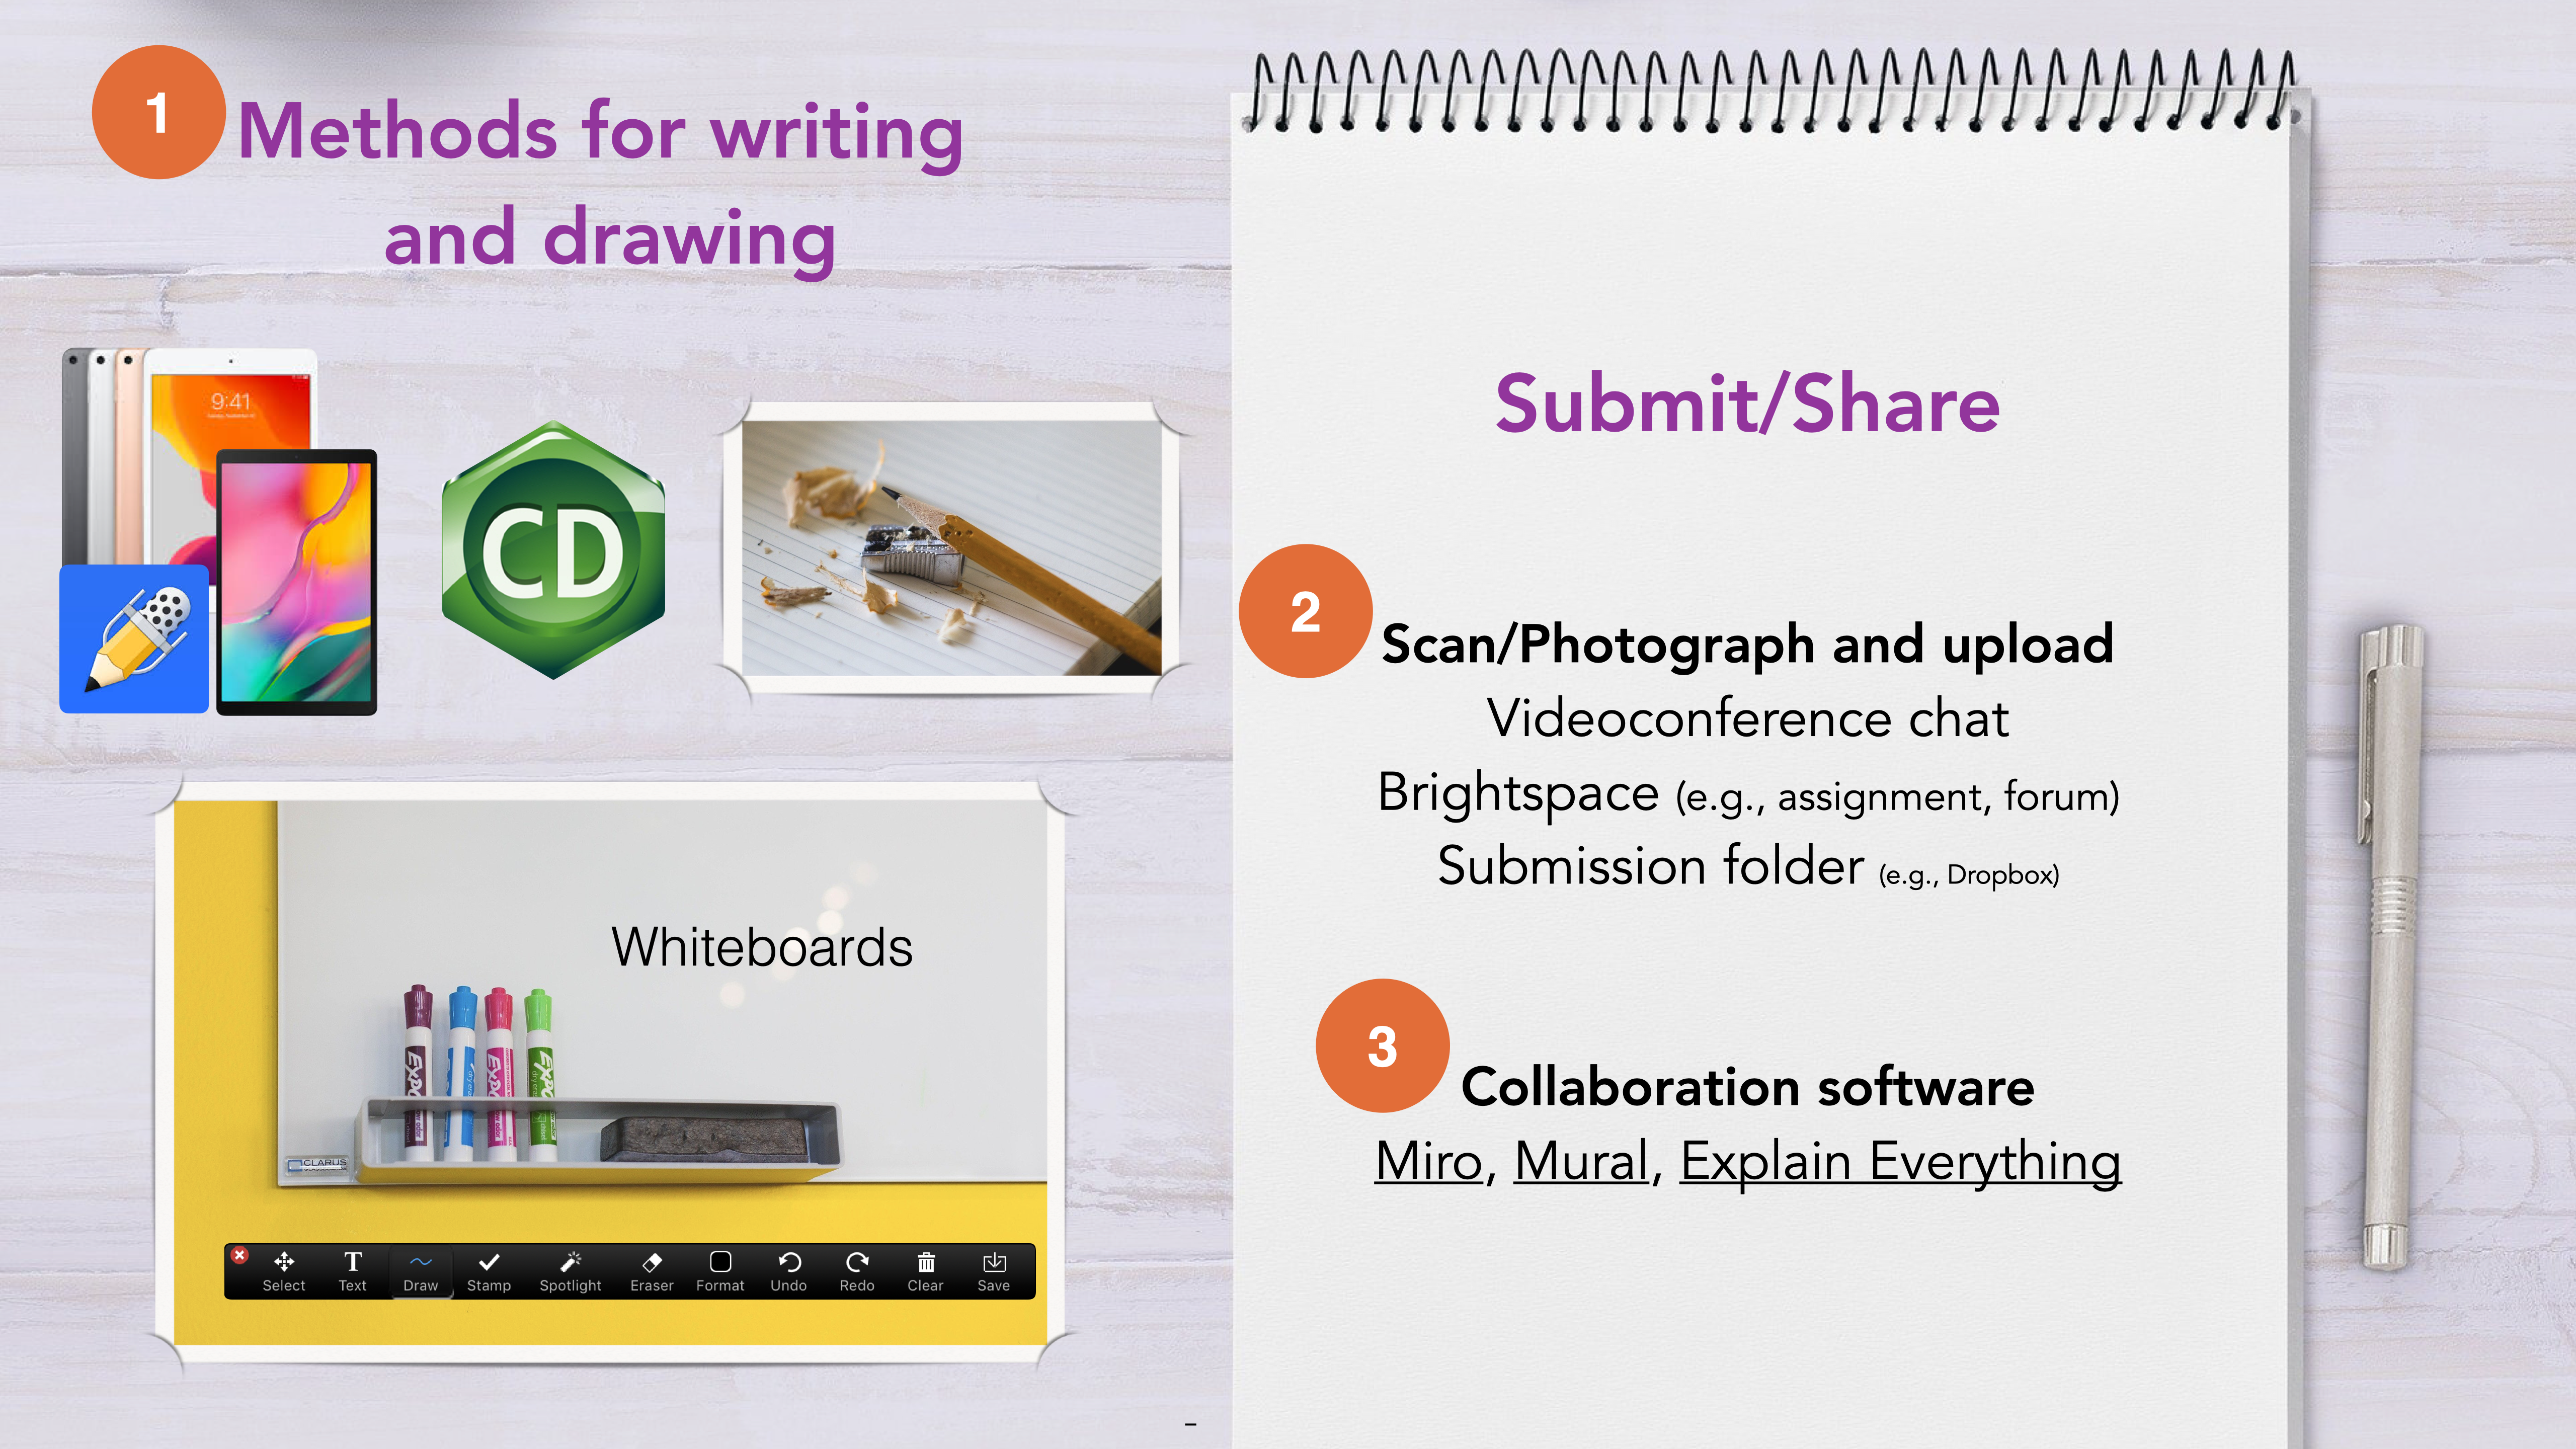
Handwriting online
Being able to handwrite and share online is important for many disciplines (e.g., math, physics, organic chemistry, art).
- Consider having 2–3 options for students to balance the technology students may/may not have available (Figure 12).
- The lowest tech option involves handwriting on paper, photographing, then uploading the image
- Some students will have tablets (e.g., iPad, Microsoft Surface)
- Use the videoconference’s whiteboard
- Identify a method for students to share their drawings, such as sharing their screen, dropping their file into the videoconference chat, pasting into a collaborative document (e.g., Google Docs), uploading to Brightspace (e.g., as an assignment, in a forum), or uploading to a submission folder (e.g., dropbox)
- Alternatively, use a software designed for collaboration, such as Miro, Mural, or Explain Everything.
 Wrap-up and next steps
Once the class is over, post the recording as soon as possible (especially important during a pandemic when students may not be able to participate synchronously). Using a streaming service allows at least for rough captioning, optimizing the streaming rates, and gives choices in playback speeds (e.g., YouTube). The recording can then be posted in Brightspace.
You can also connect the class session with other parts of the course by identifying options for students to engage in the class asynchronously or announcing the next steps.

Disruptions during a videoconference
Things can go wrong online just like they can in the physical classroom. By staying calm and being prepared, you can prevent and address these issues. Often these issues are minor technical problems that can readily be resolved.
First and foremost: you always have the option of stopping or leaving the session. If you are not sure what to do about an issue, stop the session and follow up with students as soon as possible.
Building a respectful community is one of the most important ways to prevent issues from arising (described above). Now let’s look at how to address issues by (1) knowing the technology, (2) taking appropriate action.
1. Know the technology
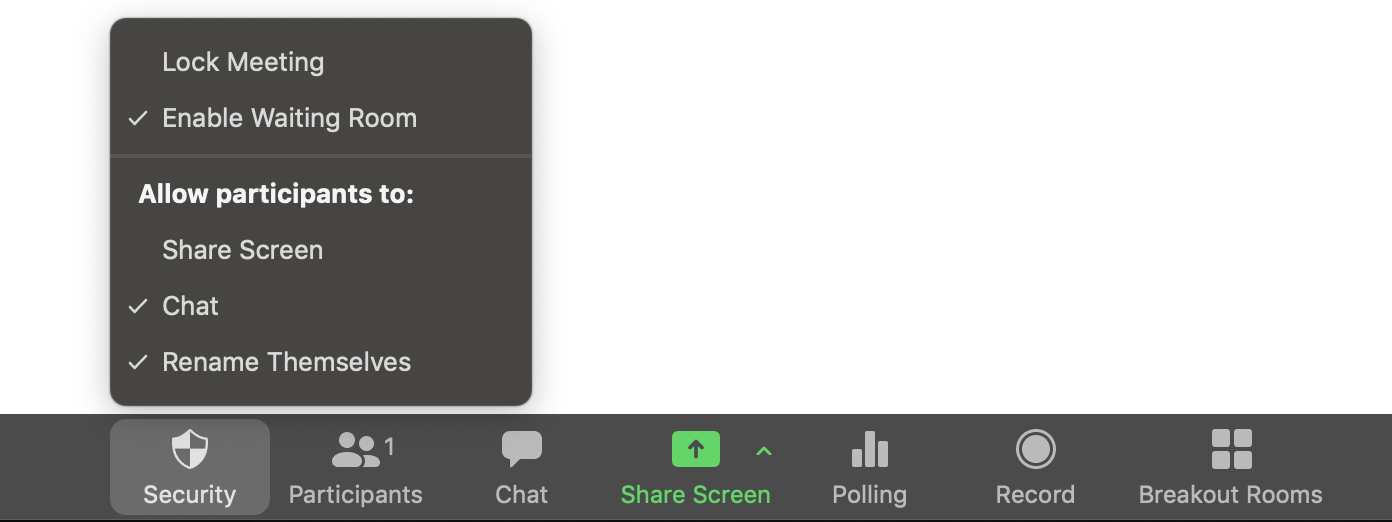
Practice using the videoconference software before the first DGD/tutorial. In particular, learn how to control the following options: mute/unmute microphones, turn on/off videos, turn on/off participants’ screensharing and screen annotation abilities, remove participant, and chat.
For example in Zoom, you can (Figure 11):
- Create the connection link using a password, currently a default setting in Zoom that should be used
- For institutions or accounts with Single Sign-On (SSO), you can require sign-in only from authenticated accounts (e.g., at uOttawa)
- Enable the “waiting room” once most students have joined
- Disable screen sharing, or enable it only for specific purposes
- Chat can be disabled if needed, although this limits community-building and students’ ability to ask questions (of you or each other)
- Lock the meeting, but this will make it challenging for students to join/re-join if they have connection issues (or scheduling issues)
- Remove participants by clicking on participants then selecting the one(s) to be removed (should be done only if essential)
- Note: Zoom has two versions that enable single sign-on authentication (e.g., from identified uOttawa users only) Business and Enterprise.
2. Taking appropriate action
Remember: you always have the option of stopping or leaving the session. If you are not sure what to do about an issue, stop the session and follow up with students as soon as possible.
Behaviour issues
- Serious issues like uninvited participants making rude, racist, sexist, etc. comments: remove the “participant” and either lock the videoconference or enable the waiting room so that you control any other entrances
- Participants getting off-topic, spamming the chat with emoticons, etc.:
- Ask participants to keep the messages focussed on the conversation at hand
- Student being disruptive, lacking professionalism:
- Gently ask them to return to the topic at hand or to stop the action (scribbling on whiteboard, talking over someone else); assume the best: that they don’t realize the effects of their behaviour
- Send an individual chat message or email
- If the behaviour is really inappropriate (e.g., racist comment): tell the person to stop immediately and publicly; this not only stops the behaviour but shows all participants that you will protect them and the learning space
- Remind the student that everyone is there to learn, has paid for the course, committed time and energy, and given up other activities to be here
- If needed, mute their microphone (sometimes people leave it on by accident and start talking to their cat)
- You could also send out a general reminder to everyone about the importance of mutual respect in the course
Connection and technology issues
- Record synchronous sessions for equity reasons
- Test the equipment beforehand
- If you tend to have bandwidth issues
- Send the slides/content to the students ahead of time
- Put screenshots or other documents into the chat
- Turn your video off if needed
- Give your sessions from a different location, if possible
- If your audio is bad
- Borrow a microphone from the university [details to be added]
- Be mindful that students may have the same issues
- Offer options: video on/off
- Watch a video at a different time
- Use the chat instead of answering orally
- If a technology is not working as intended, use a different method or move on. Maybe the polling software is not working so you create a question on the whiteboard instead, or you ask students to discuss in breakout rooms.
What to do when things go wrong (like a zoombombing)
Addressing other issues
- Other issues may arise, like students not finding a button or needing time to load up a new activity/website.
- Anticipate that new activities and software will take a little longer the first time.
- Students may be confused at the instructions:
- Write down the instructions, keep them to 3 steps max, and include the amount of time allocated; an example is shown below (Figure 12). If the activity needs more than that, give the first few instructions so they can get started, then build in the rest. If you need to give more than 3 instructions at a time, consider simplifying the activity.
Issues with a difficult student
The following recommendations are adapted those from Stanford University’s Teaching Commons.
- “First, maintain a safe environment for your students, which means preventing the debate from turning into a prolonged attack on either individual students or groups with whom students may identify. It also means keeping your cool and staying respectful if a student challenges you; this preserves students’ trust in you.” – Classroom Challenges, Stanford
- Decide whether a conversation is appropriate in the moment, whether to arrange another time to discuss, or whether to refer the student to the course supervisor.
During the conversation:
- Identify the source of the concern. To better understand the issue, listen carefully and ask questions. Take a deep breath and stay calm.
- Use evidence when disagreeing with a student and ask students to provide evidence for their positions. Don’t use your position as a reason to be right (e.g., I know this because I am a TA)
- Avoid “teasing or sarcastic humour, since these are all too often easily misinterpreted.” – Classroom Challenges, Stanford
- You may want to brainstorm or outline the options
To go deeper
Recommendations for holding synchronous sessions
This collection of articles summarizes key aspects of facilitating online learning sessions.
Video series of recommendations
The first series of four videos from Contact North captures some main recommendations for working with students through videoconference methods.
Up Next
In the next chapter, we address options for assessments, including quizzes, assignments, and exams. We also address academic integrity.
Please feel free to contact us at any time with questions, suggestions, and concerns. In particular, we check this form each semester and will continue to update this guide as the situation evolves.
Presence is considered a central concept in online learning. ‘Presence’ in the online course is understood as the ability of people “to project their personal characteristics into the community, thereby presenting themselves to other participants as ‘real people’”. (Garrison, Anderson, & Archer, 2000, p. 89).
Garrison, D. R., Anderson, T., & Archer, W. (2000). Critical inquiry in a text-based environment: Computer conferencing in higher education model.The Internet and Higher Education, 2(2-3), 87-105.
