5 Creating Instructional Videos and More!
Creating Great Instructional Videos
Using Studio Spaces at McMaster University
MacPherson on Main Campus offers a studio with many background choices including green-screen capabilities and technology such as teleprompters and a lightboard. Visit the MacPherson studio link for further information and booking procedures. The studio is located on the 4th floor of the Mills Library and is available to all McMaster faculty.
- Access/Booking can be gained by using the Outlook Calendar. RJC Room 241 has a shared calendar. Users can see when the studio is available. Book the room by using “Invite Attendees” while scheduling a meeting in Outlook, Add “RJC 241”. You will receive a confirmation e-mail shortly after, and your booking is now in the RJC 241 public calendar and your own Outlook calendar.
- Technology and Bringing your own USB flash drive with sufficient space – The room has a built in desktop to connect to. It also allows users to connect their own laptop via HDMI. Adapters for most video inputs are provided but it is best to bring your own adapter if you have a laptop that requires additional technology for connection. The system captures a HD MP4 file to a user provided USB flash drive. *NOTE video files are much larger than standard documents. Make sure your USB drive has sufficient free space for your video recording (1080p MP4 video files are approximately 3 Gigabytes/hour).
- Pictures and a guide are below:
Here is a guide to using RJC Studio Room 241
Your At Home Setup
Camera, mic, lights, what do I need? Here is a quick guide to consider if you are just getting started:
Tips: What and what not to do
- Lighting – It can’t be stressed enough how important lighting is for delivering a quality viewing experience to your audience. Find a space where the overhead lighting is consistent and won’t change throughout the day. Consider adding a light source to your desk, near your camera to keep your presentation space bright. Pay attention to your background. Avoid windows or strong light sources that will effect your camera in adjusting the white balance and creating a back-lighting situation.
- Microphone – Invest in a quality microphone as opposed to relying on something built in to your laptop. Test your audio quality by doing a quick recording, or invite someone to watch you present and provide feedback of the audio quality. Online platforms compress the audio signal for optimal online stream-ability, not quality, so it’s up to you to be sure your audience is able to hear you clearly.
- Quiet Area – Find an area where audio and video disturbances are minimized. Your audience doesn’t need visual distractions during lessons and your audio is important.
- See additional tips here: Top Tips for Creating Effective Instructional Videos
Planning Your Productions
Tips for Creating Timeless Videos
- Set a learning objective: Stick to a single concept or idea to keep your video on task.
- Script out your lesson: Just like preparing your PowerPoint presentations, jot down your main ideas and create a point form list or full script.
- Don’t date yourself: Avoid using dates, names and course information that will change from year to year. This way, you do not have to edit your video every term. Keep your information relevant, so you can use the video for multiple years.
- Keep it short and sweet: Aim for no longer than 5 minutes for an introductory video.
- Use simple graphics: A name plate, few photos or the department logo can go a long way in making your video more dynamic.
Recording
Using Synchronous Tools for Recording:
Before hitting that record button you should make sure your call settings are optimized and working properly. You can see this link to find support in setting up before a Zoom call.
Zoom
See the Slides below to set up a recording, save to the desktop or cloud. A Local recording will save your file in your MyDocuments/Zoom folder. A cloud recording will be saved to your Zoom Account under the Recording Tab where you can share a URL, or Download the file.
MS Teams
To begin a recording in an MS Teams meeting you select Start Recording from the meeting controls. Participants are notified of the meeting being recorded. Select Stop Recording to stop. Once processed you will be notified that your recording is available in MS Stream. The slideshow below will help you gain an understanding of how MS Teams saves your recording and how to find the recording in your MS Stream library.
Cisco WebEx
WebEx provides an option to save a recording to your account cloud service, or to your desktop. You can download your recording from the cloud using similar steps as you would in Zoom, or MS Stream. By downloading your video you can post and share on MacVideo to have closed captioning added, and load it into your Avenue to Learn course shell. To get started using WebEx view the guide here: Getting Started with WebEx
Asynchronous Tools:
Kaltura Capture for MacVideo
You can use Kaltura Capture to record your display, as well as audio and your camera. Once the recording is finished, the recording will automatically be uploaded to MacVideo for you to view and share. You will need to download and install the Kaltura Capture software before you can begin recording. Ensure to choose which operating system you’re currently using whether you’re on a Windows or Apple computer. Learn more about how to use Kaltura Capture
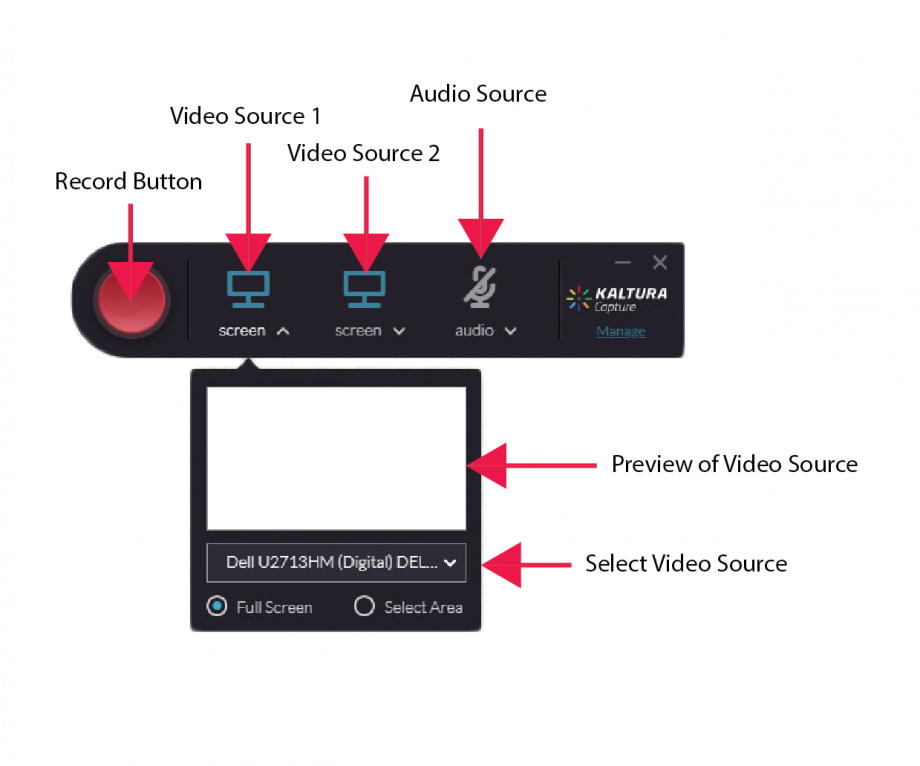
More information on Kaltura Capture
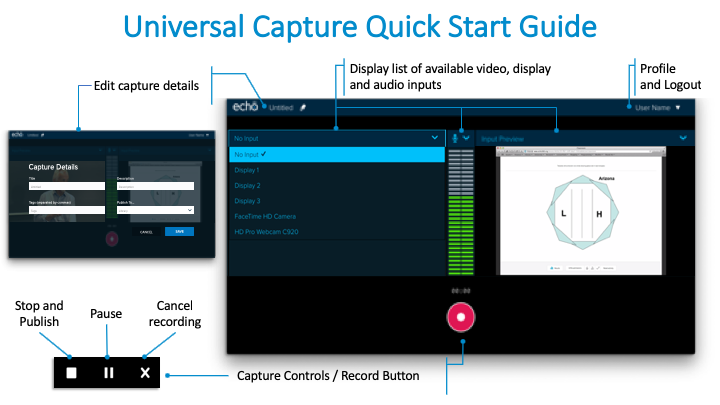
Echo360
Echo360 is a lecture capture and student engagement platform. The system allows instructors to record audio and display. Echo360 is a powerful tool that can be used for review, or to supplement materials covered in class. To capture you lectures, you will use Universal Capture – Personal, that will automatically save and post your recording to Echo360.
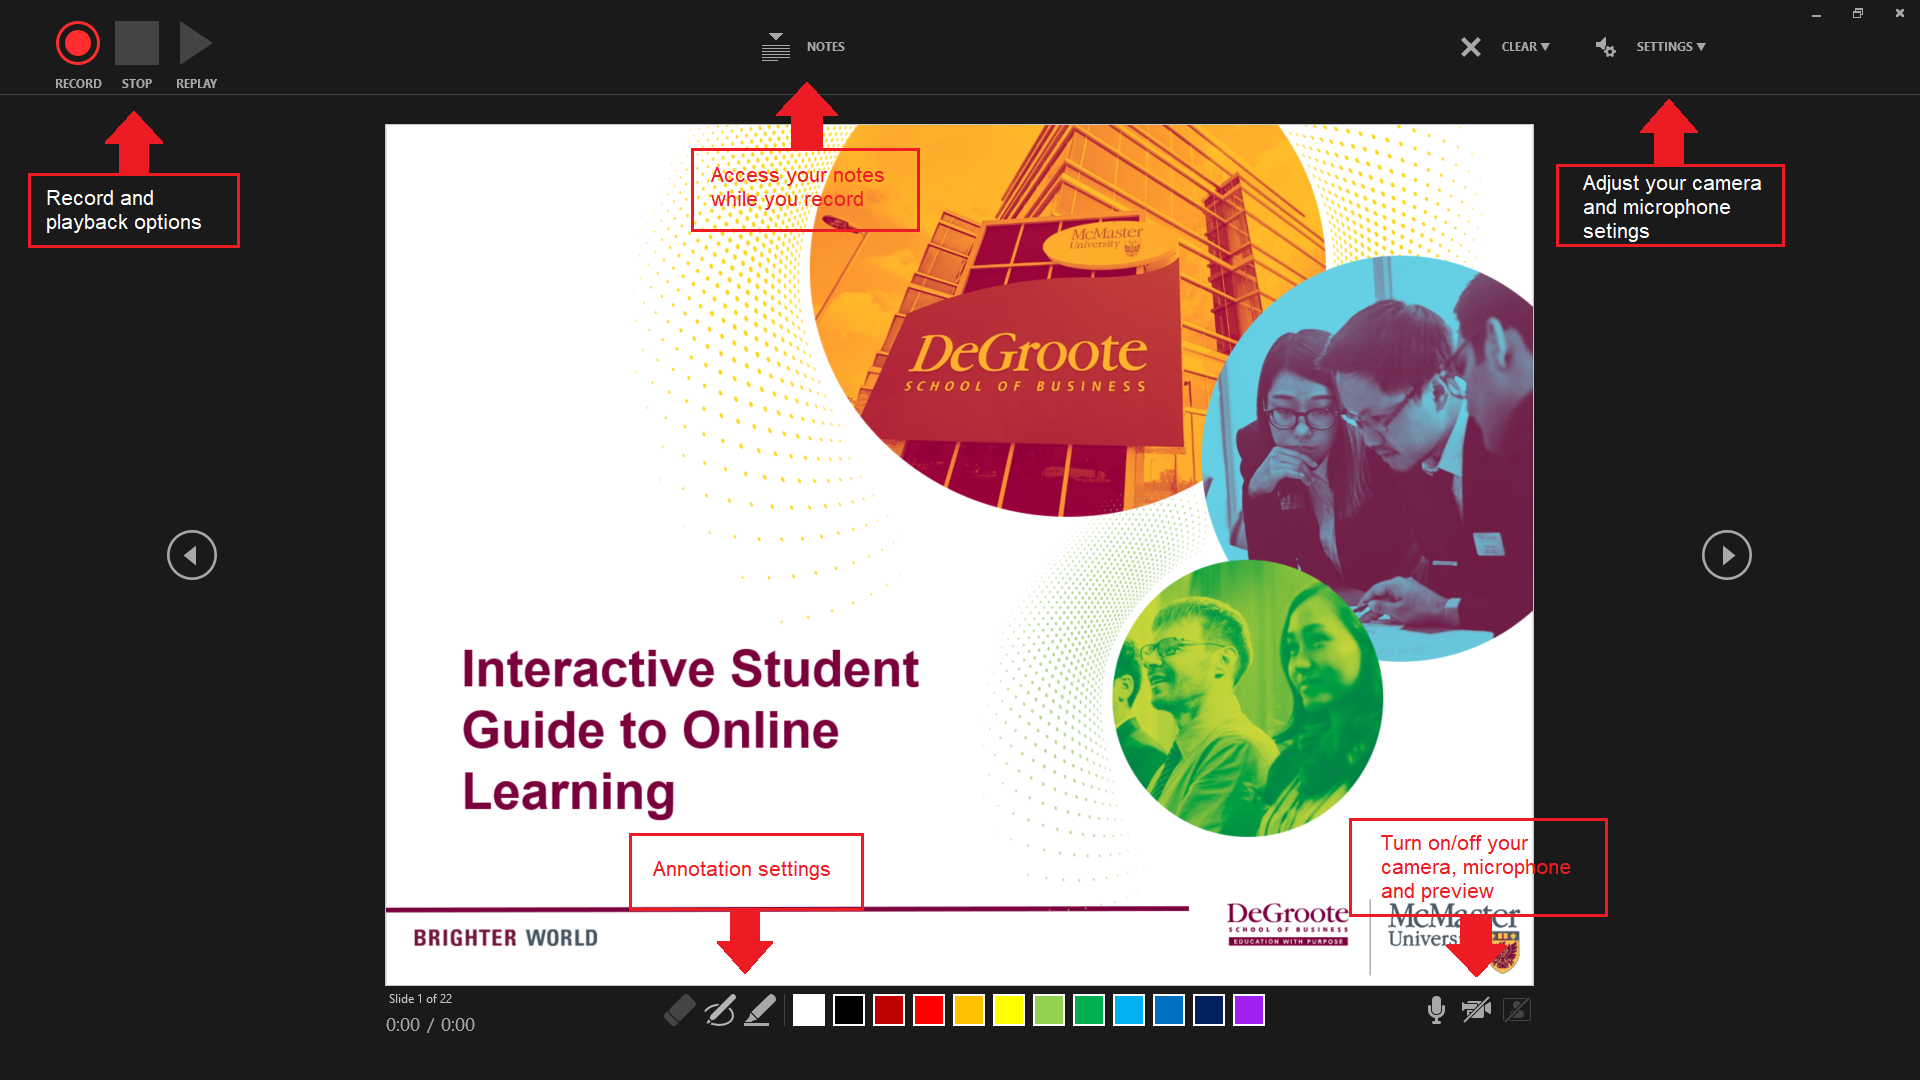
PowerPoint
Record your slides in PowerPoint, along with audio and video, and save it as a video for easy sharing to your students.
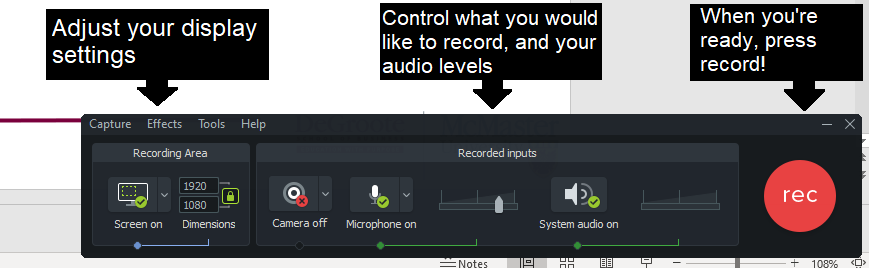
Camtasia
Camtasia is an all-in-one screen recording tool, with built in features and a video editor. All faculty have access to Camtasia for free! (Go to the linked website and search “Camtasia”)
Uploading
Once your files are recorded, it’s time to upload them. First, we must locate our files and see if they are ready for upload.
Where do the recorded files go? How do I find them?
- Zoom – Locate your recording, local or cloud recording.
Cloud recordings: If you’re planning on sharing your video directly from the cloud you can log into your Zoom account on your web browser. See the following video to get the URL from a Zoom Cloud Recording. If you are uploading a local recording to your Avenue course shell, you will first need to upload the Zoom recording video to your MacVideo channel to have it closed captioned, and then add the video to your course. - MS Teams – If you’d like to add a link to the video hosted on your MS Stream channel you will need to share the URL link. Remember you can trim a video in and out points before sharing. If the file needs to be downloaded for editing, follow the steps in this video for download. Then upload your video to your MacVideo channel to have closed captioning added. This link shows you how to add a video from your MacVideo channel to your Avenue course page.
- Cisco WebEx – Cloud recordings: To locate your recordings, log into WebEx and click “Recordings” on the left hand side. Here, you can view, save, share and delete your recordings. If you are looking to add closed captions to your recording, you will need to add the file to MacVideo.
Uploading to MacVideo
Depending on how you recorded your video, you may need to upload it to MacVideo in order to share it to your students, and add closed captions. Uploading it to MacVideo will also allow you to make edits to your video and add interactive features.
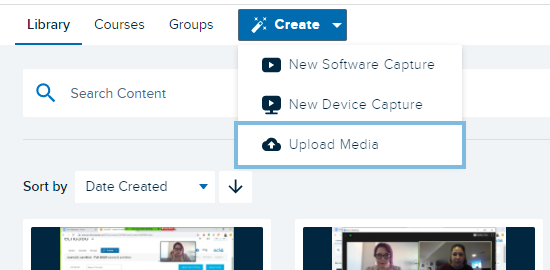
Uploading to Echo360
Similar to MacVideo, you can also upload your content to Echo360. Echo360 also allows you to edit your videos and add interactive features. The choice of tool to use is based on your preferences.
Editing
Some editing tools are built into the video tools we most often use.
MacVideo
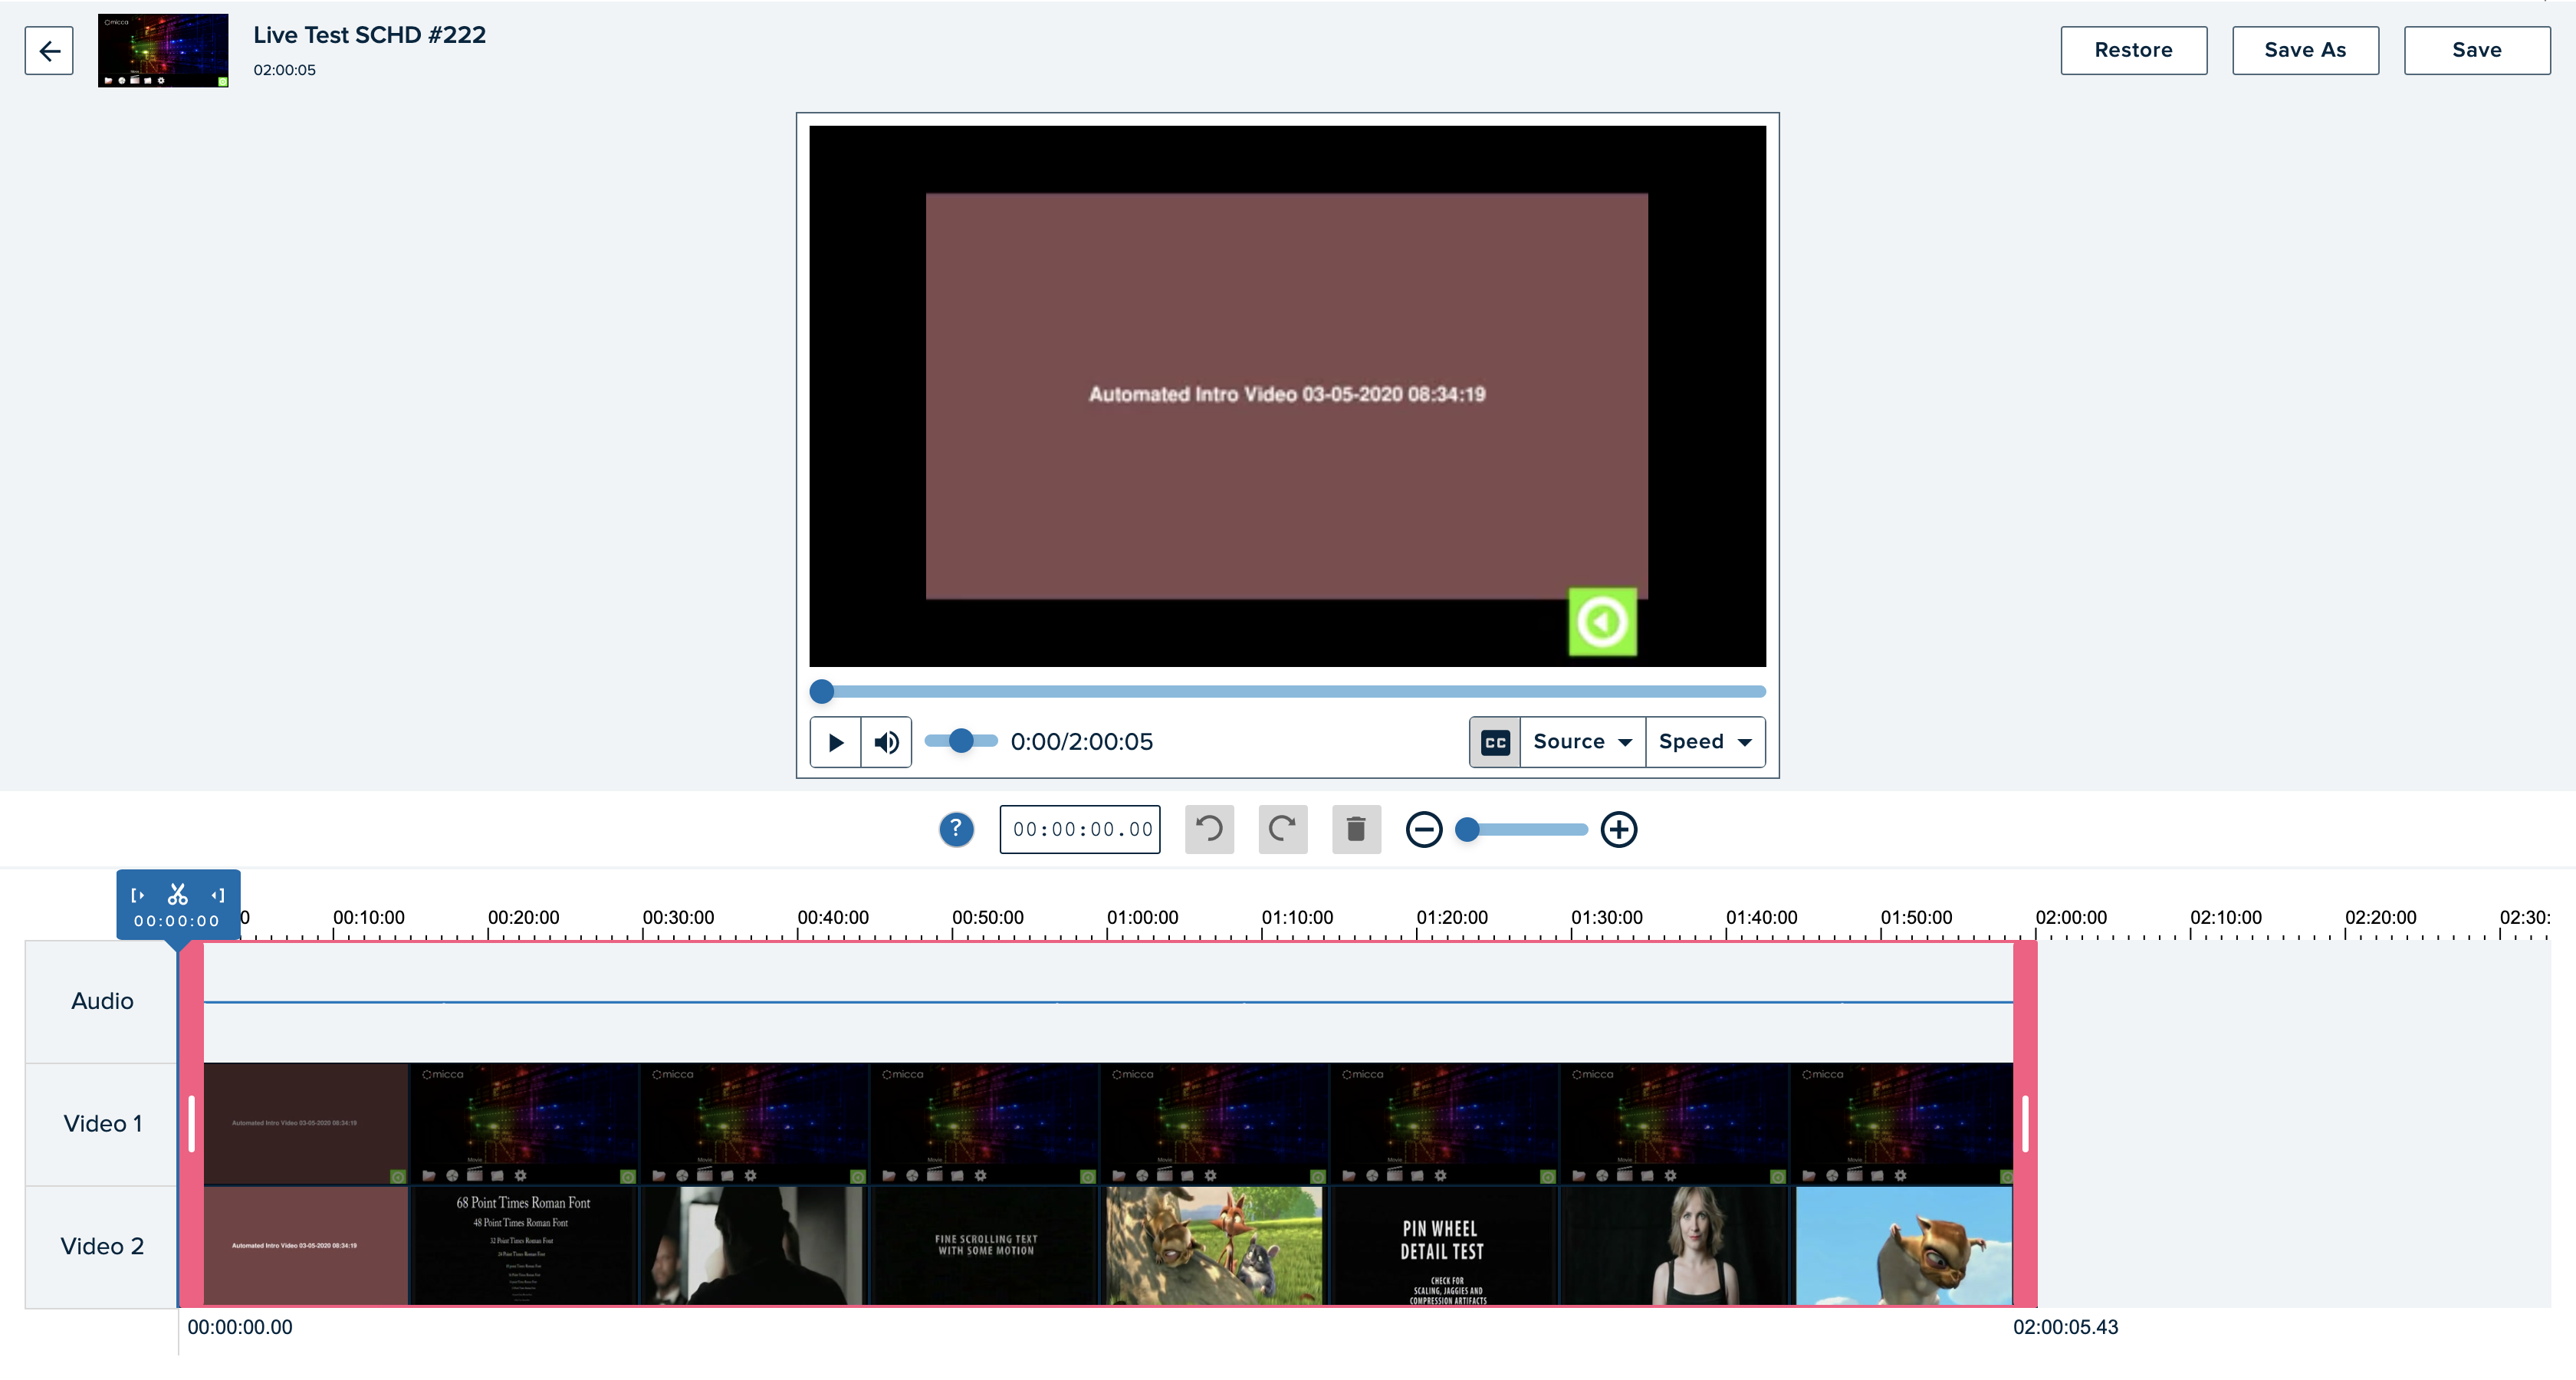
Has the ability to trim in and out points for existing video. Using the Launch Editor feature in MacVideo allows you to split your video and edit specific parts of your video. You can also use the Add Chapters feature to longer videos to create start points at specific times throughout the video. You can add Quizzes and stop points during playback of your video and you can add Hotspots to create engagement in your videos.
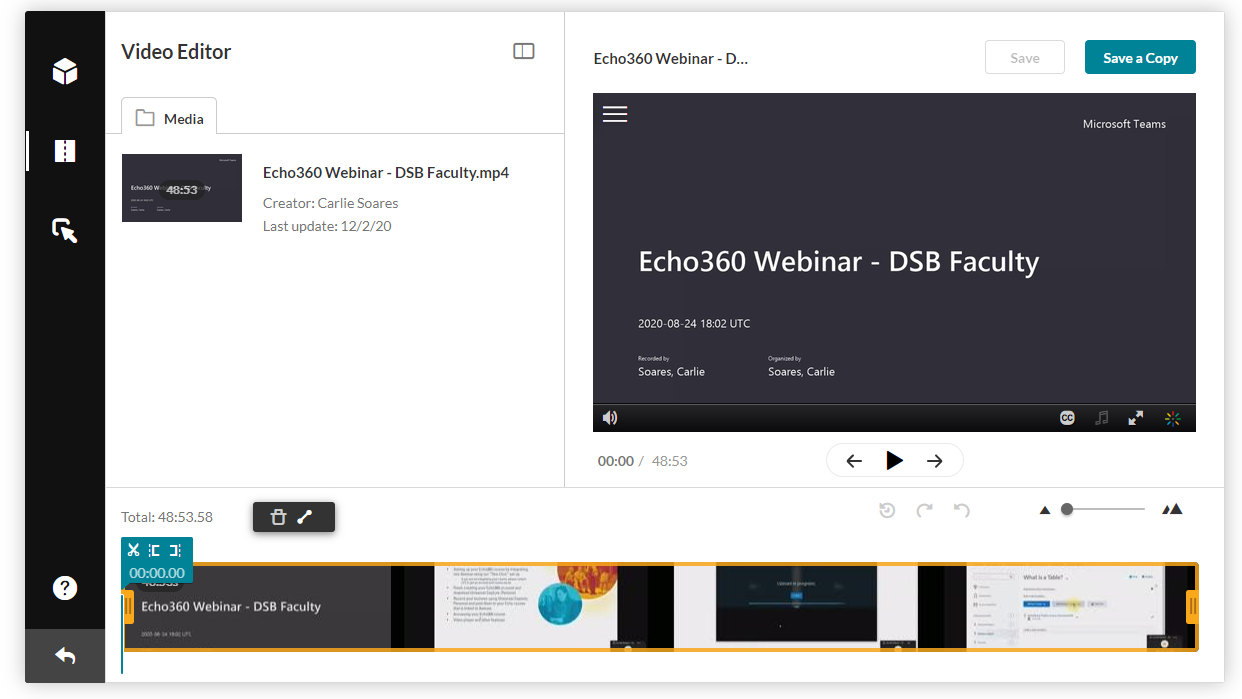
Echo360
Echo360 provides a basic video editing function, allowing you to make cuts and trims to video content as needed. In addition, you can make changes and save them to the original video, or you can make changes and Save As. You also have the ability to add interactive polls to your video and apply closed captions. Find out more about editing videos on Echo360
Camtasia
Camtasia is a free software tool that allows you to capture your screen, webcam, or both, during a presentation. It can also be used as an offline video editor like iMovie. The Techsmith Support page offers great tutorials on using Camtasia and editing video.
Sharing
Once your content is recorded and uploaded, now it’s time to share it with your students! In this section we will go over the best way to share your content.
Share Type |
Tools Applicable |
Pro/Cons |
| Integration into Avenue to Learn | MacVideo, Echo360, Teams Meetings | Easy access for students directly through their Avenue course
Access to detailed analytics (instructor) All videos/recordings are in one spot/module. |
| Embed Link | MacVideo, Echo360, Stream, Zoom, WebEx | Easy to create and post to Avenue
Secure way of sharing, students cannot download or share embedded videos. Access to basic analytics (how many times it was viewed) Echo360: No access to tools (for students) |
| Copy and Paste Link | MacVideo, Echo360, Stream, Zoom, WebEx | Easy to create and post to Avenue
Not secure – need to make public links that students can share with others. Echo360: No access to tools (for students) |
Closed Captioning
Closed captioning is required on all video material you create and share with your students. Luckily, it is easier than ever to get closed captions added to your video.
| Synchronous Tools: | How to get Closed Captions |
| Zoom | Recording will have to be uploaded into MacVideo or Echo360. The Zoom recording does come with a transcript when saved to the cloud. |
| Teams | Recording will automatically upload to Microsoft Stream, which provides closed captions. |
| WebEx | Recording will need to be uploaded to MacVideo or Echo360 to get closed captions added. |
| Asynchronus Tools: | How to get Closed Captions |
| Kaltura Capture – MacVideo | Recording gets posted to MacVideo, and captions are added automatically. |
| Echo360 | An automatic transcript is created which can be applied as closed captions. This only applies to videos that are posted into Echo360 courses. |
| Camtasia | Captions can be added manually to the video, or it can be uploaded to MacVideo or Echo360 for automatic captions. |
| PowerPoint | Recording will need to be uploaded to MacVideo or Echo360 to get closed captions added. |
View Campus Supported Captioning Solutions here. As well as resources such as links to caption file converting software below:
