Intro Skills Lab Outline
Introduction
Using microscopes, capturing and analyzing images, and using pipettes to make solutions are among some of the most fundamental skills required to work in a laboratory. It is one thing to read directions on how to capture an image using a microscope, but it requires actually using the equipment to understand the types of issues one can encounter when trying to complete these "simple tasks."
To help you become better acquainted with these common lab equipment, we have developed a few foundational lab skills exercises for you to complete. There are no marks associated with the exercises. They are provided as opportunities to practice using some of the lab equipment and software you will encounter during the course.
Compound Light Microscopy Principles
The Living System Lab Appendices will be your best friend when it comes to familiarizing yourself with the microscopes in the lab this semester. The microscope you will interact the most frequently with is the Primostar 3 microscope, a compound light microscope that allows you to magnify up to 1000X while examining specimens on microscope slides. The other types of microscopes you will interact with this year include the stereomicroscope, which allows for magnified 3D viewing of specimens during dissection or interacting with model organisms, the inverted compound light microscope, which permits looking at the bottom of a petri dish to examine cells instead of viewing the specimen from the top, and a fluorescent stereomicroscope, for viewing fluorescently labelled proteins within a model system. Today's lab will focus on beginning to work with the Primostar 3 microscope, and practicing putting the microscope into Kohler illumination (placing the light path source appropriately to ensure the light passes through the specimen without causing scattering/refraction), changing between objectives to increase or decrease the magnification, putting the microscope into focus using the coarse and fine focus knobs, and capturing images of the view through the microscope using the accompanying computer software (Zen) and camera.
Micropipette Principles
A micropipette is a common and essential laboratory instrument. It is used to accurately and precisely transfer volumes of liquid in the microlitre range. You will see micropipettes used in various labs this semester, including the epidemiology lab, the cell biology labs, and the locomotion lab. Micropipettes are available in a variety of different designs and sizes, so the micropipettes used in LIFESCI 2L03 this year may look different from the ones you used in BIOLOGY 1A03 or in a research lab, but they all share certain components. This includes the plunger, display, tip cone, tip ejector, and grippy. A diagram of the Sartorius pipettes used in this course is shown below in figure 1.
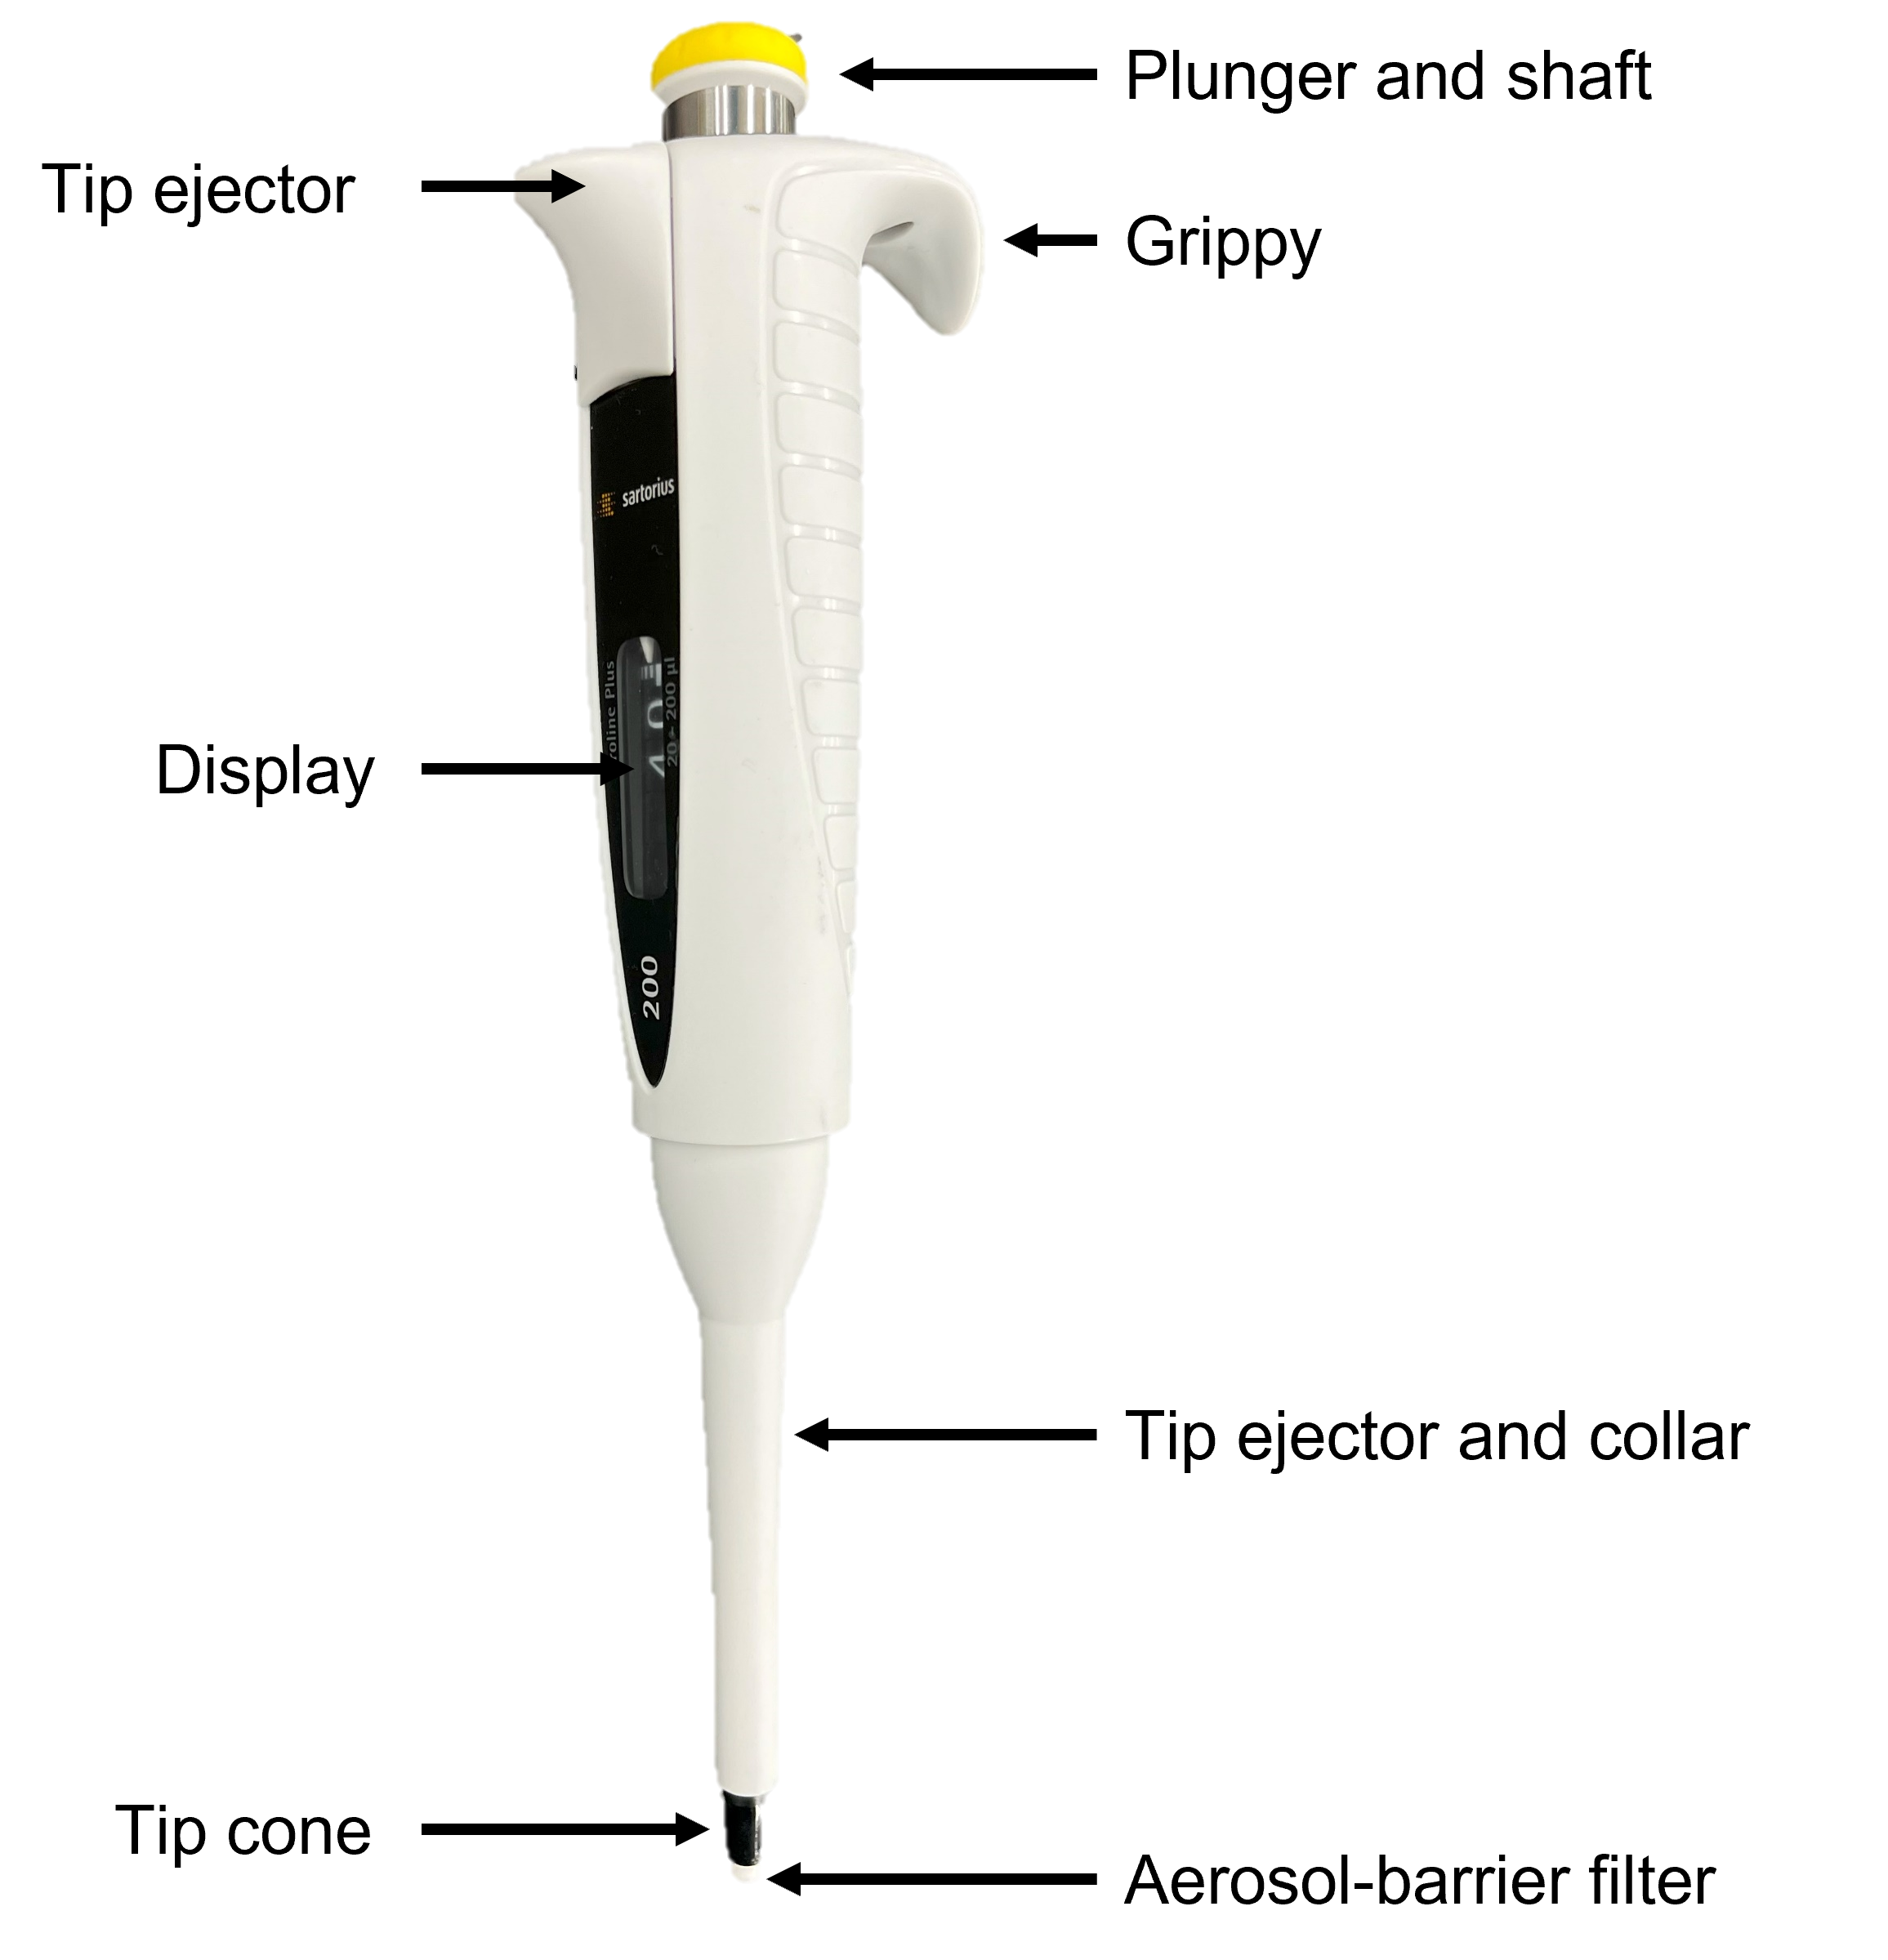
This model is an air displacement micropipette - the pipette draws up the appropriate volume of liquid via piston-driven air displacement. The moving piston within the pipette creates a vacuum into which liquid is drawn. The volume you set your pipette to dictates the volume of the vacuum to be filled with liquid, as you are adjusting how much the piston will move with plunger depression.
Proper operation of the micropipette is important to ensure the volumes of liquid you are transferring are accurate. Rotate the shaft to the desired volume. Hold the micropipette comfortably with the grippy extended over your fingers with your thumb on the plunger button. The plunger shaft will depress to two different positions, and understanding how these positions relate to the operation of the micropipette will ensure proper operation. Never rush when using a micropipette - smooth, steady movement of the piston will produce the most accurate results while preventing liquids from aspirating too quickly into the aerosol-barrier filter.
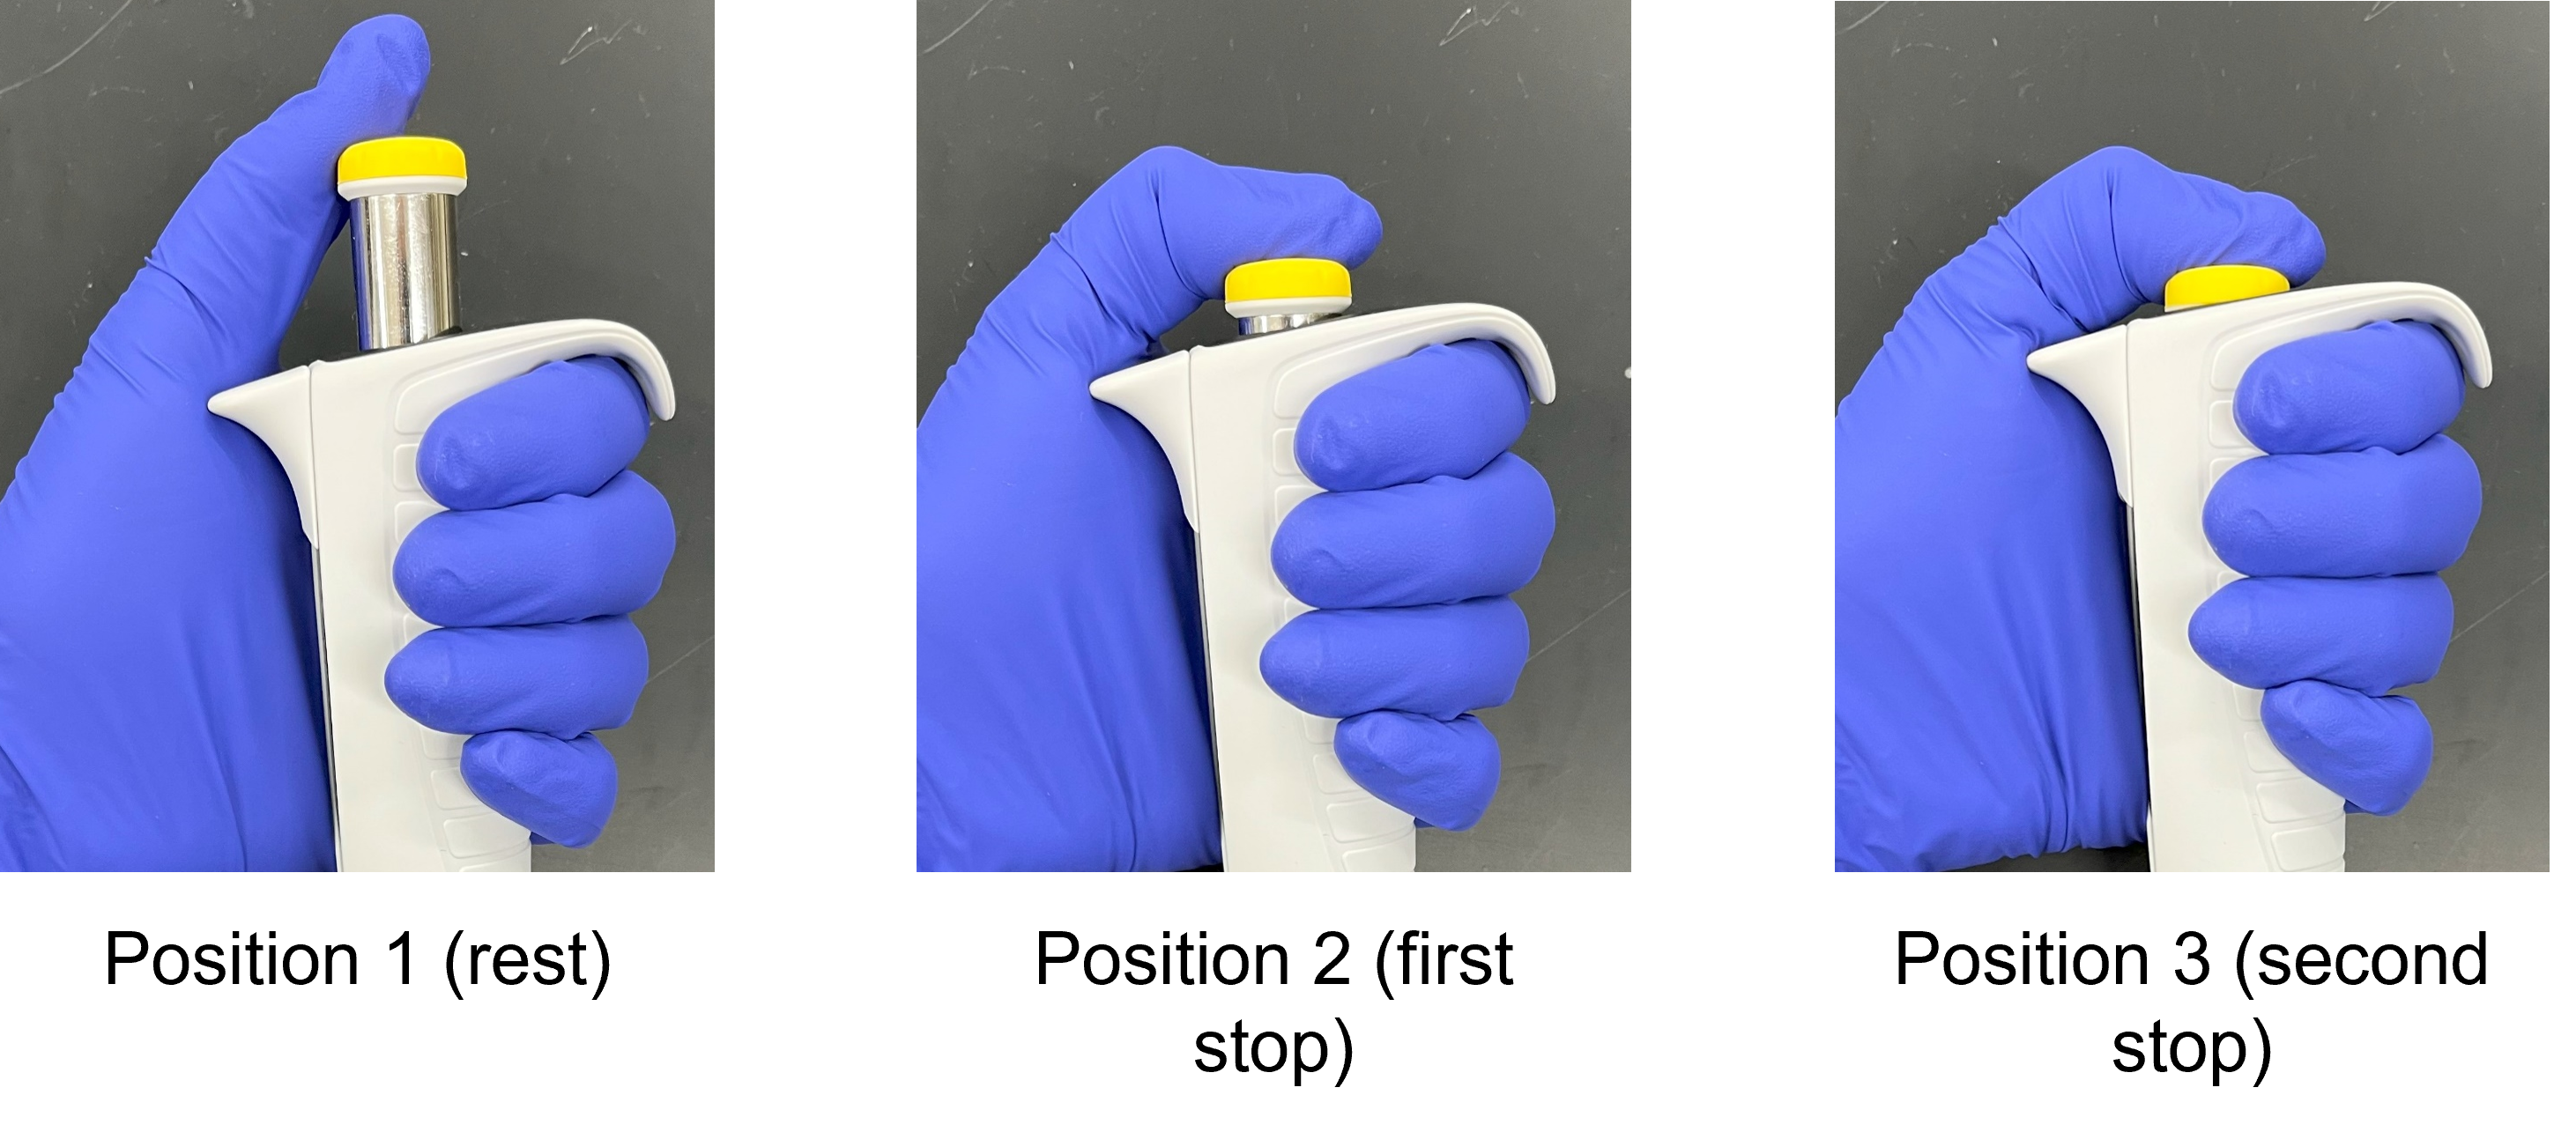
Position 1 - rest position
- in this position, you will press the micropipette into a fresh pipette tip from the box. You do this without ever touching the tip with your fingers.
Position 2 - first stop
- you use the first stop when aspirating liquid into the tip - the first stop is calibrated to the volume you have set the micropipette to
- Instructions:
- press the plunger down to the first stop
- immerse the pipette tip vertically in the liquid, and slowly release the plunger while the tip is immersed. The volume of liquid aspirated into the pipette tip will match the preset volume
- remove the micropipette and tip from the liquid and move gently to the receiving vessel
Position 3 - second stop
- this second stop is used to dispense the liquid into the receiving vessel
- Instructions:
- slowly press the plunger to the first stop to dispense the liquid. You will note that not all of the liquid leaves the tip when you are at the first stop.
- continue to press the plunger further to the second stop - this will empty the tip completely. The second stop will push MORE air out of the tip than the calibrated volume, which ensures all the liquid leaves the tip.
- remove the pipette while the plunger is still depressed so liquid is not drawn back into the tip
- eject the used tip into a tip waste container.
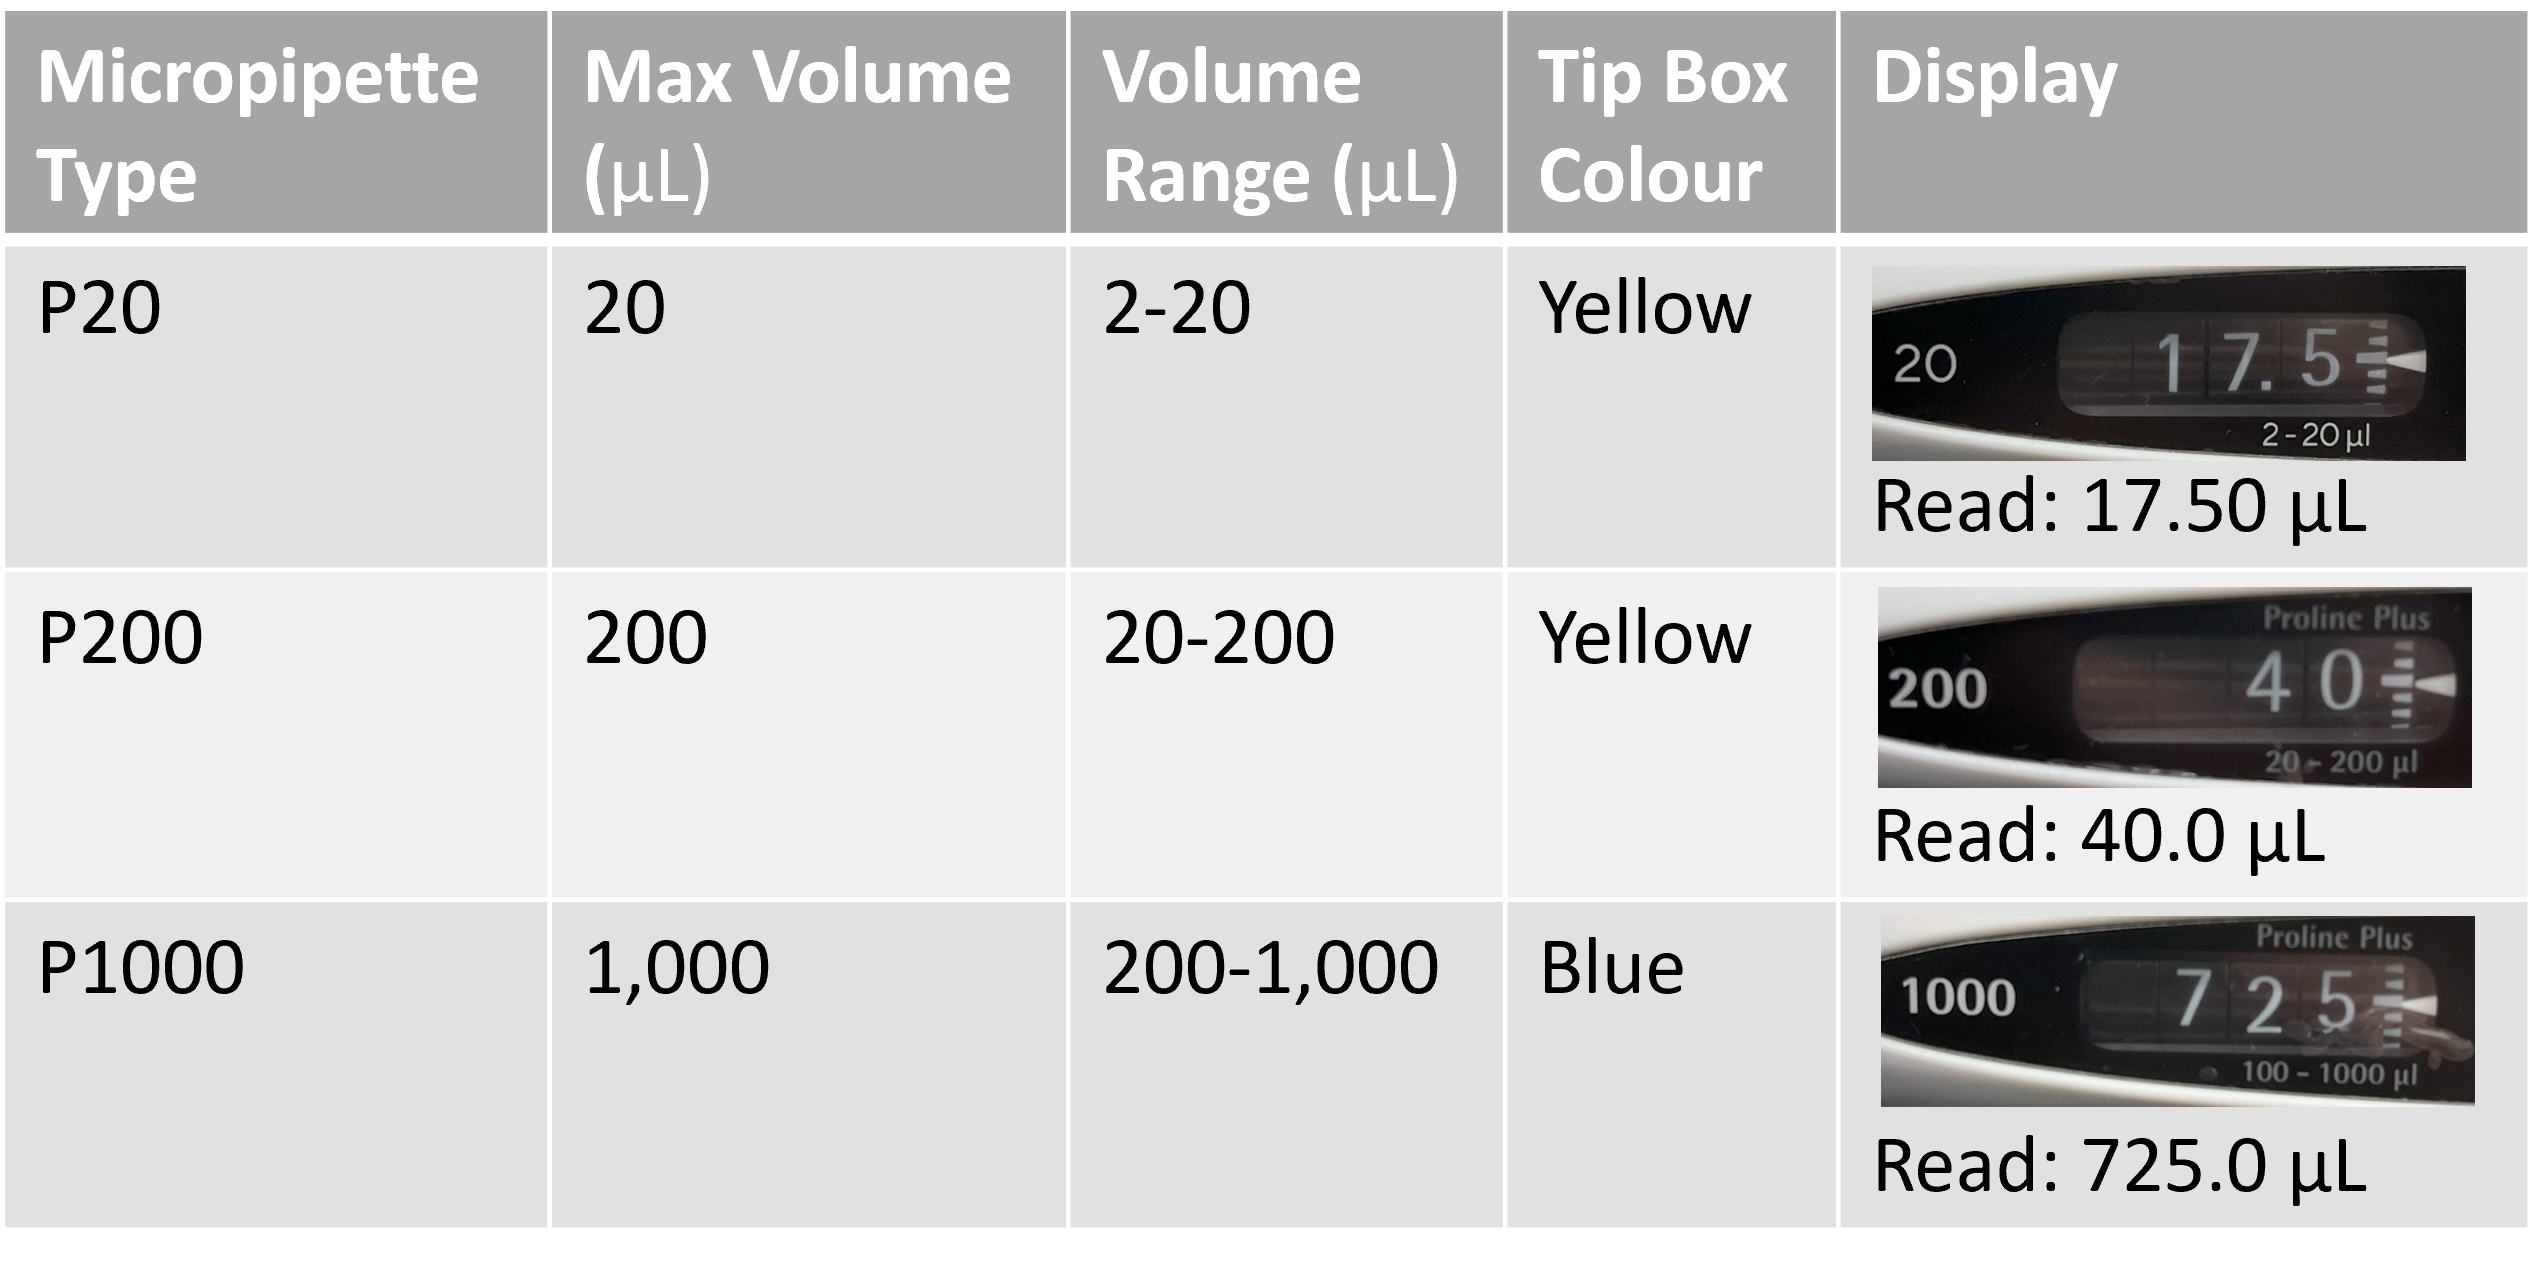
Micropipettes are available in different size volumes ranging from 0.1 µL to 10,000 µL. In this course, you will only be working with three common pipette sizes, summarized in table 1. They are frequently referred to as P20, P200, and P1000 micropipettes, based on the maximum volume that can be aspirated/dispensed using them. The display is unique for each micropipette - some will have decimal places and others will not, depending on the maximum volume that pipette can accommodate. The main volumes we use with micropipettes are millilitres (mL = 10-3 L) and microlitres (µL = 10-6 L). Understanding the volume relationship in micropipettes can be tricky at first, but if you can remember that 1,000 µL equals 1 mL, and 1,000 mL equals 1 L, you should be fine.
Table I: Parameters of micropipettes commonly used in LIFESCI 2L03.
For further pipetting review, you can watch this video created by our colleague, Russ. You will notice that the pipettes used in this video have a lock mechanism for the volume dial, which is not something you will see on the pipettes used in this LIFESCI 2L03 course.
LSL Video Intro Skills - Micropipettes
Lab Overview and Timeline
The ABB 106 lab is arranged into eight workstations (we call these pods), with two large benches in the middle of the room. These benches will usually hold shared reagents, surplus equipment, and other materials. Students will sit at the pods during laboratory sessions. You'll note several cubbies along the wall near the door - this is where you will store your personal belongings and electronics during the lab sessions. Handwashing sinks can be found beside the cubbies and by the second door to the classroom, near the fume hood.
You can start at any station - we will have students rotate between stations halfway through the lab period.
| Time (min) | What will you be doing? | Total Time (min) |
|---|---|---|
| 0-10 | Overview of lab activities by the TA. | 10 |
| 10-90 | Lab Part 1: Compound Microscope Lab Protocol 1: Use the PrimoStar 3 Compound Microscope and Zen Software to Capture Images Lab Protocol 2: Use ImageJ to take measurements |
80 |
| 90-160 | Lab Part 2: Pipetting Lab Protocol 3A-C: Colour Wheel Activity |
70 |
| 160-170 | Clean up and reset your workstations | 10 |
Lab Part 1: Compound Microscope
Purpose
To practice...
- Working with the Primostar 3 compound light microscope
- Capturing an image using Zen software
- Calibrating the scale in ImageJ and taking measurements
Summary of Activities
You will capture images of prepared slides and a stage micrometer on the lab computer, using the PrimoStar 3 microscope and Zen software. You will then use these images to measure the diameter of a cell with ImageJ.
Materials
- Zeiss PrimoStar 3 Compound Microscope
- Zen image software
- ImageJ (image analysis software)
- Stage micrometer (slide with a scale etched on it)
- Prepared onion root tip slide
- 70% ethanol (EtOH) in spray bottle (for sanitizing equipment)
Lab Protocol 1: Use the PrimoStar Compound Microscope and Zen Software to Capture Images
- Open Appendix E - Zeiss PrimoStar 3 Compound Microscope and follow the video directions to initially set up the microscope.
- Open Appendix E - Zeiss PrimoStar 3 - Kohler Illumination and follow the video directions to align the microscope for Kohler Illumination.
- Ask your TA to confirm your microscope is aligned for Kohler illumination before continuing. This is necessary in order to achieve high-quality images.
- Observe the prepared slide at 40X total magnification, bringing it into focus. Increase the total magnification to 100X, refocusing. Increase the total magnification to 400X when ready. Locate a plant cell undergoing ANAPHASE.
- Open Appendix F: Zen Software and follow the directions in parts 1-3 for using Zen software to capture images of the selected cell and a stage micrometer at 400X total magnification.
- Upload your captured images to your OneDrive account in the web browser. Do not insert any personal USBs into the computer. Any files left on the computer will be deleted.
Lab Protocol 2: Use ImageJ to take measurements
- Once you have saved your images, you may proceed to take measurements of the onion cell you have selected.
- Open Appendix B: ImageJ and follow the directions on using ImageJ to take measurements in images.
- Determine the length and width of the cell you selected. Are these values similar or quite different? Try adding a scale bar to the image of the cell. Add something to the image to indicate WHICH CELL is the cell you were measuring (e.g. you could draw a circle around it in ImageJ). When you are done, save your image as a .jpg and upload it to your Crowdmark lab notebook.
- When finished with the microscope, return the prepared slide to the slide box, and turn off and unplug the microscope.
- Use the bottle of EtOH to spray the eyepieces and other parts you handled. Let it air dry.
Lab Part 2: Pipetting
Purpose
- To practice accurate pipetting of solutions
- To practice following step-by step dilution instructions to create a colour wheel
Summary of Activities
The colour wheel challenge will test your ability to follow directions and let you tap into your artistic side. You will use micropipettes to mix primary colour dyes to create secondary and tertiary colours, which will be added to filter paper to produce colour wheels. Work with a partner to use your time efficiently, follow each step in the procedure carefully, and share the micropipetting so you each master this skill.
Materials
- Micropipettors and tips (P1000, P200, P20)
- Tip waste container
- Liquid waste container
- Red, yellow and blue primary colour dye stocks
- distilled water
- 1.5 ml microcentrifuge tubes
- microcentrifuge tube racks
- 96-well plate
- 70% ethanol (EtOH) in spray bottle (for sanitizing equipment)
Lab Protocol 3A: Getting comfortable with the Micropipettes
- While holding your micropipette in your hand, use your thumb to gently press the operating button down to the first and second stops. Test this out until you can comfortably identify the first and second stop positions. Ask the teaching assistant for help if you need it. Refer to figure 1 and 2 in the introduction when following the instructions.
- Begin with the P1000 pipette. Set this pipette to 500 µl. DO NOT ATTEMPT TO SET THE PIPETTE BELOW 200 µl or ABOVE 1000 µl. This will damage the pipette. Pipettes cannot be set beyond the maximum or below the minimum. To avoid overturning, rotate the set knob slowly as you become familiar with it. If you encounter resistance, STOP and ask for a tutorial from your TA to ensure you do not break this delicate piece of lab equipment.
- When DECREASING the volume, go slow, making sure not to overshoot the mark.
- When INCREASING the volume, overshoot the required setting by 1/4 of a turn and then slowly decrease the volume to reach the correct setting. Do not increase the setting to beyond the maximum volume in the range.
- Practice using the pipette with just water initially. Use the beaker of water on your bench to draw and dispense various volumes of all pipettes.
- Select the plastic tip that fits your micropipette. These are sterile, plastic, disposable tips meant for one use only.
- Fit your micropipette with the new tip by GENTLY pushing the end of the micropipette into the plastic tip. To ensure a firm and airtight seal, twist the micropipette a quarter turn while applying the tip. Do NOT touch the tip with your fingers.
- Push the plunger down to the first stop. Lower the tip vertically into the liquid. SLOWLY release the plunger to draw up the liquid.
- Check the tip carefully to see the liquid in the tip. Check sides of tip to be sure no extra fluid is hanging on to the outside walls of the tip. If there is, simply wipe it on the inside of the tube as you withdraw your micropipette.
- To dispense the liquid, press the plunger slowly and smoothly to the first stop, and then press the plunger to the second stop to expel any residual liquid from the tip.
- Keep the plunger pressed fully down and slowly remove the micropipette from the liquid, drawing the tip along the inside surface of the tube. Once the tip is completely out of the tube, slowly and smoothly release the plunger.
- Discard the tip into the waste container by pressing the tip ejector.
Lab Protocol 3B: Creating the Colour Wheel colours
You will be making a colour wheel composed of 12 primary, secondary, and tertiary colours. Use the first row (row A) of the 96-well plate to set these up.
- Place three 1.5 mL microcentrifuge tubes in the tube rack on your bench. Use your marker to label the tops of these tubes as R, Y, and B.
- Set the P1000 micropipette to 500μL, and transfer 500μL of red dye from the stock solution to the R tube. Cap the lid. Dispose of the tip.
- Repeat step 3 for the yellow and blue dyes.
- Set the P200 micropipette to 100μL. Aliquot 100μL of RED dye to wells 3 and 11. Keep the tip.
- Set the P200 micropipette to 50μL and use the same tip to aliquot 50μL of RED dye to wells 1, 2 and 12. Discard the tip to waste.

Figure 4: Loading the red dye into the plate. - Aliquot 50μL of YELLOW dye to wells 4, 5 and 6. Keep the tip.
- Set the P200 micropipette to 100uL and use the same tip to aliquot 100μL of YELLOW dye to well 7 first and then well 3. You'll see that you have created your first secondary colour in well 3. Mix the contents of well 3 (orange) 4-5 times using the same tip. Only mix to the first stop position on the plunger! Discard the tip.

Figure 5: Loading the yellow dye into the plate and mixing the orange well. - Set the P200 micropipette to 50μL. Aliquot 50μL of BLUE dye to wells 8, 9 and 10. Keep the tip.
- Set the P200 micropipette to 100uL and use the same tip to aliquot 100μL of BLUE dye to well 7. Mix the contents of well 7 (green) 4-5 times using the same tip. Only mix to the first stop position on the plunger! Discard the tip.
- Aliquot 100μL of BLUE dye to well 11. Mix the contents of well 11 (purple) 4-5 times using the same tip. Only mix to the first stop position on the plunger! Discard the tip.

Figure 6: Loading the blue dye into the plate and mixing the green and purple wells. - Set the P200 micropipette to 50μL and aliquot 50μL of GREEN dye from well 7 to wells 6 and 8. Mix the contents of each well 4-5 times using the same tip. Discard the tip to waste.
- Aliquot 50μL of ORANGE dye from well 3 to wells 2 and 4. Mix the contents of each well 4-5 times using the same tip. Discard the tip to waste.
- Aliquot 50μL of PURPLE dye from well 11 to wells 10 and 12. Mix the contents of each well 4-5 times using the same tip. Discard the tip to waste.

You have now created the 12 colours of your colour wheel. The colours in the first row of your 96-well plate should look something like this (figure 8) - note that these are approximate, and your real life colours will look different than the cartoon colours.

Lab Protocol 3C: Loading the Colour Wheel
The final step is adding the correct volume of each dye to the corresponding circle on the template. The template is shown below (figure 9):
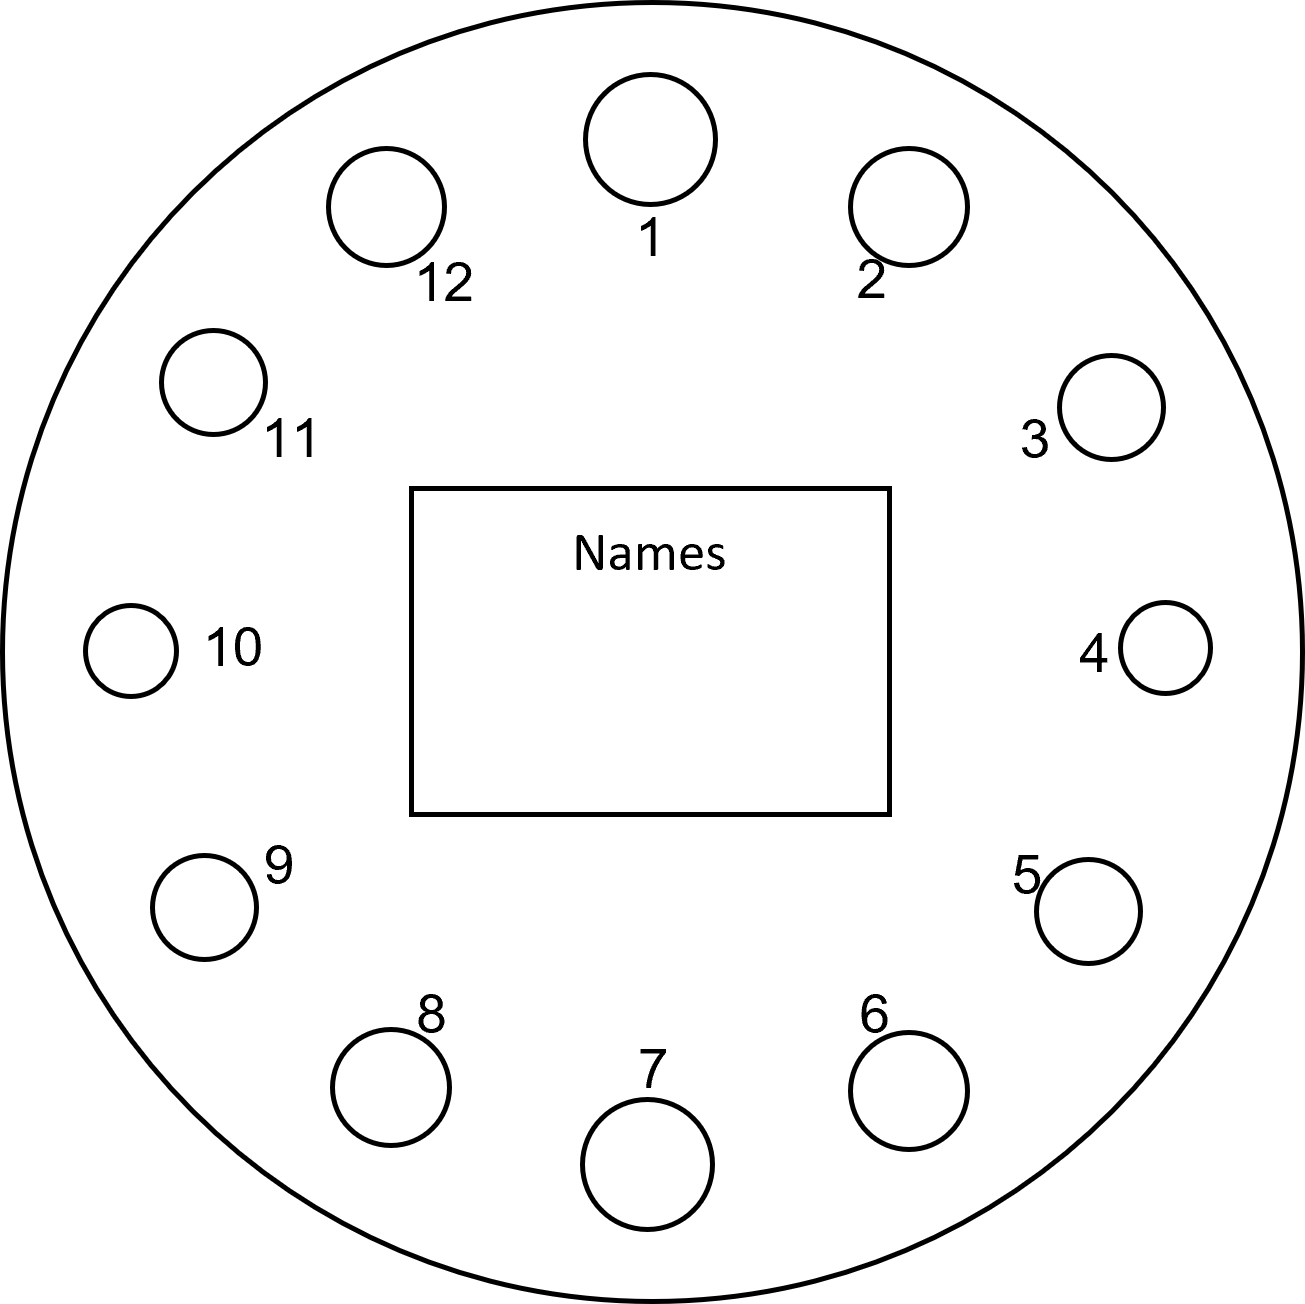
- Place the filter paper over the template and use 4 small pieces of tape at the top, bottom, and each side to hold it in place. You should be able to see the template underneath by pressing down on the filter paper.
- Set the P20 micropipette to 5μL and draw up 5μL of dye from well A1 and dispense it fully into the 1 circle of the colour wheel. Press the plunger to the second stop position when dispensing and touch the tip to the filter paper to ensure it spreads properly.
- Use the same micropipette to draw up 5μL of dye from well A7 and dispense it fully in the 7 circle of the colour wheel.
- Set the P20 micropipette to 2μL. Draw up 2μL of dye from well A4 and dispense it fully into the 4 circle of the colour wheel.
- Use the same micropipette to draw up 2μL of dye from well A10 and dispense it fully into the 10 circle of the colour wheel.
- Set the P20 micropipette to 3μL. Draw up 3μL of dye from well A3 and dispense it fully into the 3 circle of the colour wheel.
- Repeat step 6 for wells A5 to the 5 circle, A9 to the 9 circle, and A11 to the 11 circle.
- Set the P20 micropipette to 4μL. Draw up 4μL of dye from well A2 and dispense it fully into the 2 circle of the colour wheel.
- Repeat step 8 for wells A6 to the 6 circle, A8 to the 8 circle, and A12 to the 12 circle.
- Sign your colour wheel with both of your names and hand it in to your lab TA for assessing. You can compare your wheel to the answer key and see how you did.
- Clean up your bench - rinse the 96-well plate in the water basin, rinse it clear with tap water, and leave it inverted to dry. Cap your 1.5 mL microcentrifuge tubes and place them in the waste container. Make sure your bench area is neat.
Lab Exit Checklist
Lab Part 1: Compound Microscope
- Image captured of the onion root tip and stage micrometer uploaded to your Crowdmark lab notebook
- Measured the dimensions of your onion root cell using ImageJ, and included this in your Crowdmark lab notebook
Lab Part 2: Pipetting
- Colour wheel handed in to your TA before you leave (make sure your name is on it!)
- All liquids and solid waste cleaned up prior to leaving the lab
- 96-well plate rinsed and left inverted to dry
References
Images retrieved from:
Figure 3: Creative Commons, by creator bccoer
Colour wheel activity adapted from Russ Ellis, ISCI 1A24. (2023).
