Resume and Cover Letter Writing
7 Resumes
A resume is a one- to two-page document that sums up a job seeker’s qualifications for the jobs they’re interested in[1].
Your resume includes your relevant experience, skills, education, and accomplishments. It helps you show what you can do and convinces an employer that you are qualified and would be a good hire [2].
The purpose of your resume is to get you an interview! Your resume is your personal marketing tool; it describes and proves your accomplishments, skills, experiences, and knowledge in a way that is concise and persuasive.
Pre-Recorded Resume Workshop
Below you can also view our Resume Workshop with Sara Del Piano, Manager, Educational and Employer Partnerships, Digital Technologies.
Myths and Facts
Digital Technologies Resume Format
While the format of a resume will vary depending on the situation, there are some guidelines that can help you develop a standard resume for the Digital Technologies job postings:
- Headings and sections names will help give structure to the content of your resume.
- Consistent font choice throughout the resume, font size of the body is between 10 and 12 points.
- Text is free of spelling, grammatical, or punctuation errors.
- Consistency with formate like dates or bulleted lists
- Check out the York U Career Centre Resume Resources
- Always target your resume to each job posting and employer
Resume example:
Use a sans-serif font like Calibri, Arial, Helvetica, Tahoma, Trebuchet MS or Verdana.
TIP: A sans-serif font is a typeface that does not contain any superfluous flourishes—there is nothing extra that has been added.


“When writing your resume, […] make it as easy as possible for employers to identify the reasons why you are a great candidate. That means featuring the most important and relevant information first and removing irrelevant or outdated information”. [3]
If a recruiter only spends 7 seconds screening a new resume, where are they looking? Watch this video explaining what recruiters are looking at in that short time frame.
The Top Third of Your Resume
While there may be different approaches to crafting a resume, everyone can agree that the resume’s most important “real estate” is the top third of page 1. There are 2 things to know about this all-important section of your resume:
First: the top of page 1 is where the reader will start reviewing your resume. The very top is where the reader expects to be able to find your name and contact information. Always place your name and contact information first.
-
- Contact Info – Your name and contact information (email, phone number, LinkedIn profile URL, or link to your online portfolio if you have one).

Second: a person reading your resume will only spend around 7 seconds reviewing it before deciding whether you make a good candidate to interview. Make it very clear right away that what you have to offer is a good match for what the reader is looking for.
Immediately following the name and contact information, indicate an easy-to-scan list of their best skills and knowledge – that would qualify them for the position they’re looking for.
-
- Highlights / Skills – Information about your skills and accomplishments – you can have a separate section devoted to what would be of particular interest or value to the employer. For example, you could have a Technical Skills section.
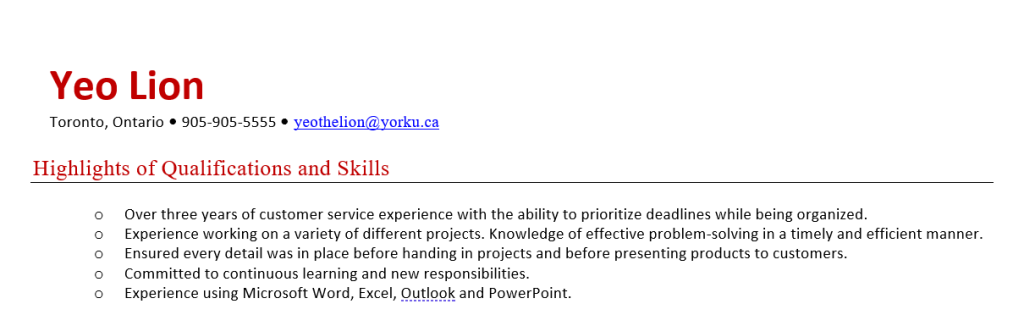
How to Write Your Highlights of Qualifications
Highlights are chunks of information designed to give someone the important details quickly. You will want to limit yourself to 5-7 sentences in length, using bullet points to quickly advertise your critical qualifications for the job goal. You can do this by following these 3 steps:
Education Section
In the Education section, show what formal education you have engaged in. If it is a formal credential – such as a certificate, diploma, or degree – make that clear by providing the name of the credential, the institution, and the date completed (or expected to be completed). Take a look at the visual example below, taken from the earlier examples, to see for yourself:
- Education – include any relevant courses, awards, and extracurricular involvement; GPA can also be included if it is considered to be exceptionally strong.

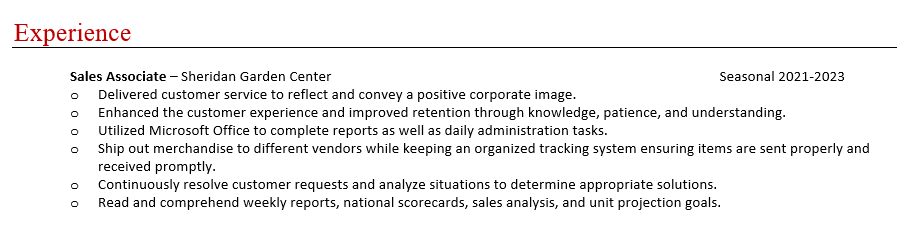
Experience Section
Experience can come from multiple sources, such as employment, school projects, volunteer work, extracurricular activities, or experiential learning activities.
- Experience – You do not have to separate paid and unpaid experience into 2 separate sections (e.g., Work Experience vs. Volunteer Experience). Instead, you can combine them under “Experience” heading. However, with the experience, you will need to clarify if it was a volunteer role.
In the Experience section of your resume, you get to show how and where you have accomplished results in the past through the application of your skills.
When listing work experience, list the positions you have held in reverse chronological order, beginning with your current or most recent position. Be sure to provide the name of the employer, job location (city), dates of employment, and 4-6 bullet points with related accomplishment statements.
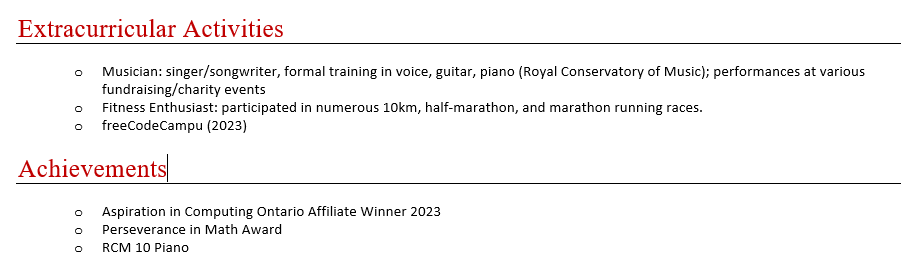
Other Resume Sections
What other information should I include in my resume (and what should I leave out)?
That depends on your unique background as well as the job you’re applying for. In some cases, providing additional information, such as certifications, awards, or memberships, can contribute to the positive impression you make. Just remember that everything you include in your resume should have a purpose, and it should support your efforts to show the reader why you are the best fit for the job.
Here are some practical tips and examples:
- When deciding what to include in your resume, try to make sure the information is relevant and rece
- If you include non-employment experience, list only those that signal knowledge, skills, or attributes that could be relevant to the job you seek (e.g. “Code Camp leader since 2024” indicates leadership and community-mindedness)
- Many employers want to see your Interests section. This can either be directly related or not.
- Another way to demonstrate your interest in the digital technologies field and your well-rounded interest would be to add Volunteer, Extracurricular, or Achievements and Awards sections.
- https://www.pongoresume.com/articles/391/what-is-a-resume-a-brief-overview.cfm ↵
- https://resumegenius.com/blog/resume-help/what-is-a-resume ↵
- www.indeed.com/career-advice/resumes-cover-letters/how-to-write-a-resume-employers-will-notice ↵
