Histology Lab Outline
Introduction
Histology
Histology is the study of the cellular organization of body tissues and organs. The term is derived from the Greek "histos" meaning web or tissue, and refers to the "science of tissues". The compound light microscope is the tool used most widely for clinical applications of histology. However, the advent of the electron microscope greatly extended the detail at which subcellular structure can be studied. Thus, histology now embraces the study of the structures of both tissues and cells, and the relationship between these structures and physiological function.
The structure of cells and tissues can be distinguished at two levels. The fine structure is that which can be distinguished at the level of compound light microscopy (a magnification of 1000x or less). Electron microscopes are generally employed to study ultrastructure, the detailed structure of the cell cytoplasm, organelles and membranes that is not discernable with a compound light microscope.
Many techniques have been developed which are designed to preserve the structural integrity of a specimen so that it can be viewed microscopically. The process through which cell structure is preserved is called fixation. Since cells rapidly deteriorate after a tissue has been removed from the body, achieving adequate fixation is often the most difficult task confronting a histologist. "Artifacts" are changes to the original structure of cells and tissues that arise from tissue deterioration and from the fixation process itself. Thus, a skilled histologist employs techniques that minimize the formation of artifacts in different types of tissues, and has the ability to distinguish artifacts from normal cell structures.
Cell structure is most commonly studied in slices of the tissue, called sections, which are thin enough to allow transmission of light or an electron beam. There are many methods of sectioning tissues, and sometimes particular tissues require special techniques. The method most widely employed is called the paraffin method. Although this technique is not universally applicable, e.g., it does not work well with hard tissues such as woody parts of plants or bones from animals, it does present many advantages over alternative methods. The necessary reagents are inexpensive, readily available, and much less toxic to humans than those used in most other techniques.
How do we see specific parts of a organism, organ or tissue?
Sectioning a tissue into a thin slice (e.g.. 5 - 10 µm) is required in order to examine the tissue using transmitted light microscopy because the light needs to pass through the section in order to visualize the different structures. However, it is important to understand that the orientation of the tissue while sectioning will determine the parts of the cells/structure/tissues that can be visualized on the microscope slide. This is largely related to the anatomical planes and the symmetry (or asymmetry) found in living organisms, organs, and even individual tissues. For example, imagine slicing the Caenorhabditis elegans (C. elegans, figure 1), commonly referred to as a nematode, in half. There are a few ways this can be achieved. First, the worm could be sliced longitudinally. This section cuts along the entire length of the nematode (e.g., like cutting a baguette along the length to separate the top from the bottom in order to make a sandwich).
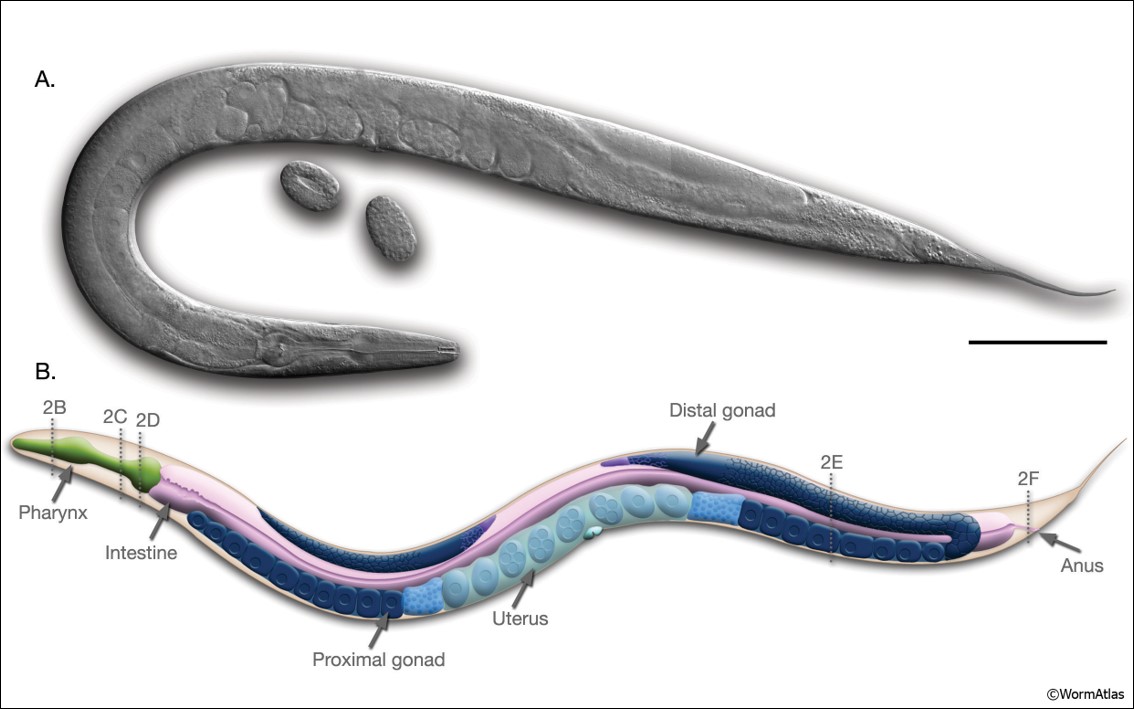
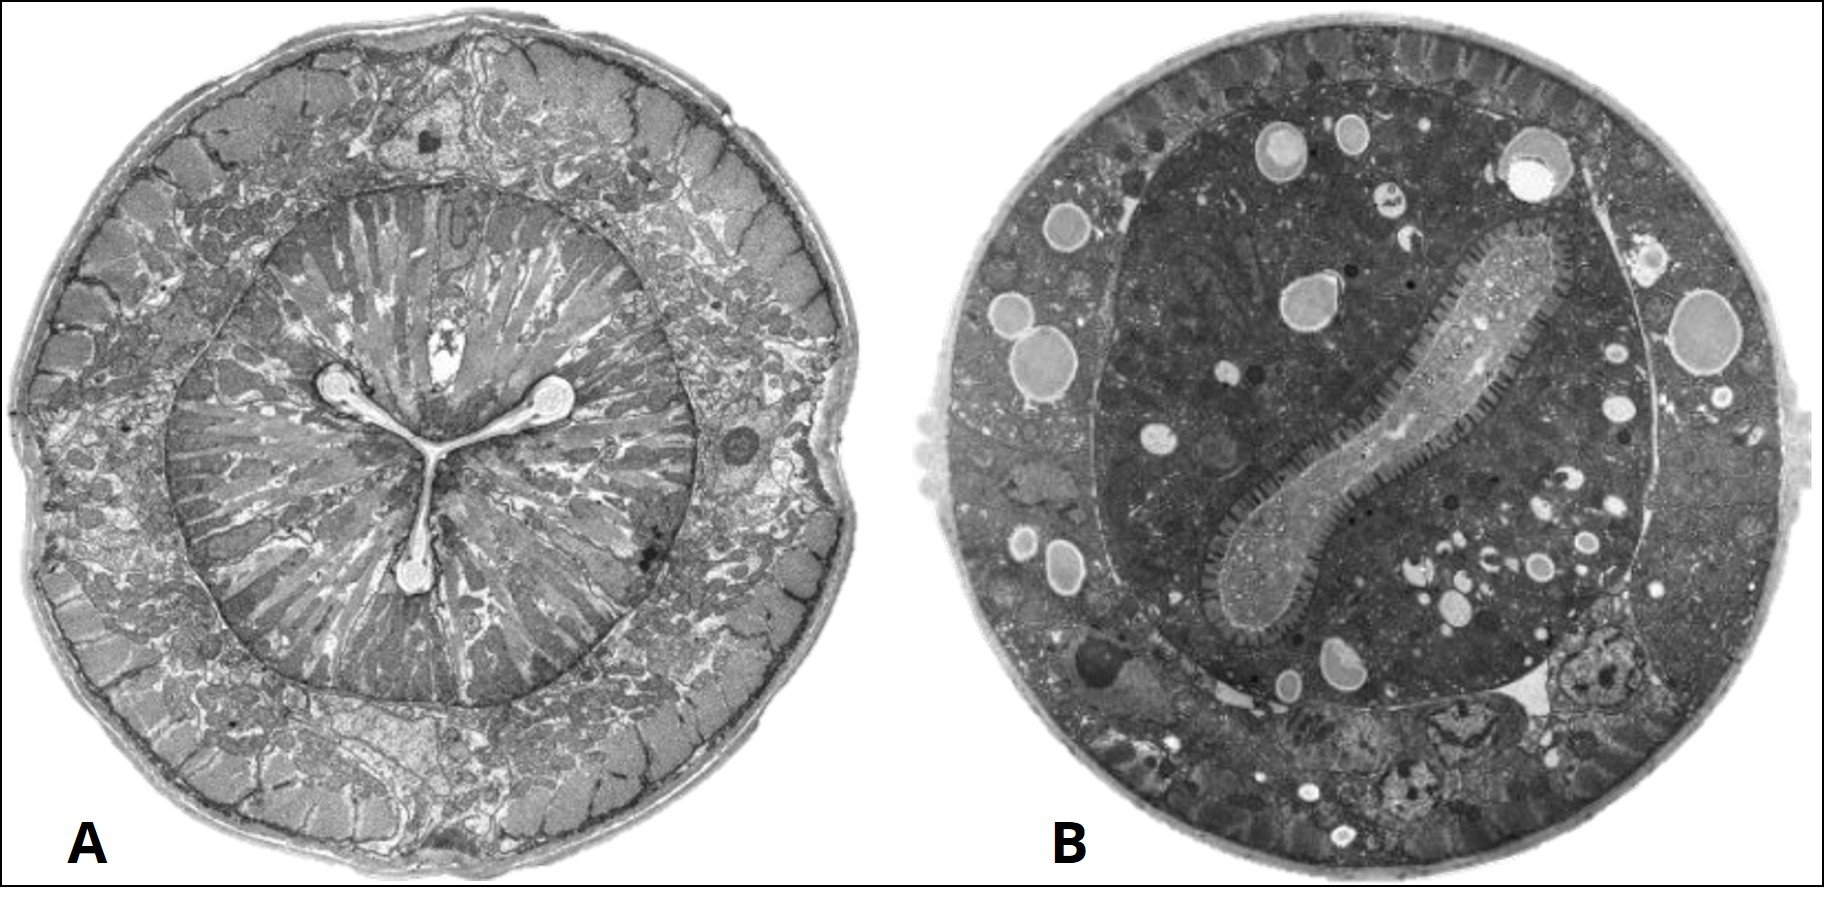
There is another method of sectioning an organism. This is the transverse section (you may also hear this described as a cross-section). This involves sectioning the organism perpendicular to the longitudinal axis (e.g. like cutting your baguette sandwich into smaller pieces for sharing). If this nematode were to be sectioned along the dotted lines 2B and 2E in Figure 1, the resulting view of the internal structures of the nematode are obtained, shown in Figure 2.
The anatomical planes may be described with other words depending on which organism you are studying. In humans, there are three primary planes:
- The sagittal plane sections the body into left and right sides
- The frontal plane sections the body into anterior and posterior regions
- The transverse plane sections the body into superior and inferior regions
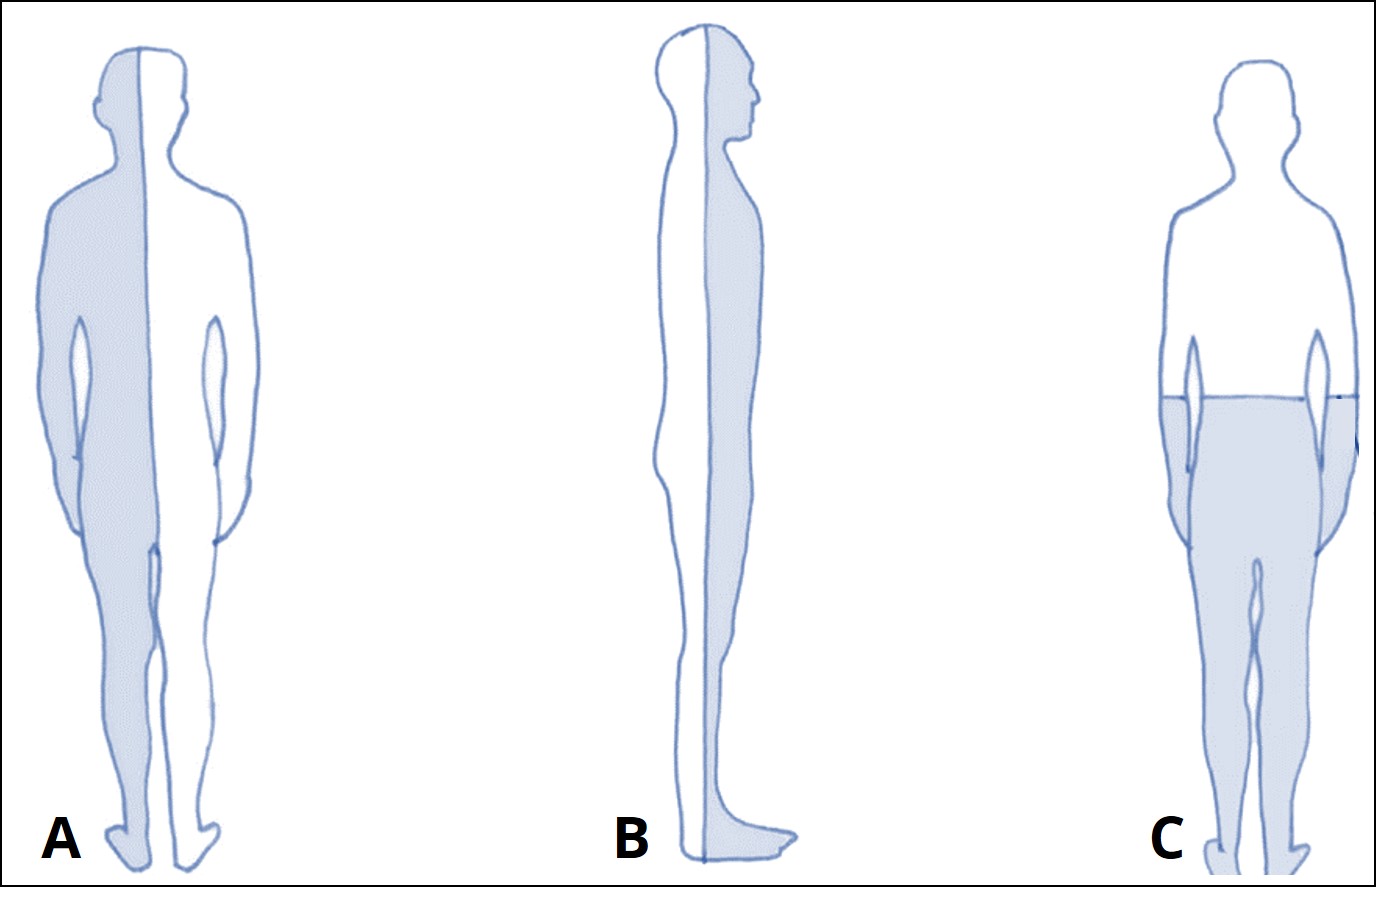
You may recognize that both the sagittal and frontal planes section a human similarly to the longitudinal section in the nematode. Other organisms may be sectioned longitudinally into dorsal and ventral regions, instead of anterior and posterior.
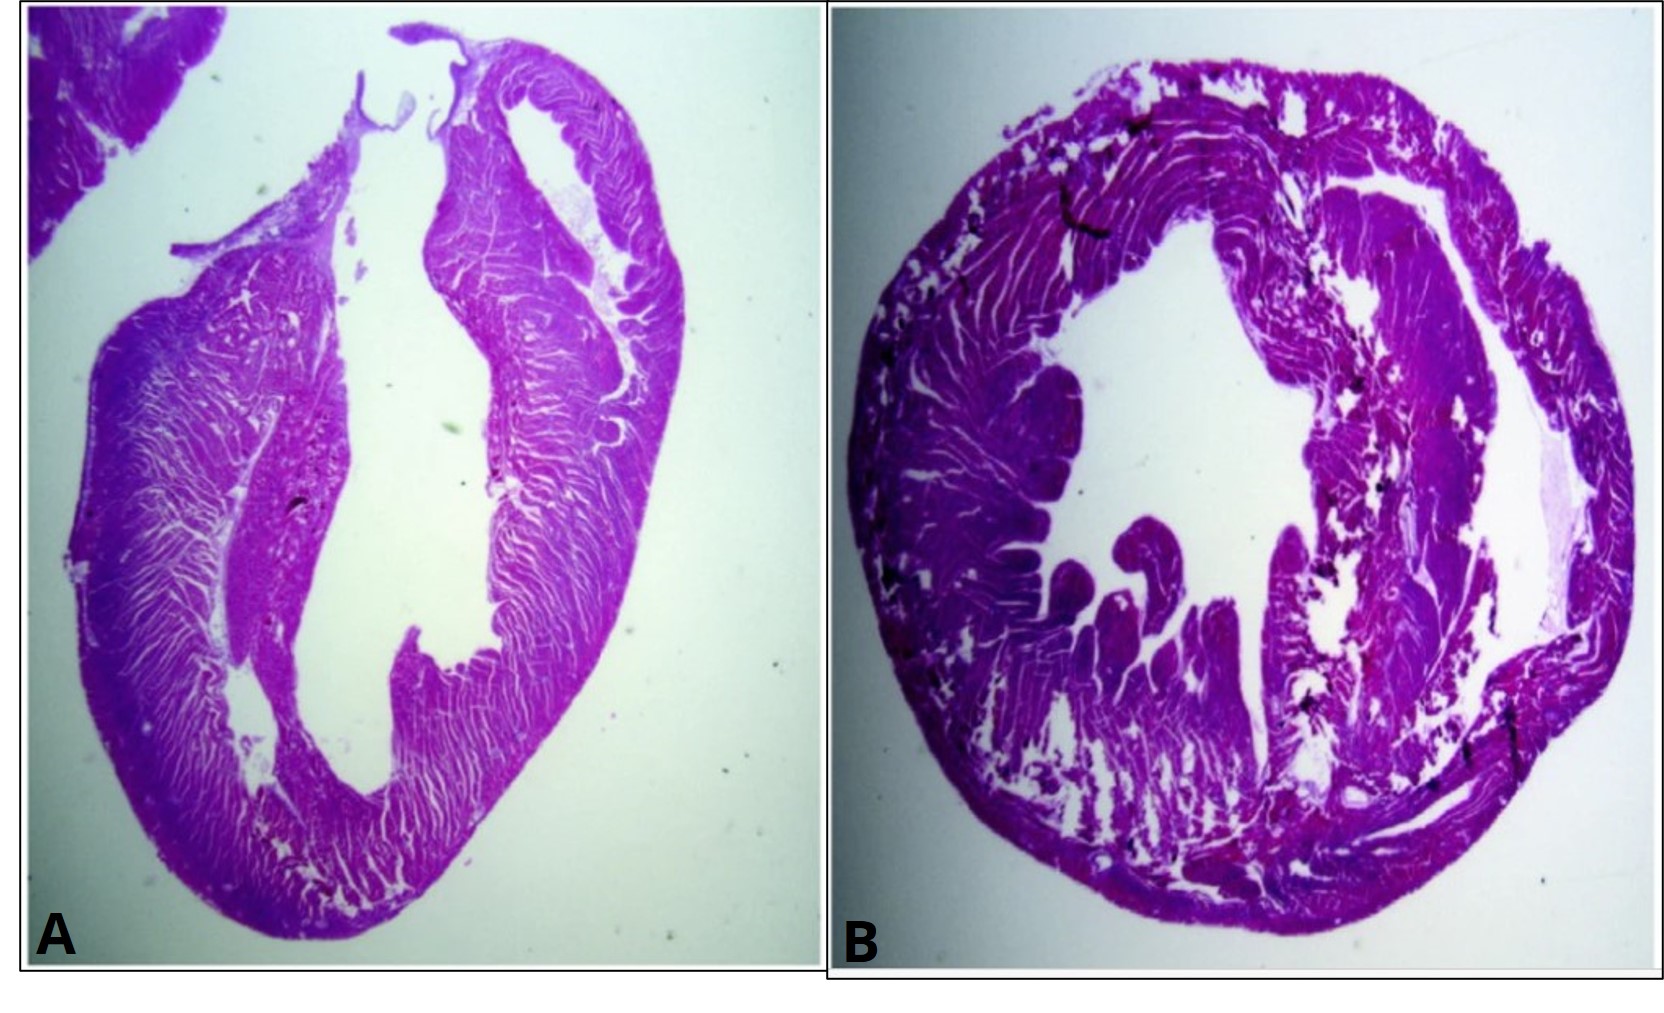
It is very unlikely you will ever be sectioning an entire organism that is larger than 1-2 cm (e.g. you won't be sectioning an entire mouse!). Instead, these same sectioning concepts can be applied to excised organs, such as a mouse heart. An example of a longitudinal and a transverse section of a mouse heart can be seen in Figure 4. Note that this heart was likely sectioned into hundreds of sections, but only a single longitudinal and cross section are displayed. Depending on which specific section you select, you can see some things (e.g. a left ventricle) but not others (e.g. a right ventricle). An experienced histologist will know how to orient and section the organ to obtain sections containing the structures they are interested in viewing.
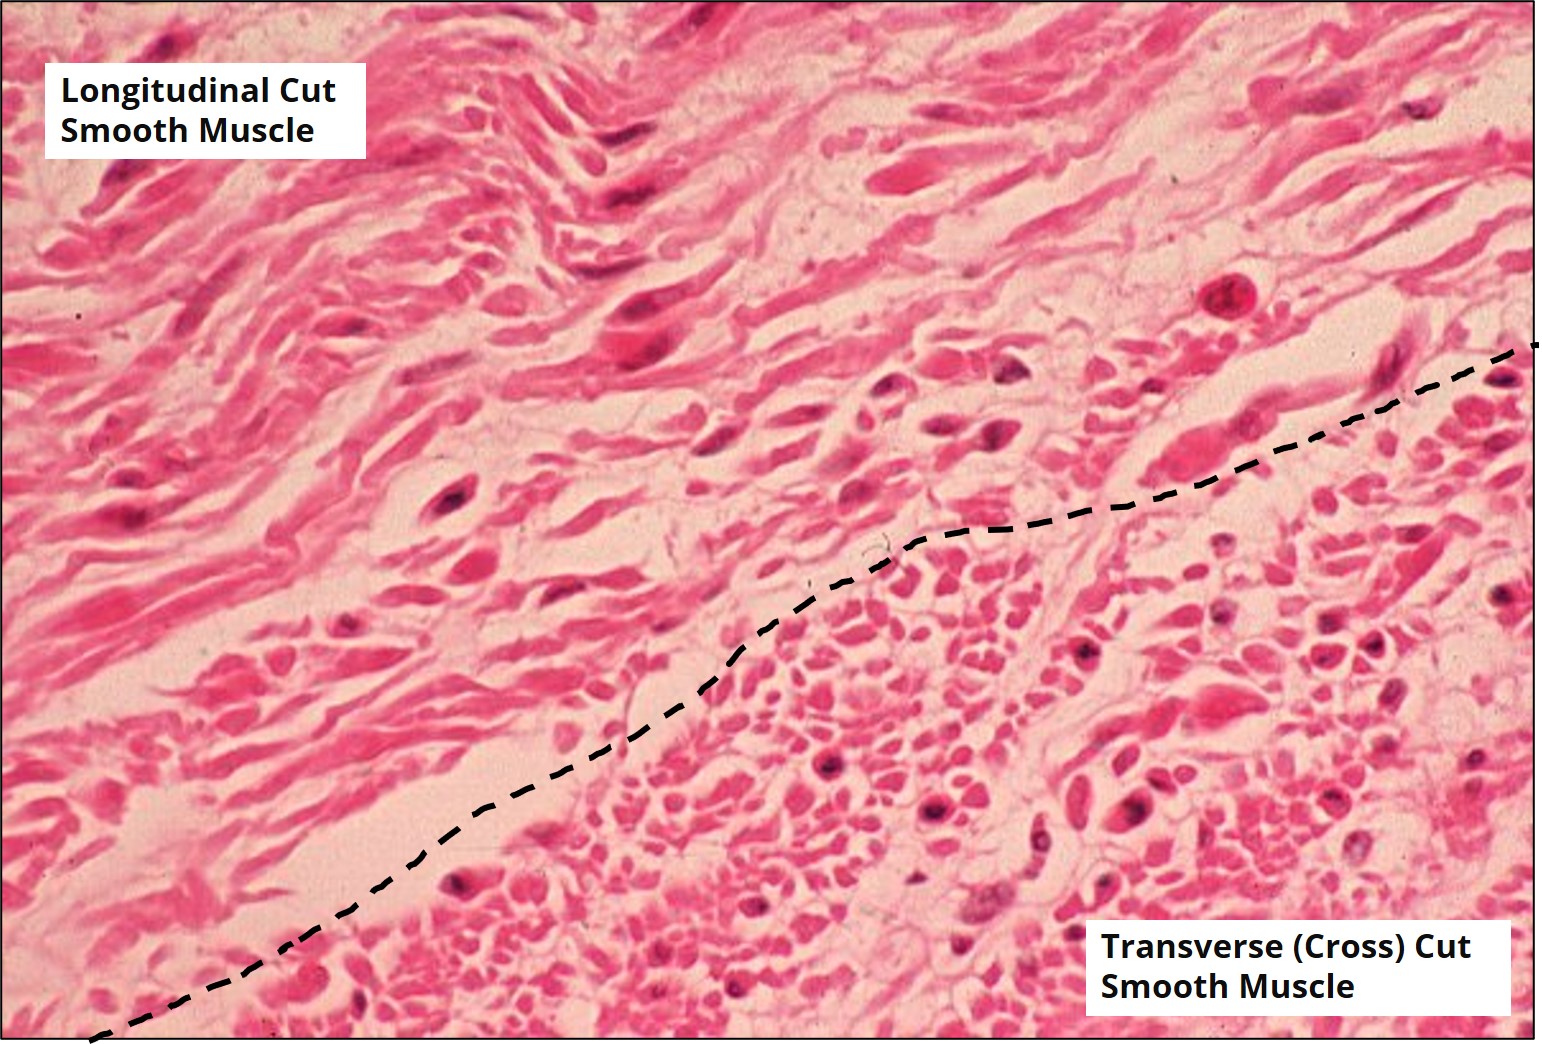
Aside from a few very specific organs, excising and removing an organ means sacrificing or euthanizing the research organism. In some cases, a researcher may not want to euthanize their model organism, and a tissue biopsy can be performed instead. This involves a minor surgical procedure to cut away a piece of tissue from the organism being studied. Biopsies are also performed in humans regularly in clinical settings (think muscle biopsies, tumor biopsies, etc.) as a way of investigating the cellular structure of the tissue in question. An example of longitudinal and transverse (cross) sections of a muscle tissue are shown in Figure 5.
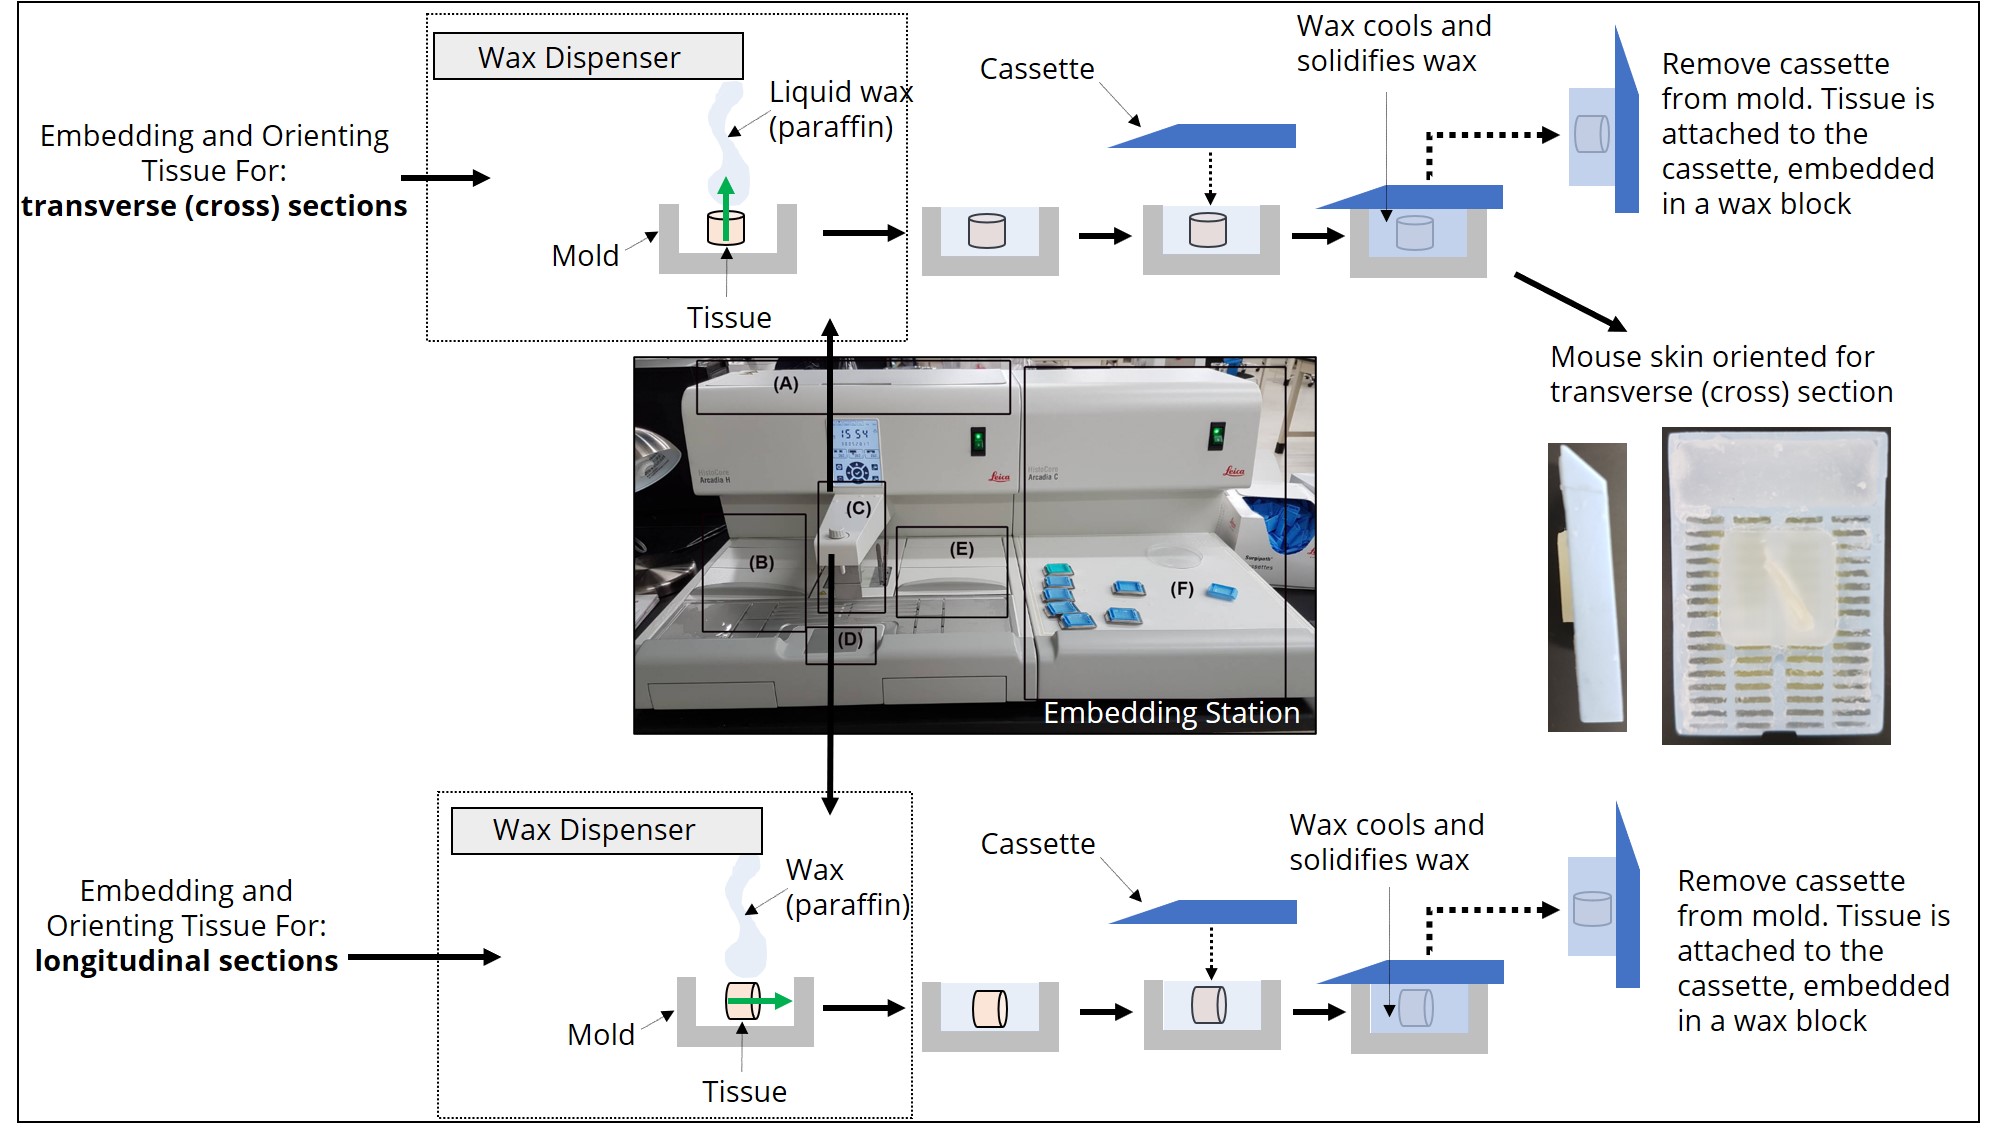
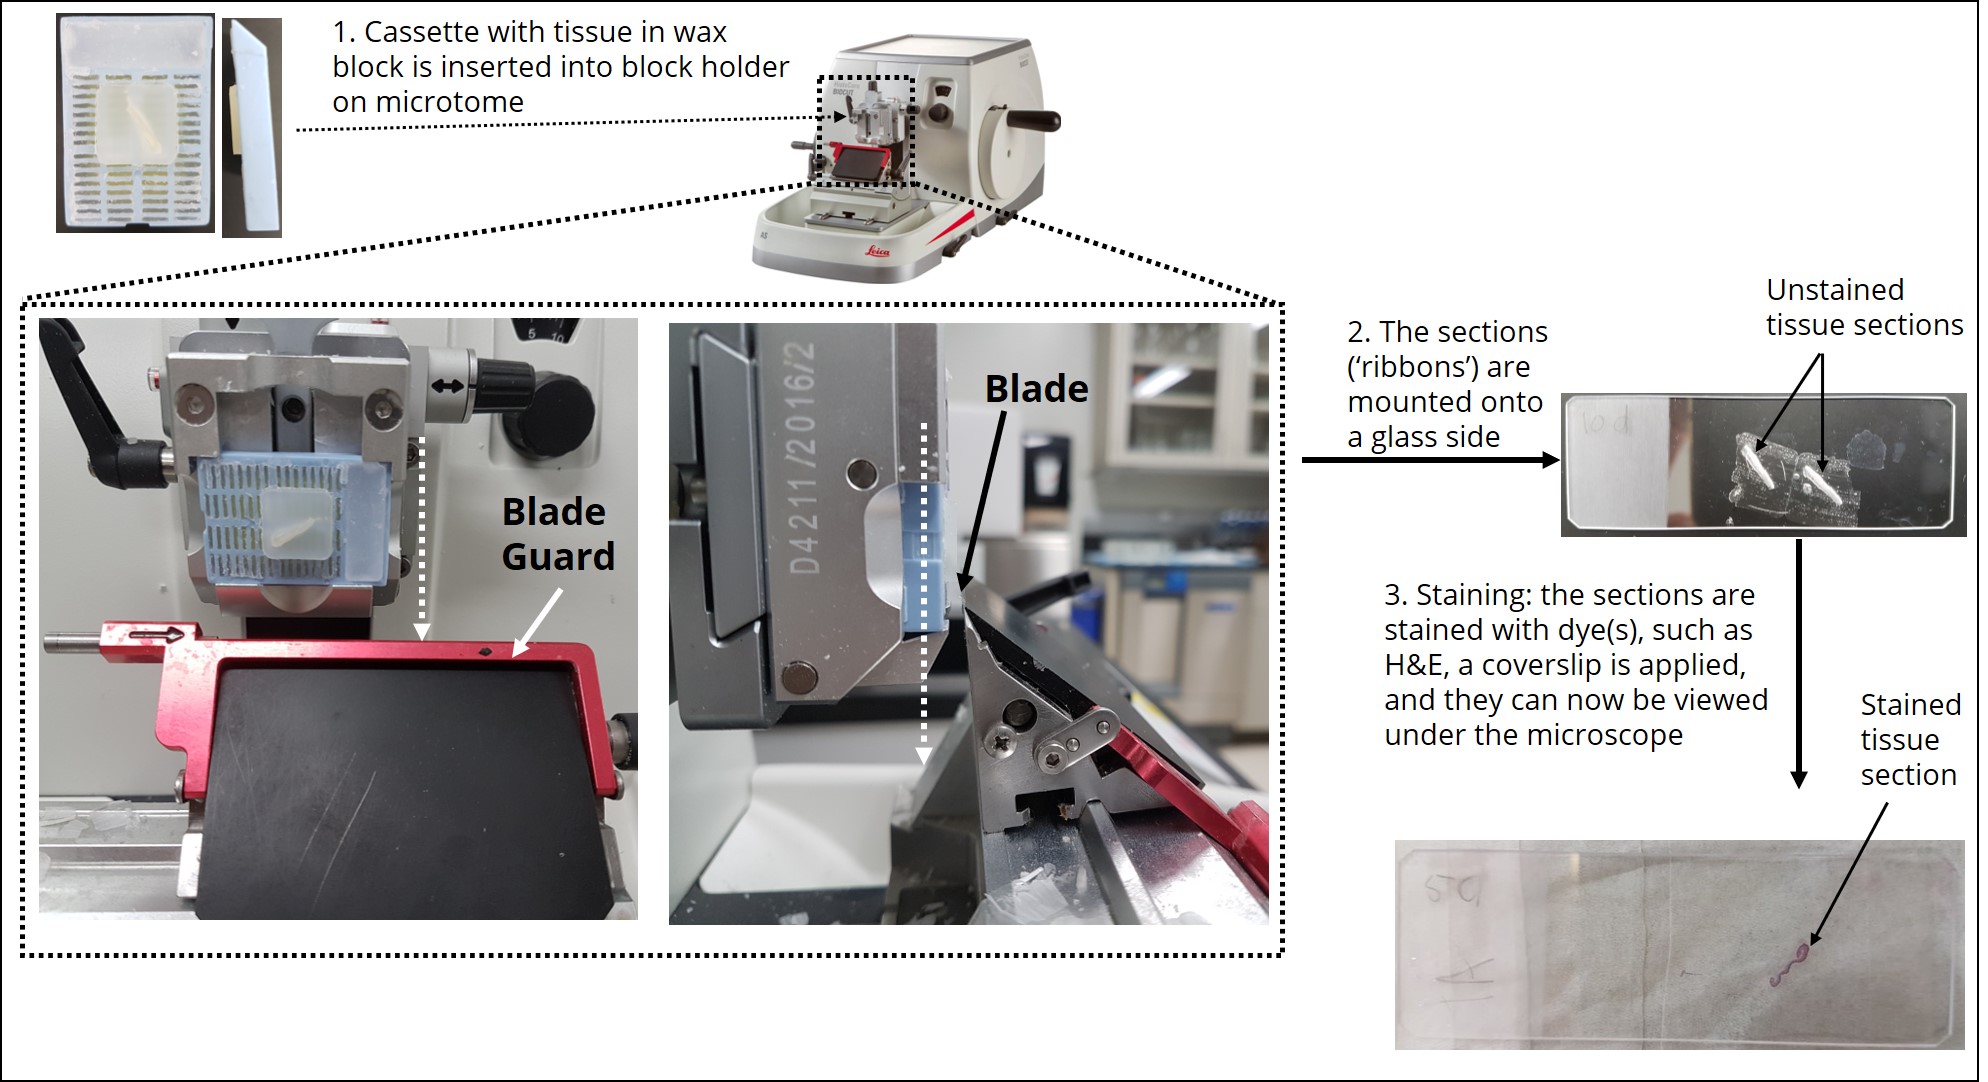
The type of information that can be learned by looking at the tissue sections through the microscope (e.g., relationships between tissue layers, cell types and structures etc.) is dependent on how the tissue was cut (e.g. longitudinal, transverse etc.). How the tissue is cut is dependent on how the tissue was originally embedded and sectioned. Therefore, an important feature of histological experimental design is deciding the best orientation for embedding a tissue before it is sectioned with a microtome. When using the paraffin method, the tissue is sliced by the microtome parallel to the base of the mold used to embed the tissue. Therefore, the positioning of the longitudinal axis of the tissue within the mold during embedding is of utmost importance. Figure 6 shows the positioning of tissue during the embedding process required for longitudinal or transverse sections to be obtained during the sectioning process. Figure 7 demonstrates how the tissue is sectioned (cut) with the microtome.
The Paraffin Method
All histological procedures can be divided into a similar series of steps. For the paraffin method, these steps are listed below.
Table I: Steps of the paraffin method
| Step | Overview | Details |
|---|---|---|
| 1. Tissue Resection | removing the tissue of interest from the organism | - tissue is collected from organism, either via sacrificing or biopsy |
| 2. Fixation | halting cells in their current state | -tissue is placed in a fixative to preserve the cellular structure and minimize autolysis (degradation of tissue by its own enzymes) -must be started immediately after the resection -small squares of tissue (~0.5x0.5 cm) are placed in 10% formalin solution -1 ml of formalin per 50 mg of tissue (20ml:1g ratio) -fixed for 48 hr minimum at room temperature, then transferred to 70% ethanol for longer term storage |
| 3. Dehydration | tissue is dehydrated through a series of alcohol baths | -Isopropyl alcohol (IPA) is a favoured reagent because it is miscible in paraffin -the alcohol displaces the water within the cells, dehydrating them -done slowly (~6 hours) to prevent distortion of the tissue -pass tissue through a series of increasing IPA concentrations (from 70-100%) |
| 4. Infiltration and embedding | tissue is infiltrated with a material that acts as a support during the sectioning process | -this provides structural support during sectioning and ensures tissue does not become damaged -most commonly use paraffin wax as the infiltrant -the IPA is displaced from the tissues with xylene, a clearing agent. This is a hydrophobic liquid. -the xylene is then displaced with paraffin wax at 58°C. The wax is miscible with the hydrophobic xylene. This process takes ~4 hours. -the paraffin wax now occupies all the space in the tissue that was originally held by IPA -the tissue is then allowed to solidify in a mold, embedded within a small cube of paraffin. Refer to the video below for a demonstration of this step. |
| 5. Sectioning | slicing the tissue into thin layers using a microtome | -the microtome drives a knife across the surface of the paraffin cube to produces a continuous ribbon of thin sections adhering to one another by their leading and trailing edges -the thickness of the sections can be preset, 5 – 10 μm is optimal for viewing with a compound light microscope |
| 6. Mounting | adhering thin layers of tissue to microscope slides | -sections are carefully transferred to a water bath held at 45◦C -within a few seconds, the sections flatten and the wrinkles/crinkles disappear -a clean microscope slide is dipped into the bath and slowly pulled upward out of the solution, bringing the section along with it, now adhered to the surface -care should be taken to ensure the slide is oriented with the label on the same side as the section -the bottom of the slide is carefully dried and any overhanging edges of the section blotted away, then dries overnight |
| 7. Clearing and staining | rehydrating the tissue and staining the cellular structures | -paraffin must be removed by clearing using xylene -when tissue is all that remains on the slide, dyes are applied to allow observation of features not otherwise distinguishable -customary to use two dyes, one that stains certain cellular components a bright colour (in this case, hemotoxylin stains negatively charged structures, such as DNA, a blue colour) and the other, called the counterstain, that will stain other cellular structures a contrasting colour (in this case, eosin will stain most other cell components a pink colour) -Hematoxylin and eosin staining (abbreviated H&E) is just one of hundreds of staining techniques that can be used |
| 8. Preparation of permanent mounts | using a resin to adhere a coverslip to the stained tissue to prevent damage to the stained tissue over time | -the stained tissue is covered with a medium that will harden to produce a clear binder between the slide and coverslip -Permount is a common mounting resin, which does not distort the stain colour, and does not become yellow or brittle as the slide ages |
LSL Video Histology – Embedding
This video shows steps 5-8 of the paraffin method:
LSL Video Histology – Sectioning, Staining and Permanent Mounts
Note 1: The H&E staining protocol referenced in the video can be viewed in detail, and is based on guidelines from the National Society for Histotechnology. You don't need to know these steps for the lab, these resources are provided as optional reading for those that are interested.
The histology module includes two parts which can be completed in any order. In the Staining Activity (Part 1), you will stain a microscope slide which contains a cross section of mouse or rat tissue. After staining, you will make permanent mounts of these slides. In the Microscopy Activity (Part 2), you will use the compound light microscope to capture images from prepared slides containing mouse skin cross sections. You will then analyze the images and evaluate if there are changes in the integumentary (skin) structure associated with age.
Lab Overview and Timeline
| Time (min) |
What will you be doing? | Total Time (min) |
|---|---|---|
| 0 - 10 | Overview of lab activities by the TA. 3 pods will do the staining activity (Protocols 1 and 2) first, and the other 3 pods will start with the microscopy activity (protocol 3). You will switch activities halfway through the lab time. |
10 |
| 10 - 90 | Lab Part 1: Staining and Coverslipping Lab Protocol 1: Clearing and Staining Tissue Lab Protocol 2: Preparing permanently mounted sections |
80 |
| 90 - 160 | Lab Part 2: Capturing Images and Image Analysis Prep Lab Protocol 3: Image Capture and Analysis |
70 |
| 160-170 | Wrap up and submit ELN on Crowdmark | 10 |
Lab Part 1: Staining and Coverslipping
Purpose
To complete an H&E staining protocol and prepare a permanent mount by coverslipping.
Summary of Activities
Each student will stain a slide and then add a coverslip to prepare a permanent mount. Multiple students can share the same vertical slide holder, which is used to transfer the slides between the different staining solutions. After staining, each student will attempt to place a coverslip over the stained tissue.
Materials
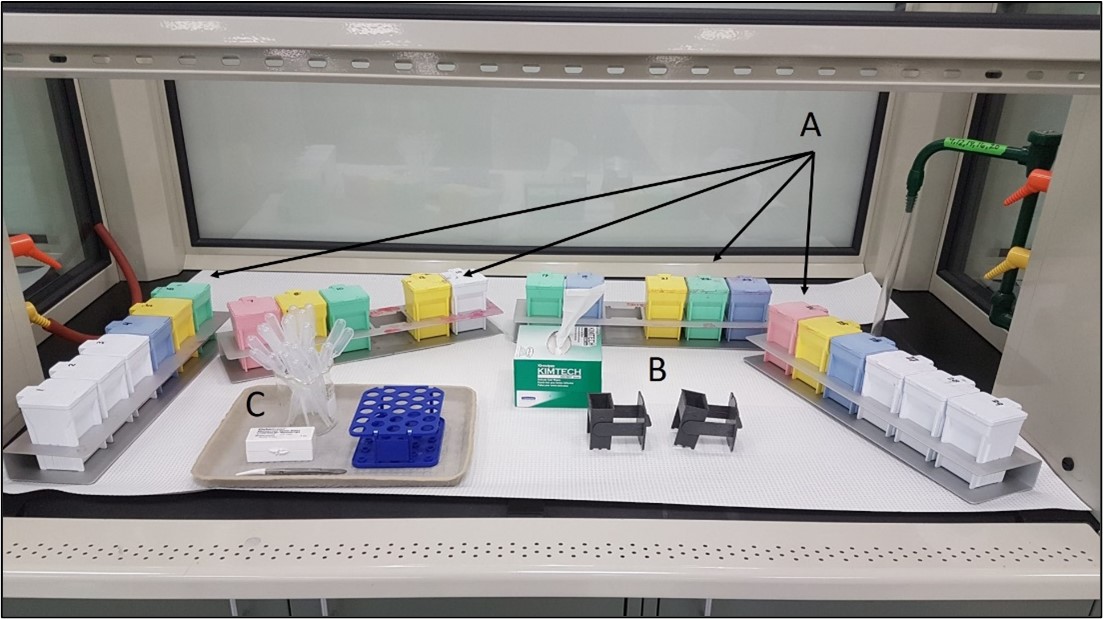
Figure 8: Materials for Lab Part 1 (H&E Staining (protocol 1) and coverslipping (protocol 2)). (A) Staining dishes. Each dish is numbered and contains the solution corresponding to the step number in protocol 1. (B) Vertical slide holders. Used to hold slides and transfer them between solutions. (C) Coverslipping materials used for protocol 2.
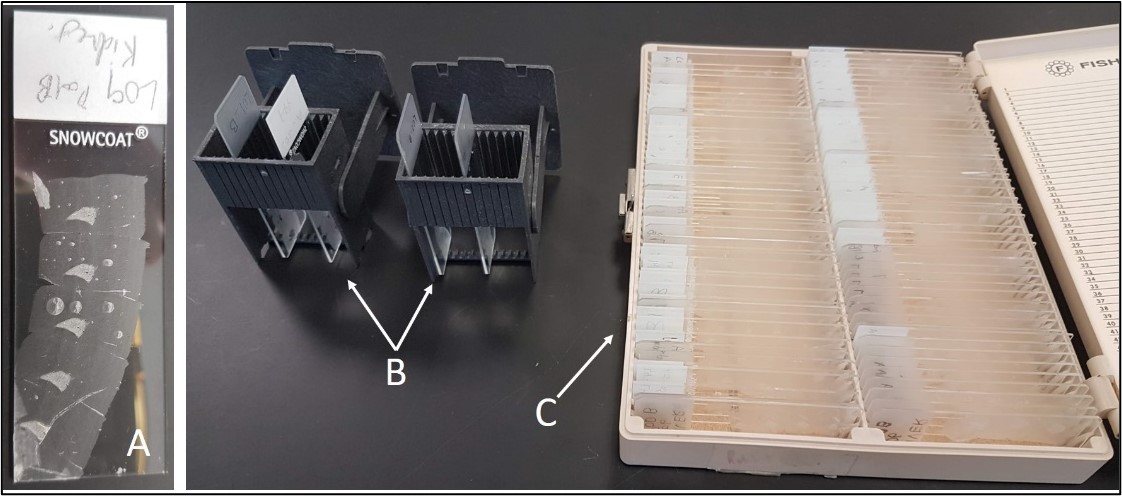
Figure 9: Detailed view of materials for Lab Part 1. (A) Slide with unstained tissue section. (B) Vertical slide holder. Place slides in here. (C) Slide box with unstained slides. Obtain slides for staining from here.
Safety Reminders
You should always exercise caution and use common sense when working in any lab. In the lab this week, these are a few of the activities where extra care is warranted:
- H and E Staining
- You will be staining tissues which are adhered to glass slides. This requires the use of various solutions including xylene, alcohol, hematoxylin, eosin and other buffers.
- You must wear gloves and a lab coat when working at the fumehood and staining your tissues. The solutions can stain your skin or clothes, and cause mild to severe skin irritation.
- You must wear chemical splash goggles when working with chemicals in the fumehood, even if the sash guard is lowered.
IMPORTANT: You CANNOT wear gloves in the hallways. Should you be exiting the classroom to use a fumehood in the other classroom, you must remove gloves before entering the hallway so as not to contaminate surfaces that other McMaster University users will be touching with their bare hands.
Lab Protocol 1: Clearing and Staining Tissue
You will be working in groups of four students per fume hood, but each student will have their own slide. Place your slide of choice in the vertical slide holder, which is used to transfer the slides between the different staining solutions. You can mark your slide with your name in pencil, as marker and pen will be soluble in the xylene.
This protocol has three main parts:
- Clearing and rehydrating (steps 1-9 of the protocol).
- Staining & rinsing (steps 10-17 of the protocol).
- Dehydrating (steps 18-23 of the protocol).
Pair 1 starts. Pair 2 can begin once the first pair moves onto step 2. If you have three or fewer students in your fume hood, stain all slides at the same time together.
Before you begin, ensure you are wearing the appropriate personal protective equipment (PPE): gloves, lab coat and chemical splash goggles.
- Clear (remove) wax from sections by placing slides in xylene I - dip 10X, then leave for 3 minutes.
- Transfer to xylene II and dip 10X, then leave for 3 minutes.
- Transfer to xylene III and dip 10X, then leave for 3 minutes.
- Displace xylene by transferring slides to 100% Ethanol I. Dip 10X and leave for 1 min.
- Transfer to 100% Ethanol II, dip 10X and leave for 1 minute.
- Transfer to 100% Ethanol III, dip 10X and leave for 1 minute.
- Rehydrate the tissue slide by transferring to 95% Ethanol - dip 10X, leave for 1 min.
- Transfer to 70% Ethanol, dip 10X and leave for 1 min.
- Use faucet to rinse slide with tap water for 2 min.
- Stain nuclei by placing slides in Modified Mayer’s Hematoxylin - dip 10X, leave for 5 minutes.
- Use faucet to rinse slide with tap water for 1 minute.
- Differentiate and destain. Transfer to the weak Acid Alcohol and dip 10X.
- Use faucet to rinse slide with tap water for 1 min.
- Place in Bluing Agent, dip 10X and leave for 1 min to “blue” the Hematoxylin.
- Use faucet to rinse slide with running tap water, dip 10X, leave for 1 min.
- Transfer to 95% Ethanol, dip 10X.
- Stain all other tissue by placing slides in Alcoholic 0.5% Eosin pH 5.5 - dip 10X, leave for 30 seconds.
- Transfer to 95% Ethanol I and dip 10X, leave for 1 min.
- Transfer to 100% Ethanol I and dip 10X, leave for 1 min.
- Transfer to 100% Ethanol II and dip 10X, leave for 1 min.
- Transfer to Xylene I, dip 10X and leave for 2 min.
- Transfer to Xylene II, dip 10X and leave for 1 min.
- Leave slides in XYLENE until you are ready to coverslip (protocol 2).
Lab Protocol 2: Preparing permanently mounted sections
- Lay your stained slide flat on top of a piece of paper towel.
- Remove excess xylene from around the tissue with a KimWipe or paper towel. Do not directly wipe the tissue.
- Place a thin line of resin solution (=Permount) along the bottom edge of the slide.
- To avoid trapping air bubbles, angle the coverslip on one edge of the slide and lower it gradually to cover the stained section. Use the forceps to gently tap the coverslip to remove trapped air bubbles (only if they appear over the tissue).
- Leave the slide to dry on the tray provided. Write your lab section, pod, and name on the frosted part of the slide with the provided pencil. Your TA will check your slide for completion.
- The slides will air dry for at least 24 hours; you can peek at them during the next lab.
Lab Part 2: Capturing Images and Image Analysis Prep
Purpose
To capture images of mouse skin cross sections for analysis with ImageJ.
Summary of Activities
Students will capture images from the prepared slides of mouse skin sections using the compound microscope.
Materials
-
- Prepared slides of mouse skin tissue:
- Mouse: 3 month
- Mouse: 13 month
- Compound Light Microscope
- Stage Micrometer images
- Prepared slides of mouse skin tissue:
Lab Protocol 3: Image Capture
- Use the Zeiss compound light microscope to capture 2 images at different locations (=regions of interest; ROIs) from each slide. Use the 10X magnification objective (100X total magnification).
- Make sure your computer contains an image of the stage micrometer at the same magnification you used to capture your images of the skin tissue.
- Each microscope in the Living Systems Lab has an instructional guide located in the appendix of this Pressbook, in addition to guides for using the software required for this activity. Refer to the following relevant appendices as needed during this activity:
- For image analysis in the ELN assignment, you will measure the thickness of the epidermis and dermis in each ROI for the 3 month and 13 month mouse images, then calculate the mean thickness of the dermis and epidermis for these samples. Use ImageJ on the lab computers to complete these measurements.
Lab Exit Checklist
- Complete H&E Staining
- Complete Coverslipping
- Stained slide labelled with lab section, pod, name, and placed on designated tray for drying
- Capture 2 images at different ROIs from each of the two ages of prepared mouse skin tissue slides (use the 10X objective).
- Use the image of the stage micrometer at 100X magnification during your ImageJ analysis.
- Use the lab computer and ImageJ to complete your analysis for the ELN.
References
Altun, Z. F., & Hall, D. H. (2009). Introduction to C. elegans Anatomy. Worm Atlas. doi:10.3908/wormatlas.1.1
AMAC. (n.d.). The three anatomical planes. AMAC Fitness Training Provider. Retrieved January 11, 2021, from https://amactraining.co.uk/resources/handy-information/free-learning-material/level-3-exercise-and-fitness-knowledge-index/level-3-17-the-three-anatomical-planes/
Friedlander, E. (2010). Smooth Muscle, Longitudinal and Cross Sections. Ed’s Basic Histology Gallery. http://www.pathguy.com/histo/055.html
SlidableWorm. (n.d.). Worm Atlas. Retrieved January 11, 2021, from https://wormatlas.org/SW/SW.php/index.html
Sowah, D., Brown, B. F., Quon, A., Alvarez, B. V., & Casey, J. R. (2014). Resistance to cardiomyocyte hypertrophy in ae3−/−mice, deficient in the AE3 Cl−/HCO3−exchanger. BMC Cardiovascular Disorders, 14(1), 89. https://doi.org/10.1186/1471-2261-14-89

