Fluorescent Labelling Lab Outline
Introduction
Over the last few weeks, you’ve had the opportunity to learn about fixing and sectioning tissues and staining these tissues using an H&E staining protocol. You’ve also had the opportunity to try working with living cells/tissues in petri dishes, and staining dead cells for viewing in the haemocytometer for counting purposes.
What about visualizing things inside of living cells, without having to remove them from their petri dish or fix them in position?
You’ll often read about scientists labelling certain structures INSIDE of cells in research articles. Today, we are going to try this out ourselves, using C2C12 cells in a 6-well plate and a fluorescent inverted microscope. We are going to be visualizing a fluorescent dye that localizes to the mitochondria within the cell. This dye is not cytotoxic to the cell in the time frame in which we will be conducting the experiments, so it will be possible to see the labelled mitochondria in the cells while they are still alive.
What is Fluorescence?
This term “fluorescence” gets tossed around all over scientific literature. You hear about it in chemistry when talking about how light is emitted from certain compounds. You read about it in a paper discussing the GFP-tagged molecules in a certain experiment. (GFP = Green Fluorescent Protein, which you’ll maybe have already heard about in BIO 1A03). You’ll hear it from us, talking about fluorescently labelled structures or epifluorescent microscopes. What does it mean?
Fluorescence is the ability for SOMETHING to emit light after absorbing energy. A relatable example of this is glow-in-the-dark stickers, or stars that you might have stuck to your bedroom ceiling (although this process is slightly different, and is called phosphorescence). Fluorescence and phosphorescence are forms of luminescence. In life sciences research, bioengineers have created molecules that have the ability to absorb light energy of a certain wavelength, and then emit that energy back out in a different wavelength. Some are proteins, and some are chemicals. GFP is certainly a familiar one – the green fluorescent protein can be inserted into a wide variety of biological systems using molecular engineering, and not only can we create dyes that we apply to something that will localize to certain parts of the cell/tissue, but there are also mechanisms for building the coding of a GFP-containing protein into the genome of an organism, so that when that organism produces that protein naturally, it will fluoresce without any intervention required.
In this week’s lab, we will be working with a dye that has been designed to enter living cells and bind to only the mitochondria, thus ensuring that only the mitochondria will fluoresce when we look at the cells. However, you’ll also get the opportunity to see how organisms appear when they possess a gene for a protein that includes a fluorescent tag in a future lab module (locomotion).
How does this fluorescent dye work?
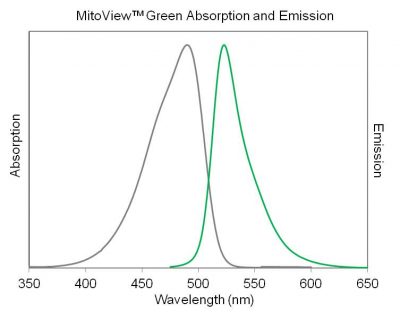
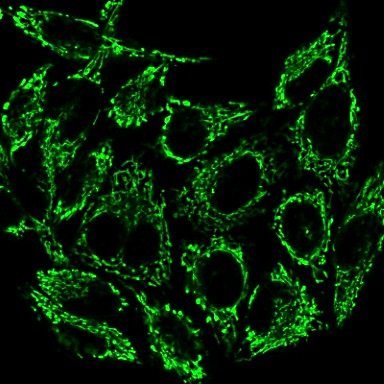
The dye we will be using today is called MitoViewTM Green, produced by the company biotium. This dye is a molecule that has been designed to enter the cell membrane and locate the mitochondria specifically, based on the mitochondrial mass. Other dyes are designed to locate the mitochondria based on the membrane potential that is generated across the mitochondria during the electron transport chain. MitoViewTM Green is only able to fluoresce when it has actually entered the mitochondrial membrane, so the only regions that appear fluorescent under a microscope has dye that has entered the mitochondrial organelles. Importantly, this dye is NOT an antibody, and does not localize to the organelle of interest using a surface ligand-binding reaction. This dye is not a protein that is produced by cells during translation.
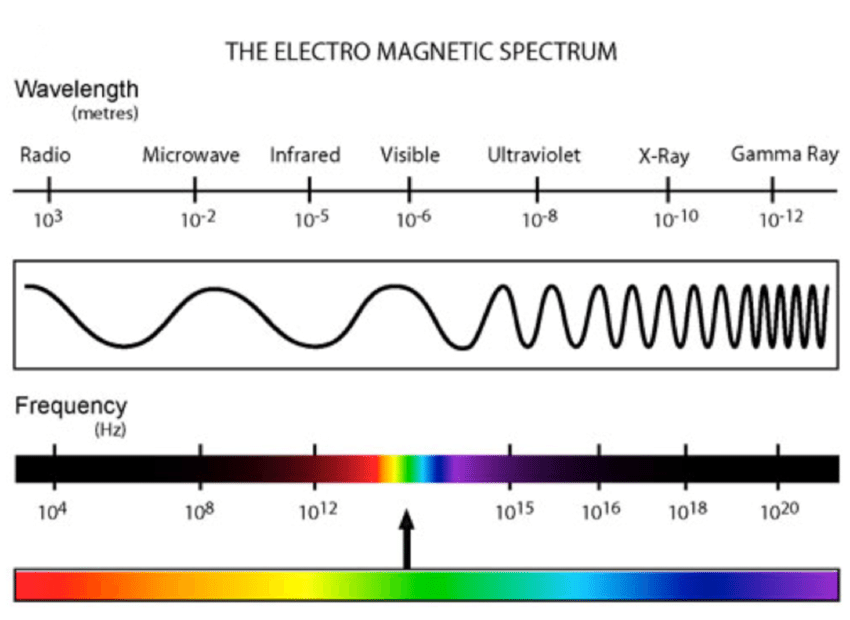
Why Green? To answer this, we will need to tip-toe into the physics of light waves and incident and emitted energy in the visible light spectra. Visible light is just one small region of energy waves that travel through our world every day. With fluorescence imaging, we are only concerned with the wave aspect of photons/light, not the particle piece, but we acknowledge that light energy possesses both features of particles and features of waves in how this energy travels. (We’ll save the rest of this for your intro physics course!)
The green part is the light that we will see when we look through the microscope. However, this is not the same colour of the light that is initially sent towards the sample. With any energy absorption and subsequent re-emission, some of the original total energy is lost, and the energy that is released after it has been absorbed has a slightly lower total energy. There is an equation that can be used to explain the relationship between energy and wavelength:
E = hc/λ
Where E = energy in units of Joules, h = Planck’s constant, which is a fundamental, unchanging value, c = the speed of light in a vacuum in m/s, and λ = the wavelength in meters.
With h and c both being unchanging constants for the purposes of light microscopy, we can simplify this equation to see the proportionality relationship between the energy and the wavelength:
E ∝ 1/λ
So as the energy decreases, the wavelength increases (or goes from the purple side of the light spectra towards the red side of the light spectra). This is an inversely proportional relationship.
Tucking all the math aside, this simply means that if we want our dye to emit green light, we need it to absorb blue incident light, to accommodate for the slight loss of energy during the absorption/emission process.
There’s one last thing to talk about before we can hop in the lab – how much dye should we expose our cells to? We don’t want to add too much dye to the point where we won’t be able to tell what is what (everything will be a blurry green blob) but we want enough dye that we can see the mitochondria. When you buy a reagent from a chemical vendor, you usually get the reagent in highly concentrated version, called a stock concentration. In this case, the dye is sold in powder form, and needs to be resuspended in dimethyl sulfoxide, or DMSO, which is an organic solvent that can dissolve both polar and non-polar compounds. Once resuspended, the stock concentration of this dye is 100μM (C1). The suggested concentration to apply to live cells in a petri dish is 100 nM of dye (C2), so you’ll need to perform the math required to complete this dilution. Remember the relationship between concentration and volume:
V1C1 = V2C2
Each well of your cell plate will receive the same amount of cell culture media that you have prepared with dye in it, but you need to decide how much dye to add to your media vial first (V2), to ensure you have the final working concentration that should be applied to the cells. Once you have your number, your TA will bring over the stock and add it to your cell media, which you will then apply to your cells for the labelling protocol.
Lab Overview and Timeline
There’s going to be some hands on work done as pods today, but the ELNs are still to be submitted in pairs (the same pairs from last week please! Speak with your instructor if your partner is absent).
Each 6-well plate has been divided to be split between two pairs of students (or a pod total). Each pair will have two wells with cells seeded in them, and one empty well. You can disregard the empty well.
One of your wells has been treated with 1.0 mM hydrogen peroxide (H2O2) the night before. Hydrogen peroxide is a known apoptosis inducing agent, so our hypothesis is that the well dosed with the peroxide will likely look different than the other well, which has not received a treatment (this is our control well). When we visualize the mitochondria, we’ll get a better idea of how severe the impact of the peroxide was on these cells!
| Time (min) |
What will you be doing? | Total Time (min) |
|---|---|---|
| 0 - 10 | Overview of lab activities by the TA. | 10 |
| 10-40 | Part 1: Setting up your calculations and preparing the working solution of the dye for labelling Lab Protocol 1: Determine how much dye to add to your cell culture media Lab Protocol 2: Prepare your cell culture media for the labelling protocol |
30 |
| 40-165 | Lab Part 2: Applying the dye and imaging your cells Lab Protocol 3: Labelling your cells, incubating, and viewing under the fluorescent microscope |
125 |
| 165-170 | Clean up and disinfect workstations. Submit Crowdmark ELN in PAIRS. |
5 |
Safety Reminders
You should always exercise caution and use common sense when working in any lab. In this module, these are a few of the activities where extra care is warranted:
- Biohazardous materials
- You will be working with the C2C12 cell line, which are immortalized mouse myoblasts
- It is imperative that you protect yourself from this biohazardous material, as well as protect the cell culture from being contaminated by you or the environment
- You must wear the following PPE when handling and pipetting the material: gloves, lab coat, goggles and closed toed shoes
- You may remove the goggles when you are not spraying EtOH or pipetting the material
- No personal computers or phones at the lab bench. Use the computers provided, which can be sprayed down with EtOH to decontaminate
- 70% EtOH
- You will use 70% EtOH to ensure a sterile environment. It will be applied by a spray bottle. Wear the following PPE (gloves, goggles, lab coat, closed toed shoes) when spraying EtOH.
- 70% EtOH will be applied to any surfaces both before and after they come into contact with the cell suspension or items containing the cell suspension. This includes the cell culture plates, lab bench, gloved hands, computer keyboards, etc.
If you do not follow the safety guidelines regarding PPE and personal electronics being stowed away this week, you will be asked to leave the lab without accommodation. Be respectful of the safety rules, and of the personal safety for you and your classmates.
Lab Part 1: Setting up your calculations and preparing the working solution of the dye for labelling
Purpose
- You will need to dilute the stock concentration of the dye to an appropriate working concentration, using the basic math we learn in introductory chemistry. Too high a concentration may be cytotoxic, and will result in a poor view of the mitochondria.
Summary of Activities
- You will use the known values of your stock concentration and desired working concentration in order to solve for the amount of stock dye you will be adding to your cell culture media vial.
Materials
- 6-well tissue culture plate, pre-seeded with C2C12 cells in 4 of the wells
- P1000 micropipettes and pipette tips
- 15 ml conical vial containing 5ml of supplemented cell culture media (DMEM)
- stock vial of 100 μM MitoViewTM dye (TA will bring to you and dispense)
- tin foil (the dye is photosensitive, so you should keep the DMEM covered once the dye has been added to it)
- tips waste container
- permanent marker
- mini-vortex
Lab Protocol 1: Determine how much dye to add to your cell culture media
- Recall the equation that is used to determine how much of a stock concentration solution you will need to add into your final volume of working concentration solution: V1C1 = V2C2
- Use this equation, and the known values (working concentration should be 100 nM, the stock concentration is 100 μM, and you have a total final volume of 5 ml of cell culture media/dye solution once you add the dye, because we can assume that the volume of stock being added will be negligible to the total volume, i.e. very tiny).
- Once you have completed your math, check it with the TA. If you’re correct, the TA will let you move on to the next step. Otherwise, try your math again! Pay close attention to unit conversions – both μM to nM and ml to μl.
Lab Protocol 2: Prepare your cell culture media for the labelling protocol
- Once you’ve determined the correct volume of stock to add to your 5 ml of cell culture media, your TA will pipette this volume into your 5 ml conical vial of media.
- Once the TA is done, you can pipette the media up and down using a P1000 pipette, gently mixing the solution to ensure the dye gets mixed in homogenously. You can alternatively mix the solution using the mini-vortex, ensuring the cap is firmly screwed on before using the vortex so no splashing occurs.
- Re-cap your vial and wrap the vial with tin foil. This will ensure no light enters the vial and reduces the dye efficacy before you’re ready to apply the dye to the cells.
Lab Part 2: Applying the dye and imaging your cells
Purpose
- You will apply your dye to the cells and follow the protocol to incubate them for the appropriate amount of time before imaging. You will then go with the instructor to view the cells under the fluorescent inverted light microscope in the other lab room, 2 pods at a time.
Summary of Activities
- Students will remove the old cell culture media and replace it with the dye-media for the incubation so the dye can enter the cells. During the incubation, you will have time to work on the calculations in your ELN in your pairs.
Materials
- 6-well tissue culture plate, pre-seeded with C2C12 cells in 4 of the wells
- P1000 micropipettes and pipette tips
- 15 ml conical vial containing 5ml of supplemented cell culture media (DMEM)
- tips waste container
- liquid waste container
- permanent marker
- Axio Observer fluorescent inverted microscope
- Zen Software
Lab Protocol 3: Labelling your cells, incubating, and viewing under the fluorescent microscope
- Recall from last week – the 60mm petri dishes hold approximately 5 ml of cell culture media. These wells in the 6-well plate are much smaller in diameter, so we only be placing 1.0 ml of media into each well.
- Each of the four students should select a well (pairs, make sure you each have one control well and one treated well. Label your wells with your initials using the marker on the lid of the plate.)
- One at a time, remove the old cell culture media from your well and place it in the waste beaker, using the P1000 pipette. Last week, you used an aspirator pump for this, but we are also able to do this with a P1000.
- Next, use the P1000 to pipette 1 ml of your dye-media into your well. When all 4 students have prepared their well, the plate can be GENTLY swirled to ensure the media coats all of the cells.
- Bring the plate to the incubator – you will leave the cells to incubate in the dye (and in the dark!) for a minimum of 30 minutes – the longer the incubation, the more intense the staining will appear (up to about 72 hours with no cytotoxicity).
Incubation! (Which, today, essentially means: Intermission!) In your partners, complete the calculation questions in the ELN regarding your cell concentrations from Table I last week. This will give the dye adequate time in the incubator to be taken up by the mitochondria. The TA will be circulating to assist if you’re having some confusion with the steps in the ELN guide.
5. Once you’re done your cell passaging calculations and the cells have incubated for at least 30 minutes (it’s fine if it ended up being longer), your pod can take your plate out and head to the dark room in ABB 107 with the instructor. You’ll get to take a peek at your cells under the fluorescent microscope, and you will be able to note the differences between your control and hydrogen peroxide treated groups based on how the mitochondria appear in the cells.
6. Bring your plate back to the lab room and leave it in the fume hood for disposal. The final ELN question can be completed now that you’ve looked at your cells, and the assignment can be submitted. Be sure to tidy up and disinfect your workstation before you leave the room.
Lab Exit Checklist
- Calculate the appropriate volume of stock solution to add to your cell culture media.
- Apply the working solution of dye-media to your cells and incubate for at least 30 minutes
- Complete the cell calculations portion of the ELN using table I from last week while the incubation is taking place
- Once done the calculations, as long as 30 mins have passed, collect your plate from the incubator and head to the dark room with the instructor to view your cells under the fluorescent inverted microscope
- Submit your completed ELN with your partner
- Tidy up and disinfect workstation before leaving
References
Figure 1:
Gorrec, F. (2015). Innovative screening conditions for the crystallization of macromolecules: application to solve protein structures by X-ray diffraction. Doctoral Thesis, University de Rennes. Accessed on Research Gate, October 2023.
Figure 2 & 3:
Images provided by the MitoViewTM product information page, biotium website. https://biotium.com/product/mitoview-dyes/
Xiang J, Wan C, Guo R & Guo D. (2016). Is hydrogen peroxide a suitable apoptosis inducer for all cell types? Biomed Res Int. 2016:2016(7343965). DOI: 10.1155/2016/7343965
