Cell Biology Lab Outline
Introduction
Cellular Senescence and Aging
As we have begun to see, the limits to human longevity are based on genetics, lifestyle, medical history, and sociology. The impacts of aging are seen on all tissue types, including skin, neural, muscle, and bone cells. At the basis of organism longevity is cell longevity. Stem cells in our body have different abilities to undergo mitosis and replace cells that die naturally or are damaged. In general, nerve and muscle tissue have the least potential for cell replacement; connective and epithelial tissue have the greatest potential for cell replacement. Part of this difference is the potential for persistent stem cells to replicate through cell division.
In the mid-20th century, Leonard Hayflick was studying human fibroblast cells growing in culture. He observed that the healthy cells could be passaged multiple times and still maintained the ability to divide rapidly through mitotic cell division. He was surprised to find one day that the cell morphology was changing and that the cells stopped dividing at a healthy rate (Shay & Wright, 2000). The phase at which cells are alive but stop dividing even when treated with normal growth factors that induce cell division is called senescence.
What are the implications of senescence for human aging? The cells that Hayflick studied were fetal fibroblast cells maintained in the lab in culture media. However, researchers hypothesized that the same tendency towards senescence was occurring in our own cells as we age.
Eventually, even our stem cells lose the ability to divide. At this point, we can no longer replace lost cells and our tissues and organs will degenerate. This is believed to be due to the inability of our cells to completely replicate the ends of DNA molecules. As a result, DNA molecules (and ultimately chromosomes) become shorter with every cell division. While we have long tracts of expendable non-coding DNA at the ends of chromosomes called telomeres that prevent the destruction of coding DNA, eventually the erosion of the ends of chromosomes impacts chromosome integrity and cell function, preventing the cell from being able to replicate, culminating in cell death.
Cell culture is a technique used by biologists to grow and study cells in vitro. There are a wide variety of cell types that can be studied in this way from many different animal and even plant sources. Primary cells are those that are harvested directly from tissue and sustained using special growth medium containing essential nutrients and growth factors to support proliferation for short periods of time. Their lifespan is limited, but they best represent in vivo conditions in the tissue from which they have been isolated from. Cell lines are laboratory-derived cells that have acquired the ability to replicate for many generations. Cell lines can be finite or immortalized, where the former eventually succumbs to senescence, while the latter can be divided almost indefinitely. Immortalized cells have acquired the ability to replicate indefinitely due to genetic mutations or artificial modifications. Cell lines are preferentially used when scientists are investigating basic biological processes, manipulating cellular functions, or establishing new methods because they are cost effective and easy to work with (Kaur & Dufour, 2012). Regardless of cell type, all cell culture is based on the same principles of sub-dividing growing cells in an aseptic environment, and is a vital laboratory skill for anyone studying cell biology.
Figure 1: Hayflick's Limit. Hayflick's three phases of cell culture. Phase I is the primary culture; phase II represents subcultured cells during the period of exponential cell division. Phase III represents the period where cell replication ceases, but metabolism continues. This phase is called senescence. Cells may remain in this state for at least one year before death occurs (Shay and Wright, 2000).
Cell Culture Overview
We are working with an immortalized and adherent mouse myoblast cell line named C2C12. Immortalized means the cells will continue dividing and not enter senescence. Adherent means the cells attach to the surface of the container they are in, as opposed to suspension cell lines, which float freely within the cell culture media.
The C2C12 cells are grown and maintained in a petri dish. The surface of the petri dish has been treated to allow the cells to adhere. In addition to the cells, the dish contains cell culture medium, which is a solution containing many of the nutrients (e.g. amino acids, vitamins, ions, glucose, pH buffer, etc.) that the cells require to grow, divide and be healthy. The cell culture media we use for our cell line is called Dulbecco’s Modified Eagle’s Medium (DMEM) which is supplemented with 10% Fetal Bovine Serum (FBS). FBS is a serum supplement for the cell culture and contains growth factors and other biological components that the cells need. When we prepare the DMEM and add FBS, we usually refer to this as "supplemented cell culture media." These dishes of cells are stored in an incubator which regulates the environmental temperature and CO2. The C2C12 cell line is maintained at 37°C with 5% CO2.
The cells continually divide and consume the nutrients in the cell culture media, so the media needs to be changed every few days. Once the cells reach appropriate confluence (confluence is the % of the dish that is covered by cells), the cells are passaged (split), where some fraction of cells (e.g. 1/10th) are added into a new dish with new media, where they can continue to grow. For the C2C12 cell line, we usually passage cells once they are 90% confluent. The exact number of cells that are added to the new dish depends on the size of dish and the particular cell line. Information about the culture methods for specific cell lines can typically be found from the supplier, such as the American Type Culture Collection (ATCC), which is a large organization that maintains and distributes cell lines and other materials for research.
When working with cell culture, we need to maintain a sterile or aseptic work environment. This is so that our cells do not become contaminated with bacteria or viruses that are naturally found in the lab environment. Our skin naturally carries bacteria that can accidentally be introduced into our working environment and compromise a cell culture, so care must be taken to minimize bacterial exposure as much as possible. We also need to protect ourselves from the contents of the cell culture in case they contain any infectious materials. We wear personal protective equipment (PPE) such as a lab coat, gloves, and goggles to minimize exposure of ourselves to the cell culture but also protect our cells from contamination. We control the sterility of our environment by using a biological safety cabinet (BSC). The BSC is specially designed to control air flow to prevent unfiltered air from the outside environment from entering the working space inside the cabinet. This is achieved by an air curtain that blows air across the opening of the BSC. The air in the BSC undergoes specialized filtration using a High-Efficiency Particulate Air (HEPA) filter to ensure that the air is as clean as possible inside the BSC.
As part of the cell culture process and for setting up experiments with cells, it is important to know how many cells are present in a given volume of culture. We can count cells using a special microscope slide called a haemocytometer. As cells divide and space runs out in a culture dish, some cells will die naturally due to lack of resources. When using a haemocytometer, it is difficult to distinguish between the live and dead cells without a label. Conventionally, we use a dye called Trypan Blue, which selectively permeates through the cell membranes of dead cells but cannot enter live cells. This results in all dead cells appearing blue when observed under the microscope.
IMPORTANT PRE-LAB PREP:
Review the following videos before coming to lab this week.
Watch this video demonstrating how to work with serological pipettes:
LSL Video - Understanding Serological Pipettes
Watch this video demonstrating how to use the green Pipette Pump:
LSL Video - Using the manual Pipette Pump
Watch this video demonstrating the proper use of a micropipette:
LSL Video - Using a Micropipette
LSL Video Cell Biology - "Choose Your Own Adventure" Cell Culture
Lab Overview and Timeline
In this lab, you will learn some basic cell culture techniques. This will include observing cell morphology and confluence using an inverted compound light microscope, passaging (splitting) cells using aseptic techniques required to maintain healthy cell cultures, and performing cell counts using a haemocytometer.
Note: You will be working in the biosafety cabinet (BSC)/tissue culture hood. This is different from the fume hood that is used during the histology lab. In brief, a fume hood is meant to protect the user from the chemicals/reagents within the fume hood. A biosafety cabinet is meant to protect the biological agents inside it from the contaminants surrounding them in the air. There's more to it than that, but for our lab course, that's the basic difference.
| Time (min) |
What will you be doing? | Total Time (min) |
|---|---|---|
| 0 - 10 | Overview of lab activities by the TA. Half of the class will complete Part 1 during the first half of lab and the other half will complete Part 2 first. |
10 |
| 10-45 | LIVE DEMO from Instructor/TA about how to complete the protocols for the lab this week (All students) |
35 |
| 45-105 | Part 1: Introduction to Cell Culture Techniques Lab Protocol 1: Preparing Yourself and Disinfecting Your Environment Lab Protocol 2: Passaging C2C12 Cells |
60 |
| 105-165 | Lab Part 2: Performing Cell Counts with a Haemocytometer Lab Protocol 3: Counting Cells with a Haemocytometer |
60 |
| 165-170 | Clean up and disinfect workstations. Submit Crowdmark ELN in PAIRS. |
5 |
Safety Reminders
You should always exercise caution and use common sense when working in any lab. In this module, these are a few of the activities where extra care is warranted:
- Biohazardous materials
- You will be working with the C2C12 cell line, which are immortalized mouse myoblasts
- It is imperative that you protect yourself from this biohazardous material, as well as protect the cell culture from being contaminated by you or the environment
- You must wear the following PPE when handling this material in the biosafety cabinet (BSC): gloves, lab coat and closed toed shoes
- You must wear the following PPE when handling and pipetting the material outside the BSC: gloves, lab coat, goggles and closed toed shoes
- You may remove the goggles when you are not spraying EtOH or pipetting the material
- No personal computers or phones at the lab bench. Use the computers provided, which can be sprayed down with EtOH to decontaminate
- 70% EtOH
- You will use 70% EtOH to ensure a sterile environment. It will be applied by a spray bottle. Wear the following PPE (gloves, goggles, lab coat, closed toed shoes) when spraying EtOH.
- 70% EtOH will be applied to any surfaces both before and after they come into contact with the cell suspension or items containing the cell suspension. This includes the biological safety cabinet (BSC), cell culture dishes, lab bench, gloved hands, 1.5 ml tubes containing cell suspension, etc.
If you do not follow the safety guidelines regarding PPE and personal electronics being stowed away this week, you will be asked to leave the lab without accommodation. Be respectful of the safety rules, and of the personal safety for you and your classmates.
Lab Part 1: Introduction to Cell Culture Techniques
Purpose
- To observe cell morphology and estimate confluence in cell cultures using an inverted compound light microscope
- To practice passaging (splitting) cells using aseptic technique which is required to maintain healthy cell cultures
Summary of Activities
- Before the lab begins, you will first read over the protocols for cell culturing below. Next, you will watch the interactive video, where you'll be prompted to select the correct action based on the protocol.
- In this lab activity, students will work in groups of 2-4 students per BSC. Pairs of students will share a tissue culture plate with cells seeded on it, taking turns completing the steps of the passaging protocol.
- Wear PPE (gloves, lab coat, and closed toed shoes) and use aseptic technique at all times when handling or passaging cells
- Passage the cells by following the trypsinase protocol below.
Materials
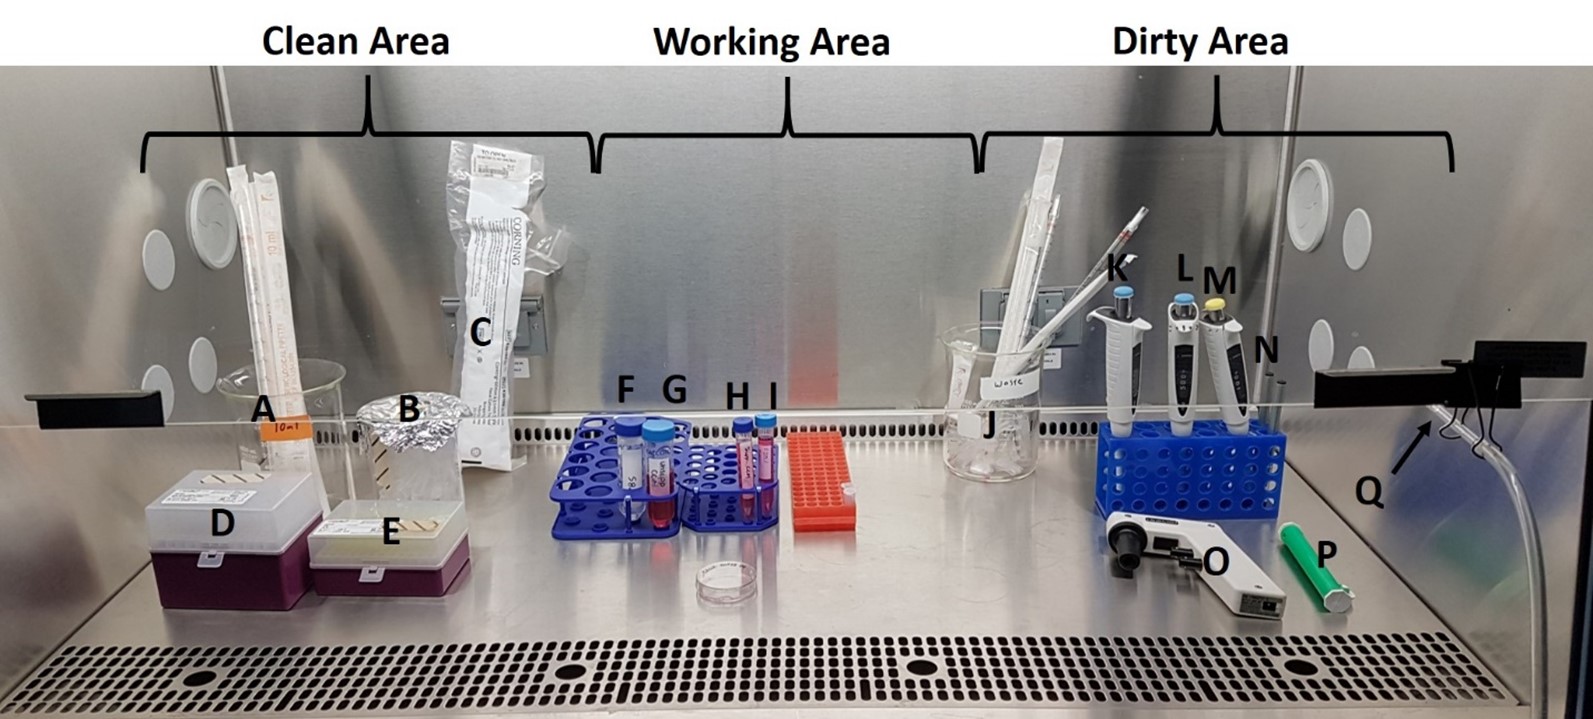
Figure 2: Biological Safety Cabinet (BSC) Setup and Materials for Part 1. Refer to the table below for description.
| Item | Name | Purpose/Description |
|---|---|---|
| A | 10 ml serological pipette | Connects to the pipette aid and used to pipette solutions with reasonable accuracy |
| B | 1.5 ml microcentrifuge tubes | Transfer the cell suspension you prepare from the TC plate into this tube and use for cell counts and seeding new TC plates |
| C | 60 mm tissue culture (TC) Petri dishes | Growing and passaging cells. Dishes with cells will be in the incubator, empty dishes are used for passaging cells |
| D | P1000 tips | Use with P1000 pipette |
| E | P200 tips | Use with the P200 |
| F | Phosphate Buffered Saline (PBS) | Washing cells and removing residual CCM when passaging cells |
| G | Un-supplemented DMEM Cell Culture Media | Cell Culture Media (no FBS). Used when FBS isn't required |
| H | Supplemented DMEM Cell Culture Media | Cell Culture Media (CCM) that has been supplemented with 10% Fetal Bovine Serum (FBS) and antibiotics |
| I | 0.05% Trypsin | Detach cells from plate when passaging |
| J | Waste Container | Used tips and serological pipettes go here |
| K | P1000 (set to 1000 ul) | Set to pipette 1000 µl (1 ml) |
| L | P1000 (set to 500 ul) | Set to pipette 500 µl (0.5 ml) |
| M | P200 | Set to pipette the desired µl volume for transferring cell suspension to new TC dishes |
| N | Labelling Marker | To label dishes, tubes |
| O | Pipette Aid | Electronic. Connect to a serological pipette and use the buttons to draw up or expel liquids |
| P | Pipette Pump | Manual version of pipette aid. Use if pipette aid not working |
| Q | Aspirator Pump Tubing | Connects the aspirator pump to the collecting basin beneath the Biological Safety Cabinet. Connect a sterile glass Pasteur pipette to the end and use to aspirate (remove) solutions in the TC dish. |
Lab Protocol 1: Preparing yourself and disinfecting your environment
1. Ensure long hair is tied back.
2. Wash your hands.
3. Put on your PPE (lab coat, gloves and goggles).
4. Place the supplemented DMEM cell culture media (sup-DMEM), unsupplemented DMEM (unsup-DMEM), phosphate buffered saline (PBS) and trypsinase enzyme (trypsin) in the incubator, to bring to the same temperature as the cells. (This step has already been done by the lab technician).
5. Make sure that your BSC is turned on and functioning normally. (This step has already been done by the lab technician).
6. Turn on the aspirator pump.
7. Spray down your gloved hands and the BSC with 70% EtOH and disinfect the workspace. (This step has already been done by the lab technician).
8. Spray down anything that goes into the BSC with 70% alcohol, disinfecting all supplies as you move them into the BSC. (This step has already been done by the lab technician).
Lab Protocol 2: Passaging C2C12 Cells
Note: Throughout this protocol, you will see the terms "tissue culture" and "cell culture" both used to refer to the dishes/plates where the cells are cultured. For our purposes, using a cell culture or tissue culture grade dish differentiates the dish from a basic plastic petri dish, which is not sufficient for cell growth.
- Remove one cell culture plate containing the C2C12 cells from the incubator and examine under the inverted microscope. Observe the cell morphology and estimate % confluence under the microscope.
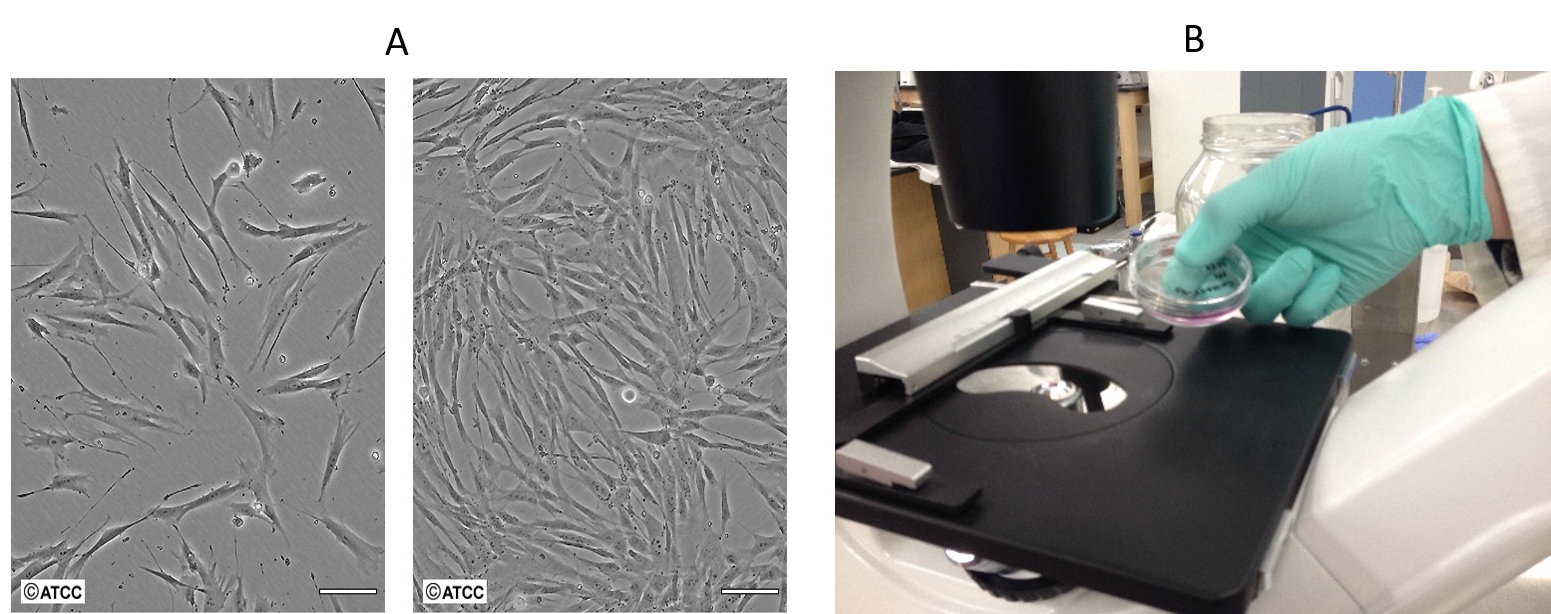 Figure 3: Passaging Cells. (A) Low confluence (left) versus high confluence (right). (B) Placing the petri dish on the stage of the inverted microscope. Notice that the objective is underneath the stage on this microscope. This is why it is called an inverted microscope.
 - Spray the outside surface of the C2C12 plate with 70% EtOH and place in the BSC.
- Remove the sup-DMEM, unsup-DMEM, PBS and trypsin from the incubator, spray with 70% EtOH, and place in the BSC.
- Connect a P1000 pipette tip to the aspirator pump tubing. Be careful this tip does not ever come into contact with the BSC surface. If it does, put the contaminated tip in the waste container and replace it with a fresh one.
- Tilt the C2C12 plate so the media accumulates along the bottom, and use the aspirator pump to remove the old cell culture media from the dish.
- Use the P1000 (set to 1000 µl) to add 1 ml of PBS to the plate. Swirl and aspirate.
- Use the P1000 (set to 1000 µl) to add 1 ml of PBS to the plate. Swirl and aspirate.
- Use the P1000 (set to 1000 µl) to add 1 ml of trypsin to the plate. Swirl across the surface. Place in 37°C incubator for 5-7 minutes.
- While your cells are incubating, label two new 60 mm cell culture dishes and a 1.5 ml tube (with the lid closed) with:
- the date the cells were passaged
- passage number (e.g. if the starting dish with the C2C12 cells is P3, label the dish for the next passage P4)
- the type of cell line being used (C2C12).
- Your (and your partner's) name.
- Add unsupp-DMEM media to each of the two new dishes using a serological pipette and the green Pipet Pump. Base the volume on the estimated confluence of your original plate.
- 30% confluent - split 1:5
- 0.3 ml of cell suspension + 4.7 ml of unsupp-DMEM
- 70% confluent or greater - split 1:10
- 0.15 ml of cell suspension + 4.85 ml of unsupp-DMEM
- 30% confluent - split 1:5
- Remove the plate containing the trypsin from the incubator and view under the inverted microscope. Tap the dish and check if cells are adherent. If still adherent, place back in incubator for another minute. See figure 4.
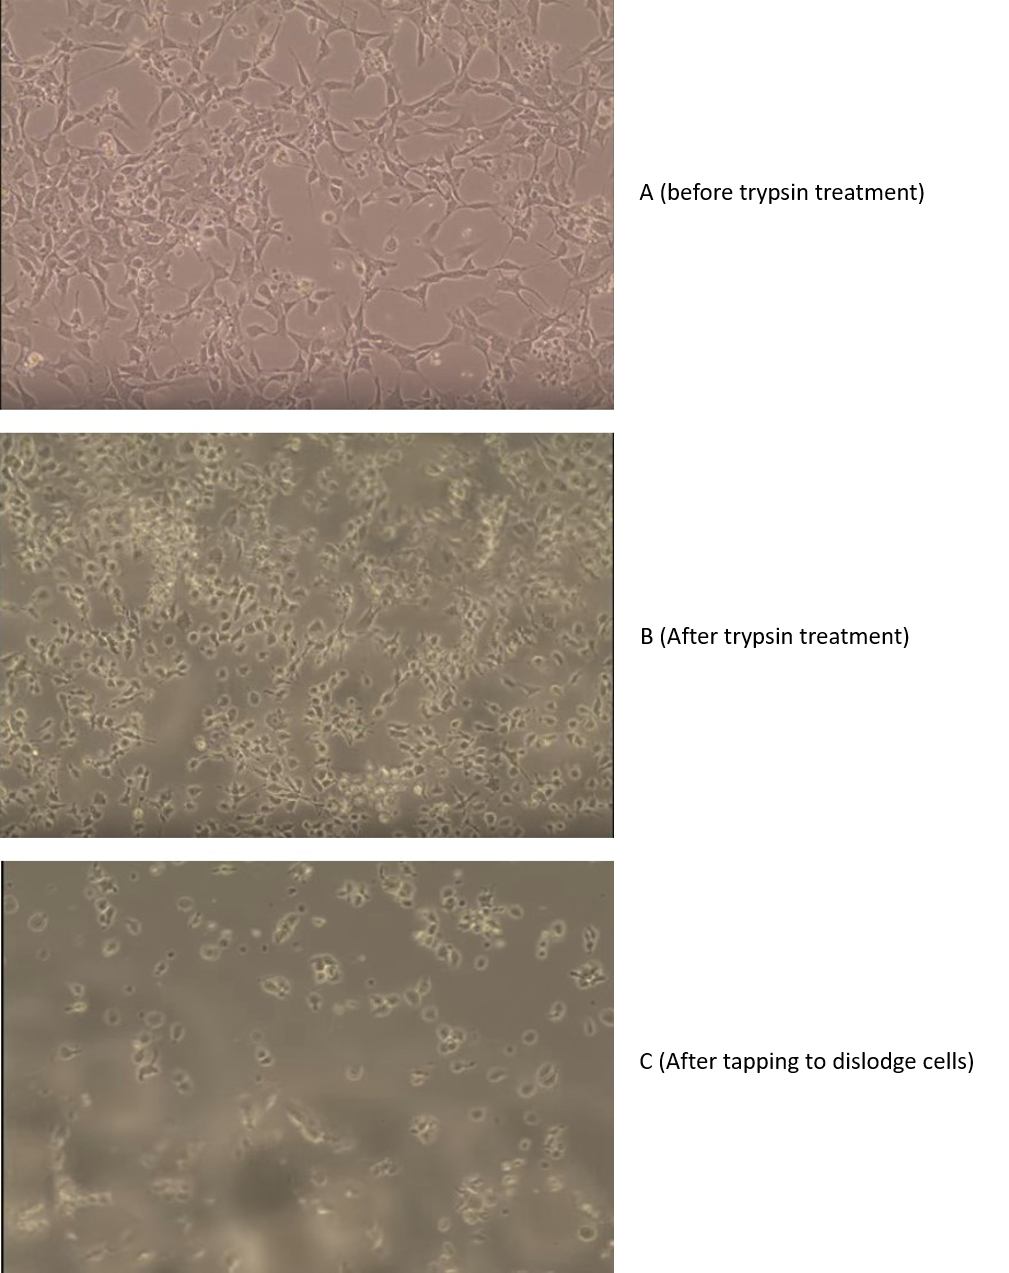 Figure 4: The effect of trypsin on adherent cells. (A) Before trypsin treatment, the cells are adhering to the plate. (B) After trypsin treatment, the cells are rounded up. (C) After a gentle tap at the side, the cells are now floating free of the plastic.
 - After cells have detached, spray the C2C12 plate with 70% EtOH and place in the BSC.
- Use the P1000 (set to 500 µl) to add 0.5 ml of Supp-DMEM to the dish. Swirl the media around the dish (clockwise x3, counter-clockwise x3, forward and back x3, left and right x3). This will stop the trypsin enzymatic reaction.
- Tilt the dish so the cell suspension accumulates along the bottom edge, and use the P1000 to pipette the cell suspension up and down 3X to break up any cell clumps. The dish will have a total of 1.5 ml of cell suspension.
- Use the P1000 (set to 1000 µl) to transfer the 1.5 ml of cell suspension into the labelled 1.5 ml tube. It will take two transfers to move all of the cell suspension.
- Split the cells based on the confluence you estimated above. For the C2C12 line, the following works well to achieve a 70-90% confluent dish in 3 days (these values are using the 1.5 ml of cell suspension in your tube and a petri dish that holds 5 ml):
- 30% confluent - split 1:5
- 0.3 ml of cell suspension + 4.7 ml of unsupp-DMEM
- 70% confluent or greater - split 1:10
- 0.15 ml of cell suspension + 4.85 ml of unsupp-DMEM
- 30% confluent - split 1:5
- Use the P200 to add the required volume of cell suspension to each of the newly labelled cell culture plates. Swirl (clockwise x3, counter-clockwise x3, forward and back x3, left and right x3). Repeat for the second plate.
- Place both new plates in the 37°C incubator. New cell growth should be observed after a couple days.
- Clean up: all waste (tips, pipettes) in waste container inside BSC, old TC dishes go in container with 10% bleach (in fumehood), spray down BSC with 70% EtOH.
- Ensure the 1.5 ml tube containing the cell suspension is closed, spray with 70% EtOH, and this tube can now be removed from the BSC and taken to the bench to be used for a cell count using a haemocytometer.
Lab Part 2: Performing Cell Counts with a Haemocytometer
Purpose
- To practice using a haemocytometer to count viable and dead cells in the cell suspension.
Summary of Activities
- The TA will prepare a cell suspension for you during the demonstration. You can use this for making your cell counts.
- Each student should complete a cell count on their own and record this data in table I. You will share data with your partner to complete the Crowdmark ELN, but each of you should contribute your own values.
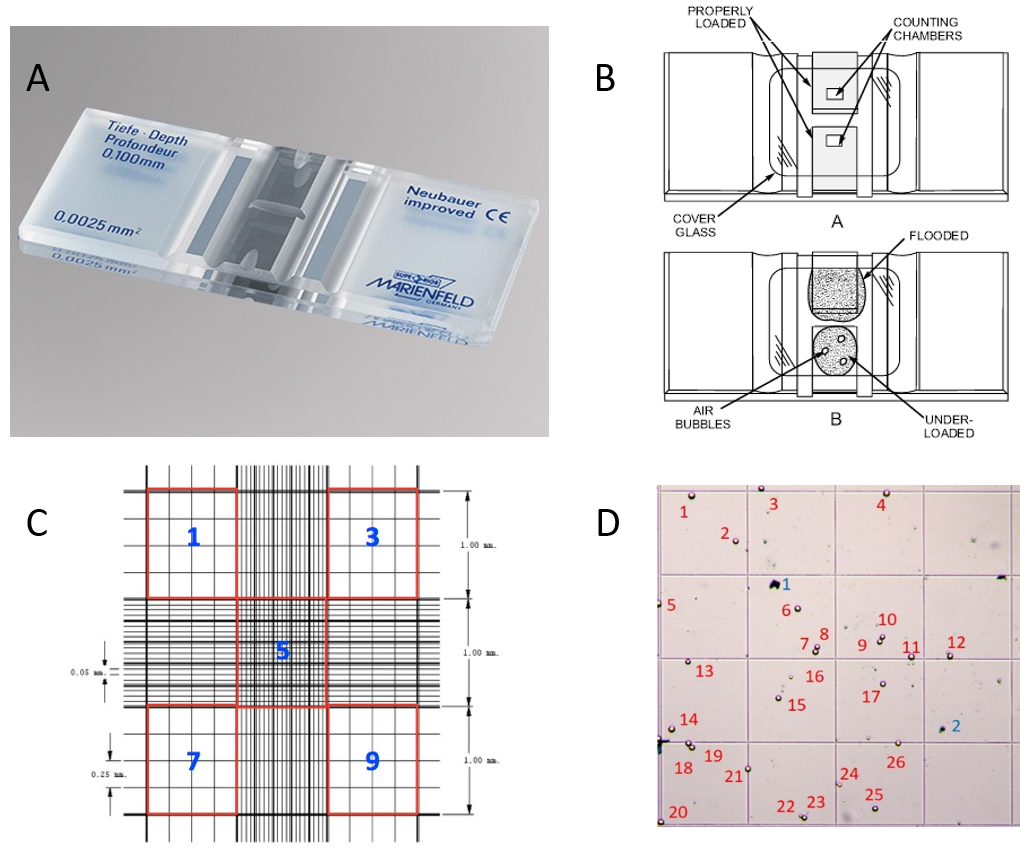
Figure 5: The Haemocytometer. (A) Photograph of a haemocytometer. (B) Diagram of a haemocytometer. Fill the haemocytometer chamber with the appropriate amount of cell suspension. 12µl should work well, but do visually monitor your chamber as you fill it. (C) Grid system in the haemocytometer chamber. Count cells in five sectors, 1, 3, 5, 7 and 9 (i.e. the four corners and the middle). (D) A single red square used for cell counts. Note that the squares are not actually coloured red on the haemocytometer, and you will have to identify which squares to use for your counts. The red numbers indicate the live cells (26) and the blue numbers indicate dead cells (2). You would repeat these counts for each of the squares outlined in red. Count cells fully in the grid system of the sector and those touching the left and top lines. Each red square is 1 mm x 1 mm x 0.1 mm = 0.1 mm3. Recall 1 cm3 = 1 ml.
Materials
- P20 pipette
- P200 pipette
- 1.5 ml tube containing cell suspension (C2C12 cells).
- Tips for P20/P200
- 0.2 ml tubes
- Rack for 0.2 ml tubes
- 0.4% trypan blue
- Un-supplemented DMEM Cell Culture Media (use to dilute cell suspension if there are too many cells to accurately count)
- Haemocytometer
- Coverslip (these are NOT single use - clean and leave on the bench for the next student)
- Spray bottle with 70% EtOH
- Cell Counter (click to keep track of your cell counts)
- Tip Waste Container
Note: Dispose of the used 0.2 ml tubes in the bleach bucket, located in the fumehood.
Lab Protocol 3: Counting Cells with a Haemocytometer
Watch this video demonstrating how to perform cell counts with the haemocytometer:
LSL Video Cell Biology - Counting Cells with a Haemocytometer
Note: Each haemocytometer costs approximately $600.00. Treat them with care.
- Spray the haemocytometer with 70% alcohol and wipe with a KimWipe. Wait for the alcohol to evaporate (~1-2 minutes)
- Place a coverslip on the haemocytometer.
- Label a 0.2 ml tube as CS-T (=cell suspension + trypan blue)
- Tap the microcentrifuge tube containing your cell suspension to re-suspend cells that have settled to the bottom of the tube. You can also gently pipette the solution up and down within a pipette tip to re-suspend cells.
- Immediately after tapping the cell suspension tube, transfer a 50 µl aliquot of cell suspension into the 0.2 ml tube labelled CS-T
- Transfer a 50 µl aliquot of 0.4% trypan blue into the CS-T tube. Gently invert the tube 2-3 times to mix.
Important: Complete steps 7 – 10 within 20 minutes, as trypan blue is toxic to cells and will eventually enter and kill the viable cells.
- Review figure 5. Tap the 0.2 ml tube (CS-T) to re-suspend the cells. Immediately after tapping, use the P20 pipette to take a 12 µl aliquot of the cell suspension/trypan blue solution from the CS-T tube and apply to the haemocytometer as demonstrated in the video and figure 5. Very gently fill ONE chamber underneath the coverslip, allowing the cell suspension to be drawn out by capillary action. Do not over-fill or under-fill the chamber.
- Repeat step 7 to fill the chamber on the other side of the haemocytometer.
- Place the haemocytometer on the microscope stage. Starting with the lowest power objective (4X), bring the haemocytometer slide into focus and then use the low power objective (10x) to bring the 3 x 3 grid into focus. Adjust the light intensity and condenser diaphragm until you can see this grid and cells contained within.
- Focus on one of the squares (i.e., focus on one of the red squares from figure 5c).
- For each of the five red squares, count the # of live cells (appear clear/translucent) and dead cells (stained blue) and record your data in table I. Use the cell counter to keep track of the counts. Note: the top boundary and left boundary of each square should be counted - the right and bottom boundaries should not be counted.
- To accurately count cells, there should not be too many cells that they overlap. A general rule is no more than 50 cells per red square.
- If there are too many cells, dilute the cell suspension with the culture media, and then repeat from steps 5 onward using the diluted cell suspension. Try a four-fold dilution (your initial 1:1 ratio of cells and trypan blue is a two-fold dilution)
- Each student should make their own cell counts and record the data in table I.
- When you are finished, clean the haemocytometer and coverslip with 70% EtOH, gently wipe with a KimWipe, and leave it on your bench to dry.
Lab Exit Checklist
Part 1
- Review the cell culturing protocol and follow along with the LIVE DEMO to prepare for the lab.
- Complete the cell passaging protocol using aseptic techniques.
- Ensure you labelled your tissue culture dishes well when you placed them back in the incubator!
Part 2
- Load the haemocytometer at your lab bench using your cell suspension of C2C12 cells.
- Observe the stained cells under the microscope, and count the viable and dead cells visible.
- Complete the template of table I by inputting your cell count values and the average numbers of viable and dead cells.
- Upload your raw data to the Crowdmark ELN. You will need this data in tutorial where you will complete cell concentration concentrations with your partner.
References
Cover Page:
C2C12 (ATCC CRL-1772) Cell Micrograph. (n.d.) ATCC. https://www.atcc.org/~/media/896CEBC8FA384823A8E89C2014CB8FA6.ashx
Kaur, G., & Dufour, J. M. (2012). Cell lines: Valuable tools or useless artifacts. Spermatogenesis, 2(1), 1–5. https://doi.org/10.4161/spmg.19885
Mitchell, T.R.H., Glenfield, K. Jeyanthan, K., and Zhu, X.-D. (2009). Arginine Methylation Regulates Telomere Length and Stability. Molecular and Cellular Biology. 29(18): 4918–4934. https://doi.org/10.1128/MCB.00009-09
Shay, J. W., & Wright, W. E. (2000). Hayflick, his limit, and cellular ageing. Nature reviews Molecular cell biology, 1(1), 72. https://doi-org.libaccess.lib.mcmaster.ca/10.1038/35036093
