Learning about Microsoft Word (MS Word)
Words in this lesson:
| Document | Font | Ribbon | Tab | Template | Tools | USB |
 Word is a program used to make documents. Documents are letters, resumés, and flyers.
(Word sections modified from: Essential Skills for Word Processing 2016, TR Leger School, STEP Program, UCDSB)
Click the Window icon in the bottom left corner. ![]()
- Find the MS Word icon and click on it.

Word will open on your computer:

What are tabs and tools?
Your Microsoft Word Tools are on the top of your page. This area is called the ribbon.
Tools on the ribbon help you in Word.
You click the tabs to get to your tools.
For tools to help you with the colour and size of your letters, click on the Home tab.

For putting pictures or links in your document, click on the Insert tab.

For checking your spelling or adding a comment, Review tab.

If you click on something you put into your document, like a picture or a table, you will see a new tab show up on the ribbon. It will go away once you have deselected (clicked off) the object.
How do I make a new document?
A new document is like writing on a paper.
Click on yo
ur File tab. ![]()
Click New.

Click blank document to open the page.

How do I close a document?
Click on File tab. ![]()
Click on Close. ![]()
You will see this: 
To save your document, click Yes. If you do not need to save your document, click No. To stop closing the document, click Cancel.
How do I save the document to my computer?
To save a document to the Documents folder on the computer, go to the File tab.

Click Save as.

Click on Browse.
Use scroll bar to find Documents.
Click on Documents from the side menu.

Click beside File name.

Type the name you would like to call your file.
Click Save.
Wait as the computer saves your file.
* You should save your work as you go, about every two minutes.
* Once you have saved your work with a name, click the Save icon by the File tab to save changes.
Activity #26 – Practice Saving
 |
1. Open a new Word document.
2. Type your name. 3. Click Save As. 4. Save to Documents. 5. Type My Name in the File name bar. 6. Click Save. |
How do I save a document to a USB memory stick?
 Put your memory stick into the USB port in your computer.
Click on the Save As icon beside the File tab. ![]()

Click on Removable Disk on the left-hand side.

Scroll down.
Double click on the USB drive.
Click in the File name box.
Delete everything in the File name box.
Type the name of your file.
Click ![]() .
.
How do I open a document from my computer?
Click on the little folder icon at the top of your screen by your File tab.

Select Documents from the side menu.

Click on the file you wish to use here.
Click Open.
How do I open a document from a USB memory stick?
Click on the File tab and click on Open.

Click on Browse.

Scroll down the menu on the left side.

You will see an icon like this: ![]()
Click on the USB drive.
Select the Word file you want to open (on the right).
Click Open ![]() .
.
Activity #27 – Save a Document to a USB
 |
1. Type the name of your country in a Word document.2. Save on a USB under “My country.”
3. Close Word. Click the X in the top right corner. 4. Open Word. 5. Open the My Country file. |
How do I change what the letters look like (the font)?
A font is the type of the text that you use.
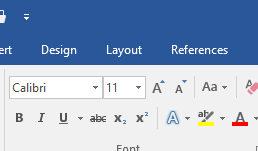
Choosing a font will change the way letters (the type) will look on your screen.

When you want to change your font, go to the Home tab. 

Select the words you want to change by highlighting them.
Click the downward arrow ![]() beside the font name.
beside the font name.
Use up and down arrows to look through the fonts.
As you move your pointer over the font names, your word will change to show you what that font will look like. Click on the font that you want.
How do I make the font bold or italic?

This is where your font styles are located.
This is bold.
This is Italic.
This is underlined.
Select the words you want to change by highlighting them.
Click on the letter of what you want to do.
To make a word bold, click the B.
To change the word to italics, click I.
To underline, click U.
To undo, just click the B, U, or I again and it will change back.
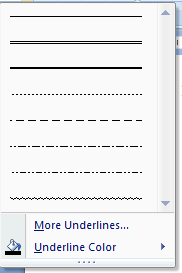 To change the style of underline you want to use, click the down arrow beside the U.
Click on the type of underline that you want.
How do I change the size of my letters?
 You can change the font size by the number beside the font name.
The standard size is 12 but you can make it bigger or smaller.
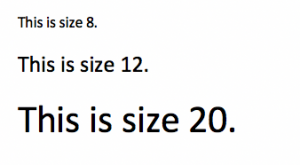
 To change font size, select the words you want to change by highlighting them.
Click on the down arrow beside the font size. ![]()
Click on the font size you want.
How do I change the colour of my letters?
You can change the colour of the font. ![]()
Select the words you want to change by highlighting them.
Click on the down arrow beside the A with the underline.

You will see the font colours.
Click on the box of the colour you want. If you do not like that colour, you can choose a new one.
Activity #28 – Change the Colour of the Words
 |
1. Write a note to a friend or family member thanking them for something that he or she did that you liked.
2. Select their name by highlighting it. 3. Change the font colour to blue. 4. Change font size to 24. 5. Change the font of the note to Lucida Handwriting. 6. Save as “Letter” to Documents on the computer. |
How do I undo changes and go back to how things were?
![]()
If you make a mistake you can change it back by clicking Undo.
Undo will change the last thing you did.
You can click Redo if you click undo and did not want to.
Undo and Redo are at the top left-hand of the screen.

To undo, click ![]()
To redo, click ![]()
Activity #29 – Practice Undoing and Redoing
 |
Type the word:
Change the font: Undo Redo |
document
document document document |
How do I print my document?
![]()
You can print your documents from your screen to paper in Word.
Click on the File Tab. ![]()
Click on Print from the drop-down menu.


Use the drop-down menu to pick how you want the document to print.
Select number of copies.
Select printer.
Select what pages to print.
Select printing on one or two sides of the page.
Click Print. 
How do I check the spelling of my document?
If a word is misspelled, you will see a red squiggly line under it.

To check the spelling of the document, click the Review tab.
Click Spelling & Grammar. 
You will see a screen like this one at the right side of the screen: 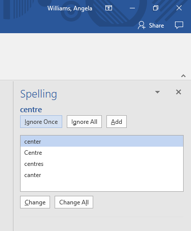
Choose the word that you want from the list of suggestions.
Click ![]() .
.
When you are done, click OK.

Activity #30 – Using Spell Check
 |
Type this into a Word document:
I am lerning abut computurs and I lorve it. This is so much fun to lern.Check the spelling of this sentence. |
How do I check the spelling of one word?
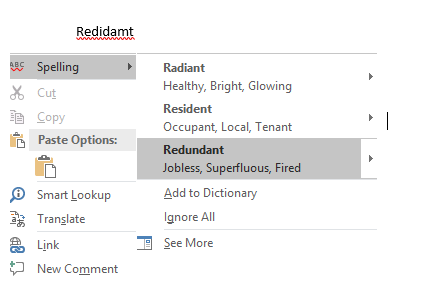
 You can right click with the mouse on a word to get suggested spellings.
You can do this with grammar mistakes too. You will be given ideas of what the right spelling or grammar should be.
Right click to see spelling and grammar help.
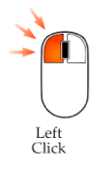
Left click to choose the new word.
This suggestion also shows you what the word means. This will help you pick the right word.
How do I move words around, copy, paste or cut them?
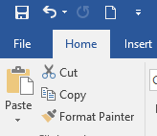
Copying words
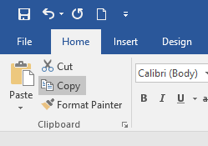
Pick the words you want to copy by highlighting them.
Click on the Home tab.
Click on Copy.
Moving Words from One Place to Another
Pick the words you want to cut by highlighting them.
Click on Cut. ![]()
The words will go away.
Click to the place in the page where you would like to put them.
Click Paste. 
Activity #31 – Deleting Words in a Document
 |
1. Type your name in a Word document.2. Make it bold and underlined.
3. Select the words by highlighting them. 4. Click on Cut. 5. Click on Paste. |
How do I make a thank you card?
Word has already started some documents that people might use a lot.
MS Word calls these templates.
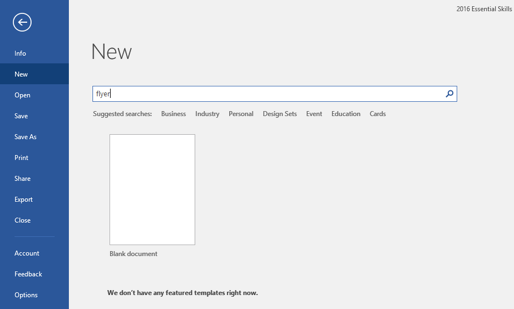
You can search for any template and use it to make what you need.
Click File. Click New. Type thank you card in the search box.

Click on the one that you wish to use, then click Create. 
You can click on the text in the template and type your own words, if you want.
Print and save your thank you card.
Activity #32 –Looking at a different template
 |
1. Go to File.
2. Go to New. 3. Search for an online template in the search box.
4. Type basic resumé in the search box. 5. Click on a resumé. You can pick the one you think looks good.
6. Click Create. *You do not have to work on this resume now, just know that these types of documents can be searched in templates. 7. When using any template, delete any parts you do not want by highlighting them and pressing the Backspace key. Have fun with it.
8. Use Undo if you make any mistakes. |
Now click on the next chapter.


