Learning about Email
Words in this lesson:
| Account | Address | Compose | Contact | Create | Folder | |
| Forward | Gmail | Reply | Send | Theme | Video | Chat |
Google has a free email service called Gmail.
If you do not have an email address now, you can get one on Google.
You need to sign up for it.
 |
Please finish Choosing an Email Address and Picking a Password on page 12 and 13 of your workbook. |
How do I get a Gmail account?
Pick an email name and a password you will remember.

Go to the address bar and type gmail.com.

Click on Create account. → → → → → → →

Click in each box.
Type in your first name and last name.
Pick a username. There are many used ones. It will take 2 or 3 tries to get one.
Pick a password with letters and numbers. You will type it twice.
Click on Next.

Type your phone number.
Click the drop-down boxes to give your birthdate and gender.
Click Next.
Click Not Now when asked to have a number sent to your phone.

Scroll down and click I agree. → → → →
(Read the agreement first. Ask for help if you need it.)
Google has pages of information about Gmail.

Click Next to look at the next page. → → → →
Click Go to Gmail.

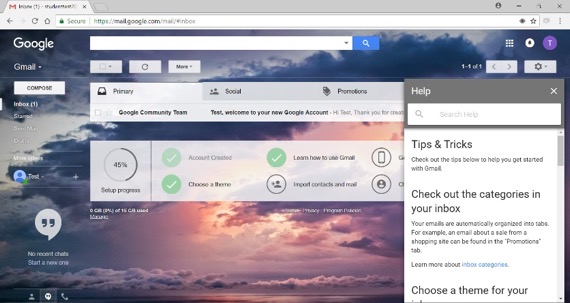
You will see this screen.
This is your email.
You can use this to send emails and video chat (to see someone on the screen while you are talking to them).
You can check your email on computers, iPads, iPhones, and Android phones.
Google helps you set up your email.
Activity #12 – Set Up Your Gmail Account
 |
After you have signed up for a Gmail account: Set up your email.
1. Click on Choose a Theme to set up your theme.
2. Scroll down to see all themes. 3. Click the one you like. 4. Click on the X on the right to close.
5. Click on Learn How to Use Gmail.
6. Scroll down to look at the tips.
7. Then click the X to close. 8. Click on the X to exit. You have done everything you need to do for now.
|
How do I write and send an email?
All email addresses have an “at” sign @. You are writing to someone at his or her email site.
Writing an email is called composing it. After you have written the email, you send it to the other person.
This is what the screen might look like when you are writing an email to someone.
|
To: |
JuniperBurnaby@mail.ca |
|
Subject |
Interview on August 12th |
|
Greeting |
Dear Mr. Burnaby, |
| (space) | |
|
Message (State who you are. Write what you want the person to know.) |
This is Hannah Myers. Your office assistant called me and asked me to email you about our interview on August 12th. I can come to the interview at 2pm on 22 Main Street East. Thank you for your time. |
| (space) | |
|
Closing |
Sincerely, |
|
Your Name |
Hannah Myers |
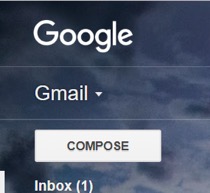
To starting writing an email, click Compose.

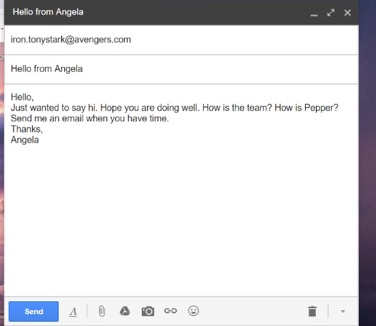
You will see this: 
Click on To: and type in the email address of the person you are emailing.

Click on Subject and say what your email is about (for example, “Hello from Angela”).


Click in the big, white box to write your email.
Read it over to make sure it is ok.
Write message here. →
Click Send. →
Your Sent Mail folder keeps all the emails you have written.

Click Sent Mail to see if your email is there. →
Click Inbox to go back to your list of emails.
Activity #13 – Sending Email
 |
1. Ask someone for her or his email address (friend, classmate, or teacher).
2. Write that person an email (compose). 3. Click Send. 4. Check your Sent Mail folder to see that your email sent. |
How do I reply to an email?
Click on the sender’s name in your inbox.
It will open your email.

 Read your email.
Look at the bottom of the message for Reply.
Click Reply. → → → → →
Write your reply in the box that shows up.
Read it over.
Click Send.

Gmail will keep all emails in one place so you can see what you have said.
You can forward an email. Forward means you send an email that you have received to someone who did not send it to you.
Click Forward. It is under the email beside reply.

Type in the email address and click Send.

*Note: You can type a message in the box before you forward if you want.
Activity #14 – Reply to Email
 |
1. Give someone your email address.
2. Ask them to send you an email. 3. Reply to that email. |
How do I add someone to my list?
Have someone’s email address ready.

On the top right of your screen when you have Gmail open, go to the round circle that has nine little squares in it. This is called the waffle icon.

Click on it. It will open up and show lots of icons.
Click Contacts.
 Click on Add a Contact or click the red circle with the plus sign.

 Be sure to fill out the first name, last name, and email. You can add other details if you want.
Look it over to make sure it is right.
Save.
Click on Add new contact again to add more contacts if you want.
Click on the waffle (Google app) icon to open it up, then click on the Gmail icon to go back to Gmail.
Click on Compose to write an email.
 Click on To in the compose screen.

Click the checkbox beside the person you want to mail.
Click Select. → → → → →
Your contact is now in the email.
If you want to send the email to more than one contact, click more than one checkbox.
Then click Select.
Write the email to your contact.
Add a subject.
Send your email.
Want to learn more about email?
Type these websites into your address bar:
https://youtu.be/AGiFkJDwG-khttps://edu.gcfglobal.org/en/gmail/
Learn when to use reply all, visit: https://www.lifewire.com/do-not-default-reply-all-1173272

 |
Please finish Sending an Email and Writing an Email on page 14 of your workbook. |
How do I send a picture in an email?
You can attach a picture or document to your email and send it to someone else. These are called attachments.
 You send an attachment by clicking on the paperclip icon beside the Send button at the bottom of your email.
Activity #15 – Send an Email with a Photo to Yourself
 |
1. Sign into your email and click on Compose.
2. Type your email address beside To: (Yes! You are sending this email to yourself). 3. Your subject will be: Test.
4. Write a message to yourself. 5. Click on the paperclip beside Send. 6. Click on Desktop, and click on your New Pictures folder.
7. Click on one of your pictures and then click Open. 8. Send your email. 9. Go to your Sent folder and open the email you just sent to see your attachment.
*Try this again with a Word or Notepad document that you have saved to your USB. |
Now click on the next chapter.


