1.4 Printing
Learning Objectives
- Use the Page Layout tab to prepare a worksheet for printing.
- Add headers and footers to a printed worksheet.
- Examine how to print worksheets and workbooks.
Once you have completed a workbook, it is good practice to select the appropriate settings for printing. These settings are in the Page Layout tab of the Ribbon and discussed in this section of the chapter.
Page Setup
Before you can properly print the worksheets in a workbook, you must establish appropriate settings. The following steps explain several of the commands in the Page Layout tab of the Ribbon used to prepare a worksheet for printing:
- Open the CH1 GMW Sales workbook, if it is not already open.
- Click the Page Layout tab of the Ribbon.
- Click the Margins button in the Page Setup group of commands. This will open a drop-down list of options for setting the margins of your printed document.
- Click the Wide option from the Margins drop-down list. (see Figure 1.47)
- Click the Orientation button in the Page Setup and select Landscape.
- Click on the arrow to the bottom right of the Page Setup category to launch the Page Setup options dialog box.
- Click the Margins tab and locate “Center on Page”. Click the boxes to Horizontally and Vertically center the data on the worksheet. Click OK.
Why?
Use Print Settings
Because professionals often share Excel workbooks, it is a good practice to select the appropriate print settings in the Page Layout tab even if you do not intend to print the worksheets in a workbook. It can be extremely frustrating for recipients of a workbook who wish to print your worksheets to find that the necessary print settings have not been selected. This may reflect poorly on your attention to detail, especially if the recipient of the workbook is your boss.

Table 1.2 Printing Resources: Purpose and Use for Page Setup Commands
| Command | Purpose | Use |
| Margins | Sets the top, bottom, right, and left margin space for the printed document | 1. Click the Page Layout tab of the Ribbon. |
| 2. Click the Margin button. | ||
| 3. Click one of the preset margin options or click Custom Margins. | ||
| Orientation | Sets the orientation of the printed document to either portrait or landscape | 1. Click the Page Layout tab of the Ribbon. |
| 2. Click the Orientation button. | ||
| 3. Click one of the preset orientation options. | ||
| Size | Sets the paper size for the printed document | 1. Click the Page Layout tab of the Ribbon. |
| 2. Click the Size button. | ||
| 3. Click one of the preset paper size options or click More Paper Sizes. | ||
| Print Area | Used for printing only a specific area or range of cells on a worksheet | 1. Highlight the range of cells on a worksheet that you wish to print. |
| 2. Click the Page Layout tab of the Ribbon. | ||
| 3. Click the Print Area button. | ||
| 4. Click the Set Print Area option from the drop-down list. | ||
| Breaks | Allows you to manually set the page breaks on a worksheet | 1. Activate a cell on the worksheet where the page break should be placed. Breaks are created above and to the left of the activated cell. |
| 2. Click the Page Layout tab of the Ribbon. | ||
| 3. Click the Breaks button. | ||
| 4. Click the Insert Page Break option from the drop-down list. | ||
| Background | Adds a picture behind the cell locations in a worksheet | 1. Click the Page Layout tab of the Ribbon. |
| 2. Click the Background button. | ||
| 3. Select a picture stored on your computer or network. | ||
| Print Titles | Used when printing large data sets that are several pages long. This command will repeat the column headings at the top of each printed page. | 1. Click the Page Layout tab of the Ribbon. |
| 2. Click the Print Titles button. | ||
| 3. Click in the Rows to Repeat at Top input box in the Page Setup dialog box. | ||
| 4. Click any cell in the row that contains the column headings for your worksheet. | ||
| 5. Click the OK button at the bottom of the Page Setup dialog box. | ||
Headers and Footers
When printing worksheets from Excel, it is common to add headers and footers to the printed document. Information in the header or footer could include the date, page number, file name, company name, and so on. The following steps explain how to add headers and footers to the GMW Sales Data workbook:
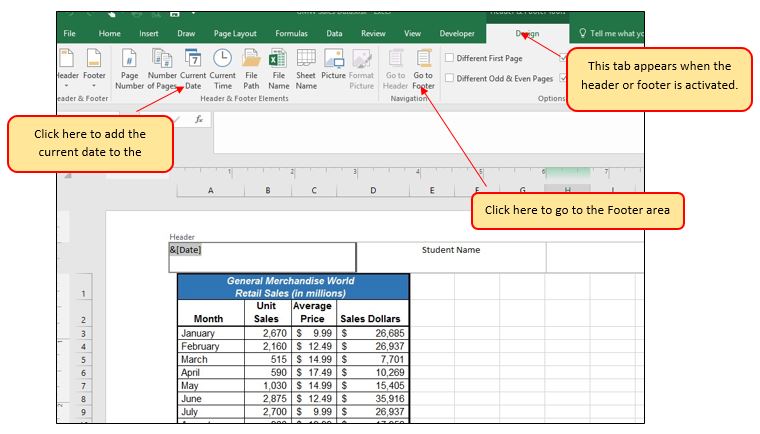
- Click the Insert Ribbon and click on Header & Footer at the right end of the ribbon (located in the Text group). You will see the Design tab added to the Ribbon; this is used for creating the headers and footers for the printed worksheet. Also, this will convert the view of the worksheet from Normal to Page Layout (see Figure 1.48). This Page Layout view makes adding Headers & Footers easy and provides key features to incorporate.

Figure 1.48 Design Tab for Creating Headers and Footers - Type your name in the center section of the Header.
- Place the mouse pointer over the left section of the Header and left click (see Figure 1.48).
- Click the Current Date button in the Header & Footer Elements group of commands in the Design tab of the Ribbon. This view will display as &[Date] until printed or until you return to normal view.
- Click the Go to Footer button in the Navigation group of commands in the Design tab of the Ribbon.
- Place the mouse pointer over the far right section of the footer and left click.
- Click the Page Number button (you may need to click on the Design tab again) in the Header & Footer Elements group of commands in the Design tab of the Ribbon. This view will display as &[Page] until printed or until you return to normal view.
- Click any cell location outside the header or footer area. The Design tab for creating headers and footers will disappear.
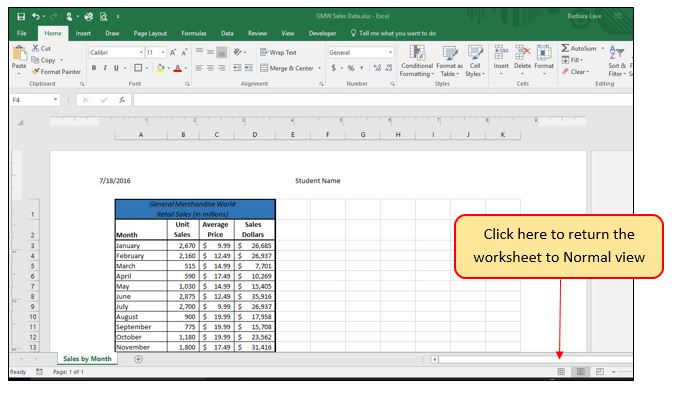
- Click the Normal view button in the lower right side of the Status Bar (see Figure 1.49).

Printing Worksheets and Workbooks
Once you have established the print settings for the worksheets in a workbook and have added headers and footers, you are ready to print your worksheets. The following steps explain how to print the worksheets in the GMW Sales workbook:
- Click the File tab on the Ribbon.
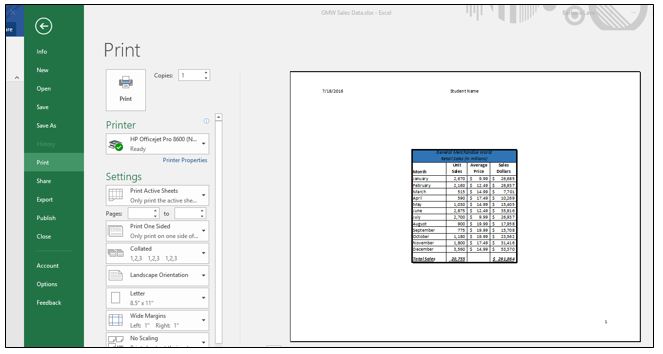
- Click the Print option on the left side of the Backstage view (see Figure 1.50). On the right side of the Backstage view, you will be able to see a preview of your printed worksheet.

Figure 1.50 Backstage View Print option - Click the Print Active Sheets button in the Print section of the Backstage view (see Figure 1.50).
- If your instructor has asked you to print your work, click the Print button.
- Click the Home tab of the Ribbon.
- Save and close the CH1 GMW Sales workbook.
- Compare your work with the self-check answer key (found in the Course Files link) and then submit the CH1 GMW Sales workbook as directed by your instructor.
Key Takeaways
- The commands in the Page Layout tab of the Ribbon are used to prepare a worksheet for printing.
- You can add headers and footers to a worksheet to show key information such as page numbers, the date, the file name, your name, and so on.
- The Print commands are in the File tab of the Ribbon.
Attribution
Adapted by Barbara Lave from How to Use Microsoft Excel: The Careers in Practice Series, adapted by The Saylor Foundation without attribution as requested by the work’s original creator or licensee, and licensed under CC BY-NC-SA 3.0.

