16 Creating Online Learning Modules
Rob Power
Introduction
When asked to write this chapter on creating learning modules, I admit that the idea seemed a bit overwhelming. After all, I teach graduate-level courses where we spend an entire term exploring the principles of the instructional design process, design, build, and test prototype online modules. We spend a great deal of time not just on the theoretical aspects of good instructional design but also on helping each other select appropriate learning activities and digital tools and mastering how to use those tools to construct a solid product. How do I encapsulate those elements into a concise chapter with practical tips for busy teachers? With the great variety of learning management systems such as Blackboard, Brightspace (D2L), Canvas (Instructure), Moodle, or Google Classroom: How do I keep things relevant when many of you use a range of different platforms to create and host your modules?
Then I realized many of the theoretical and technical issues we explore in my instructional design courses are already covered elsewhere in this eBook. There are chapters on everything from designing learning activities and assessments to using technology to provide meaningful feedback and selecting useful digital tools to meet all of your teaching and learning needs throughout an online module. So, I will focus this chapter on the process of designing, creating, and launching your learning module.
The Module Development Process
The processes that I follow with my instructional design students are those that I use when developing learning modules for clients or my courses. Creating modules is independent of the platform used. It does not matter if you build a module inside a learning management system, create a module for your Google Classroom, or use an advanced eLearning content authoring system like Adobe Captivate or Articulate Storyline. There are two sets of guidelines to follow. The first will guide the module development “project” itself. The second will show what your learning module looks like and how your students interact with it.
Guidelines for the Module Development Project
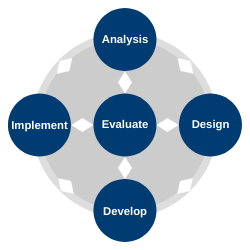
Most instructional designers follow a standardized sequence to design, develop, and launch a learning module. I like to follow the ADDIE model (Branson, 1978; Culatta, 2022; Kurt, 2018). ADDIE stands for:
- Analyze (determining what you need in your module),
- Design (creating a map of what the module will look like),
- Develop (building the module in whatever platform you choose),
- Implement (launching your module for your students), and
- Evaluate (looking at what works, what does not work, and how to make things better).
The traditional descriptions of the ADDIE model depict it as a linear or waterfall process, yet dynamic interplay between each aspect can be very effective and potentially more timely (Tripp & Bichelmeyer, 1990). Figure 1 outlines a modified interrelated interpretation of the linear model.
Figure 1. ADDIE as a Cyclical Process
The guidelines below outline some practical ways to use the ADDIE model to guide you towards creating your learning module.
- Analyze your needs. Determine what you need from your learning module before deciding what activities to include and what resources and tools to create it. You want to make sure that you cover the desired learning outcomes and target the right student audience. Create a list of these things to make sure you meet all your needs and do not try to do too much in one learning module. Think of this as doing a bit of pre-planning before starting a home repair or home renovation project. If you do not know what you need to tackle, you cannot determine what supplies you will need and what steps to follow.
- Design your module before you start building it. Plan your module in detail before you start building it. I cannot emphasize this step enough! Instructional designers create a blueprint, map, or storyboard before developing anything (Aura Interactive, 2022). This plan can be as simple as pen-and-paper sketches of what should be on each page or slide. Some designers use PowerPoint slides to create a non-functioning mock-up of what things will look like in the learning management system or on a web page. I prefer to use a table in a Word document or a spreadsheet, where each row represents one page of content and activities. Similarly, Google Docs and Sheets afford increased collaborative opportunities with active linking, which can save time as well. I also strongly recommend including as much detail as possible at this stage, including scripts of the text you will put on each page, the media you will embed, and links to any digital resources you will need. If you do not have these links or need a new media resource, list it here to keep track of these requirements. As you list your media and resource requirements, it is good to keep track of any copyright issues, subscriptions or accounts needed, and any potential student privacy considerations. This stage is often the most time-consuming part of the process, but it is worth it. Mapping everything out before you start building will accomplish three things:
- It will make sure that you cover all your learning objectives and needs.
- It will prevent you from suffering from “scope creep,” a phenomenon of constant growth occurring as you find new things you think would be nice to include (Adeboye, 2014). Often, it gets to the point where it becomes difficult for you to finish the project, and the module will likely have too much for your students to handle.
- It will make it much easier for you to build the learning module in whatever platform you choose because you can focus on how to build it in that platform rather than on what to include.
- Develop your learning module. With a plan in place, you can focus on the process of building your learning module in whatever platform you choose. At this stage, do not build anything that you have not included in your plan. Focus on putting everything together and on learning how to use the specific digital tools you have chosen (if needed). I find it helpful to do this methodically, focusing on one technical aspect at a time.
- Create your skeleton structure, adding blank pages as placeholders for everything in your storyboard or blueprint.
- Add the text to each page, focusing on getting the text on the page and formatting it consistently throughout the module.
- Insert any images needed on the content pages or slides, focusing on adequately embedding, sizing, and adding ALT-text to each image. This is also a good stage to model curriculum standards and standardized referencing processes (e.g., APA citation, hyperlinking).
- Insert any embedded media such as audio or video links to external resources.
- Check each content page or slide for Digital Accessibility compliance and potential barriers for your students (refer to the chapter Accessibility in Online Learning in this eBook).
I also find it helpful to stop after I have built a small chunk of my learning module to evaluate what works, what does not work, and what needs to be redesigned or improved by rapid self-testing the content. Suppose you create a short learning module (something that students could complete in a few minutes or even an hour or so). In that case, it is okay to build everything before moving on to the Implementation and Evaluation stages. But, if you are working on something larger (like an entire unit or even a whole course), it is far better to stop and evaluate what needs tweaking before going too far. There will be far less for you to fix if you make changes to your general design now, rather than waiting until you build everything.
If you are developing your learning module before teaching a course, you may have the luxury of pre-testing the module before your actual students interact with it. If not, that is okay. You can always view your first run with a learning module as a pilot test for future terms. If you can, ask a colleague or a group of “pilot” students to try out the module to give you some feedback.
- The implementation phase is the action phase of the learning process, where we share the content with the students. For our situation, this phase includes:
- Preparing the learning environment ensures that what we have planned works as anticipated and changes as required. Examples include reflecting on content adaptiveness (e.g., does screen size impact the content), potential privacy issues (e.g., will students be required to set up an account), and low-fi backups if there are connectivity issues (e.g., having a PDF of your video lectures).
- Preparing the student includes providing insights into what is anticipated and required. During this time, you will want to ensure that you have provided time to know how to use the tools, understand processes or workflows, or acquire other assets (such as headphones) that lead to their success.
- Evaluate how things went. Use your observations of how your students (or colleagues) interacted with your learning module. This evaluation can be done informally (chatting with users) or through a short feedback survey. I find it helpful to revisit my storyboard or blueprint and add these notes to have an updated map of the changes I need to make before using the learning module. I also find it helpful to categorize my potential changes as either “must do now,” “nice to do now,” “nice to do for next time,” and “not possible to do.” You can use a separate column for each category at the end of each row (content page) in your blueprint, or you can colour-code the notes for quick reference. Whatever your process is, make sure that you budget time for this stage as it is essential for future success.
Guidelines for the Structure of Your Learning Module
The previous guidelines help manage the learning module design and building phase. But, how should the module look? Regardless of the learning content, I find it helpful to follow some guidelines for the general structure of my learning modules, similar to the general design of a good lesson plan. I like to follow the BOPPPS model developed by the Instructional Skills Workshop program (Pattison & Day, 2006).
General Guidelines
- Bridge into the learning. Before you ask your students to engage with any learning resources or activities, you must capture their attention. Your learning module should begin with introducing the topic and piquing their interest. This introduction can be as simple as a brief overview, focusing on why the topic is relevant to them. Or it could be a video overview that you find online or record yourself. Potentially, you can engage students with provocative questions as well.
- State the outcomes clearly. Once you have your students’ attention, you should list the outcomes for the module. What will students learn? What should they be able to do by the end of the learning module? Or, if you follow a constructivist approach, you can recruit student insights to support self-concepts and motivation to learn.
- Pre-test your students’ knowledge. What do your students already know about the topic? What misconceptions do they have? By integrating an activity that checks students’ knowledge, you can better determine if you need to provide additional resources or spend more time with them (perhaps in a live instructional session). In some cases, you may find that your students can already demonstrate mastery of the learning outcomes. When creating an online learning module, you can use this feedback to allow some students to skip ahead to another topic or provide them with advanced activities and resources to keep them engaged while other students focus on the primary activities. It is up to you to determine the best way to integrate a knowledge pre-test. I frequently use discussion forum postings to self-scoring and self-paced quizzes.
- Participatory learning activities are the primary learning resources and activities your students will engage with throughout the module. These activities can include background readings, multimedia resources, and individual or group tasks (e.g., discussions, peer-assessment, or group projects).
- Post-test students’ knowledge. It is essential to determine if students have achieved the learning outcomes before moving on to another topic (or completing a course). You can draw upon many technology-mediated assessment activities, including some explored elsewhere in this eBook.
- Summarize the learning. Don’t just leave things hanging. It is essential to provide students with a summary of what they have ideally learned at the end of your module. It is also helpful to provide your students with a quick overview of what is coming next with a simple email overview or a multimedia presentation such as a video.
Activities
This book has many resources to help you choose digital tools for your module to share content, facilitate learning activities or learner interaction, or assess student learning. The emphasis of this chapter is on the planning or designing aspects of creating your learning module, as there are many tools available to help you translate your plans into a live module. The planning stage takes the most time, which is crucial in creating a meaningful and effective learning experience. Similarly, the evaluation stage is often overlooked when creating learning modules. But we should avoid skipping this stage as it provides valuable insight into whether the module we have designed is accomplishing what we had intended. The following activities focus on the Design and Evaluate stages in the ADDIE cycle.
Activity 1: Planning Your Learning Module
Overview
So, you are going to build an online learning module. Like an architect or a construction contractor, you will need a plan. Without a good plan, you will likely miss something important or exhaust your time building far more than you need to. Let’s create a storyboard for your learning module.
Description
For this activity, choose a lesson or a unit for which you would like to create an online learning module for your students. The following steps will help you create a storyboard that can detail the page (or slide) details and resources required to bring it to life.
- Choose a template. Storyboarding or blueprinting can seem overwhelming, especially if you have not done it before. How do you decide what goes on each page or slide when you don’t even know what pages or slides you need yet? It is helpful to use a ready-made template that will help you keep track of these things, make sure that you don’t miss anything, and help you to avoid scope creep. I have provided links to a couple of templates below that I have created for designing modules (or even whole courses) using the Canvas and Moodle learning management systems.
- Modify the template as needed. The templates that I am providing here are optimized for Canvas and Moodle. But they follow the same general structure and can be quickly modified to meet the specific requirements of whatever platform you will be using. It is good to make a few customizations to the template before populating it. For instance, you may want to do something as simple as adding a “notes” column on each page, or you may need to add a column to list settings requirements for each page in your chosen platform.
- Populate the template in stages. I find it helpful to start with the basics, such as listing the module (or chapter) titles, the page titles, and the types of content pages that I need to add to my learning module. Then, I go back and add the text script for each of these pages, including placeholders in the script where I think that I will need to embed links or media. Then, go back and list all the resources and media you will need for each page.
- Align your template to your outcomes. Review your completed storyboard. Ensure that every content page, learning activity, and assessment is connected to at least one of your learning outcomes. If it is not, reconsider whether you need content or activity. Ensure that all your required outcomes are covered at least once somewhere in your storyboard. If outcomes are not covered, you may need to add some content or activity before building your design. The process of creating a Table of Specifications [PDF] may also be beneficial, which helps us reflect on the validity of our efforts (Fives & DiDonato-Barnes, 2013).
- Keep track of student time requirements. You may have covered all of your learning outcomes and created a plan to keep you on track when the time comes to build your module. But have you designed too little or too much for your students to handle? Review your storyboard to estimate how much time it might take the average student to engage with the planned content and activities. I find it helpful to add at least 10 to 20 percent extra time to my estimate and use that to help me determine if I need to add more to my module or start paring things down.
- Keep track of resource requirements. The templates I have provided include a column listing your resource needs throughout your module. But listing these resources is not enough. Using these resources may present challenges, which you should keep track of to avoid running into problems when it comes time to build what you have planned. I find it helpful to keep a master list of all of my resource requirements, including the (I have included a link below to a template that I developed to help keep track of these requirements):
- costs;
- copyright requirements;
- permissions that I may need from either my IT team or the school district; and
- potential privacy issues that might impact my students.
Possible Challenges
One challenge you may face is that your chosen storyboard or blueprint template may not reflect all the requirements to consider for the platform in which you will end up creating your learning module. It can be difficult to determine such shortcomings at the planning stage, especially if you do not have extensive experience using your authoring platform. you should understand that weaknesses are perfectly okay. Complete all of the sections of your storyboarding template. You can always revisit the template to add a new column as you discover platform-specific considerations. The benefit is that you will not be overwhelmed with figuring out what your module should look like and what it should include as you are learning the technical nuances of the platform that will host your module.
Resources
- Education – Microsoft Templates
- Google Slides: Online Slideshow Maker
- Storyboarding Template for Canvas [Spreadsheet]
- Storyboarding Template for Moodle [Spreadsheet]
- ETICPC – The Educational Technology Integration Copyright and Privacy Considerations Template (MS Word) (MS Word) (PDF)
Activity 2: Evaluating Your Learning Module
Overview
Depending on your context, you may or may not have the luxury of being able to pilot test your learning module before using it in one of your courses. Students and colleagues can provide insights that can be critical assets in the development process. Colleagues can provide insight into how well your module meets course requirements. Those with instructional design or technology experience can also provide insight into the technical aspects of implementing your module design. Your students can give critical insights into what works for them and what you can add, modify, or remove to make your learning module as effective as possible.
Description
We will assume that you have created an online learning module based on a storyboard that you have already developed for this activity. Once you have built at least part of your module, we will get some “expert” feedback before using the module with your students. By “expert,” we mean input from the perspective of a colleague who is either a fellow subject-matter expert or one who has experience designing and building learning modules. You can use this feedback to help tweak your module before launching it. Once you have a polished version of your module ready for your students, we will ask them for feedback. You can use this feedback to help tweak things before using the module with different students.
- Get some expert feedback. Ask one or more colleagues to review your learning module. Ask them to provide feedback on the content, the learning activities, and the overall functionality of the module. It is helpful to use a targeted feedback form or rubric. Suppose your school or organization is a member of the Quality Matters (2021a) consortium. In that case, you may be able to avail of the QM Rubric (Quality Matters, 2021b) or submit your learning module for review by a QM-trained peer review expert. For our purposes, I have included a link below to a targeted feedback form based on Northcote and Seddon’s (2011) MOOBRIC self-evaluation tool. I frequently use this form with participants in my instructional design courses to provide peer feedback to develop their own prototype modules.
- Provide your colleague with access to your learning module.
- Provide them with a copy of a rubric or feedback form to record their observations.
- Add notes from the feedback you receive to your storyboard or blueprint document. These notes will make finding where you need to make the necessary changes easier.
- Implement any of the changes that may be needed.
- Get student feedback. If your context permits, ask some students to pilot test your learning module before using it in your actual course. Consider your first run with your learning module like a pilot test for future terms or school years if this is not possible. Once your students have completed the module, get their feedback. You can do this through informal observations. However, it is valuable to collect formal feedback at this stage using a targeted student feedback form. I have provided a link below to a student feedback form based on Northcote and Seddon’s (2011) MOOBRIC self-evaluation tool and a standardized student feedback form based on the Community of Inquiry framework (Athabasca University, 2014). I frequently use this form with participants in my instructional design courses to facilitate structured feedback for prototype modules.
- Provide your students with access to your learning module.
- Provide them with a copy of a rubric or feedback form to record their observations.
- Add notes from the feedback you receive to your storyboard or blueprint document. These notes will make finding where you need to make changes easier.
- Implement any of the changes that may be needed.
Possible Challenges
The biggest challenge that you are likely to encounter is the time to conduct evaluations of your learning module. You may be pressed for time to complete your module and implement it in your course. Your colleagues and students may not have adequate time to provide structured feedback. However, the return on time investment on your part to collect this feedback is worth it. This feedback is critical to knowing whether your module has succeeded in meeting your needs and determining what, if any, improvements may be needed.
Resources
- Online Teaching Course Setup Peer Review Form (MS Word)
- Online Teaching Course Setup Peer Review Form (PDF Version)
- Online Teaching Module Delivery Peer Review Form (MS Word)
- Online Teaching Module Delivery Peer Review Form (PDF Version)
Additional Resources
- Are you looking to build your online learning modules of courses using either your organization’s Canvas learning management system or the Canvas Free for Teachers [Login page] (Instructure, n.d.) platform? Creating Your Courses in Canvas includes insights such as:
- basic Canvas configuration settings to manage users creating content pages;
- organizing your activities;
- embedding interactive content; and
- creating branching or differentiated learning pathways.
- Do you want to use Google Classroom to turn your storyboard into an interactive learning module? This Google Classroom User Guide [PDF] contains everything you need to learn how to set up your own Google Classroom space (if your organization does not provide one) and create your content and learning activities.
- Do you want to learn more about organizing your digital learning resources in your modules, including tracking potential copyright and privacy issues? Check out The free ETICPC template from Power Learning Solutions to learn more about the open-access Educational Technology Integration Copyright and Privacy Considerations Template (ETICPC) template.
- The Power Learning Solutions ID Resources site is a curated collection of instructional design templates I have used when developing online learning modules and as resources for my instructional design students.
- eLearning course developers need to plan in detail before creating any media or building a course inside an LMS. In the Using Storyboards to Develop eLearning Courses [10:30] video, I demonstrate a storyboarding process to:
- Create a blueprint
- Complete with a page-level script (before even logging into the LMS to build a course)
- How the map translates into reality
- In A Simple Guide to Creating an eLearning Storyboard, Aura Interactive (2021) summarizes a storyboard and how to get started creating one for your learning module or course.
- Learn more about the Quality Matters (2021a) consortium, including how you or your organization can become a member. This organization has provided training and resources related to quality assurance in instructional design for online learning modules since 2002.
References
Adeboye, D. (2014, October 21). Principles of Storyboarding for e-Learning design. [Video]. YouTube. https://www.youtube.com/watch?v=l9PZ2bEuKFA
Athabasca University. (2014). COI survey. https://coi.athabascau.ca/coi-model/coi-survey/
Aura Interactive. (2021). A simple guide to creating your first elearning storyboard. Shift. https://www.shiftelearning.com/blog/a-simple-guide-to-creating-your-first-elearning-storyboard
Blackboard Inc. (2022). Blackboard: Now part of anthology. https://www.blackboard.com/teaching-learning/learning-management/blackboard-learn
Branson, R. K. (1978). The interservice procedures for instructional systems development. Educational Technology, 18(3), 11-14. https://www.jstor.org/stable/44418942
Culatta, R. (2022). ADDIE model. InstructionalDesign. https://www.instructionaldesign.org/models/addie/
D2L. (2022). Brightspace: Move beyond a learning management system. https://www.d2l.com/brightspace/
Fives, H., & DiDonato-Barnes, N. (2013). Classroom test construction: The power of a table of specifications. Practical Assessment, Research, and Evaluation, 18(1), Article 3. https://doi.org/10.7275/cztt-7109
Google. (n.d.). To help expand learning for everyone. Google for Education. https://edu.google.com/
Google for Education. (2021). Google Classroom user guide. https://services.google.com/fh/files/misc/google_classroom_user_guide.pdf
Instructure. (n.d.). Canvas: Free for teachers. https://canvas.instructure.com/login/canvas
Instructure. (2022). You. The Power of Canvas by Instructure. https://www.instructure.com/canvas
Kurt, S. (2018, December 16). ADDIE model: Instructional design. Educational Technology. https://educationaltechnology.net/the-addie-model-instructional-design/
Moodle Docs. (2020, August 31). About Moodle. https://docs.moodle.org/311/en/About_Moodle
Northcote, M., & Seddon, J. (2011). MOOBRIC: A self-reflection rubric of Moodle skills and knowledge (online teaching, course design). MOODLE. http://moodle.amberwell.net/moobric/full_moobric_latest.pdf
Pattison, P., & Day, R. (Eds.). (2006). Instructional skills workshop handbooks for participants. The Instructional Skills Workshop International Advisory Committee.
Power, R. (2019, February 17). Using storyboards to develop eLearning courses. [Video]. YouTube. https://youtu.be/Ua4bWufBRgo
Power, R. (2020, February 26). Creating your own courses using canvas. Power Learning Solutions. https://www.powerlearningsolutions.com/blog/creating-your-own-courses-using-canvas
Power, R. (2021, February 26). Finding the right digital tool is not enough: Addressing copyright and privacy considerations. Power Learning Solutions. https://www.powerlearningsolutions.com/blog/finding-the-right-digital-tool-is-not-enough-addressing-copyright-and-privacy-considerations
Power, R. (2022). ID resources. Power Learning Solutions. https://www.powerlearningsolutions.com/id-resources.html
Quality Matters. (2021a). Helping you deliver on your online promise. https://www.qualitymatters.org/index.php/
Quality Matters. (2021b). Quality assurance begins with a set of standards. https://www.qualitymatters.org/qa-resources/rubric-standards
Tripp, & Bichelmeyer, B. (1990). Rapid Prototyping: An Alternative instructional design strategy. Educational Technology Research and Development, 38(1), 31–44. https://doi.org/10.1007/BF02298246
About the author

name: Rob Power
institution: Cape Breton University
Dr. Rob Power is an Assistant Professor of Education with Cape Breton University, Past-President of the International Association for Mobile Learning, and President of Power Learning Solutions. With over two decades of experience in the education sector, he specializes in instructional design for online and digital learning and educational technology integration. He has a personal passion for investigating and helping teachers learn about Digital Accessibility issues and how to leverage digital tools to support their students.
