Book Structure and Headings
Authors and collaborators often start a project by determining a textbook’s structure, or a consistent way to organize content. The textbook structure may take a variety of forms depending on the course content, learning context, pedagogical approach, and other factors.
Below are three typical textbook structures:
- Example 1: Book⟹Chapter⟹Section
- Example 2: Book⟹Chapter⟹Section⟹Subsection
- Example 3: Book⟹Unit⟹Chapter⟹Section⟹Sub-section
For our example, let’s say an author decides to organize their book according to example 1, i.e. Book⟹Chapter⟹Section. The book structure would look something like this (showing chapter one sections only):
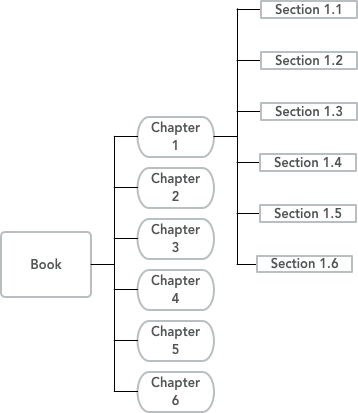
Often a book’s structure is described using terms like “parts” or “levels”. It may be useful to map the book’s structure, thereby creating a basic outline, before beginning to write.
Pressbooks provide Parts and Chapters as a way to structure your book. Parts are the containers for the chapter content, and Chapters contain the content.
Headings
Pressbooks provides a variety of heading levels beginning with Heading 1 (the most prominent and largest) down to Heading 6.
- The default setting in Pressbooks defines the chapter title as H1, therefore all subsequent headings within a chapter should begin with H2.
- Create a hierarchy for the sections in your chapters and note which headings you’ve assigned to each in your Style Sheet.
- Decide how words in headings will be capitalized and record this decision in your Style Sheet as well.
Headings are important for accessibility, which we will explore more in the Accessibility Toolkit.
This is what the six different headings look like.
Heading 1
Heading 2
Heading 3
Heading 4
Heading 5
Heading 6
User Navigation
When users navigate the web version of your resource, a list of its contents (chapters and parts) can be accessed through the “Contents” navigation menu. Use the plus sign (+) to expand and the minus sign (-) to collapse the content sections.
Each page in a Pressbooks page contains “next” and “previous” buttons. These buttons allow users to navigate between pages. Keyboard arrows can also be used to navigate.
Below is an interactive image of a typical webbook. Click on the (+) icons for more information:
“Developing Textbook Structure” from Open Textbook Publishing Orientation (PUB 101)Modules by the University of Minnesota is offered under a Creative Commons Attribution license
“Style Guide” from Ryerson Open Textbook Authoring Guide Copyright © 2017 by Ryerson University is licensed under a Creative Commons Attribution 4.0 International License, except where otherwise noted.
