Initiation and Titration of NIV/BiPAP Settings
Initiating non-invasive ventilation is very similar to how you approach setting up PSV for a spontaneously breathing patient. There are three main settings that need to be adjusted as well as one additional “back-up” setting. First, you will set the oxygen delivery (FiO2), a distending pressure to help recruit alveoli (EPAP), and a high pressure to augment the patient’s normal breath (IPAP). The back-up setting is a basic RR (remember, this setting does not replace the patient spontaneously breathing).
Therefore, the settings to be set for NIV are:
- FiO2
- EPAP pressure (similar to PEEP)
- IPAP pressure (delta Pressure, similar to pressure support)
- RR
These settings will be discussed in detail below.
FiO2
FiO2 is mandatory to set and should be titrated based on what the patient needed before non-invasive application. If on high oxygen, start FiO2 at 1.00 and then wean to SpO2. If the patient does not require a lot of oxygen, starting at 0.50 and weaning within a few minutes to target SpO2 >92% is ideal.
EPAP
EPAP pressure is similar to PEEP. It is the distending pressure that helps recruit alveoli and help with oxygenation. Where it differs from invasive ventilation is using an interface of a face mask instead of intubating and sealing the lungs to a ventilator. The normal pleural pressures that exist with spontaneously breathing patients are still present (see the discussion of lung pressures in Chapter 1). This means that the distending pressures of EPAP can be lower than the minimum PEEP you must set. EPAP settings are usually started from 4-8 cmH20.
IPAP
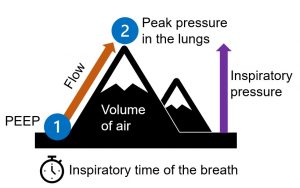
IPAP is the high pressure NIV will cycle up to when the patient initiates a breath. The difference between the EPAP and IPAP is the delta pressure or change in pressure. The change in pressure is the same as a pressure support or additional pressure given to help augment a person’s breath. Think of the change in pressure between the EPAP and the IPAP (delta pressure) as the push to get up to that high level. This is identical to the Pressure Support in PSV but described a slightly different way in NIV. Think back to the waveform and mountain analogy from Chapter 4:
If the difference between the EPAP and IPAP is bigger, that is a larger push of pressure to get to the higher level.
Example A:
EPAP 6 and IPAP 10 → Delta P/PS of 4 (difference between EPAP and IPAP)
This is a Pressure Support of 4 cmH20
Example B:
EPAP 6 and IPAP 12 → Delta P/PS of 6 (difference between EPAP and IPAP)
This is a Pressure Support of 6 cmH20.
In Example B, this is a higher support, or “push,” to give the patient a bigger assist for a larger tidal volume.
IPAP is usually set +4-10 cmH20 above the EPAP and then adjusted to make sure the patient is taking adequate tidal volumes. Increase the IPAP to help the patient take bigger breaths or if they need more support due to increased work of breathing (WOB).
Two words of caution on pressures…
EPAP and IPAP can be increased higher than these initial ranges as needed based on the patient—namely their WOB and issues with CO2 and oxygen. Pressures should be started lower first and then adjusted after watching the patient for about 30 minutes and checking the effect with ABGs and overall WOB. Don’t start higher than these levels unless directed by a physician or a practitioner experienced with NIV.
Keep in mind as well: the higher the pressures that are used, the tighter the patient’s mask needs to be. A tight mask means additional pressure that is being pushed into your patient’s face and may mean that NIV is not tolerated for a conscious patient. Pressures should be initiated on the lower side and increased as needed over time to promote patient comfort and decrease the risk of failure of therapy due to patient’s refusal to wear the mask. Staying within these starting ranges with slow increases over time will help promote patient tolerance.
RR
RR stands for Respiratory Rate. But, how can you set a respiratory rate for a non-invasive mode where the patient must have an intact drive to breathe? Though it is termed an “RR,” NIV does not use a true respiratory rate. As you have already learned, the patient must be triggering breaths on their own. Therefore, you can think of the RR as a mandatory breath cycle that can be used as a back-up to ensure the patient continues to trigger breaths at a certain rate. Usually, the RR is set much lower than the patient’s intrinsic RR. For NIV, it is normally set at 12-16 bpm, though most patients on NIV are usually tachypneic due to increased WOB or oxygenation issues.
When setting up a patient on NIV, the best guide for choosing your initial numbers originates in the reason the patient would benefit from NIV. As stated earlier, patients usually fall into two categories:
- difficulty oxygenating/requiring lung recruitment
or - high CO2 or hypercapnia/increased WOB.
Patients needing lung recruitment or help with oxygenating will benefit from higher EPAPs and not as large of a delta P/PS—resulting in a lower IPAP setting. Patients with high CO2/increased WOB do not need as much distending pressure (EPAP), but need their IPAPs set higher to ensure a larger delta P/PS to help augment their normal tidal volume.
Occasionally, you may have a patient that is a combination of the two situations. These patients will require a higher EPAP as well as a high IPAP with a large delta P.
Let’s break it down in this table, which shows recommended initial settings according to the type of patient you are dealing with:
| Setting starting point | |||||
|---|---|---|---|---|---|
| EPAP | IPAP | RR | FiO2 | Charting Notation | |
| Type 1
Needs oxygenation help and distending pressure |
8 | 12-14 | 12-14 | 1.0 | RR12 12/8 (IPAP/EPAP)
FiO2 0.8 |
| Type 2
Needs help clearing CO2 or with increased WOB |
4-6 | 12-16 | 16 | 0.5-1.0 | RR 16 16/6 (IPAP/EPAP)
FiO2 0.5 |
| Type 3
Combo of type 1 and type 2 |
6-8 | 14-18 | 16 | 1.0 | RR 16 18/8 (IPAP/EPAP)
FiO2 1.0 |
Media Attributions
- Mountain analogy infographic © Amanda Robinson is licensed under a CC BY-SA (Attribution ShareAlike) license
