Experiment 4: Measurement of a Change in Enthalpy
Mg(s) + 2 H3O+(aq) → Mg2+(aq) + H2(g) + 2 H2O(l)
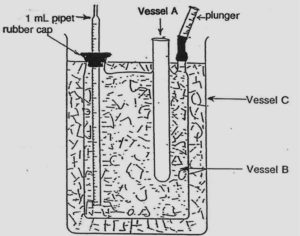
In an ice calorimeter (see Figure 12), the reactants are placed in the built-in test tube, vessel A, which is maintained at a temperature of 0°C within vessel B containing an ice-water mixture. Everything inside B (including A) is defined as the system under investigation. Everything outside of B is defined as the surroundings; thus the beaker, C, containing ice, is part of the surroundings. C is present to ensure that there is minimal heat transfer from the system to the surroundings.
When an exothermic reaction takes place in A, a heat transfer occurs to B, and some of the ice will melt to form liquid water in B. When ice melts, there is an accompanying volume change, which can be monitored on the pipet; thus, the volume change in B is related directly to the heat flow into B and you will be able to evaluate the enthalpy change for the reaction occurring in A.
The reactants placed in test tube A are open to the atmosphere so that any heat flow inside the system occurs at constant pressure, i.e., qp. Thus, there are only pressure–volume work effects involved in this experiment and as discussed in the lectures, under these conditions ΔHsystem = qp. Since vessels B and C are both at 0°C, there is no heat transfer between the system (A and B) and the surroundings (C), thus:
ΔHsystem = 0
If the enthalpy changes due to the reaction occurring in test tube A is ΔHVessel A, and the heat required to melt ice is ΔHVessel B, then:
ΔHsystem = ΔHVessel A + ΔHVessel B = 0
Therefore, ΔHVessel A = –ΔHVessel B
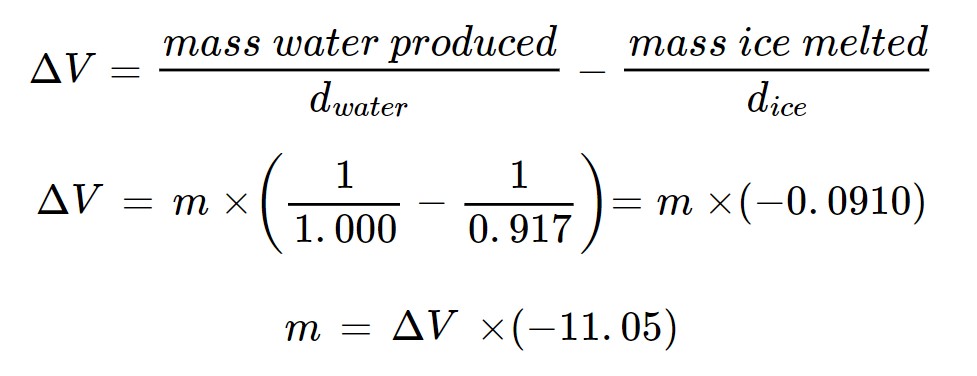
An exothermic reaction occurs in A. The heat evolved in A spreads to B and causes some ice to melt. Since the density of ice is less than the density of water, the melting of ice causes a decrease in the total volume of ice/water mixture in B. The change in volume is measured using the pipet. This volume change can be used to calculate the mass of ice melted as a result of the heat released by the chemical reaction. The measured change in volume, ΔV, is the result of ice melting and water being produced:
ΔV = V2–V1
V2 = volume of water produced by melting
V1 = volume of ice melted
Since water is formed from melted ice, the mass of ice melted = the mass of water produced = m.
Volume = mass/density
at 0°C, dwater = 1.000 g cm−3 and dice = 0.917 g cm−3
From the mass of ice melted and the known enthalpy change for the melting of a unit mass of ice, the enthalpy change for the chemical reaction is determined.
Materials
| Table of Contents | << previous section | next section >> |
| Reagent | Hazard Statements | |
| Hydrochloric Acid (2.0 M) |   |
Corrosive
Irritant |
| Mg (turnings) |  |
Flammable |
| Glassware | Quantity |
|
Beaker, 1000 mL
|
1
|
| Beaker, 250 mL |
2
|
|
Calorimeter
|
1
|
|
Pipet, measuring, 1 mL
|
1
|
|
Pipet, volumetric, 2 mL
|
1
|
|
Rod, glass stirring (thin)
|
1
|
|
Septum, rubber
|
1
|
|
Syringe, plastic
|
1
|
|
Test tube 16 x 150
|
2
|
|
Tube, rubber
|
1
|
Pre-Lab Work
| Table of Contents | << previous section | next section >> |
A minimum of 24 hours before the start of your lab period:
- Watch the pre-lab video
- Complete and submit the pre-lab quiz for Experiment 4 on Avenue (under Assessments > Quizzes).
- Prepare a flowchart (see here) of the experimental steps in your laboratory notebook. Uploaded images of your flowchart to the Exp 4 Pre-Lab Assignment folder (Assessments > Assignments)
- Prepare any data tables that you think will help to keep your results organized. You do not need to submit these to Avenue as part of your re-lab assignment, but they do help you to get the lab completed on time and with higher marks overall.
Procedure
| Table of Contents | << previous section | next section >> |
Students will work in pairs. Include your partner’s name in your lab report.
- One partner must present their McMaster University student card to sign-out a calorimeter from the TA. Inspect the calorimeter for any cracks/chips. Report any damage to the TA BEFORE starting the experiment.
Reaction A: Enthalpy Change For A Redox Reaction
- Prepare the ice calorimeter (Figure 12) in the following manner: Rinse out the built-in test tube (Vessel A) of the ice calorimeter with distilled water. Remove excess water. Put a dropper bulb on Vessel A – it should not have water in it. Pack Vessel B with crushed ice and fill it completely with water. Put the fold over cap, with pipet inserted, securely in place. Shake the apparatus gently and stir the ice-water mixture with the stirring rod to get rid of all air bubbles that may have been trapped in the water by the chips of ice. (Note: The ice will contain some air bubbles that cannot be removed.) Obtain a 1000 mL beaker (Vessel C) and put 2 to 3 cm of ice at the bottom of it. Place the calorimeter in this large beaker and completely fill the beaker with ice so that the whole calorimeter is fully surrounded by ice.
- Add 5 mL of 2 M HCl to a clean and dry test tube and allow it to cool for about 10 minutes by standing the test tube in a beaker of ice water.
- Accurately weigh about 0.06 g of magnesium turnings (4 or 5 pieces ~0.06 g) and transfer them to the built-in test tube in the calorimeter (Vessel A).
- Use a wash bottle to completely fill the calorimeter and its tubing with water. Place the plunger into the tubing and drive the water into the pipet as high as possible, but not above the top graduation mark.
- Measure the change in volume in the calorimeter by observing the water level in the pipet at 30-second intervals. When this change becomes very small (about 5 x 10⁻³ mL or half of the smallest division on the pipet) per minute or less, start to record time–volume readings every minute for about 5 minutes. When taking time readings, record the actual time on the clock. If the water level falls faster than the recommended rate, do not proceed any further. Check for leaks and/or ask your demonstrator for help.
- After recording five, one-minute interval readings, add the 5 mL of chilled HCl quickly to the magnesium turnings in vessel A. Make sure that the magnesium is completely immersed in the acid.
- Record the volume every 15 sec until the change in volume is about 5 x 10⁻³ mL per minute.
- Then take readings every minute for 5 more minutes. This way you have five initial readings with volume reducing at less than 0.005 mL/min. and five final readings with volume reducing at this rate.
- When the measurements are done, dispose of chemical waste into the appropriate waste containers.
- Rinse glassware with distilled water and return it to your drawer.
- Wipe down your lab bench with paper towels or a j-cloth.
Report
| Table of Contents | << previous section |
You may discuss your reports with your partner, but you must prepare and submit INDIVIDUAL reports. Plagiarism offenses are taken seriously and will be brought to the Academic Integrity Office.
Treatment of Data
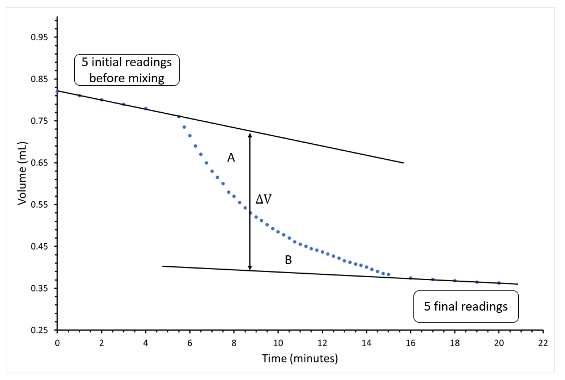
- Prepare a graph. Plot the volume of water in the pipet (y-axis) against time (x-axis) for the period before and following the mixing of the reactants. The graph should be similar to the one shown in Figure 13. Remember to make the scale big enough so the graph will cover the whole page; put in the title of your graph and label the axes. The line used to measure ΔV is drawn such that it is parallel to the y-axis and areas “a” and “b” are approximately equal.
- From the graph, determine the change in volume of the ice-water mixture caused by the chemical reaction. ΔV from the graph will be a negative number (Vfinal–Vinitial). Determine the mass of ice melted, and ΔHVessel B, the heat required to melt the ice.
- Calculate the enthalpy change per mole of limiting reagent reacted. Pay attention to significant figures. Include proper units.
Report Submission
Have your TA sign and date every page of your data for this experiment. Within 1 hour of the end of your lab period, upload a single pdf of the images of your data pages and report to the appropriate Avenue Assignment folder (Assessments > Assignments > Experiment 4 Report). We recommend using the Microsoft Lens app for quick preparation of the final pdf.