Experiment 1: Quantitative Volumetric Analysis
Table of Contents
Introduction
| Table of Contents | next section >> |
The purpose of this experiment is to demonstrate the principles and techniques of volumetric analysis. Please refer to the introductory pages for information on the glassware and techniques used in volumetric analysis. During this experiment, you will be using a stock, calibrated solution of hydrochloric acid to determine an accurate concentration of an unknown sodium hydroxide (NaOH) solution.
A titration is the controlled addition of one solution (titrant) to another solution (titrate or titrand) with which it reacts. Usually, the titrant is added dropwise from a burette. The addition of one solution to the other is controlled such that it is stopped when the substances have completely reacted: at this point there is excess of neither reagent. This point is called the equivalence point of the titration. If the balanced equation for the reaction is known, the volume of solution added is known, and its concentration standardized, then the number of moles of added reactant may be calculated. This experiment will involve an acid–base reaction, that is, a neutralization reaction.
The stoichiometry of the acid-base reaction:
H3O+ + OH– → 2H2O
requires one mole of hydroxide ion (OH–) for each mole of hydronium ion (H3O+). Therefore, at the equivalence point of a titration
# moles OH– added = # moles H3O+ in the sample
The molarity (M) of a solution is defined as the number of moles of solute per litre of solution.
# moles of solute = Molarity x Volume of solution in litres = M x V
At the equivalence point of a 1:1 acid-base titration:
M(OH–) x V(OH–) = M(H3O+) x V(H3O+)
The equivalence point can be detected using a chemical indicator which changes colour at, or very near, the equivalence point of the titration. The point at which the indicator changes colour is called the endpoint of the titration. The indicator that will be used in this experiment is phenolphthalein. It is colourless in acidic solutions and pink-violet in basic solutions.
Materials
| Table of Contents | << previous section | next section >> |
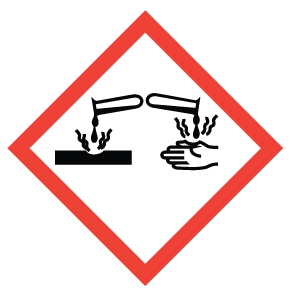
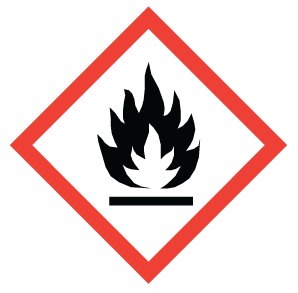
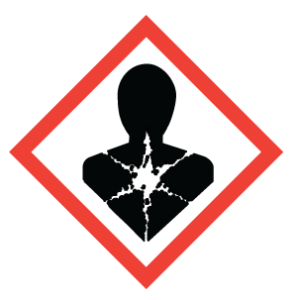
| Reagent | Hazard Statements | |
| Hydrochloric Acid (~0.1 M) |   |
Corrosive
Irritant |
| Sodium Hydroxide (~0.1M) |   |
Corrosive
Irritant |
| Phenolphthalein |    |
Flammable
Irritant Health hazard (carcinogen) |
| Glassware | Quantity |
| Beaker, 100 mL | 2 |
| Beaker, 250 mL | 1 |
| Flask, Erlenmeyer | 3 |
| Funnel, plastic | 1 |
| Pipet, volumetric, 10 mL | 1 |
| Reader, meniscus | 1 |
Pre-Lab Work
| Table of Contents | << previous section | next section >> |
A minimum of 24 hours before the start of your lab period:
-
- Watch the pre-lab video
- Complete and submit the pre-lab quiz for Experiment 1 on Avenue (under Assessments > Quizzes).
- Prepare the required data tables and a flowchart (see here) of the experimental steps in your laboratory notebook. Take photos of these pages and upload them to the Exp 1 Pre-Lab Assignment folder (Assessments > Assignments)
- Required Data Tables: a table to record the Initial Burette Reading, Final Burette Reading, Volume of NaOH Used (difference between Final Burette Reading and Initial Burette Reading) and Molarity of NaOH for all three trials. Example below.
Trial Initial Burette Reading (mL) Final Burette Reading (mL) Volume of Titrant Added (mL) (Final – Initial burette reading)
1 2 3 Procedure
Table of Contents << previous section next section >> Students are to work individually. You will determine the exact concentration of an unknown NaOH solution, using an HCl solution of known concentration as a primary standard. You will calculate the molarity of the NaOH solution and record the value in your notebook.
- Using a clean and dry 100 mL beaker, obtain about 70 mL of stock NaOH solution. Record the Lot/Batch # of this solution (located on the top or side of the stock solution container).
- Prepare your burette: Rinse a 50.00 mL burette 3 times with small amounts of deionized water (found in a wash bottle on your lab bench) followed by 3 rinses with small amounts (~ 5mL) of your stock NaOH solution. Use your 250 mL beaker as a waste beaker.
- Fill the burette with the NaOH solution to the 0.00 mL line at the top.
- Remember: the tip of the burette should have no air bubbles.
- Always read the burette to two decimal places.
- The initial liquid level may not be exactly at the zero mark so you must record the initial reading.
- Use a clean and dry 100 mL beaker to obtain about 50 mL of the HCl solution. Make sure you record the molarity of the HCl solution directly into your lab notebook.
- Prepare three clean Erlenmeyer flasks, rinsed with distilled water (they do not need to be dry inside; why?).
- For this part of the experiment, you will use a pipette and pipette bulb. Be sure to watch the pre-lab video to see how to use this specialized glassware.
- Wash a 10.00 mL pipet 3x with distilled water and then 3x with a small amount of the HCl solution using pipet bulb.
- Make sure that there is no liquid inside the pipet bulb.
- Use this pipet to transfer 10.00 mL portions of the HCl solution to each Erlenmeyer flask. If you are unsure about this step, ask your TA for assistance.
- Add two drops of phenolphthalein to each flask.
- Add approximately 20 mL distilled water to each flask (this does not need to be accurate, just approximate).
- Titrate the HCl solution with the NaOH solution.
- Swirl the Erlenmeyer flask constantly. Initially, the titrant can be added almost in a continuous stream. The colour change of the indicator will appear in the area where the titrant is in excess. This will quickly change back to the original colour with continuous mixing if the addition of the titrant is stopped.
- As the end point of the titration is approached, the pink colour will persist. The rate of titrant addition should be gradually decreased, until the pace is one drop at a time.
- Half-drops can be added by allowing a partial drop to hang from the tip of the burette, which is added by touching the tip to the side of the flask followed by washing the side of the flask with distilled water.
- The end point is reached when a drop (or half-drop) from the burette permanently changes the colour of the solution to light pink. Ideally, the pink colour should be faint to the point that it requires a second opinion. Record the final reading of the burette to two decimal places.
- Repeat the titration with the two other portions of HCl solution that you have previously transferred to Erlenmeyer flasks. Record all values in the table you created prior to coming to the lab.
- Dispose of chemical waste in the appropriate waste containers (see page iv).
- Rinse glassware with distilled water and return it to your drawer.
- Wipe down your lab bench with paper towels or a j-cloth.
Report
Table of Contents << previous section - Write a balanced equation for the reaction between the NaOH solution and the HCl solution directly into your notebook.
- Calculate the average molarity of the NaOH solution
- Compare this to the technician’s value shared with you by the TA. Calculate the % error.
- Summarize the key findings and discuss possible sources of error
- See here for more information on how to prepare your report.
Have your TA sign and date every page of your data for this experiment. Within 1 hour of the end of your lab period, upload a single pdf of the images of your data pages and report to the appropriate Avenue Assignment folder (Assessments > Assignments > Experiment 1 Report). We recommend using the Microsoft Lens app for quick preparation of the final pdf.
