Biophysics Lab Outline
Introduction
Protein Aggregation
Aging is a complex biological process that involves changes in molecular and cellular behaviours that in turn impact tissue and system health and function. Cellular aging is accompanied by an increasing number of toxic protein aggregates in the cells. These aggregates are correlated with various neurodegenerative disorders, such as Alzheimer’s, Huntington’s, and Parkinson’s disease. Researchers are trying to identify how protein aggregation might cause the observed cellular and tissue-level phenotypes seen with these diseases.
Modelling Protein Aggregation in Living Systems
Protein aggregation can be studied using a number of biological model systems. For example, a strain of C. elegans has been developed by the Morimoto lab in Northwestern University which produces fluorescently labelled protein aggregates in the muscle cells of its body wall (figure 1). The effect of knocking down various proteins (e.g. through RNA interference; RNAi) on the size and amount of these aggregations can be used to identify proteins involved in the unfolded protein response, which is crucial for understanding these neurological diseases. However, there are limitations to using this C. elegans model for studying neurological disease pathology for a number of reasons. For instance, the protein aggregations in these disease states actually occur in neurons, not in the muscle cells like we see in this model. However, this is still a good model for studying the unfolded protein response (activated in response to an accumulation of unfolded or misfolded proteins in the lumen of the endoplasmic reticulum) and how dysfunction of this response can affect protein aggregations that contribute to these neurological diseases.
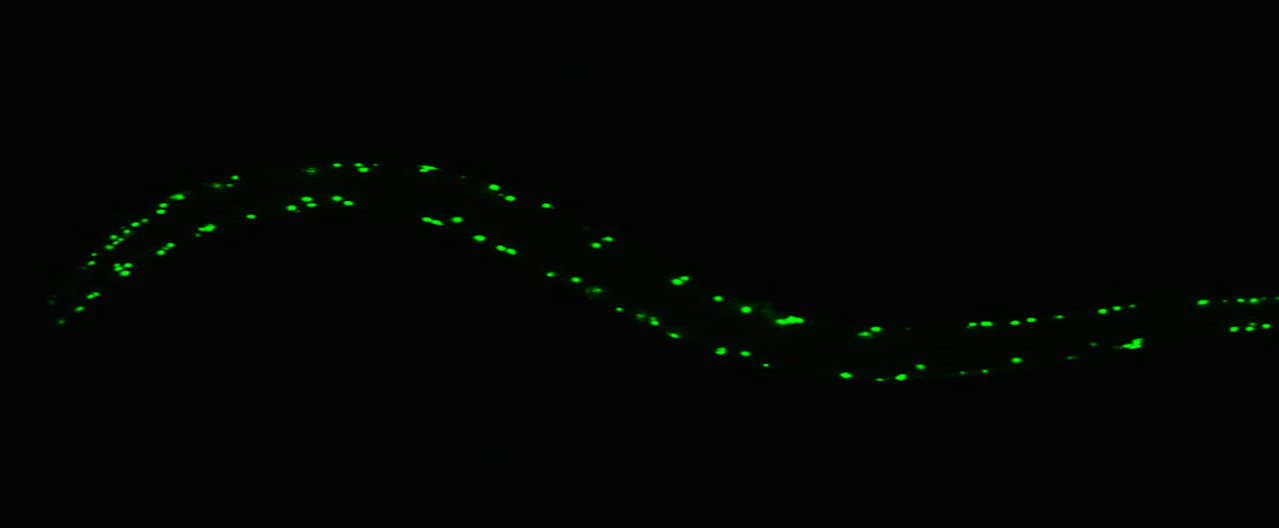
The video below is from a different strain of C. elegans that contains a fluorescent protein (Green Fluorescent Protein) in the muscle cells. You can observe these organisms under a stereomicroscope. In this video, C. elegans movement is being influenced by chemotaxis – movement of the organism triggered by following chemical gradients in the surrounding environment.
LSL Video Biophysics – C. elegans
Modelling Protein Aggregation in Non-Living Systems
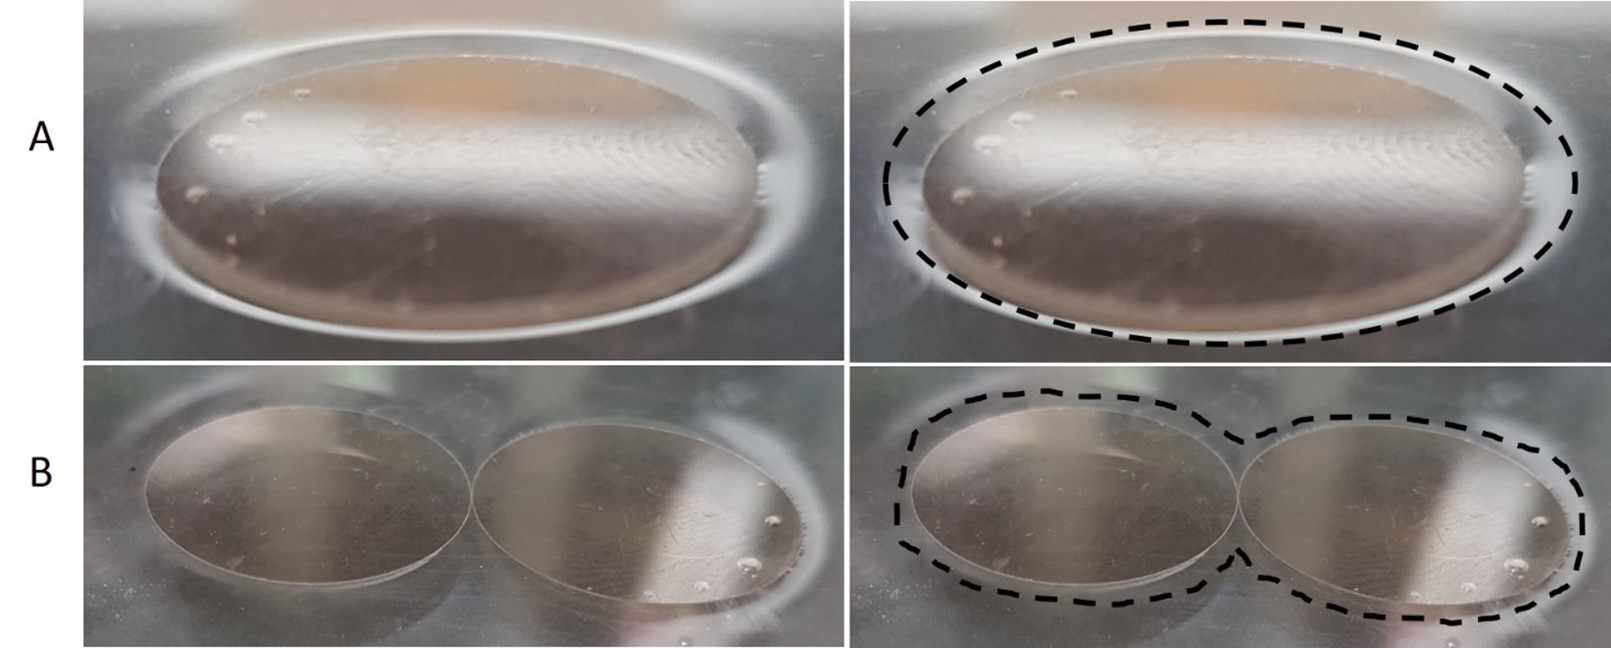
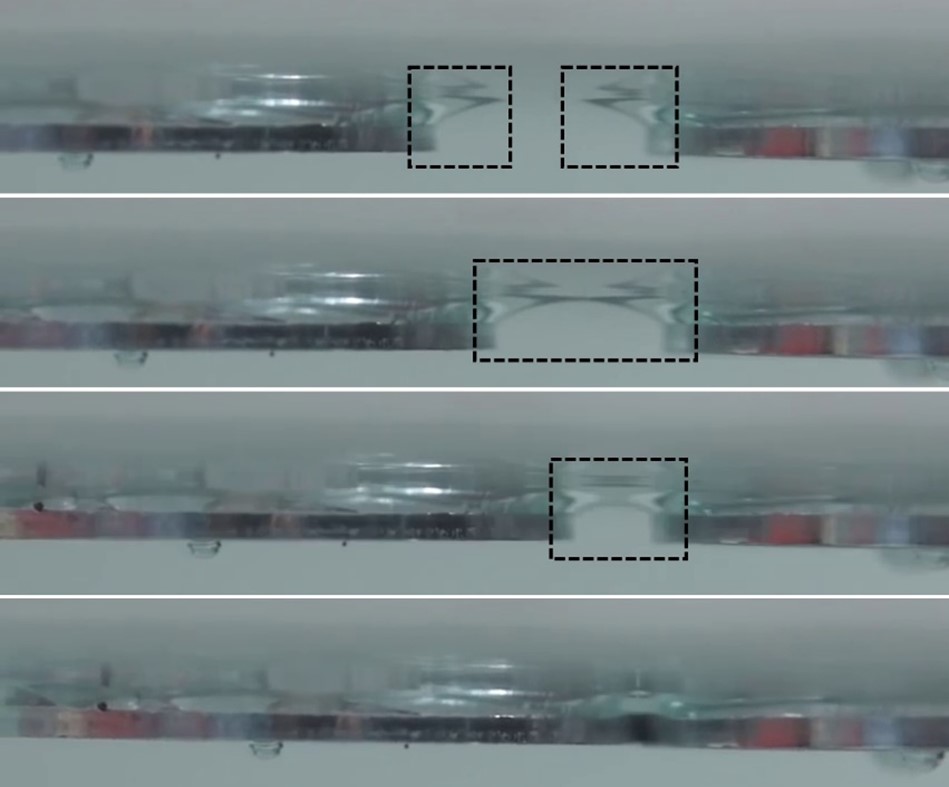
Protein aggregation can also be studied in non-living systems, allowing one to investigate the physical processes involved. In this week’s lab, protein aggregation will be modelled by floating aluminum foil discs on the surface of water. This can also be modelled with mica discs (which you will see in some of our videos and figures). The discs float on water due to surface tension, and as additional discs are added they aggregate together. The discs aggregate together because the surface of the water gets distorted around the perimeter of each disc (figure 2A and 3), and this distortion costs energy. However, when the disks aggregate together, the area in contact with water stays the same, but the perimeter around the cluster is less than the sum of the perimeters of the individual (non-aggregated) discs (figure 2B and 3). Therefore, it is more energetically favourable for multiple discs to cluster together compared to those discs remaining separated from each other. This phenomenon is demonstrated in the video below from The Molecular Foundry, Lawrence Berkeley National Lab (click HERE to learn more).
LSL Video Biophysics – Surface Tension
We can use this model to investigate the physics that affect aggregation and explore how changes in the aqueous environment affect the ability of the discs to aggregate together and float on water. This is similar to the work done by Dr. Maikel Rheinstadter at McMaster University. Dr. Rheinstadter is interested in studying how changing the environment of the proteins (the cell, the cell membrane) might prevent or decrease harmful protein aggregation.
Lab Overview and Timeline
| Time (min) |
What will you be doing? | Total Time (min) |
|---|---|---|
| 0 - 5 | Overview of lab activities by the TA. | 5 |
| 5 - 25 | Lab Part 1: Working with Aluminum Foil Discs and Preliminary Experiments click HERE Lab Protocol 1: Preparing the Aluminum Foil Discs - click HERE Lab Protocol 2: Working with Aluminum Foil Discs and Preparing your Controls - click HERE Lab Protocol 3: The Effect of Dish Soap on Aluminum Foil Disc Aggregation/Floatation - click HERE |
20 |
| 25 - 100 | Lab Part 2: Designing your own Experiments click HERE Lab Protocol 4: Experimental Design and Hypothesis Testing - click HERE |
75 |
| 100 - 110 | Finish notes and clean-up | 10 |
Lab Part 1: Working with aluminum foil discs and preliminary experiments
Purpose
To explore the aluminum foil disc aggregation model and record initial observations about the physics controlling their behaviour.
Summary of Activities
To start, you will need to make your aluminum foil discs by folding and trimming a sheet of aluminum foil as described in lab protocol 1.
Follow lab protocol 2 and practice floating the aluminum foil discs on the surface of the water in a bowl and observe their behaviour (e.g. do they float? aggregate?). This will serve as a control.
Next, follow lab protocol 3 to test the effect of dish soap on flotation/aggregation of the aluminum foil discs on the surface of the water. This will serve as one of your treatment groups.
Materials
- Medium bowls
- Roll of aluminum foil
- 30 cm ruler
- Paper towel
- Cell phone timer/clock
- Fork for manipulating aluminum foil discs
- Solution of 50% dish soap
- Cups/glasses (for preparing solutions for experimental design)
- Tablespoon/teaspoon for measuring small volumes
- 1 cup measure for large volumes
- Water
Safety Reminders
There are potential risks associated with these lab activities that you should be aware of, including but not limited to:
- Cuts/Sharps
- While cutting and working with aluminum foil
- Be aware of your surroundings (e.g. other people in your house, pets) and work in an area free of clutter
- Splash Hazard
- Be aware of splashing when pouring liquids, and ensure you are not leaning your head close so as to risk splashing in your eyes
- Acids and Bases
- You will work with household acids and bases today: vinegar, lemon juice and/or baking soda
- Please only use the acids/bases we list, as they can be safely disposed of and pose the least amount of risk in case of splashing
- In case of contact with your eyes, flush with running water.
- Wash your hands after working with vinegar, lemon juice or baking soda and avoid contact with your eyes.
- These three household items can all be safely disposed of by washing them down the sink with water.
If for any reason you do not feel comfortable or safe completing the activities described, please contact the Instructional Assistant (Devon Jones; (jonesde2@mcmaster.ca so alternative arrangements can be made.
Lab Protocol 1: Preparing the aluminum foil discs
Protocol 1 is described in this video:
LSL Video Biophysics Preparing Aluminum Foil Discs
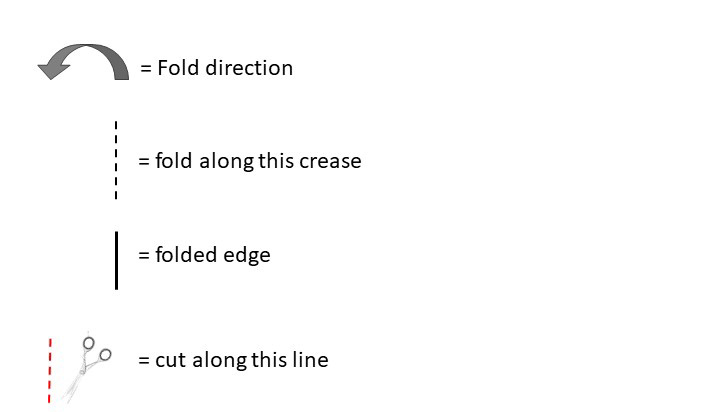
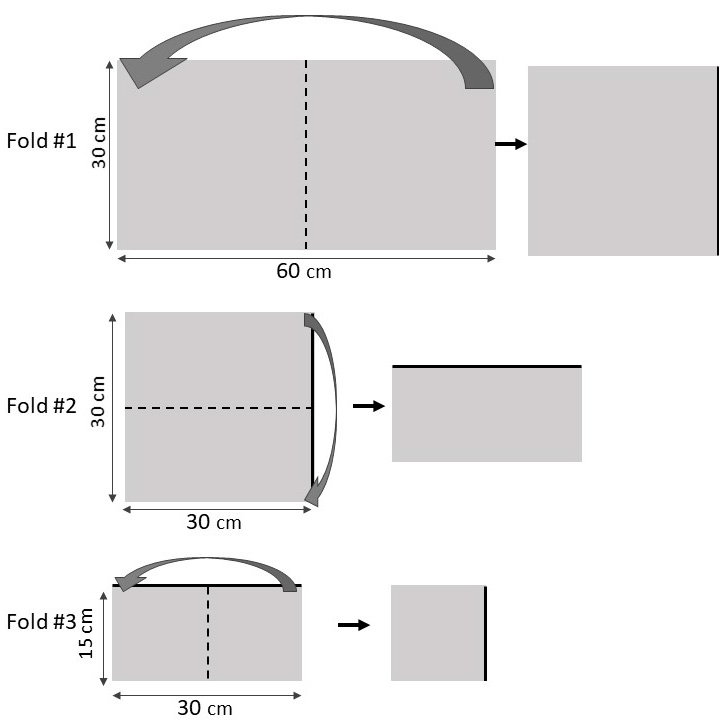
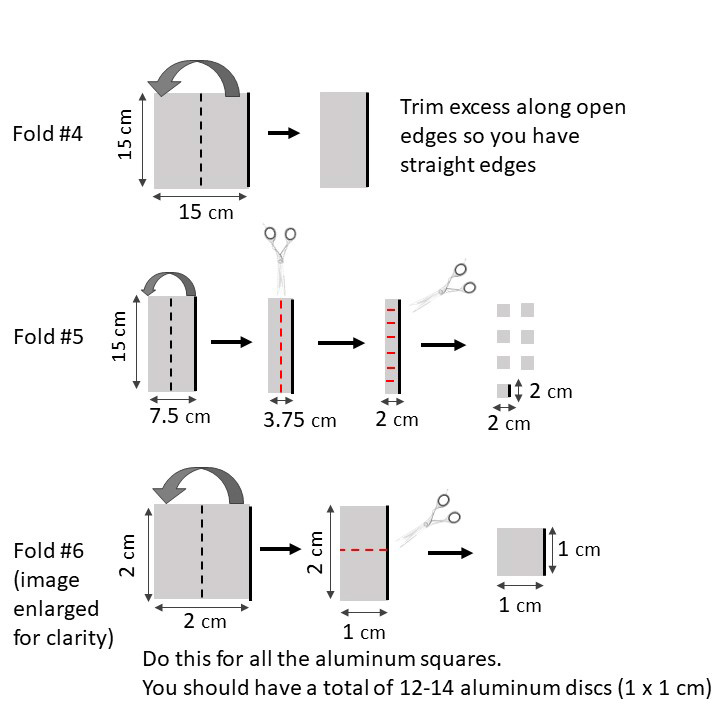
- Refer to figure 5. Unroll approximately 60 cm x 30 cm of aluminum foil from the roll and cut/tear away from the package. Set the package aside.
- Using the ruler, carefully fold the aluminum foil in half 5 times, smoothing the edges to ensure all foil stays flat and uniform. The 5th fold should create a long rectangle shape, so make this fold along the longer axis.
- Using the ruler, mark 2 cm increments along the long rectangle, and draw a line 2 cm away from and parallel to the folded edge. Cut along this line and use the 2 cm increments to cut the folded part into 5-6 2x2cm aluminum foil squares.
- Fold each of these 2x2cm squares in half one more time. This fold will be a bit more difficult, and you can use the ruler to help you manipulate the foil.
- Cut each of these new, 1x2cm rectangles in half perpendicular to the folded edge to create two 1x1cm squares. These will be the aluminum foil discs used in today’s activity. (will result in 10-12 discs total).
- Your goal is to have the layers of aluminum foil remain compressed together, and for the discs to stay relatively flat. Try dragging a ruler over the discs, or placing a weight on the them (e.g. a dish pot filled with water) for 10 minutes to help flatten and compress them.
- Move to lab protocol 2 once the aluminum discs are prepared.
Lab Protocol 2: Working with Aluminum Foil discs and preparing your controls
A general overview of protocol 2 and 3 is described in this video:
LSL Video Biophysics Aluminum Foil Disc Experiments
- Fill one bowl with water using a 1 cup measure so you will know the total number of mL in the bowl (1 cup = 250 mL). Pick a round number (e.g. if 3 cups fits the bowl but 4 will overfill the bowl, use 3 cups).
- Place the bowl onto a paper towel. Label this paper towel with the relevant parameters (e.g. tap water only, control).
- Use the fork (you can also use your fingers, but the fork may be easier) to pick up one aluminum foil disc and gently drop it onto the surface of the water. The disc should be parallel with the surface of the water and close to the surface when you release it. The disc should float. If it sinks to the bottom, you most likely put one of the edges in the water while releasing. Retrieve the disc with the fork and try again. You may need to dry and re-flatten the disc.
- Keep adding foil discs onto the surface of the water in the bowl until you have a total of 4 or 5 discs floating. Observe what happens with the discs when they come close to one another. This dish will serve as one of your controls.
- Come back to this dish after a few minutes and check on the status of the discs (e.g. are they still aggregated and floating, have they disaggregated, have they sunk?).
- Continue onto lab protocol 3 in the meantime.
Lab Protocol 3: The effect of dish soap on Aluminum Foil disc aggregation/floatation
- Set up another identical bowl to investigate the effect of dish soap on disc aggregation/floatation.
- Measure out the same volume of water and place into the bowl. Then, remove the volume of water that you intend to replace with a volume of 50% dish soap. (e.g. remove ¼ cup, 1 tablespoon, 2 tablespoons, and then replace with the same volume of 50% dish soap. You pick the volume, but keep clear notes!)
- Place the bowl onto a paper towel (or piece of scrap paper, napkin, etc.). Label this paper towel with the relevant parameters.
- Use the fork to place the aluminum foil discs on the surface of the water.
- After your discs are stable, use the tablespoon or other measurement tool to place the appropriate volume of 50% dish soap into the bowl (match the volume to how much water you initially removed. You want the total volume of liquid in this bowl to be the same as in your control bowl).
- Record your observations and the experimental conditions.
- Compare to your observations to the first bowl (just water).
- Do you have to prepare another control? Have you introduced an additional factor that you should control for? If so, think about an additional experiment you should perform to control for this factor.
- If you have run out of discs for your experiments, rinse them thoroughly with water and reuse, or make more by repeating lab protocol 1.
Lab Part 1 Checklist
- Prepare 10-12 aluminum foil discs (lab protocol 1)
- Practice working with the aluminum foil discs and prepare your control experiments (lab protocol 2)
- Conduct your water and dish soap experiment (lab protocol 3)
- For each experiment, record the experimental conditions, procedure (methods) and observations in your notes.
Lab Part 2: Designing your own experiments
Purpose
To design experiments to test how changes in the environment (e.g. aqueous medium) impact the behaviour (floating and aggregation) of the discs.
To prepare solutions of a set concentration. Refer to the Preparing Chemical Solutions Appendix HERE for help preparing solutions of different concentrations.
Summary of Activities
Now that you are comfortable floating the discs on the water, you will design an experiment to test how changing the conditions of the environment might alter the behaviour of the discs with respect to floating and/or aggregation. You will need to come up with a hypothesis, null hypothesis and prediction for this experiment, and record your protocol (experimental procedure) and results. Refer back to the notes on hypothesis formulation (click HERE) for a review of experimental design considerations.
Materials
- Same as Lab Part 1
- Optional additional materials:
- Vinegar
- Lemon juice
- Baking soda
Lab Protocol 4: eXperimental Design and hypothesis testing
Safety Reminders
There are potential risks associated with these lab activities that you should be aware of, including but not limited to:
- Cuts/Sharps
- While cutting and working with aluminum foil
- Be aware of your surroundings (e.g. other people in your house, pets) and work in an area free of clutter
- Splash Hazard
- Be aware of splashing when pouring liquids, and ensure you are not leaning your head close so as to risk splashing in your eyes
- Acids and Bases
- You will work with household acids and bases today: vinegar, lemon juice and/or baking soda
- Please only use the acids/bases we list, as they can be safely disposed of and pose the least amount of risk in case of splashing
- In case of contact with your eyes, flush with running water.
- Wash your hands after working with vinegar, lemon juice or baking soda and avoid contact with your eyes.
- These three household items can all be safely disposed of by washing them down the sink with water.
If for any reason you do not feel comfortable or safe completing the activities described, please contact the Instructional Assistant (Devon Jones; (jonesde2@mcmaster.ca so alternative arrangements can be made.
- Before beginning, read the detailed notes we provided on hypothesis formulation and experimental design (click HERE)
- In lab part 1 you investigated the effect of dish soap (=’applied intervention’) on the behaviour of aluminum discs. The ‘behaviour’ (= measured effects/end point) you recorded included whether the discs aggregated, time to aggregation, whether the discs sink, time to sink etc. This experiment included at least one control group.
- Now, you are going to design an experiment that further explores how changing the conditions of the environment might alter the behaviour of the aluminum foil discs. You are responsible for identifying any additional controls you will need to run. Some variables to consider include:
- Size of foil disc (large 2x2cm vs. small 1x1cm)
- Number of folds for each foil disc (6x folds vs. 5x folds)
- Bowl material (glass, plastic, ceramic)
- Number of discs added to the bowl
- Mixing artefacts (e.g. effect from adding solutions into the dish while discs are floating)
- Time (will the discs sink on their own after a certain amount of time, regardless of changes you make to the environment?)
- The following solutions can be used as your ‘applied intervention’ to alter the aqueous environment of the aluminum foil discs:
- Vinegar (~5% acetic acid)
- Lemon Juice
- Baking soda (dissolve in water first so you can add as a liquid and not introduce an additional variable)
- You can premix the solutions in glasses and pour the solution into clean bowls, or start with the discs in water and add the test solution (e.g. acetic acid) after the discs are stable. When mixing solutions, be sure to record the concentrations and volumes at each step. This will help you keep track of how dilute each test solution becomes.
- Consider whether you will set up your experiments to have independent (‘unpaired’) data or matched (‘paired’) data.
- Matched (paired) data example: Float discs on water and observe aggregation and flotation, and then add the dish soap solution to the same dish and compare the observations before and after adding the dishwater solution. The same discs served for both the control and treatment group.
- Independent (unpaired) data example: Set up a dish with aluminum foil discs floating on water (control), and then set up another dish (experimental) with a different group of aluminum foil discs in your treatment solution. Compare the results/observations of the control to the treatment dish. This is what you did in protocols 2 and 3.
- Rinse dishes along the way as needed. All equipment only needs to be rinsed with water.
- Once you have set up your experiment, place the bowls on paper towel and label with the testing conditions. Set these bowls aside. Check on them periodically and record your observations.
- If you were working in a research lab, you would record notes and observations in your lab notebook. The template below ‘Biophysics Experiment Lab Notes’ will serve as your ‘lab notes’ for the experiments you competed. Make sure to fill in all sections as you will need this for the assignment. You can also use the documentation tool provided below to fill in your notes and export into a word document.
Biophysics Experiment Lab Notes
Hypothesis/Prediction ‘If…Then’ Statement:
Independent variable:
Dependent variable:
Hypothesis:
Null hypothesis:
Prediction:
Experimental Design:
Results:
Conclusion:
Lab Part 2 Checklist
- Follow lab protocol 4 to design experiments that investigate an additional two interventions that further explore how changing the conditions of the environment might alter the behaviour of the aluminum foil discs.
- Include appropriate control(s) for any major variables you identify
- Record your ‘lab notes’ using the Biophysics Experiment Lab Notes template.
Lab Exit Checklist
- Complete lab part 1 and 2 activities
- Once finished:
- Clean all dishes for your cohabitants – don’t leave the kitchen a mess!
- Aluminum foil can be recycled
- Ensure you have a completed set of lab notes – you will need these for the assignment.
References
Bloes, D. A., Kretschmer, D., & Peschel, A. (2015). Enemy attraction: bacterial agonists for leukocyte chemotaxis receptors. Nature Reviews Microbiology, 13(2), 95.
Cira, N. J., Benusiglio, A., & Prakash, M. (2015). Vapour-mediated sensing and motility in two component droplets. Nature, 519(7544), 446-450.
Clayton K., Van Enoo A.A., and Ikezu T. (2017). Alzheimer’s Disease: The Role of Microglia in Brain Homeostasis and Proteopathy. Front. Neurosci. 11(680).
Han, K. H., Arlian, B. M., Macauley, M. S., Paulson, J. C., & Lerner, R. A. (2018). Migration-based selections of antibodies that convert bone marrow into trafficking microglia-like cells that reduce brain amyloid β. Proceedings of the National Academy of Sciences, 115(3), E372-E381.
