Slide Structure
In this section:
Slide Layouts
Providing structure to documents is essential for assistive technology but helps all readers navigate your documents efficiently and understand relationships between topics.
Avoid adding textboxes to slides for anything other than plain text. Instead, modify slide layouts and add proper placeholders.
Microsoft guide to finding accessible templates for Office products.
To ensure accessible structure, avoid invisible tables, text boxes, and repeated tabs, spaces, or returns. Instead:
- Create columns using Layout > Columns.
- Change spacing before and after paragraphs via Home > Line Spacing Options.
- Manually create a line break by pressing Shift and Enter.
- Of repeatedly pressing Enter, use Insert > Page Break.
- Of repeatedly pressing Tab or Spacebar, navigate to Home > Increase/Decrease Indent or use the indent markers on the horizontal ruler (View > Ruler).
Tables
Tables are useful for organizing data. Properly built and formatted tables are completely accessible.
To insert a table in PowerPoint:
- Insert tab
- Table
- Insert Table
- Indicate the number of columns and rows and press Ok
- You can add columns and rows later
Additional PowerPoint table tools:
Table Options
Set a header row/column:
- Click anywhere in your table.
- Select Table > Table Design tab > click Header Row (or First Column, if the column is a header) checkbox.
- Select Banded Rows or Banded Columns for a landscape document.
- Select the header row, navigate to Table Layout, and select Repeat Header Rows to repeat headers across page breaks.
- Accessible tables in Word can only have one header row, one header column, or both.
Right-click on the table and select Table Properties for advanced table options via the table properties dialogue.
In some instances, adding alt text to a table as a summary may make sense. To do so:
- Navigate to Table Properties
- Select the Alt Text tab
- Add a Title and a Description
- Click Ok
Apply an Accessible Design
- Select the table and go to Design
- Select the features you want (Header Row, Banded Rows, or First Column)
- A Header Row, or Header Column or both are required for an accessible table
- To show all available table styles, select More or the dropdown arrow
- Most accessible tables will be Medium styles with strong contrasting colors
Best Practices
- A concise, descriptive table title helps with context and organization
- Do not use nested, merged, split, or unnecessary blank cells
- Ensure cells have adequate padding and margins
- Do not use coloured cells or text alone to indicate meaning
- Do not use tables with invisible borders to format the layout
- Office accessibility checker does not note table errors
Click in the top left cell, then use the Tab key to ensure your table reading order is logical and consistent
- Office accessibility checker does not note table errors
Lists
Properly formatted lists organize information and make your presentations accessible.
- Use bullet lists for unorganized lists
- Lists where the sequence is not important
- Use numbered lists for items where sequence is important
- Such as steps in a process
To create a list in PowerPoint:
- On the Home tab
- Select Bullets, Numbering, or Multilevel List
- The dropdowns accompanying each style offer more options and customization.
SmartArt
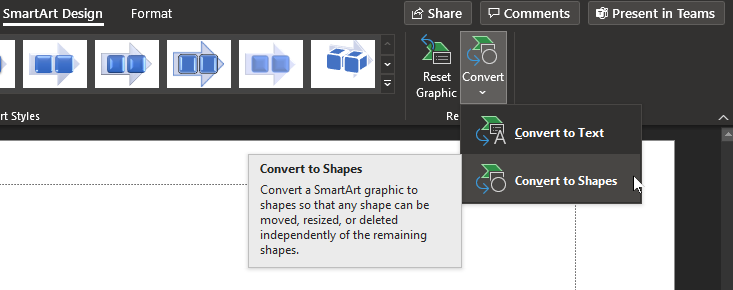
SmartArt can be an effective tool to make lists more visually appealing. To make SmartArt accessible, one additional step is required.
- Once you have created SmartArt, navigate to the SmartArt Design tab.
- Select Convert.
- Choose Convert to Shapes.
- Select the Shape Format tab.
- Choose Group > Ungroup.
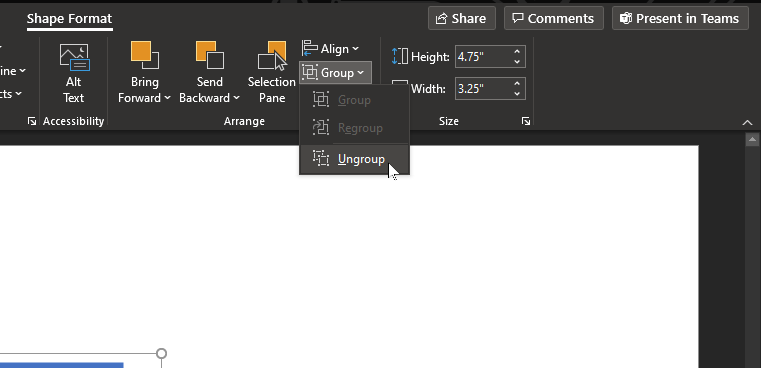
- This makes the objects independent and machine-readable.
- Add alt text (the exact text included in the graphic) to each item.
- Note: some SmartArt will include an arrow or other shape behind the objects. Select such objects, right-click and choose Edit Alt Text… and choose Mark as decorative.
The use of code (HTML attributes, PDF tags, XML, etc.) to distinguish content by meaning, not appearance. For example, a heading tag creates both a visual and coded navigation waypoint whereas increasing the font size and bolding simply makes regular text appear larger
Information presented in a grid format of rows and columns, generally to show a relationship between sets of set
