Chapter 3 – Vision and Navigation Technologies with Zumi
3.2 – Sign Detection
In this lesson, you will learn how to use Zumi’s camera to detect road signs. In the previous lesson, you learned about QR codes and how to detect them using Zumi’s camera. However, since there aren’t many QR codes on the road to scan, self-driving cars need to be able to detect all kinds of road signs.
Step 1: Detecting Signs
If you haven’t already, print out a stop sign and place it in front of Zumi’s camera. You can also print out multiple signs to create a cityscape. To detect the stop sign, you need to use the camera blocks. Drag the relevant blocks into the workspace, and don’t forget to show the image and close the camera.

Execute the code and direct Zumi’s camera towards the stop sign. In case you don’t have a printout, position Zumi’s camera towards the image provided below. Keep in mind that capturing and exhibiting a single picture may take some time.
Step 2: Finding the Stop Sign
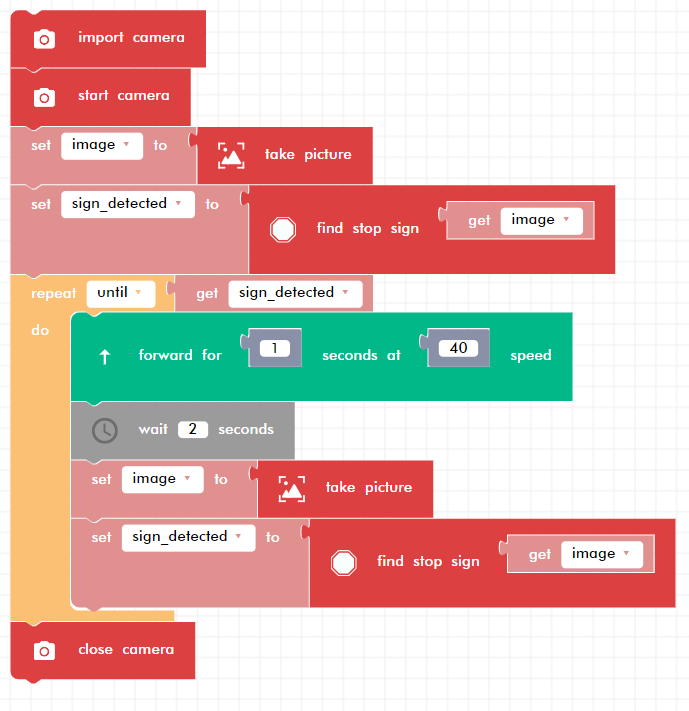
Introduce the “find stop sign” block, which will process the image parameter and draw a rectangle around the stop sign if one is found. Since this function returns a boolean, it must be connected to a variable block. The boolean will be True if a stop sign was found and False if not. Verify if a stop sign was found in the console.

Step 3: Rules of the Road
As drivers, we need to follow certain rules of the road, and one of the most important is to stop at stop signs. We want Zumi to drive forward until she sees a stop sign. Once she sees a stop sign, we want her to stop and then take a left turn.
We previously learned about loops, which repeat a section of code multiple times. However, now, we don’t know how long Zumi needs to go forward for. But we do know that we want Zumi to drive forward until she detects a stop sign. To achieve this, we’ll use the “repeat while” block from the loops tab, and change it to “repeat until” from the dropdown menu, as we want Zumi to keep driving until she sees a stop sign.


We’ll combine the camera code with our new knowledge of the until loop to ensure that Zumi only moves forward until she detects a stop sign. We’ll add a wait block so that Zumi can be still while taking her picture. If Zumi does not detect a stop sign, she’ll continue moving forward for 1 second at a speed of 40 (this can be changed) and then take another picture to see if she now detects a stop sign.

Awesome! Zumi can now stop at stop signs! Now, let’s get Zumi to turn left after stopping. Where should we place this block? Let’s consider the chronological order of events:
1. Zumi starts moving forward.
2. Zumi eventually detects a stop sign.
3. After detecting a stop sign, Zumi stops moving forward and turns left.
Based on the order of events, we can place the left turn block after Zumi detects the stop sign. Even better, since Zumi exits the loop after detecting a stop sign, we can put the left turn block right after the loop. It’s helpful to think of code in chronological order when deciding where to place each block!

With this, Zumi can now stop at stop signs and turn left. She’s getting better at driving herself!
Step 4: Review
Congratulations, you have now learned how to detect stop signs using Zumi’s camera! In this lesson, you learned how to use the “find stop sign” block and how to take pictures in a loop until a stop sign is detected.
Demo Video
Questions
