Chapter 2 – Sensor Fusion and Coding Structures
2.1 – IR Sensor
Overview
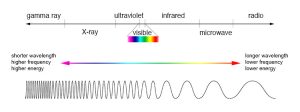
Infrared (IR for short) is a form of electromagnetic radiation that is not visible to the human eye. It’s also a form of energy. However, as scary as the name sounds, not all electromagnetic radiation is dangerous. There is a small portion of it that we can see, meaning this is visible light! The different colors that we see depend on the various wavelengths. As the wavelengths get longer, the colors become less visible to humans. However, special sensors can detect these waves.
We can use the IR sensors on Zumi to detect objects that are covering the sensors.
<
Zumi IR sensors
Zumi is equipped with 6 IR sensors: two in the front, two in the back, and two on the bottom.
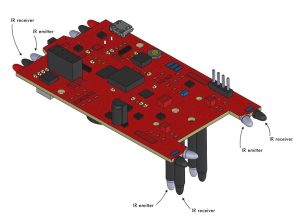
Note: All of the IR sensors come in pairs. The clear IR LED emits the infrared light, and the darker LED is the sensing part. The reason why the sensing bulb is black is to block out regular light. Think of the LED as wearing sunglasses to protect the LED from regular light.
What does the IR data mean?
IR sensors work by emitting an infrared pulse and measuring the infrared light that returns after it bounces off an object. This number will be between 0 and 255. A lower number indicates that something in the vicinity is reflecting the IR light back to the sensor. You will able to see the data on the console located at the bottom of the page. The console is where you will see any output from the program.
Reading IR data
Open the “Sensors” menu to find the read IR block. There is only one block, but you can use it to read all 6 sensors!
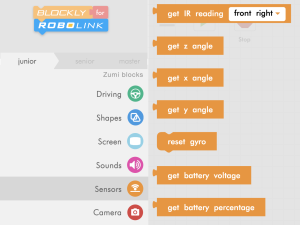
Example: IR Sensors and Sound
In this activity, we will combine our knowledge of IR sensors, sound, and conditionals to make an obstacle detector! Zumi will make sounds if she detects an obstacle in front of her sensors.
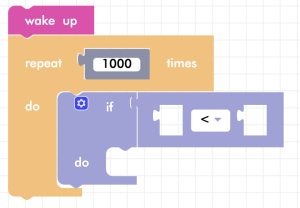
First, let’s add a wake up sound to indicate the program started and setup a repeat block that will check the sensor readings 1000 times.
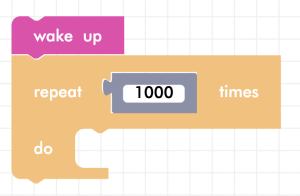
Now, let’s write code that checks if the sensor is being covered. Remember from your testing that the sensor value will drop below a certain value. On average, you can use 100 as a starting threshold. Since we are comparing values, get a “less than” comparator block.
<
Pick one of the sensors that you will be covering up and check if it goes below the threshold (in this case, 100). If the sensor is covered, pick a sound to play! It might be useful to include a print statement as well, so you can still see what values the IR sensor is outputting!
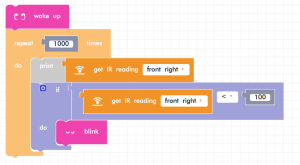
Activity – Zumi security alarm
In the example above, we only checked if one sensor was being covered.
Now, let’s try to check if one sensor or another is detected, as self-driving cars need to check all of their surroundings!
Pseudocode is provided below to help you get started!
wake up zumi
repeat 1000 times:
if the front_right reading is < 100 or the front_left reading is < 100:
do:
angry eyes
angry
lights on
else if the back_right reading is < 100 or the back_left reading is < 100:
do:
angry eyes
disoriented
lights on
lights off
Make sure to run and test your code!
