Programming on the Client Side
18 The Document Object Model (DOM)
 Learning Outcomes
When you have completed this chapter, you will be able to:
- Explain the structure and importance of the Document Object Model (DOM).
- Write JavaScript functions that change a web page dynamically by retrieving and changing the contents of DOM elements.
After the previous chapters, you should be able to write JavaScript programs that are integrated with a web page, communicate with the user through dialogue boxes, and solve problems. That’s great, but it’s only the beginning.
Up to this point, your interactions with the user have entirely made use of pop-up dialogs. While this style of communication is sometimes used in web apps, most input to a JavaScript program usually consists of mouse and keyboard events (i.e. moving the mouse, clicking, and typing) and most JavaScript output consists of modifications to the web page (e.g. changing colors and styles, revealing and hiding menus, changing the contents of an element, loading and displaying new content, etc.). We’ll start with the output first in this chapter and the next, then we’ll move on to show you how to respond to keyboard and mouse events. By the end of these two chapters, you’ll have the tools you need to write much more professional web apps.
What Is the Document Object Model?
Every JavaScript program running in a web browser has access to a document object. This object holds the browser’s internal representation of the Document Object Model (DOM), and contains all the information the browser constructs using the HTML tags and attributes, CSS style rules, images, and other components that make up the source code of the page. Understanding the DOM is key to becoming an effective JavaScript programmer.
Like any bracketed structure, an HTML page can be viewed as a hierarchical tree of elements containing other elements. When the browser reads an HTML source page it constructs an object for each element, links it to the elements it contains (the “children“) and also links it to the element that contains it (the “parent“).
 Do It Yourself
Get the files in the helloworld folder of the Full Stack Example Pack and load helloworld.html into a browser. You will need to make sure smiley.jpg is in the images folder for this to work. Right click the browser window and choose View Page Source to take a look at the original source code for the page.
Here it is for reference:
<!DOCTYPE html>
<html>
<head>
    <meta charset="utf-8">
    <meta name="viewport" content="width=device-width">
    <title>Hello World</title>
</head>
<body>
    <h1 id='message' class='heading'>Hello, World!</h1>
    <img src='images/smiley.jpg' alt='smile image'>
</body>
</html>
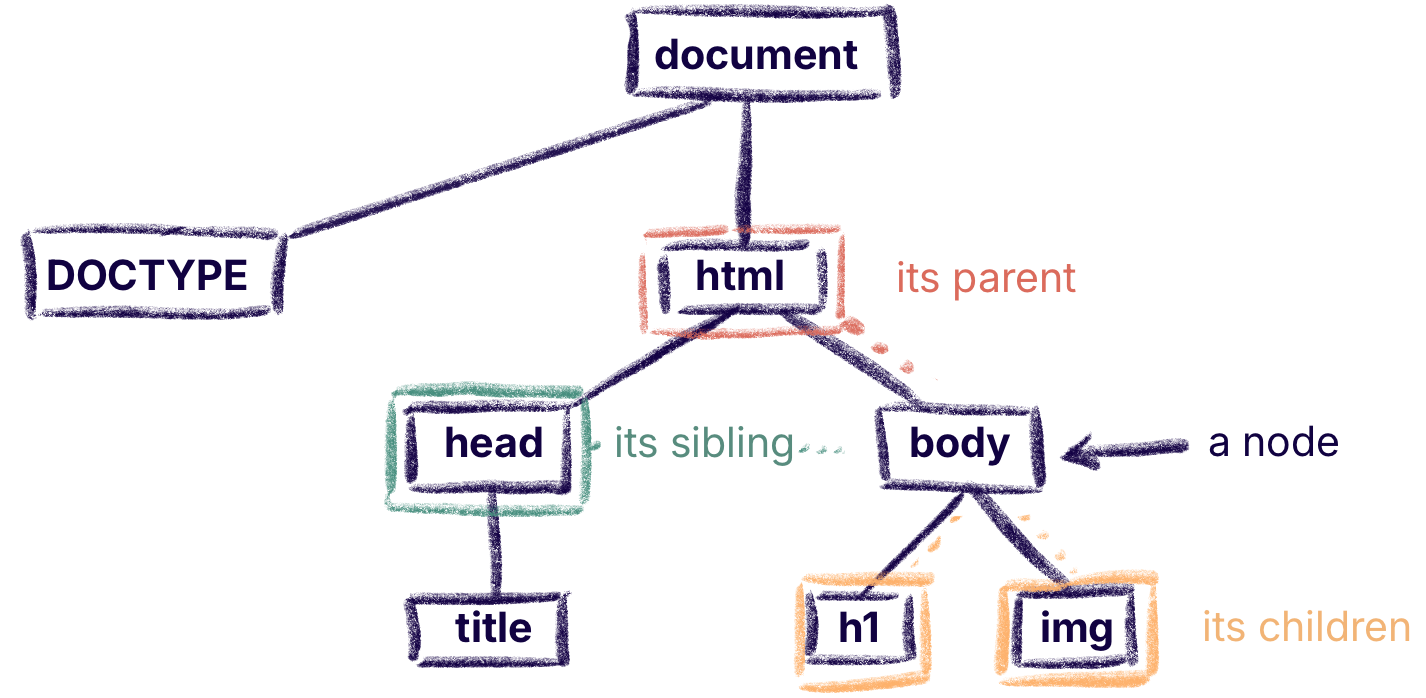
In the example above, the document consists of a DOCTYPE element and an html element. The html element contains a head and a body. The head contains a title element and the body contains an h1 element and an img element. There are also two meta elements that are included for completeness and compliance with HTML5 standards, but we will ignore those elements for simplicity.
The set of relationships described above can be displayed in a tree diagram like the one in Figure 1 below.

The items in the boxes are referred to as nodes. Each node is a JavaScript object that has been constructed by the browser to represent the corresponding HTML element. Each node object contains information about the attributes, CSS style, and contents of the element it represents.
A node can have one parent above it, any number of children directly below it, and any number of siblings (nodes with the same parent). The root node is at the top and the leaf nodes are the ones at the bottom with no children, which makes this a curious sort of upside down “tree“, more like a family tree diagram than a biological tree. When you are using JavaScript in a web page, the window field named document holds the root node of this tree. Like all properties and functions belonging to the window object, you can access document on its own or by typing window.document.
There is a lot more to say about the structure of the DOM than this, but the information in this section is good enough to get you started.
 Do It Yourself
Load helloworld.html into a browser again (see instructions in the previous Do it Yourself box). Open the developer tools but instead of the Console tab, go to the Elements tab. This is a representation of the browser’s DOM.
Now double-click the contents of the h1 element and change it from Hello, World! to Goodbye. You should see the change reflected on the page immediately.
Check the page source. Has it changed? Why or why not?
Now go to the Console, type document, and hit enter. Click the response to open the DOM and compare it to the view on the Elements tab. The document object gives you access to the browser’s DOM from within a JavaScript program.
Retrieving and Manipulating a DOM Node
Any element you retrieve using document.getElementById() will be an object of type Element. JavaScript Element objects contain a number of fields, each containing information associated with the corresponding HTML element. These fields can be used to make changes to the DOM long after a page has been loaded.
Here are some of the more useful Element fields:
- innerHTML: a String representing the contents of the element
- style: an object containing the CSS style information associated with the element
- className: a string representing the class name associated with a node
- attributes: there will be one field for every attribute specified in the corresponding tag in the original HTML source code (e.g., id, src, title, and so on)
 Do It Yourself
Load helloworld.html into a browser again (see instructions in the first Do it Yourself box above). Go to the console and try the following commands, noting the return values in each case.
const e = document.getElementById("message");
e;
e.innerHTML;
e.style;
e.className;
Now add an id to the img element, either by changing the source code, or by changing the DOM through the Elements view (see a previous DIY box).
Now use JavaScript statements similar to the ones above to retrieve the src and alt attributes of the image.
An alternative to the getElementById method is querySelector. You can use querySelector with any string representing a CSS selector and it will return the first matching element from the DOM (or null if no elements match).
For example, document.querySelector("h1") returns the first h1 element in the DOM, document.querySelector("h1.main") returns the first h1 element with a class of main, and so on. And assuming that only one element has id="myId", document.querySelector("#myId") is equivalent to document.getElementById("myId").
 Do It Yourself
Open a browser console for this page (the one you’re reading now) and try the following to get the first text box and the first subheading.
const textbox = document.querySelector("div.textbox");
const heading = document.querySelector("h2");
Then examine the textbox and heading objects by typing textbox and heading and hitting enter. When you mouse over the values returned, the corresponding elements should be highlighted on the web page.
Changing an Element’s Contents
An Element’s innerHTML field contains a String representation of the contents of the corresponding DOM node. The content is everything that appears between the opening and closing tags that defined that node in the original HTML file. Changing this string is probably the easiest way to rewrite part of the DOM.
The DIY example below shows you how to change the text contents of an element.
 Do It Yourself
Load innerHTMLExample1.html from the Full Stack Example Pack into a browser. This file contains a script element that defines the changeHeading function.
Open the console and run the changeHeading function. After you press OK on the alert box, you will see the text of the heading change.
The relevant code is shown below:
<script>
    function changeHeading() {
        alert("Press OK to see me change my heading.");
        document.getElementById("heading").innerHTML = "Done";
    }
</script>
See if you can alter this code so that instead of just changing the heading, it also changes the first p element.
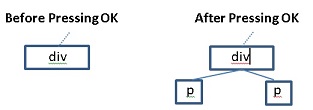
You can place HTML tags into the innerHTML field of a node. When you do that, the browser will read the tags, create DOM Node objects for the corresponding HTML elements, and add them to the DOM, as demonstrated in the DIY box below. If the innerHTML of the element you rewrite already contains other HTML elements, the corresponding nodes will be discarded from the DOM and replaced with new ones.
 Do It Yourself
Load innerHTMLExample2.html from the Full Stack Example Pack into a browser. This file contains a script element that defines the changeDiv function
Open the console and run the changeDiv function. After you press OK on the alert box, you will see the div change so that it contains two new p elements. Open the developer console and go to Elements to verify that two new nodes have been added to the DOM.
Here is a diagram of the relevant part of the DOM before and after executing the script in the DIY example above.

The relevant code is shown below:
<script>
    function changeDiv() {
        alert("Press OK to see me change the contents of my div.");
        document.getElementById("target").innerHTML =
            "<p>First paragraph</p><p>Second paragraph</p>";
    }
</script>
Change the code so that it asks the user for some HTML using a prompt dialog, and then inserts whatever the user types into the div element.
Retrieving an Array of Nodes
Sometimes we want to modify many nodes at once. The querySelectorAll method is one quick way to retrieve an array of elements. This method behaves just like querySelector, except that instead of returning a single element, it returns an array-like object containing every element that matched the selector. Then you can use a loop to access every item.
 Do It Yourself
Go to the McMaster University Wikipedia page, open the JavaScript console of your browser, and execute the following:
document.querySelectorAll("p");
You should get an object that contains all the p elements in the document. To get a particular one, use square brackets like this:
document.querySelectorAll("p")[2];
Or like this:
let paragraphs = document.querySelectorAll("p");
paragraphs[2];
Now execute the following code to change the text of all the paragraphs:
let paragraphs = document.querySelectorAll("p");
for (let p of paragraphs)
    p.innerHTML="JavaScript Rules!";
Did the code do what you expected? Can you figure out how to select all the Do It Yourself boxes on this page and change their innerHTML as well?
 Check Your Understanding
 Coding Practice
- If you didn’t do this in the relevant DIY box, modify the code for innerHTMLExample1.html from the Full Stack Example Pack so that it rewrites the p element as well as the h1 element.
- If you didn’t do this in the relevant DIY box, modify innerHTMLExample2.html from the Full Stack Example Pack so that it prompts the user for some text, and then changes the contents of the div to match what they typed. Test your code and try entering HTML at the prompt and investigate what happens to the DOM.
- Modify innerHTMLExample2.html from the Full Stack Example Pack again so that it asks the user to enter a positive integer. Then alter the contents of the div element to display the integers from 1 up to the number the user entered. Each integer should be contained in a separate p element. (Note this will require some string processing within a loop.)
- Get addition.html from the Full Stack Example Pack. Read the comment header in the page source and follow the instructions to complete the program.
- Create a new page using template.html from the Full Stack Example Pack. Place a script element after the div. This script should use a prompt dialog to ask the user how many paragraph elements they want, then ask them to type a sentence to use as the content of those paragraphs. Then change the contents of the div element according to what the user entered. Right click the page and choose “inspect element” to make sure that the paragraphs got created correctly.
- Add a function to your program from the previous exercise. When this function runs, it should ask the user for new text, and then use that to change the text of every p element on the page again. Use querySelectorAll for this. Test by running the program and creating custom paragraphs, then running your new function from the console.


Feedback/Errata